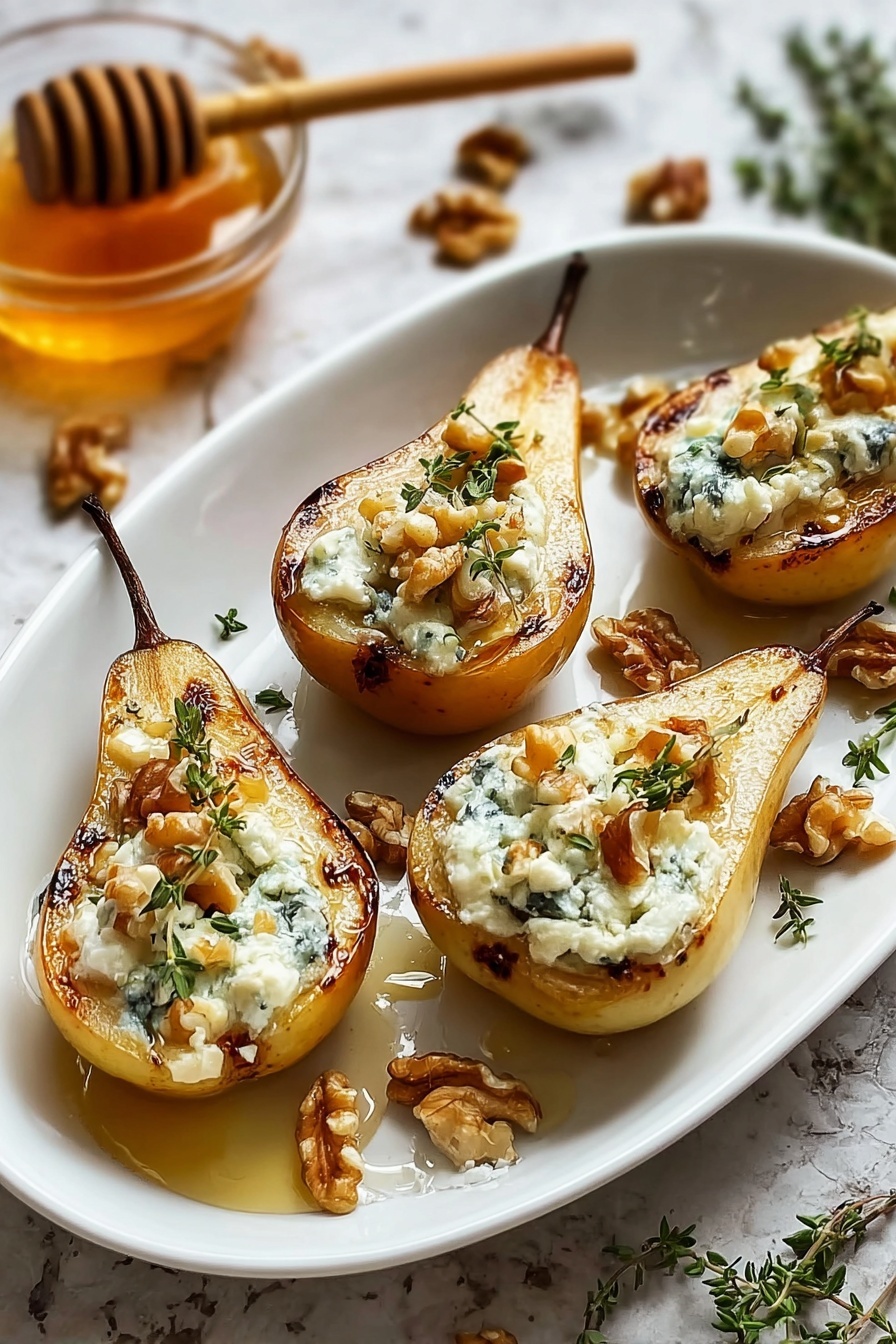
If you’re looking for a simple yet elegant appetizer that will absolutely wow your guests, then this Blue Cheese Stuffed Pears Recipe is going to become your new go-to. It’s a stunning blend of sweet, tangy, and savory flavors that just works every time. I love this recipe because it’s quick to make, feels fancy, but relies on just a handful of ingredients you can easily find. Stick around, and I’ll share some insider tips so you can nail it perfectly in your kitchen.
Why You’ll Love This Recipe
- Effortlessly Elegant: It looks fancy but is super simple to make, perfect for impressing guests without stress.
- Flavor Contrast: The sweetness of pears paired with tangy blue cheese and crunchy nuts creates an irresistible combo.
- Versatile Dish: Great as an appetizer, salad component, or light dessert — you get options with one recipe.
- Quick Prep: Takes just around 20 minutes, making it perfect for last-minute entertaining or weekday treats.

Ingredients You’ll Need
These straightforward ingredients come together beautifully — ripe pears give you that juicy sweetness, and blue cheese adds that rich, creamy punch. Be sure to pick pears that are ripe but still firm to hold up well during baking.
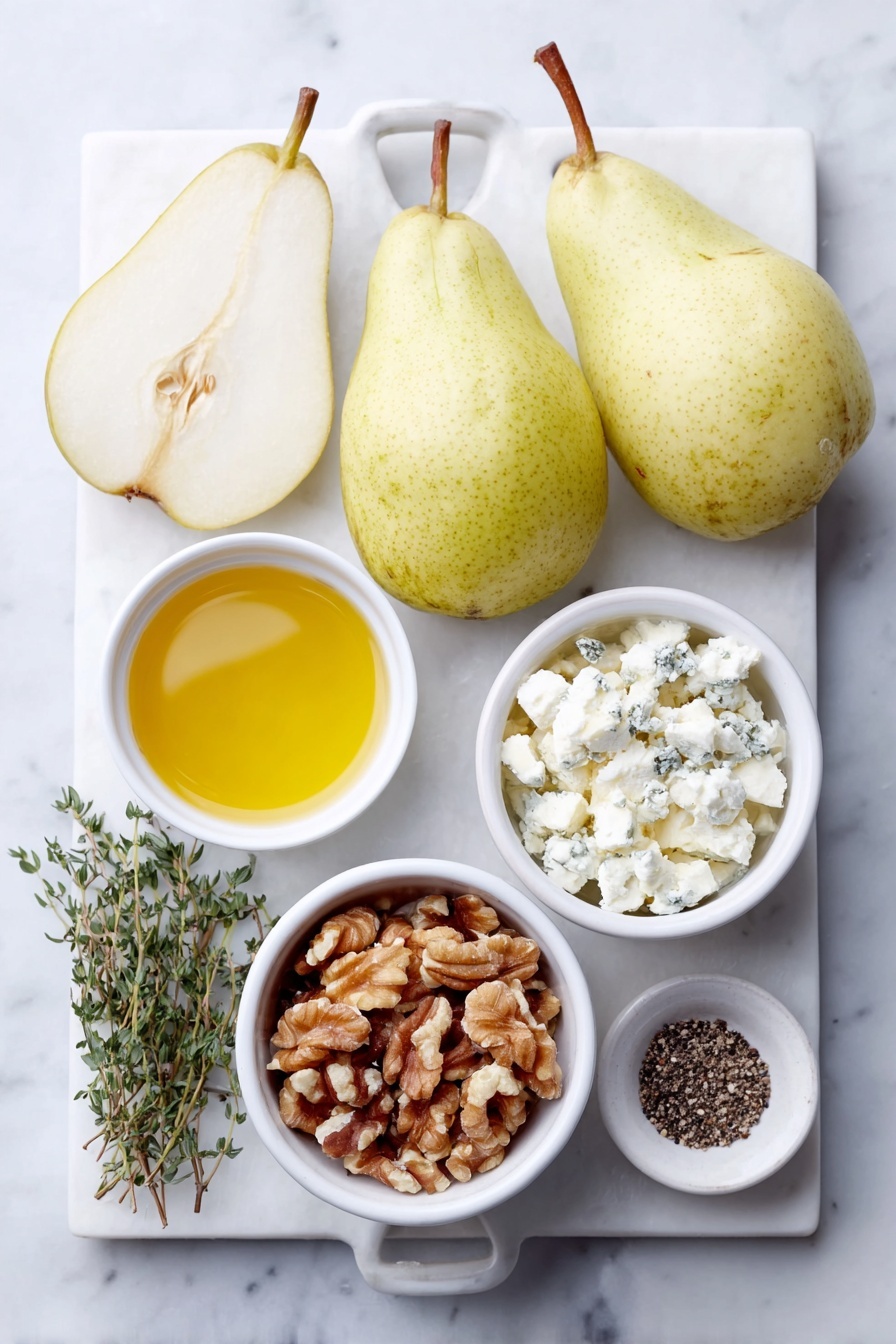
- Pears: Choose firm, ripe ones like Bosc or Anjou for that perfect balance of sweetness and structure.
- Blue cheese: Crumbled for easy stuffing, and feel free to pick your favorite variety, from milder to more pungent.
- Walnuts or pecans: Chop these for extra crunch—roasting before mixing amps up the nutty flavor.
- Fresh thyme leaves: Adds a lovely herbaceous note that brightens the richness of the cheese.
- Honey: Drizzled at the end to add a touch of natural sweetness that ties everything together.
- Black pepper: Freshly ground, to bring out the complex flavors and add a gentle kick.
- Olive oil: Used to brush the pears for a bit of moisture and to help them brown slightly in the oven.
Variations
I love how versatile Blue Cheese Stuffed Pears Recipe can be — you can easily swap ingredients or tweak things depending on what you have on hand or your taste preferences. Don’t be afraid to experiment and make it your own!
- Cheese swaps: For those who find blue cheese a bit strong, I’ve successfully used goat cheese or ricotta—still creamy but milder.
- Nut alternatives: Toasted almonds or hazelnuts add a different, equally enjoyable crunch.
- Herb twists: Instead of thyme, a sprinkle of fresh rosemary or sage works beautifully and adds a seasonal feel.
- Sweetener tweaks: Try maple syrup or even a balsamic glaze drizzle instead of honey for a flavor boost.
How to Make Blue Cheese Stuffed Pears Recipe
Step 1: Prepare the pears with care
Start by preheating your oven to 375°F (190°C). Cut each pear in half lengthwise with a sharp knife, and gently use a melon baller or spoon to scoop out the core and seeds, creating a neat hollow for the filling. I like to keep the pear halves sturdy—this method helps the pears bake evenly without turning mushy.
Step 2: Add olive oil and arrange in the baking dish
Lightly brush the cut sides of the pears with olive oil. This might seem like a small step, but it helps them develop a beautiful golden color in the oven and keeps the texture just right. Place each pear cut-side up on a parchment-lined or lightly greased baking dish, giving them a bit of breathing room.
Step 3: Make the savory stuffing blend
In a small bowl, mix together the crumbled blue cheese, chopped nuts, and fresh thyme leaves. This combo is where all the magic happens — creamy, salty, crunchy, and herbaceous. Spoon the mixture generously into the hollow centers of each pear. I find that a heaping tablespoon works perfectly.
Step 4: Bake until tender and gooey
Bake the pears for 15 to 18 minutes. Your aim is for the pears to become tender but still hold their shape, and for the blue cheese to soften and meld into the nuts without melting into a puddle. Keep an eye on them — every oven’s a bit different, and you don’t want the cheese to burn or the pears to become too mushy.
Step 5: Finish with honey and pepper
Right after you take the pears out of the oven, drizzle each one with a little honey — that touch of sweetness perfectly balances the tangy cheese and earthy nuts. Then, add a pinch of freshly ground black pepper for a gentle bite. Serve them warm or at room temperature; both are delicious!
Pro Tips for Making Blue Cheese Stuffed Pears Recipe
- Choose the Right Pears: I learned that firmer pears like Bosc or Anjou hold their shape nicely—avoid overripe pears which get mushy when baked.
- Roast Your Nuts: Toasting walnuts or pecans before mixing them in really amps up their flavor and adds a wonderful crunch.
- Watch Your Bake Time: Keep an eye after 15 minutes to prevent the cheese from melting too much or the pears from becoming soggy.
- Serve Warm or Room Temperature: I’ve found that serving these just slightly cooled helps the flavors settle beautifully, so don’t rush serving right out of the oven.
How to Serve Blue Cheese Stuffed Pears Recipe
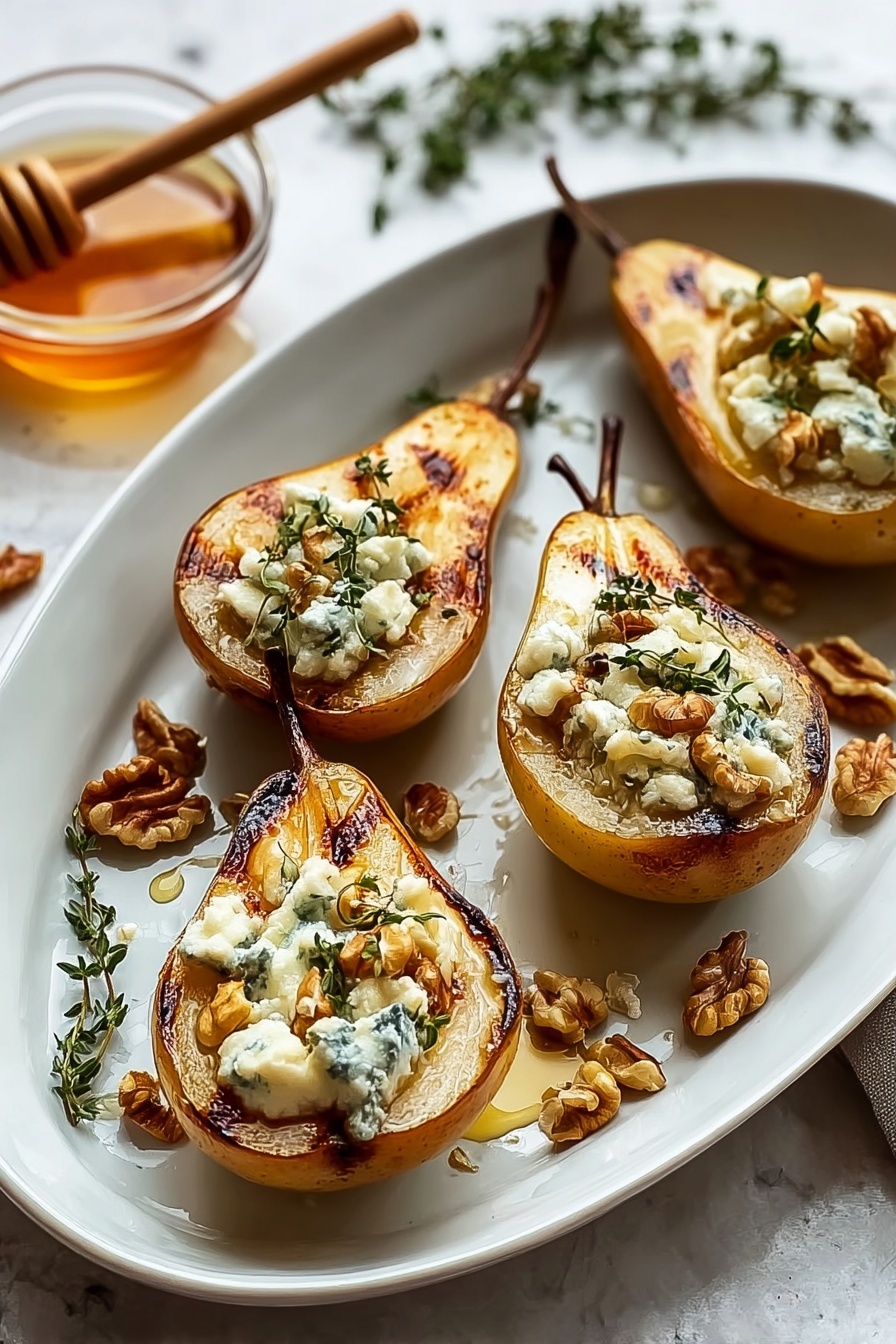
Garnishes
I like to keep garnishes simple — a few fresh thyme leaves sprinkled on top really elevate the presentation and reinforce the herb flavor. Sometimes a small drizzle of extra honey right before serving adds that extra shimmer and sweetness, which guests always appreciate.
Side Dishes
Blue Cheese Stuffed Pears pair beautifully with a crisp green salad — especially peppery arugula or mixed greens dressed lightly with lemon vinaigrette. Also, this recipe shines alongside crusty bread or a glass of sparkling or dessert wine, making for an elegant appetizer course.
Creative Ways to Present
For special occasions, I’ve served these pears on a platter garnished with whole sprigs of thyme and a handful of toasted nuts scattered around. You can also make bite-sized versions by slicing pears smaller and serving them as canapés at cocktail parties. I discovered this trick last holiday season, and it was a hit!
Make Ahead and Storage
Storing Leftovers
If you have leftovers (which sometimes happen, but not often!), I recommend storing them in an airtight container in the fridge for up to 2 days. To keep the pears from becoming too soggy, I separate them from any excess juices and add the honey fresh when reheating.
Freezing
This recipe doesn’t freeze super well because the pears can become mushy after defrosting. If you want to prep ahead, I suggest making the components separately — prep and freeze the pear halves unstuffed, and then bake fresh when ready.
Reheating
I usually reheat leftovers in a low oven (around 300°F) for about 10 minutes just to warm them through without overcooking the pears or melting the cheese too much. Adding a fresh drizzle of honey right after reheating brings back the brightness.
FAQs
-
Can I use other types of pears for this Blue Cheese Stuffed Pears Recipe?
Yes! While firmer pears like Bosc and Anjou are ideal because they hold their shape during baking, you can also experiment with Bartlett or Comice pears. Just be mindful that softer pears may become mushy when baked, so adjust your baking time accordingly.
-
Is there a good substitute for blue cheese in this recipe?
Absolutely. If blue cheese is too intense for you or your guests, creamy goat cheese or ricotta offer a milder, equally delicious alternative. These cheeses blend well with the pears and nuts, keeping the texture and savory notes.
-
Can I prepare this recipe ahead of time?
You can prep the pears and stuffing ahead, keep them refrigerated separately, then assemble and bake just before serving for the freshest taste. However, fully assembled pears don’t store well for long periods before baking, as the pears may release too much moisture.
-
What wine pairs well with Blue Cheese Stuffed Pears?
This dish pairs wonderfully with sparkling wines like Prosecco or a sweet dessert wine such as Sauternes. The bubbles and sweetness balance the saltiness of blue cheese and the sweetness of pears beautifully.
Final Thoughts
Blue Cheese Stuffed Pears Recipe holds a special place in my kitchen for those moments when I want to impress without fuss. Its balance of textures and flavors feels both sophisticated and comforting. If you’re craving something that’s quick yet elegant, give this recipe a try—you’ll find it delightfully addictive, just like my family and friends do every time I serve it!
Print
Blue Cheese Stuffed Pears Recipe
- Prep Time: 10 minutes
- Cook Time: 15-18 minutes
- Total Time: 25-28 minutes
- Yield: 4 servings
- Category: Appetizer
- Method: Baking
- Cuisine: American
- Diet: Vegetarian
Description
Elegant Blue Cheese Stuffed Pears are a sophisticated appetizer or light dessert featuring ripe, tender pears filled with a savory mixture of blue cheese, nuts, and fresh thyme. Baked to perfection and drizzled with honey, these pears offer a perfect balance of sweet and savory flavors, making them an ideal pairing for wine or a refreshing salad.
Ingredients
Pears
- 2 ripe but firm pears
Filling
- ½ cup crumbled blue cheese
- 2 tablespoons chopped walnuts or pecans
- 1 teaspoon fresh thyme leaves
Toppings and Finishing
- 1 tablespoon honey
- Black pepper to taste
- Olive oil for brushing
Instructions
- Preheat Oven: Preheat the oven to 375°F (190°C) and line a baking dish with parchment paper or lightly grease it to prevent sticking.
- Prepare Pears: Cut the pears in half lengthwise, then use a spoon or melon baller to remove the core and seeds, creating a small hollow in the center of each pear half.
- Brush Pears: Lightly brush the cut side of each pear with olive oil to promote browning and place them cut-side up in the prepared baking dish.
- Mix Filling: In a small bowl, combine the crumbled blue cheese, chopped walnuts or pecans, and fresh thyme leaves.
- Stuff Pears: Spoon the cheese mixture into the hollowed centers of each pear half, filling them generously but neatly.
- Bake: Bake the stuffed pears for 15 to 18 minutes, or until the pears are just tender and the cheese has softened but is not completely melted.
- Finish and Serve: Remove the pears from the oven and drizzle each with honey. Sprinkle with freshly ground black pepper to taste. Serve warm or at room temperature.
Notes
- For added depth of flavor, roast the walnuts or pecans briefly before mixing them with the cheese.
- If you prefer a milder cheese, substitute blue cheese with goat cheese or ricotta.
- This dish pairs well with arugula or mixed greens when served as part of a salad course.
- Works wonderfully as a wine pairing, especially with sparkling or dessert wines.
Nutrition
- Serving Size: 1/2 pear stuffed
- Calories: 180
- Sugar: 15g
- Sodium: 220mg
- Fat: 12g
- Saturated Fat: 5g
- Unsaturated Fat: 6g
- Trans Fat: 0g
- Carbohydrates: 14g
- Fiber: 3g
- Protein: 5g
- Cholesterol: 20mg


