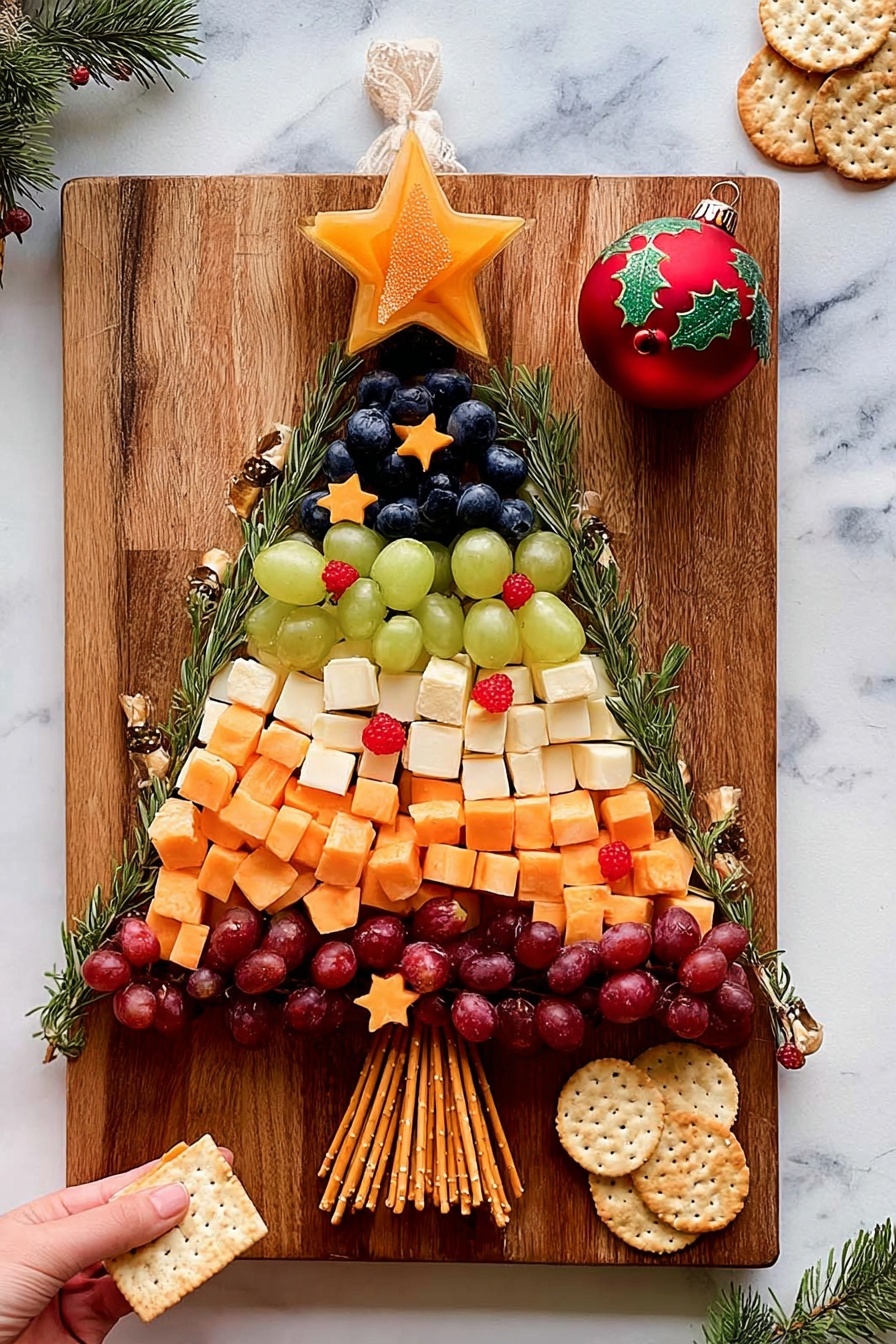
If you’re looking for a festive, fun, and downright delicious centerpiece for your holiday gathering, you’re going to absolutely love this Christmas Tree Charcuterie Board Recipe. I first tried creating a charcuterie board in the shape of a Christmas tree a few years ago, and it instantly became the highlight of our Christmas buffet. Not only is it stunning to look at, but it’s also packed with flavors and textures that your guests will go crazy for. Trust me, once you get the hang of the layout and ingredient choices, you’ll find yourself making this every year.
Why You’ll Love This Recipe
- Eye-Catching Presentation: It’s a showstopper at any holiday party, instantly drawing compliments and conversation.
- Easy to Customize: You get to play with your favorite cheeses, fruits, and nuts to suit your taste or dietary needs.
- Make-Ahead Friendly: You can assemble up to a few hours before guests arrive, which means less stress on the big day.
- Fun for All Skill Levels: Whether you’re a seasoned platter pro or trying your first charcuterie board, you’ll nail this with ease.

Ingredients You’ll Need
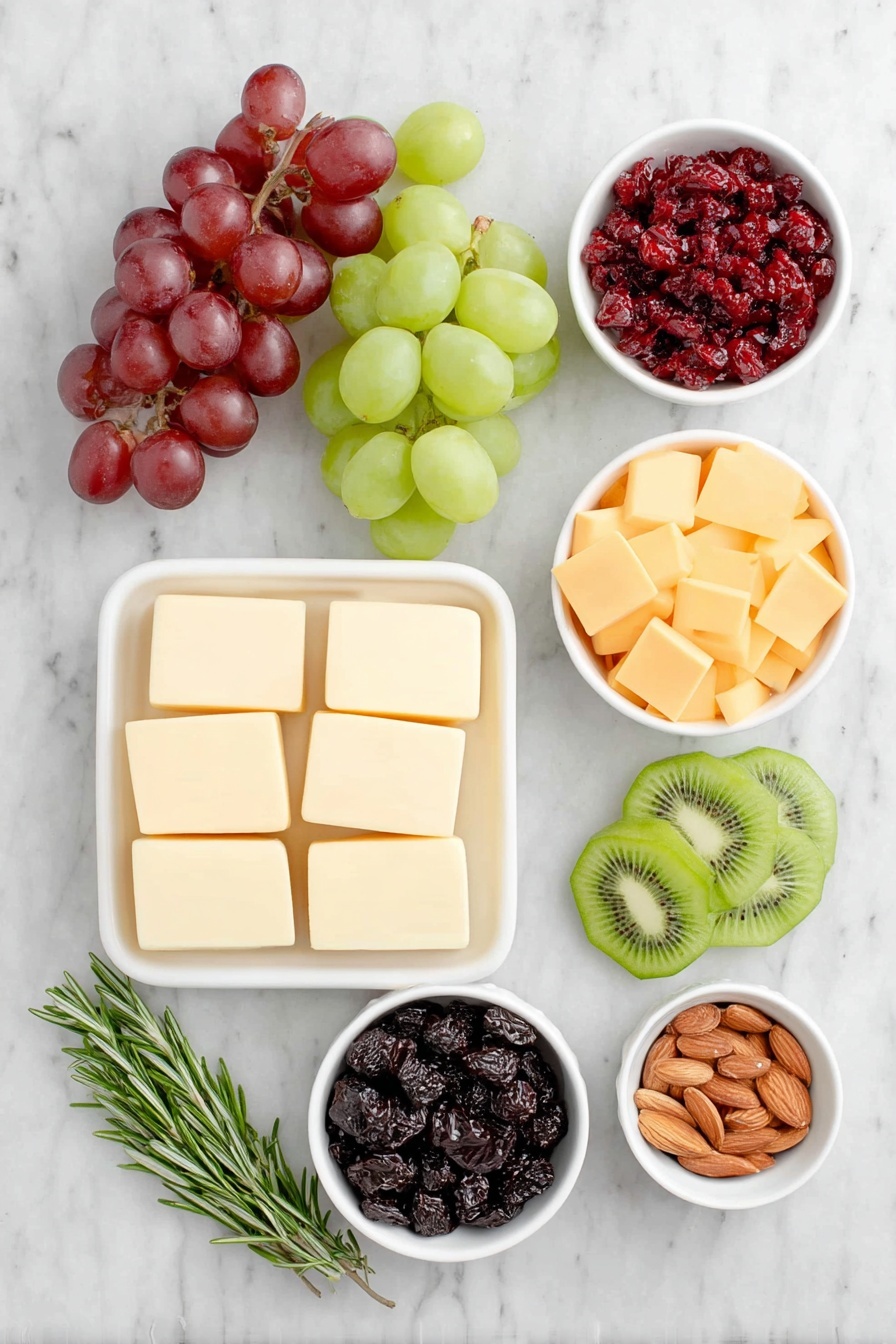
The magic of this Christmas Tree Charcuterie Board Recipe lies in its blend of fresh herbs, vibrant fruits, savory cheeses, and crunchy nuts. Each ingredient brings its unique color and texture, making your tree come alive. When shopping, try to pick fresh, firm fruits and a mix of cheeses you love—it really makes a difference in flavor and looks.
- Fresh Rosemary Sprigs: These form the base outline of the tree and add an earthy, festive aroma.
- Celery Stalk: It acts as the sturdy “trunk” of your tree and adds a nice crunch if snacked on.
- Red, Green, and Black Seedless Grapes: Use small clusters or remove stems completely to keep the clean look.
- Sharp Cheddar Cheese: Provides a bold flavor; cut into uniform squares for neat rows.
- Monterey Jack Cheese: A mild, smooth cheese that balances out the sharper cheddar.
- Mild or Medium Cheddar Cheese: Adds color diversity and complements the other cheeses.
- Fresh Cranberries: Perfect for pops of bright red and a bit of tartness.
- Star Fruit Slices: They’re the star of the show at the top—literally! If unavailable, consider thin apple slices cut with a star-shaped cookie cutter.
- Assorted Nuts: Almonds or your favorite mix work great, especially as the “pot” at the tree’s base.
- Green Kiwi Fruit: Adds fresh, zesty sweetness and a cheerful green color for the tree’s “top”.
Variations
I love how versatile the Christmas Tree Charcuterie Board Recipe is—you can totally make it your own. Over the years, I’ve experimented with different cheeses, meats, and even added little edible decorations that reflect my family’s tastes and any dietary quirks. Feel free to get creative and make it yours!
- Meat Addition: I like rolling up slices of ham or salami and placing them in rows for a more hearty, meat-and-cheese vibe—all the festive flavor without losing balance.
- Cheese Shapes: One year, I used a small star-shaped cookie cutter to make little cheese stars that I sprinkled around the tree—so cute and festive!
- Dairy-Free Option: Swap cheeses for dairy-free cheese alternatives and emphasize fruits and nuts so everyone can enjoy.
- Seasonal Fruit Switch: Sometimes I switch out kiwi for green apple slices or add pomegranate seeds for extra sparkle and tang.
How to Make Christmas Tree Charcuterie Board Recipe
Step 1: Create the Tree Outline with Rosemary
Start by laying down the rosemary sprigs on your platter or board to form the shape of a Christmas tree. I found that beginning at the top and spreading outward as you go down helps create the classic tree shape. Don’t be afraid to adjust and rearrange the sprigs until the outline looks just right to you — that’s part of the fun! Those fresh rosemary sprigs not only look festive but fill your kitchen with that lovely pine-like scent.
Step 2: Position the Celery “Trunk”
Place the celery stalk at the bottom center of your rosemary tree to act as the trunk. Depending on your board size and preference, trim the celery for length. I like mine fairly long so it stands out, but it’s totally flexible. Pro tip: Choose a celery stalk that’s firm and fresh because this will also add crunch if anyone wants to nibble on it.
Step 3: Layer Cheese and Grapes in Rows
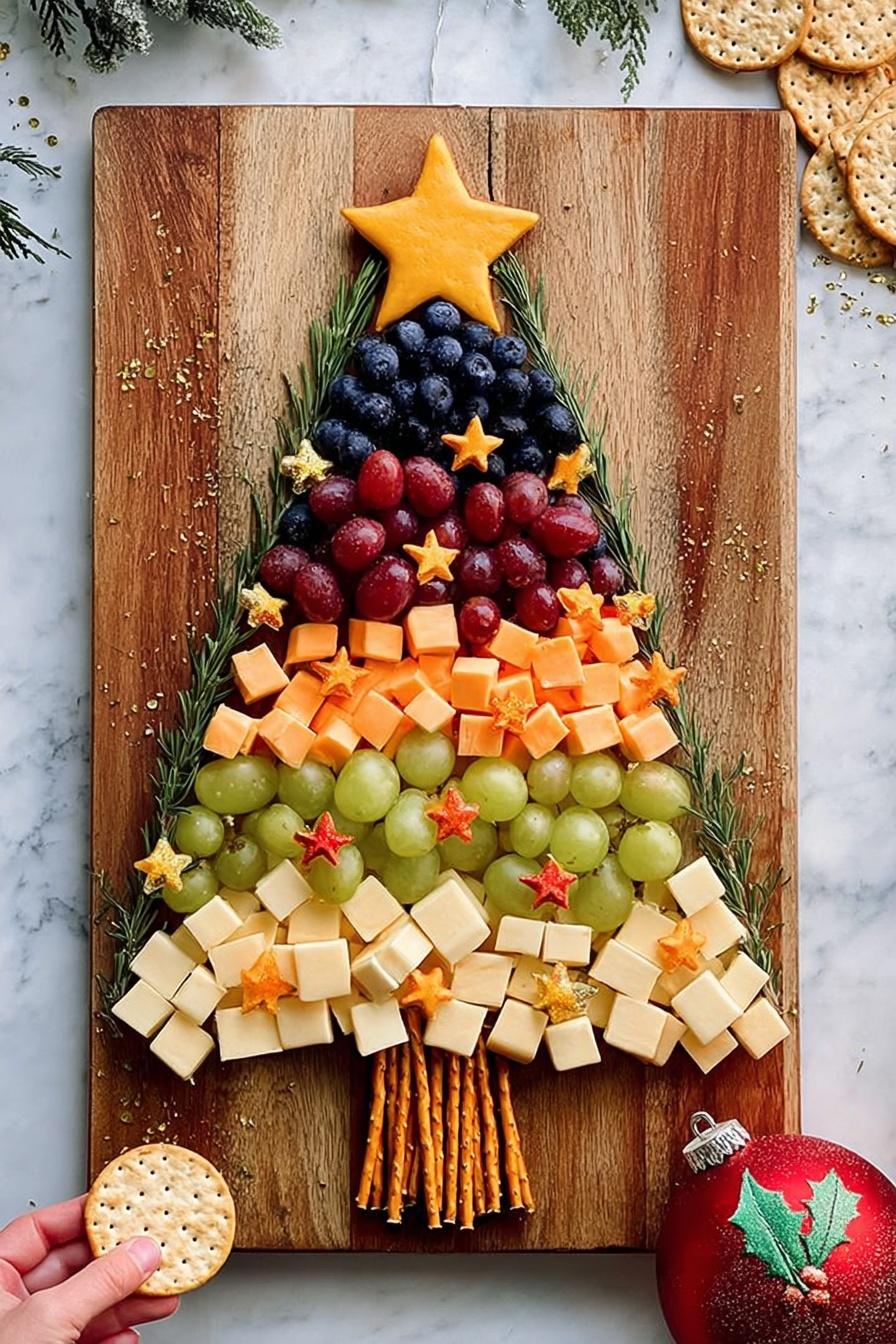
Starting from the bottom of your tree shape, lay down alternating rows of cheese and grapes. For me, it looks great to do a row of sharp cheddar squares, then red grapes, followed by Monterey Jack cheese, green grapes, mild cheddar, and then black grapes at the top. This alternating pattern gives the tree rich color and balanced taste. Make sure to keep your cheese pieces roughly the same size—about ¾ inch squares work beautifully. This makes the board look polished and easier to pick up.
Step 4: Add Kiwi and Star Fruit Decorations
Next, arrange the kiwi slices in a triangle shape near the top of the tree for a fresh pop of green. Then, place a star fruit slice on the very top of the tree as the “star.” If you can’t find star fruit, simply use a star-shaped cookie cutter to cut cheese or apple slices as a glowing topper. Scatter a few more star fruit slices around the tree like ornaments for extra flair.
Step 5: Sprinkle Cranberries and Nuts
Finally, sprinkle fresh cranberries and assorted nuts over your tree. I’ve had the most luck using almonds as the “pot” at the base of the celery trunk, arranging them in a tidy square shape. This adds texture and a nice finish to your board. Feel free to scatter nuts around in a casual but thoughtful way so your tree looks festive and full.
Step 6: Chill and Serve
Your Christmas Tree Charcuterie Board is ready to impress! If you want to prep ahead, you can assemble the board up to 4 hours before serving. Just cover it tightly with plastic wrap and keep it refrigerated. Bring it out about 15 minutes before guests arrive so the cheeses can warm slightly for the best flavor.
Pro Tips for Making Christmas Tree Charcuterie Board Recipe
- Balance the Colors: I always try to alternate the cheese and grape colors to keep the board visually appealing and festive.
- Use Fresh Ingredients: Fresh cranberries and herbs make the biggest difference in how vibrant and fresh your board looks and tastes.
- Uniform Cheese Cuts: Cutting cheeses into similar sizes makes it easier for guests to pick up and keeps your design neat.
- Avoid Overcrowding: Leave some space between elements so your tree doesn’t look too busy or cluttered.
How to Serve Christmas Tree Charcuterie Board Recipe
Garnishes
I typically garnish with a few extra sprigs of rosemary around the edge of the board to echo the tree outline and keep the fresh herbal aroma going. Sometimes I add little edible gold or silver dragees (sprinkles) for a bit of sparkle—especially if kids will be around, they love the extra fun element!
Side Dishes
This board pairs beautifully with a glass of sparkling wine or a bold red. For sides, I like to serve it with crusty baguette slices or fancy crackers to add crunch and a bit of substance. A bowl of olives or marinated artichokes also works perfectly to round out the savory options.
Creative Ways to Present
One year, I set the charcuterie board on a rustic wooden slab and surrounded it with twinkly string lights and pinecones for extra pizzazz. You can also assemble smaller “mini” versions of the tree on individual plates for a fun party favor or kids’ snack. I’ve even floated a smaller board in the middle of a service tray with holiday napkins underneath for a charming wow factor.
Make Ahead and Storage
Storing Leftovers
If you happen to have leftovers (which might be rare!), wrap the board tightly in plastic wrap and store it in the refrigerator. Leftover cheese and nuts keep well, but I usually remove any fruit that looks a bit soft or watery and replace it with fresh fruit next time.
Freezing
I don’t recommend freezing the assembled Christmas Tree Charcuterie Board since fresh fruits and herbs don’t freeze well and cheeses might change texture. However, you could freeze the cheeses separately if you want to prep parts in advance.
Reheating
This board is meant to be served cold or at room temperature, so reheating isn’t necessary. Just take it out of the fridge about 15-20 minutes prior to serving so the cheeses soften and flavors sing.
FAQs
-
Can I make the Christmas Tree Charcuterie Board Recipe ahead of time?
Yes! You can assemble the board up to 4 hours before serving. Just cover it tightly with plastic wrap and store it in the refrigerator. Let it sit at room temperature for about 15 minutes before serving to bring out the cheeses’ full flavor.
-
What if I can’t find star fruit for the tree topper?
No worries if star fruit isn’t available—simply use a star-shaped cookie cutter to slice cheese, apple, or even melon pieces to create a festive star at the top and around your tree.
-
What cheeses work best for this recipe?
I use a mix of sharp cheddar, Monterey Jack, and mild cheddar, but feel free to experiment with your favorites. The key is to cut them into uniform pieces to keep the look clean and make it easy for guests to grab.
-
Can I add meats to the Christmas Tree Charcuterie Board?
Absolutely! Rolled deli meats like ham, turkey, or salami can be added in rows alongside the cheeses, adding richness and depth to the board.
Final Thoughts
This Christmas Tree Charcuterie Board Recipe is one of those joyful holiday projects that brings out your inner artist while pleasing every taste bud in the room. I absolutely love how it combines simplicity, beauty, and flavor all in one platter. Whether it’s a family gathering, office party, or casual cookie exchange, this board never fails to get compliments and smiles. I promise once you try it, you’ll want to make it your signature holiday tradition. So grab those fresh rosemary sprigs, your favorite cheeses, and dive right in—you’re about to create a holiday masterpiece that tastes as good as it looks!
Print
Christmas Tree Charcuterie Board Recipe
- Prep Time: 25 minutes
- Cook Time: 0 minutes
- Total Time: 25 minutes
- Yield: Serves 10 people
- Category: Appetizer
- Method: No-Cook
- Cuisine: American
Description
Create a festive and visually stunning Christmas Tree Shaped Charcuterie Board using fresh rosemary, colorful fruits, assorted cheeses, nuts, and vibrant garnishes. Perfect for holiday gatherings, this no-cook recipe combines a creative presentation with delicious flavors, allowing you to customize with your favorite cheeses and optional deli meats.
Ingredients
Herbs and Vegetables
- 10 fresh Rosemary sprigs (more or less depending on size)
- 1 celery stalk
Fruits
- Red, green, and black seedless grapes, clipped into small clusters or stems removed
- ½ cup fresh cranberries
- 1-2 star fruits, sliced
- 1 green kiwi fruit, sliced
Cheeses
- 4 ounces sharp cheddar, cut into ¾-inch squares
- 4 ounces Monterey Jack, cut into ¾-inch squares
- 4 ounces mild or medium cheddar, cut into ¾-inch squares
Nuts
- 1 cup assorted nuts (almonds recommended for base)
Optional
- Sliced deli meats (optional for adding to the board)
Instructions
- Arrange Rosemary Outline: Begin by creating the outline of your Christmas tree using the rosemary sprigs. Start at the top and gradually spread the sprigs wider as you move downward to form a tree shape. Adjust and rearrange as needed while adding other ingredients.
- Create Tree Trunk: Place the celery stalk at the bottom center to represent the trunk of the tree. Adjust the length according to your visual preference, ensuring it complements the size of your tree outline.
- Build Rows of Cheese and Grapes: Starting from the bottom of the tree shape, assemble rows in a narrowing pattern upward: first a row of mixed cheeses, followed by a row of red grapes, then cheese again, green grapes next, and finally black grapes near the top. This layering creates the colorful body of the tree.
- Top with Kiwi and Star Fruit: At the very top of the tree shape, arrange kiwi slices in a triangular formation to form the upper part of the tree. Place one star fruit slice at the peak as the tree’s star, and scatter additional star fruit slices randomly across the tree to enhance the festive look.
- Decorate with Cranberries and Nuts: Distribute fresh cranberries sporadically across the tree for pops of red color. Surround the base of the celery trunk with assorted nuts, ideally almonds arranged in a square shape, to serve as the pot of the tree.
- Optional Meat Addition: If desired, add rolled deli meats in rows among or alongside the cheese for a meat and cheese charcuterie variant.
- Finishing and Serving: Your Christmas tree charcuterie board is ready to serve! You can assemble it up to 4 hours ahead, cover tightly with plastic wrap, and refrigerate until guests arrive to keep it fresh.
Notes
- This recipe serves as a flexible guide; feel free to add sliced deli meats rolled into rows to make a meat and cheese board.
- Use any cheeses you prefer—gourmet varieties or cheese curds work well and add variety.
- To enhance the motif, use a small star-shaped cookie cutter to cut cheese into star shapes, which can be placed around the tree and used as the star atop the tree.
- If star fruit is unavailable, substitute with thin slices of yellow bell pepper or pineapple slices cut into star shapes for a similar festive effect.
Nutrition
- Serving Size: 1/10th of board
- Calories: 220
- Sugar: 8g
- Sodium: 190mg
- Fat: 15g
- Saturated Fat: 6g
- Unsaturated Fat: 7g
- Trans Fat: 0g
- Carbohydrates: 12g
- Fiber: 3g
- Protein: 8g
- Cholesterol: 25mg


