
If you’re on the hunt for a festive treat that’s as fun to make as it is to eat, this Candy Cane Cookies Recipe is absolutely your new go-to. I love this recipe because the cookies come out tender, buttery, and packed with peppermint flavor, plus they look downright adorable with their classic red-and-white swirl pattern. Whether you’re baking for a holiday party or just want to brighten up your day, these candy cane cookies will totally impress.
Why You’ll Love This Recipe
- Classic Holiday Flavor: The combination of peppermint and buttery dough feels like the holidays in every bite.
- Pretty & Fun to Make: Twisting the red and white dough into candy cane shapes is easier and more satisfying than you’d expect.
- Soft & Tender Texture: Thanks to cream cheese in the dough, the cookies are perfectly tender without being cakey.
- Make-Ahead Friendly: Dough can be refrigerated or frozen, perfect for busy holiday baking sessions.

Ingredients You’ll Need
Each ingredient in this Candy Cane Cookies Recipe plays a special role in making these cookies taste like a peppermint dream with a buttery kiss—and getting the colors just right.
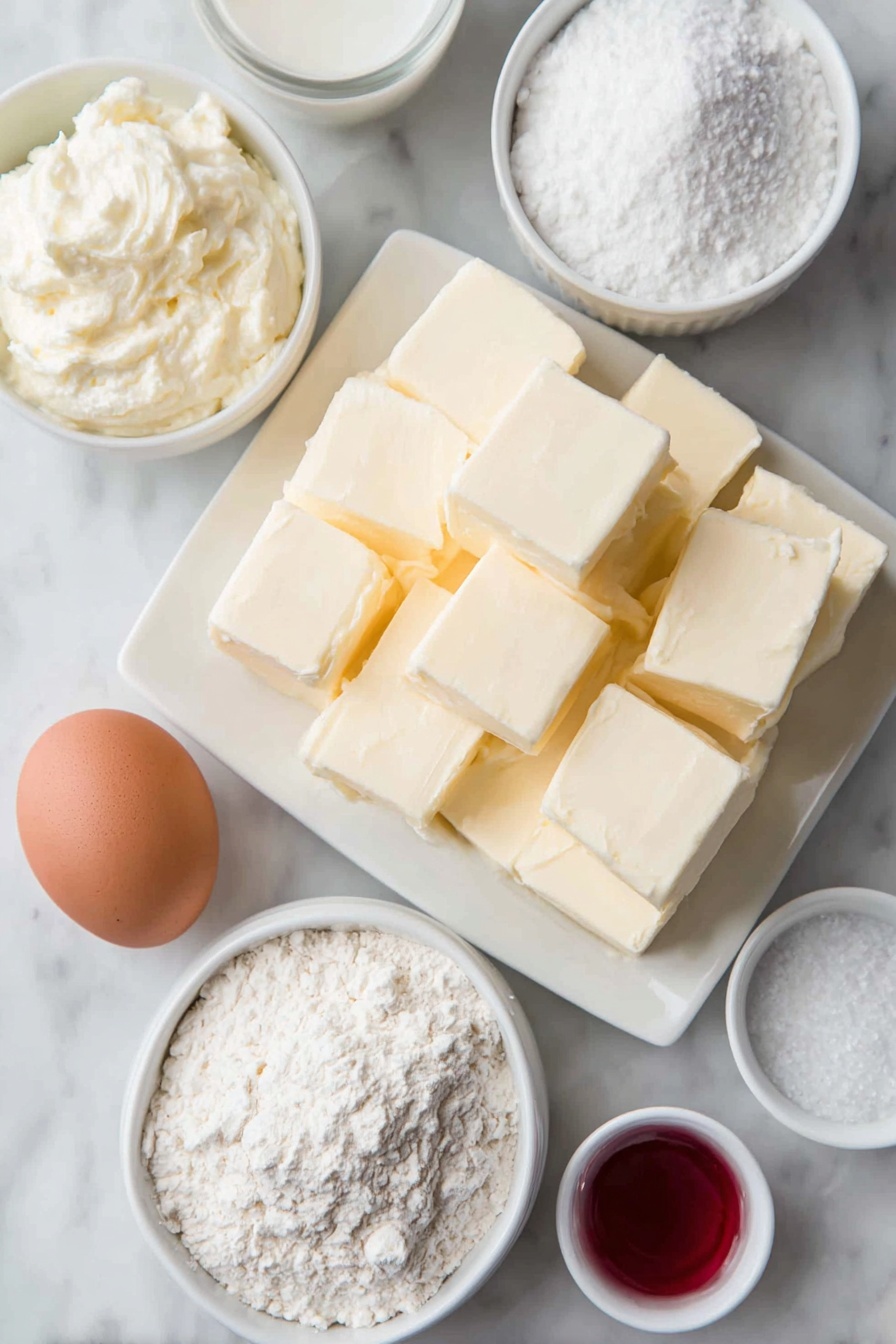
- Unsalted Butter: Room temperature butter blends smoothly with the cream cheese to give melt-in-your-mouth texture.
- Cream Cheese: Adds richness and tenderness to the cookie, making them softer than your typical sugar cookie.
- Granulated Sugar: The classic sweetener that balances the peppermint and buttery flavors.
- Egg Yolk: Helps bind the dough without making it too cakey—keeps the texture just right.
- Peppermint Extract: The star flavor—choose a good-quality extract like PURE peppermint for the best taste.
- Salt: A small pinch really brings out the sweetness and peppermint notes.
- All-Purpose Flour: The base of the dough for structure and that classic cookie feel.
- Red Gel Food Coloring: You want a gel-based color like Americolor Super Red for vibrant, true candy cane red without altering dough consistency.
Variations
I love experimenting with this Candy Cane Cookies Recipe. It’s so versatile that you can easily tweak it for different flavors or dietary needs without losing its charm.
- Chocolate Peppermint: I once swapped half the flour for cocoa powder, and the chocolate-peppermint combo was a hit at Christmas Eve gatherings.
- Gluten-Free Version: Using a gluten-free all-purpose blend works well here—just be gentle with mixing to avoid crumbly dough.
- Mini Candy Canes: For parties, I make smaller versions by cutting the dough strips thinner for bite-sized treats.
- Different Colors: While red and white is traditional, you can try green gel color to create other festive holiday hues.
How to Make Candy Cane Cookies Recipe
Step 1: Cream the Butter and Cream Cheese
Start by placing your unsalted butter in the bowl of a stand mixer fitted with a paddle attachment (or use a hand mixer). Beat the butter for about 30 seconds until it’s soft and creamy. Then add the cream cheese and mix until fully combined in a smooth, creamy texture. This blend is the secret to those melt-away cookies you’ll adore.
Step 2: Add Sugar, Egg Yolk, and Peppermint
Next, add the granulated sugar and mix again on medium speed for about 30 seconds—not too long! Then mix in the egg yolk, peppermint extract, and salt until everything comes together. Make sure to scrape down the sides to incorporate all ingredients evenly.
Step 3: Incorporate the Flour
Switch your mixer to low speed and slowly add the all-purpose flour in a steady stream. Mix just until combined—overmixing will make the dough tough, and you want tender cookies. The dough around now feels soft but manageable.
Step 4: Divide and Color the Dough
Divide the dough into two equal parts. If you’re using a kitchen scale, aim for about 18 ounces each. Keep one half plain (this will be your white dough). Add red gel food coloring to the other half and mix just until the color spreads evenly—try not to overmix so the dough doesn’t warm up too much.
Step 5: Roll and Chill the Dough Rectangles
Roll out each dough portion between two parchment sheets into long rectangles roughly ¼ inch thick, 5 inches wide, and 18 inches long. The dough’s softness might feel tricky at first, but the parchment helps a ton. If rolling is tough, pop the dough in the fridge for 10-15 minutes to firm it up. Once rolled, chill the rectangles in the fridge for 10 minutes.
Step 6: Stack and Press
Place the red rectangle on top of the white one and use a rolling pin to gently press them together. You’re aiming for a combined rectangle about ½ inch thick and still 5 by 18 inches wide/long. Wrap it tightly in plastic wrap and chill for about 45 minutes until firm—this step makes slicing and shaping so much easier.
Step 7: Cut, Twist, and Shape the Candy Cane Cookies
Use a sharp knife to slice the two-toned dough into strips roughly ½-inch wide and 5 inches long. Roll each strip in your hands to round the edges, then gently twist them to create a beautiful red-and-white spiral. Curve one end to form that classic candy cane hook and place them on parchment-lined baking sheets. If the dough starts tearing or sticking, just chill it briefly—it’s totally normal and easy to fix.
Step 8: Chill Again & Bake
While your oven preheats to 350°F (175°C), pop one baking sheet filled with shaped cookies into the freezer. They just need to chill thoroughly but not fully freeze—this helps the cookies bake up with beautiful shape and no spreading. Bake for 12-14 minutes until cookies puff slightly, lose their glossy surface, and bottoms turn a light golden. Let them cool completely on the baking sheets before moving to racks or storage containers.
Pro Tips for Making Candy Cane Cookies Recipe
- Keep Ingredients at Room Temperature: It helps the butter and cream cheese mix smoothly, making your dough silky and easier to roll.
- Don’t Overmix After Flour: Overworking will make your cookies tough rather than tender, so mix until just combined.
- Use Gel Food Coloring: Gel colors won’t affect dough consistency and give you vibrant, true red hues.
- Chill Dough Properly: Cooling the dough rectangles and twisted shapes is key to neat cookies that hold their iconic candy cane look.
How to Serve Candy Cane Cookies Recipe

Garnishes
I usually keep garnishes simple with these cookies—sometimes a light dusting of powdered sugar adds a lovely snowy effect. On occasion, I dip one end in melted white chocolate and sprinkle crushed candy canes for a festive twist that’s always a crowd-pleaser.
Side Dishes
These candy cane cookies pair perfectly with a steaming mug of hot cocoa or peppermint tea. At holiday brunches, I like to offer them alongside gingerbread or eggnog—they complement each other so well.
Creative Ways to Present
For parties, I arrange these cookies in a festive jar tied with red ribbon or stack them on a holiday platter with sprigs of fresh pine and berries. Making mini versions and placing each one into clear cello bags with a candy cane stick turns them into charming edible favors.
Make Ahead and Storage
Storing Leftovers
I store leftover candy cane cookies in an airtight container at room temperature, and they stay fresh and tender for up to a week. Just be sure they’re completely cooled before sealing them to avoid sogginess.
Freezing
You can freeze these cookies or the dough itself! I like to freeze shaped, unbaked cookie dough on a tray, then transfer it to a freezer bag. When ready to bake, thaw in the fridge overnight and bake as usual. Cookies baked fresh from frozen dough taste just as amazing!
Reheating
If you have leftover cookies that have softened a bit, a quick 3-5 minute warm-up in a 300°F oven revives their tenderness and aroma beautifully—just watch them closely so they don’t brown too much.
FAQs
-
Can I use regular liquid food coloring instead of gel?
While you can, I don’t recommend it. Liquid food coloring can make the dough too soft or sticky, making it tricky to roll and shape. Gel coloring is concentrated and doesn’t affect dough texture, so it’s your best bet for this Candy Cane Cookies Recipe.
-
Can I make these cookies without cream cheese?
You technically can, but cream cheese is what gives these cookies their signature tender, melt-in-your-mouth texture. Without it, the cookies will be a bit firmer and less rich. If you try it, consider adjusting the butter slightly and expect a different texture.
-
How do I prevent the candy cane shapes from spreading too much during baking?
Chilling the dough well before shaping and then freezing the shaped cookies for a short time before baking helps the cookies keep their shape. Also, using room temperature ingredients but not letting the dough get too warm while handling makes a big difference.
-
Can I make the dough ahead and freeze it?
Absolutely! This dough freezes beautifully. You can freeze it either as a whole ball or after shaping it into rectangles. Just wrap tightly in plastic wrap and freeze up to 3 months. Thaw overnight in the fridge before proceeding with shaping or baking.
Final Thoughts
When I first tried this Candy Cane Cookies Recipe, I couldn’t believe how festive and delicious homemade cookies could be with such simple steps. My family goes crazy for these every holiday season, and I know you’ll enjoy making and sharing them too. Once you get the hang of rolling and twisting that dough, you’ll feel like a holiday cookie pro—trust me, it’s worth every bite and the smiles they bring. So, grab your apron and peppermint extract, and let’s make some magic with these delightful candy cane cookies!
Print
Candy Cane Cookies Recipe
- Prep Time: 46 minutes
- Cook Time: 14 minutes
- Total Time: 2 hours
- Yield: 36 cookies
- Category: Dessert
- Method: Baking
- Cuisine: American
Description
These festive Candy Cane Cookies feature a delightful blend of creamy butter, tangy cream cheese, and refreshing peppermint extract, rolled into red and white spirals and shaped into charming candy cane forms. Perfect for holiday celebrations, these buttery cookies have a tender texture and a subtle minty flavor that captures the spirit of the season.
Ingredients
Cookie Dough
- 8 oz unsalted butter (1 cup), room temperature
- 4 oz cream cheese (1/2 cup), room temperature
- 10 oz granulated sugar (1.33 cups)
- 1 large egg yolk
- 2 tsp peppermint extract
- 1/2 tsp salt
- 16 oz all-purpose flour (3.5 cups)
- Red gel food coloring (Americolor Super Red recommended)
Instructions
- Prepare Butter and Cream Cheese: Place the unsalted butter in the bowl of a stand mixer fitted with a paddle attachment and beat for about 30 seconds until creamy.
- Add Cream Cheese and Sugar: Add the cream cheese to the butter and mix together until combined. Then add the granulated sugar and mix on medium speed for 30 seconds.
- Incorporate Egg Yolk and Flavorings: Add the egg yolk, peppermint extract, and salt, mixing until all ingredients combine smoothly.
- Add Flour: With the mixer running on low, add the all-purpose flour in a steady stream and mix just until the dough comes together without overmixing.
- Divide and Color Dough: Divide the dough in half (about 18 ounces each). Keep one half plain in the mixer. Add red gel food coloring to the other half and mix just until the color is evenly incorporated, turning the dough bright red.
- Roll Out Dough Rectangles: Roll each half between two sheets of parchment paper into a long rectangle approximately ¼” thick, 5″ wide, and 18″ long. If dough is too soft, refrigerate briefly to make it easier to handle.
- Chill and Stack Dough: Chill both rectangles in the refrigerator for 10 minutes. Then carefully stack the red rectangle on top of the white one. Use a rolling pin to gently roll over them, melding the two layers together into a two-toned rectangle about ½” thick, 5″ wide, and 18″ long. Wrap in plastic wrap and refrigerate until firm, about 45 minutes.
- Cut and Shape Candy Canes: Using a sharp knife, cut thin strips about ½” wide and 5″ long from the rectangle. Roll each strip between your hands to round out edges, then twist gently to create a red-and-white spiral. Curve one end to form a candy cane shape and place on a parchment-lined baking sheet. Repeat with remaining dough, refrigerating if dough becomes too soft.
- Preheat and Chill Cookies: Preheat the oven to 350°F (175°C). Place one baking sheet of shaped cookies in the freezer while the oven heats to chill them without freezing.
- Bake Cookies: Bake the cookies for 12-14 minutes. They should puff slightly, lose their raw sheen, and have lightly golden bottoms without much color change on top.
- Cool and Store: Let cookies cool completely on the baking sheet before transferring. Store in an airtight container at room temperature for up to one week or freeze for up to three months.
Notes
- If the dough feels too soft while shaping, refrigerate it briefly to firm it up and prevent tearing.
- Using gel food coloring is preferred to avoid adding excess liquid and to achieve vibrant color.
- Chilling the formed cookies before baking helps maintain their shape and improves texture.
- For consistent portioning, use a kitchen scale to divide the dough halves accurately.
- Cookies can be stored frozen; thaw at room temperature before serving.
Nutrition
- Serving Size: 1 cookie
- Calories: 110
- Sugar: 7g
- Sodium: 65mg
- Fat: 6g
- Saturated Fat: 3.5g
- Unsaturated Fat: 2g
- Trans Fat: 0g
- Carbohydrates: 13g
- Fiber: 0.3g
- Protein: 1.2g
- Cholesterol: 25mg


