
If you’re looking for a festive, fun, and utterly adorable treat to brighten up your holiday gatherings, then this Melted Snowman Cookies Recipe is exactly what you need. I absolutely love how these cookies turn out – they’re sweet, whimsical, and so easy to make that you’ll want to bake a batch every winter! Stick with me, and I’ll walk you through every detail so you can create these charming melted snowmen that practically melt your heart before you even take a bite.
Why You’ll Love This Recipe
- Super Simple and Fun: This Melted Snowman Cookies Recipe is so straightforward, even if you’re new to decorating cookies, you’ll have a blast.
- Whimsical Design: Each cookie looks like a little snowman melting away, guaranteed to make everyone smile (especially kids!).
- Perfect Holiday Treat: Great for parties, gift-giving, or cozy nights by the fire with a cup of hot cocoa.
- Customizable and Creative: You can easily mix up colors or add your own twist to make them truly yours.

Ingredients You’ll Need
The magic of this Melted Snowman Cookies Recipe is really all in how these simple ingredients come together – classic sugar cookies, glossy royal icing, and marshmallows. Each component plays a special role to bring this snowy scene to life. When shopping, try to grab good quality royal icing for that perfect smooth finish and marshmallows that are soft and fresh to ensure they stick beautifully.
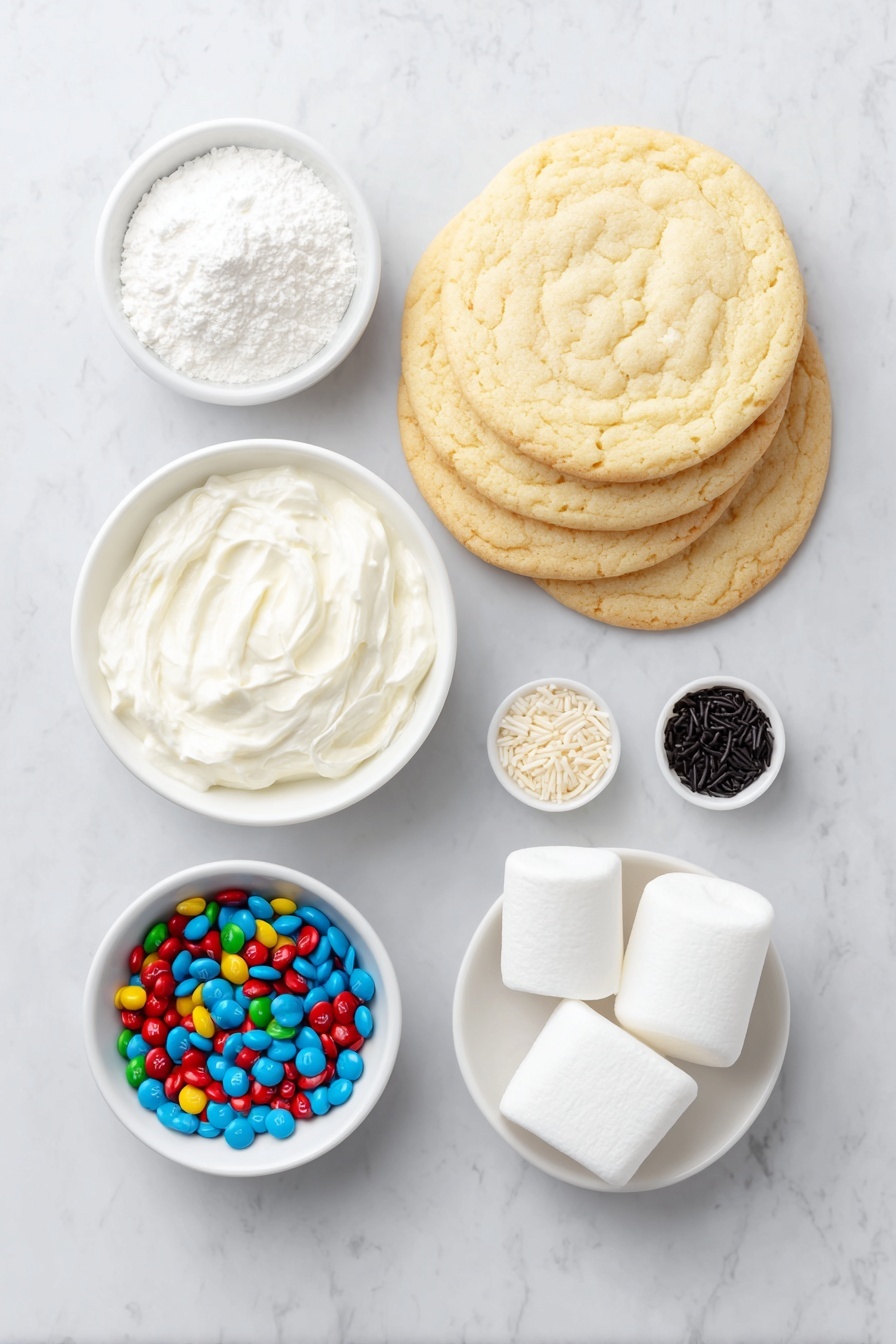
- Sugar cookies: Choose your favorite sugar cookie recipe or store-bought; I like homemade because they crisp just right.
- Royal icing: This is what gives your cookies that glossy, clean look and lets you pipe on details.
- Marshmallows, cut in half: These become the snowman’s head and add that fun 3D effect.
- Long orange sprinkles: Perfect substitute for a tiny carrot nose.
- M&Ms: I use these for the snowman’s buttons, but you can swap for mini chocolate chips too.
- Black gel food color: Essential for creating the snowman’s expressive arms and facial features.
Variations
I love that this Melted Snowman Cookies Recipe invites creativity. Over time, I’ve played around with toppings, icing colors, and even cookie bases to customize the look and flavor, so don’t be shy about making it your own. Trust me, little tweaks make it feel fresh every time you bake!
- Using sugar cookie bars instead of rounds: When I first tried baking the cookies in a sheet and cutting squares, it was easier and made for a chunkier snowman base.
- Flavor twists: Adding a hint of almond extract to the sugar cookies adds a lovely nutty aroma that elevates the whole thing.
- Seasonal color swaps: Try pastel icing colors for a spring-themed melted snowman or even neon sprinkles for a party vibe.
- Dietary adaptations: You can use gluten-free cookies or vegan marshmallows to fit your needs without losing that melted snowman charm.
How to Make Melted Snowman Cookies Recipe
Step 1: Prep Your Icing Like a Pro
First things first, take about half a cup of your royal icing and stir in black gel food color until you get a deep, rich black. You want to thin it to about 15-second consistency — that means if you drag a spoon through it, the icing takes about 15 seconds to smooth back out. Pop that into a piping bag and snip a very small tip for fine details. For the rest of the white icing, thin it slightly to a 10-second consistency and bag it the same way. These consistencies are key to getting a smooth base and perfect piping later.
Step 2: Frost Your Cookies with Care
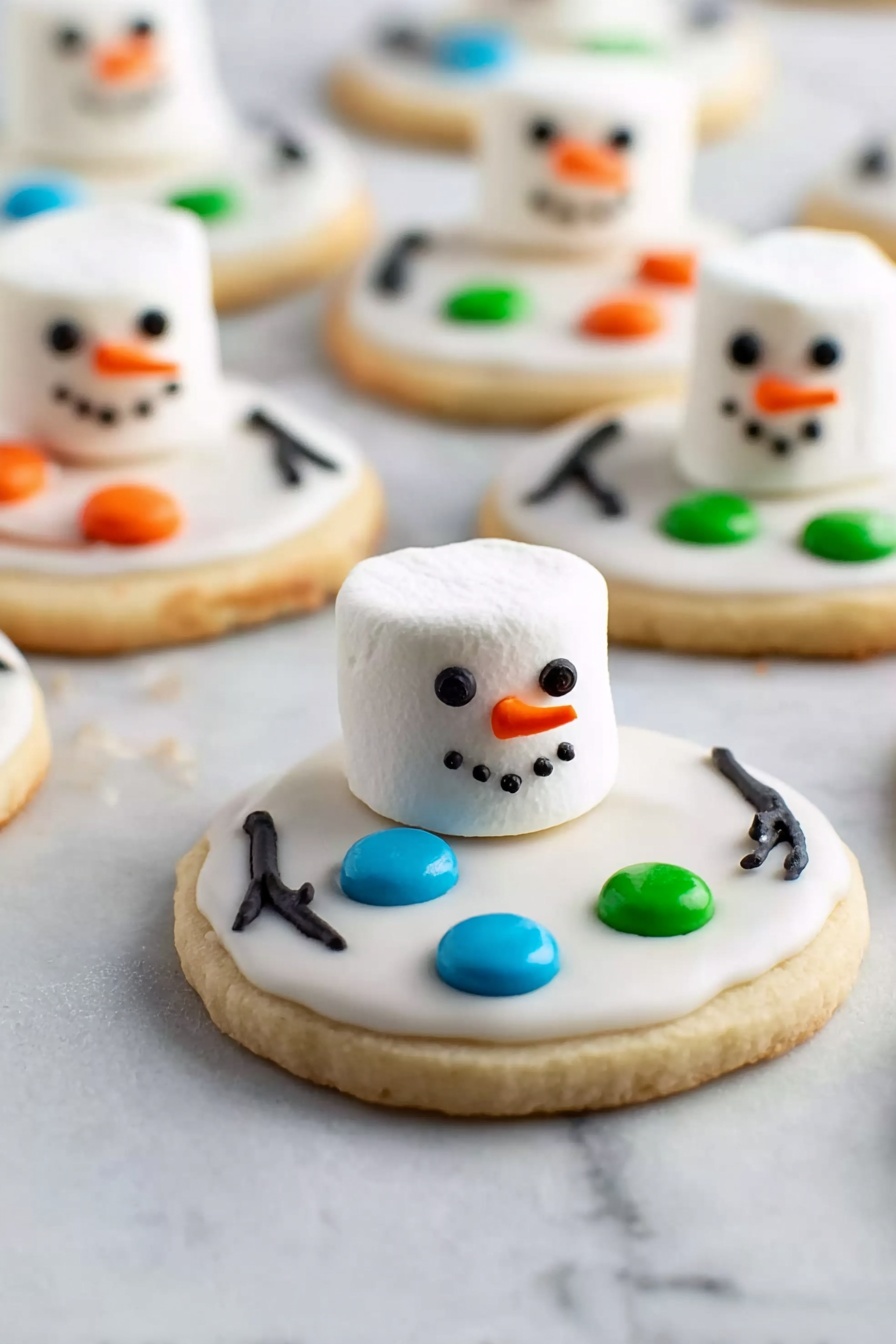
Grab your sugar cookies and flood them with that glossy white royal icing, letting it drip naturally over the edges – this “melting” effect is what makes these cookies so charming. I like to work on a wire rack over parchment to catch drips and make cleanup easier. The trick here is to work quickly so the icing is still wet when you move on to adding marshmallows and decorations.
Step 3: Build Your Melting Snowman
While the icing is still wet, gently press the cut marshmallow halves toward the back of the cookie – these become the snowman’s head. Then, line up your M&Ms right below the marshmallow for buttons. Before your icing dries, pipe thin black arms “floating” out from the marshmallow with that black icing you mixed earlier. This arm placement really sells the snowman melting away vibe; I like mine to look like they’re waving or reaching out!
Step 4: Add the Finishing Face Details
Let the cookies set for about 20-30 minutes to firm up a bit. Then it’s time for some personality! Use the black icing to pipe two little eyes and a surprised “O” mouth. I always use a little leftover white icing to attach the orange sprinkle nose right in the center – it instantly brings the snowman to life. Honestly, this is the part that makes me smile the most; each face ends up a little different, which adds to their charm.
Pro Tips for Making Melted Snowman Cookies Recipe
- Icing Consistency Is Key: I learned the hard way that if your royal icing is too thick, it won’t drip nicely, and if it’s too thin, it won’t hold the marshmallows. Aim for the 10-15 second consistency for best results.
- Work Fast but Steady: You want the icing wet enough to “glue” on your marshmallows and buttons, but not so runny that colors bleed or shapes lose definition.
- Practice Makes Perfect Faces: Don’t stress if your snowmen faces aren’t perfect at first—I found practicing piping on parchment before decorating real cookies really helped build my confidence.
- Avoid Overcrowding: Give each cookie enough space on your cooling rack or baking tray while they dry so arm details and icing don’t smoosh together.
How to Serve Melted Snowman Cookies Recipe
Garnishes
I like to keep the garnishes simple but seasonal—extra orange sprinkles or colorful mini candy pieces on the side can jazz up the presentation. Sometimes I add a dusting of powdered sugar on the serving plate for that fresh-snow look. It’s a small touch that really elevates the whole experience.
Side Dishes
Since these Melted Snowman Cookies are delightfully sweet and whimsical, I usually serve them with a cozy cup of hot chocolate topped with marshmallows (because why not double up on the marshmallow magic?). They also pair beautifully with a warm eggnog or spiced apple cider — perfect for a holiday cookie exchange or after-school treat.
Creative Ways to Present
One year, I arranged my Melted Snowman Cookies on a platter lined with crushed peppermint candies and mini candy canes as if they were “melting” on an icy surface. Another time, I made mini gift boxes and included one cookie per box as a sweet holiday favor — my family went crazy for that! Don’t be shy to get creative with presentation; it’s part of the fun.
Make Ahead and Storage
Storing Leftovers
Once the royal icing is fully set, I store leftover Melted Snowman Cookies in an airtight container layered between sheets of parchment. This keeps the cookies fresh and prevents the icing from getting damaged. Usually, they stay perfect for 3-4 days at room temperature, though honestly, they rarely last that long in my house!
Freezing
I’ve frozen these cookies a couple of times, wrapping them individually in plastic wrap and then placing them in a freezer-safe bag. When you’re ready to enjoy, just thaw at room temperature for a few hours. The texture holds up really well, and the royal icing doesn’t lose its shine, which surprised me positively.
Reheating
Since these cookies are best enjoyed at room temperature, I recommend no direct reheating. If you want to revive a bit of that freshly baked warmth, a quick 10-second zap in the microwave usually works—but be careful not to melt the marshmallow head!
FAQs
-
Can I use store-bought sugar cookies for this recipe?
Absolutely! While I love homemade sugar cookies for their fresh-from-the-oven flavor, store-bought cookies work perfectly for this Melted Snowman Cookies Recipe, especially if you’re short on time.
-
What’s the best way to thin royal icing?
I use a few drops of water at a time and stir slowly to reach the desired “10-second” or “15-second” consistency. The trick is patience—go slow so the icing doesn’t get too runny.
-
Can I make these cookies ahead of time?
Yes! You can bake and decorate these cookies a day or two in advance. Just be sure to store them in an airtight container once the icing has fully dried.
-
How do I prevent marshmallows from sliding off?
Placing marshmallow halves onto freshly piped white icing while it’s still wet gives them a “glue-like” hold. If your icing starts to set, give the cookie a gentle press to help them stick.
-
Can I substitute something for M&Ms?
Definitely! Mini chocolate chips, colored candy pearls, or even small jellybeans work well as buttons if you want to switch things up.
Final Thoughts
This Melted Snowman Cookies Recipe has become one of my all-time favorite festive treats to bake and share. It combines simplicity with a playful design that’s sure to impress family and friends alike. If you’re looking for a joyful project that’s as delicious as it is delightful, I wholeheartedly recommend giving this recipe a try—trust me, these cookies always bring a smile to my kitchen and yours will too!
Print
Melted Snowman Cookies Recipe
- Prep Time: 20 minutes
- Cook Time: 0 minutes
- Total Time: 20 minutes
- Yield: 12 cookies
- Category: Dessert
- Method: No-Cook
- Cuisine: American
Description
These Melted Snowman Cookies bring the whimsical charm of winter into a delicious treat. Featuring classic sugar cookies topped with smooth royal icing, marshmallow snowman heads, and playful details like candy arms and expressive faces, these festive cookies are perfect for holiday gatherings and family fun.
Ingredients
Cookies
- 12 sugar cookies
Royal Icing
- 2 cups royal icing
- Black gel food color
Decorations
- 6 marshmallows, cut in half
- Long orange sprinkles
- M&Ms
Instructions
- Prepare black icing. Take 1/2 cup of your royal icing and dye it black using black gel food coloring. Mix until you reach your desired shade of black, then thin the icing to a 15 second consistency. Transfer this black icing to a piping bag and snip off a small tip for detailed piping.
- Prepare white icing. Thin the remaining white royal icing to a 10 second consistency and place it into a separate piping bag with a small snipped tip for frosting the cookies smoothly.
- Frost the cookies. Cover each sugar cookie with the thinned white icing, allowing it to drip slightly over the sides to create a melted snow effect.
- Assemble snowman heads and limbs. Immediately place the cut marshmallow halves towards the back of each cookie to form the snowman’s head. Attach M&Ms to the cookie for buttons or decoration. Using the black icing, pipe stick arms extending away from the marshmallow to create the appearance of floating arms while the icing is still wet.
- Finalize the decorating. Let the cookies set for 20-30 minutes until the icing begins to firm up. Then, pipe two eyes and a surprised ‘O’ shaped mouth using the black icing. Attach a long orange sprinkle nose to each marshmallow head using some leftover white icing as adhesive.
Notes
- To achieve the perfect dripping effect, the white icing should be thinned adequately but not too runny.
- If royal icing thickens while decorating, add a few drops of water to return to consistency.
- Allowing the icing to set enough before adding facial features is important to prevent smudging.
- These cookies can be stored in an airtight container at room temperature for up to 3 days.
- For a sturdier hold, chill cookies after assembling but before decorating the face.
Nutrition
- Serving Size: 1 cookie
- Calories: 180
- Sugar: 15g
- Sodium: 110mg
- Fat: 5g
- Saturated Fat: 2g
- Unsaturated Fat: 3g
- Trans Fat: 0g
- Carbohydrates: 30g
- Fiber: 0.5g
- Protein: 1g
- Cholesterol: 5mg


