
I’m so excited to share this Santa Cookie Decorations Recipe with you because it’s truly one of my favorite festive treats to make, especially when the holiday spirit is in full swing. These adorable Santa-themed sugar cookies are super easy to decorate, and every time I make them, they bring smiles all around. Whether you’re baking with kids, hosting a party, or just craving a fun holiday activity, this recipe is straightforward but feels incredibly special—and trust me, once you try these, you’ll want to make them every year.
Why You’ll Love This Recipe
- Super Simple: You don’t need to bake from scratch or be a decorated pro to nail these festive cookies.
- Fun for All Ages: Decorating these with kids is a joyful, mess-friendly activity full of giggles.
- Eye-Catching Presentation: These Santas look so festive, they instantly brighten any holiday spread.
- Deliciously Sweet: With creamy vanilla frosting and the perfect crunch from sprinkles and coconut, everyone’s asking for seconds.

Ingredients You’ll Need
Let me tell you, the magic in this Santa Cookie Decorations Recipe isn’t just in the decorating—it’s in how these simple ingredients work together to create something that feels truly festive. I generally keep these staples on hand during the holidays, which makes whipping up this recipe a breeze.
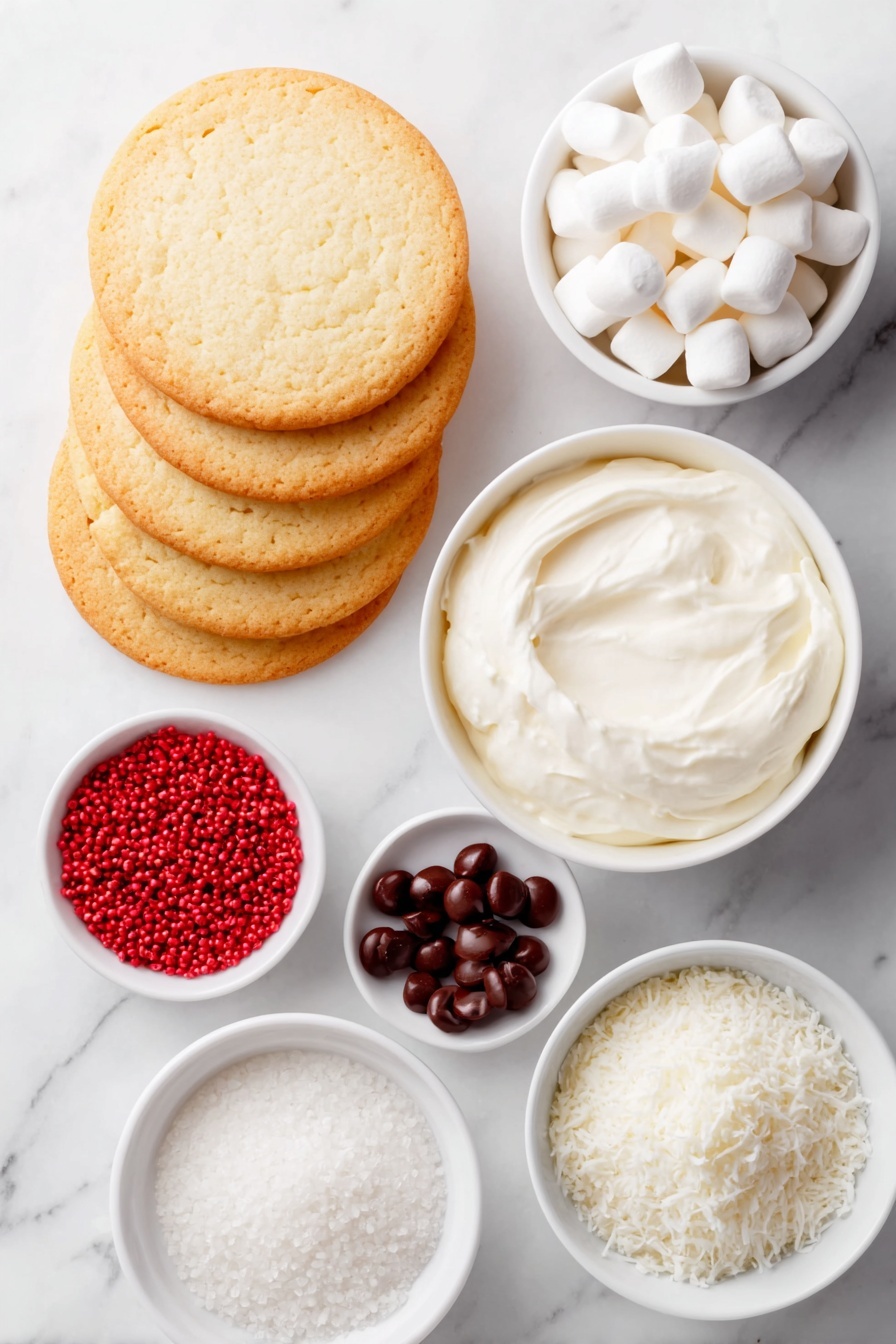
- Store-bought sugar cookies: Using pre-made cookies saves so much time and ensures a perfect base every time.
- Betty Crocker™ Rich & Creamy Frosting Vanilla: Its smooth texture makes spreading easy and holds the decorations perfectly.
- 24 candy eyes: These give Santa his charming, playful look.
- 12 cinnamon imperial candies: A festive red nose that adds a pop of color and a hint of spice.
- Red sugar sprinkles: They add festive sparkle and a delightfully sweet crunch.
- Approximately 1/4 cup sweetened shredded coconut: This gives a fluffy “fur” texture to Santa’s suit that I just adore.
- 12 miniature marshmallows: Perfect for a little Santa hat pom-pom with a soft chewiness.
- Black edible marker: Essential for giving Santa a cheerful smile with total precision.
Variations
One of the things I love about my Santa Cookie Decorations Recipe is how easy it is to tweak according to what you have on hand or your style. Play around with the details and you’ll create your own signature Santas in no time!
- Colorful Frosting: Once, I swapped the vanilla frosting for peppermint-flavored frosting – the minty freshness was a delightful surprise.
- Nut-Free Version: If you or your family members have allergies, just make sure the store-bought cookies and sprinkles are nut-free and you’re good to go.
- Extra Flourish: Use edible glitter or colored gel pens to enhance Santa’s hat or add rosy cheeks for an extra festive effect.
- Chocolate Lover’s Twist: Try chocolate frosting instead of vanilla – my kids were thrilled with this chocolaty Santa version!
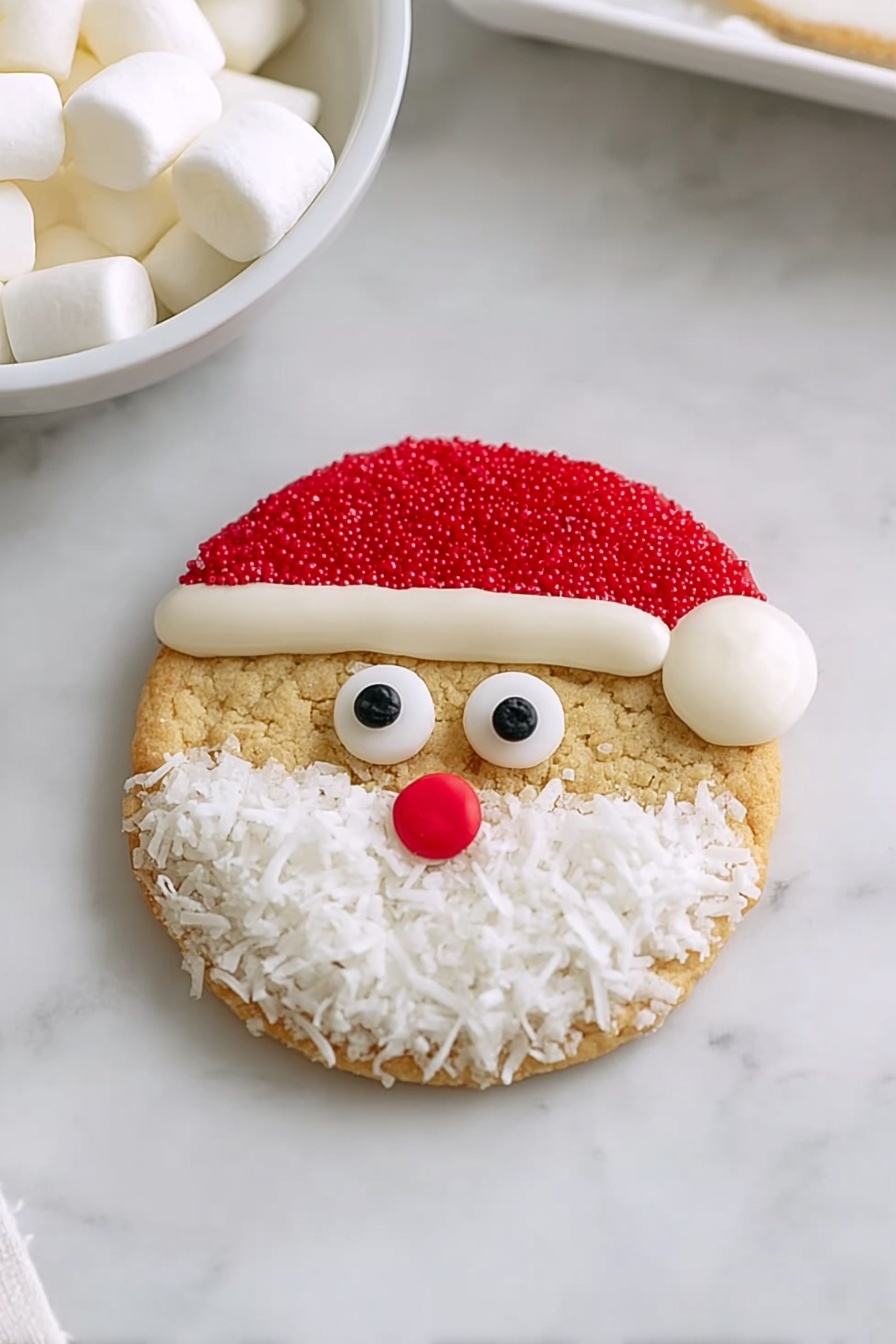
How to Make Santa Cookie Decorations Recipe
Step 1: Give Santa His Eyes and Nose
First things first: grab your sugar cookie, and using a small knife or even a toothpick dipped in frosting, carefully attach two candy eyes near the top center of the cookie. Then, press the cinnamon imperial candy right below the eyes to form Santa’s nose. This little detail brings the whole face to life, so take your time to place them evenly—you’ll feel like a pro in no time!
Step 2: Frost the Top for Santa’s Hat
Next, spread a generous layer of the vanilla frosting over the top third of the cookie. I usually use an offset spatula to get a smooth finish that’s easy to work with—this frosting will be the base for Santa’s vibrant red hat.
Step 3: Sprinkle the Festive Red Sugar
Carefully shake the red sugar sprinkles over the frosting, leaving a clean line of frosting peeking through near the edge. This touch makes Santa’s hat really pop and adds a sparkly texture that everyone loves—plus, it’s so satisfying watching the sprinkles catch the light perfectly.
Step 4: Frost the Bottom for the Fur Trim
Then, spread frosting on the bottom third of the cookie to create Santa’s fluffy coat cuff. This is the perfect sticky base for adding texture with shredded coconut.
Step 5: Add the Fluffy Coconut Fur
Press sweetened shredded coconut gently into the frosting on the bottom third. This fluffy white “fur” is my favorite part—it really transforms the cookie from pretty to festive magic. Make sure to cover evenly so it looks cozy and soft, exactly like Santa’s suit.
Step 6: Top with a Mini Marshmallow Pom-Pom
Stick a miniature marshmallow right at the peak of Santa’s hat. It’s such a cute and classic touch, and honestly, a little marshmallow always adds that bite of softness that contrasts so nicely with the crunchy sugar cookies.
Step 7: Draw on Santa’s Smile
Finally, use the black edible marker to draw a cheerful smile just below the nose. This step is quick but makes a huge difference—everyone will be charmed by your Santas’ happy faces, guaranteed!
Pro Tips for Making Santa Cookie Decorations Recipe
- Use a Toothpick for Precision: Dipping a toothpick in frosting before attaching small decorations like the eyes and nose helps you avoid messy fingers and keeps everything neat.
- Let Frosting Set Before Next Step: Wait a couple of minutes after frosting each section so the candy and coconut stick better without sliding around.
- Handle Edible Markers Carefully: Let the frosting dry slightly to prevent smudges when drawing Santa’s smile for the sharpest, happiest expression.
- Avoid Overloading Decorations: Keeping each cookie balanced in toppings means it’s easier to handle and serve without bits falling off—plus, it looks charming, not cluttered.
How to Serve Santa Cookie Decorations Recipe
Garnishes
I like to serve these cookies with a simple dusting of powdered sugar around the plate to mimic Santa’s snowy world. Sometimes, I add a few sprigs of fresh rosemary nearby for a subtle pine aroma that brings out that holiday feeling even more.
Side Dishes
If I’m serving these at a holiday gathering, I usually pair them with a warm drink like hot cocoa topped with whipped cream or a festive spiced cider. They also go wonderfully alongside a platter of fresh fruit to balance out the sweetness.
Creative Ways to Present
For holiday parties, I love arranging these Santa cookies standing up in a clear glass jar layered with peppermint sticks and candy canes for a playful centerpiece. Gift-wise, wrapping a few in cellophane bags tied with red and white twine always delights friends and family.
Make Ahead and Storage
Storing Leftovers
My family and I usually keep any leftover decorated cookies in an airtight container at room temperature for up to 3 days. I’ve learned to line the container with parchment paper between layers to prevent the frosting and decorations from sticking together.
Freezing
You can freeze these decorated Santa cookies, but I recommend freezing them unassembled or without marshmallows to maintain the best texture. Wrap them tightly in plastic wrap and store in freezer bags for up to a month. Thaw overnight in the fridge before decorating.
Reheating
Thankfully, Santa cookies don’t really require reheating! If you want to soften them a bit, a few seconds in the microwave (about 10 seconds) works well—just skip this if you want to keep the sugar cookie crunch crisp.
FAQs
-
Can I make these Santa cookie decorations with homemade sugar cookies?
Absolutely! While this recipe calls for store-bought cookies for convenience, homemade sugar cookies work wonderfully too. Just make sure they’re fully cooled before decorating so the frosting doesn’t melt.
-
What else can I substitute for the cinnamon candy noses?
If you don’t have cinnamon candies, small red M&Ms, red jelly beans, or even a dab of red gel icing will make perfect noses. The key is the bright red color for Santa’s look.
-
How long will these decorated cookies stay fresh?
When stored airtight at room temperature, they’ll stay fresh and tasty for up to 3 days. After that, the frosting might start to soften and the coconut can dry out a bit.
-
Can I prepare the decorations ahead of time?
You sure can! You can wash and prep all your decorations separately. If you want to assemble cookies ahead, just keep them in a single layer and cover lightly to avoid smudging.
Final Thoughts
This Santa Cookie Decorations Recipe holds such a warm spot in my heart because it’s simple, joyful, and perfect for bringing people together cozying up around the kitchen table. It’s not about perfect techniques but about creating sweet memories and delicious fun that even the least experienced cookie decorators can master. Give it a try—you’ll love how much spirit and smile these little Santas bring to your holiday season!
Print
Santa Cookie Decorations Recipe
- Prep Time: 5 minutes
- Cook Time: 0 minutes
- Total Time: 15 minutes
- Yield: 12 cookies
- Category: Dessert
- Method: No-Cook
- Cuisine: American
Description
These festive Santa Sugar Cookies are a fun and easy holiday treat, perfect for decorating with kids or adding a cheerful touch to your holiday dessert table. Using store-bought sugar cookies and simple decorations like candy eyes, cinnamon candies, red sugar sprinkles, shredded coconut, and miniature marshmallows, you can create charming Santa faces in less than 15 minutes.
Ingredients
Cookies & Frosting
- 12 store-bought sugar cookies
- 1 can (16 oz) Betty Crocker™ Rich & Creamy Vanilla Frosting
Decorations
- 24 candy eyes
- 12 cinnamon imperial candies
- Red sugar sprinkles
- Approximately 1/4 cup sweetened shredded coconut
- 12 miniature marshmallows
- Black edible marker
Instructions
- Attach eyes and nose: Using a small knife or a toothpick dipped in frosting, attach 2 candy eyes and 1 cinnamon imperial candy to the top of each sugar cookie to create Santa’s eyes and nose.
- Frost Santa’s hat top: Spread frosting on the top one-third portion of the cookie to form the base of Santa’s hat.
- Add red sprinkles: Carefully sprinkle red sugar sprinkles over the frosted top, leaving a line of white frosting uncovered to simulate the trim of the hat.
- Frost Santa’s beard bottom: Spread frosting on the bottom one-third portion of the cookie to create Santa’s beard area.
- Add coconut beard: Press sweetened shredded coconut onto the frosting on the bottom to give texture to Santa’s fluffy beard.
- Add marshmallow pompom: Attach one miniature marshmallow to the top of each cookie as the pompom on Santa’s hat.
- Draw smile: Use the black edible marker to draw a smile on each cookie, completing Santa’s face.
Notes
- For best results, make sure the cookies are completely cooled before decorating to prevent frosting from melting.
- You can substitute the cinnamon candies with small red candy pieces or red M&Ms if preferred.
- If you do not have a black edible marker, you can skip the smile or use melted chocolate with a toothpick for drawing.
- These cookies are best served the same day but can be stored in an airtight container for up to 2 days.
Nutrition
- Serving Size: 1 cookie
- Calories: 180
- Sugar: 20g
- Sodium: 90mg
- Fat: 7g
- Saturated Fat: 3.5g
- Unsaturated Fat: 2g
- Trans Fat: 0g
- Carbohydrates: 28g
- Fiber: 0.5g
- Protein: 1g
- Cholesterol: 5mg

