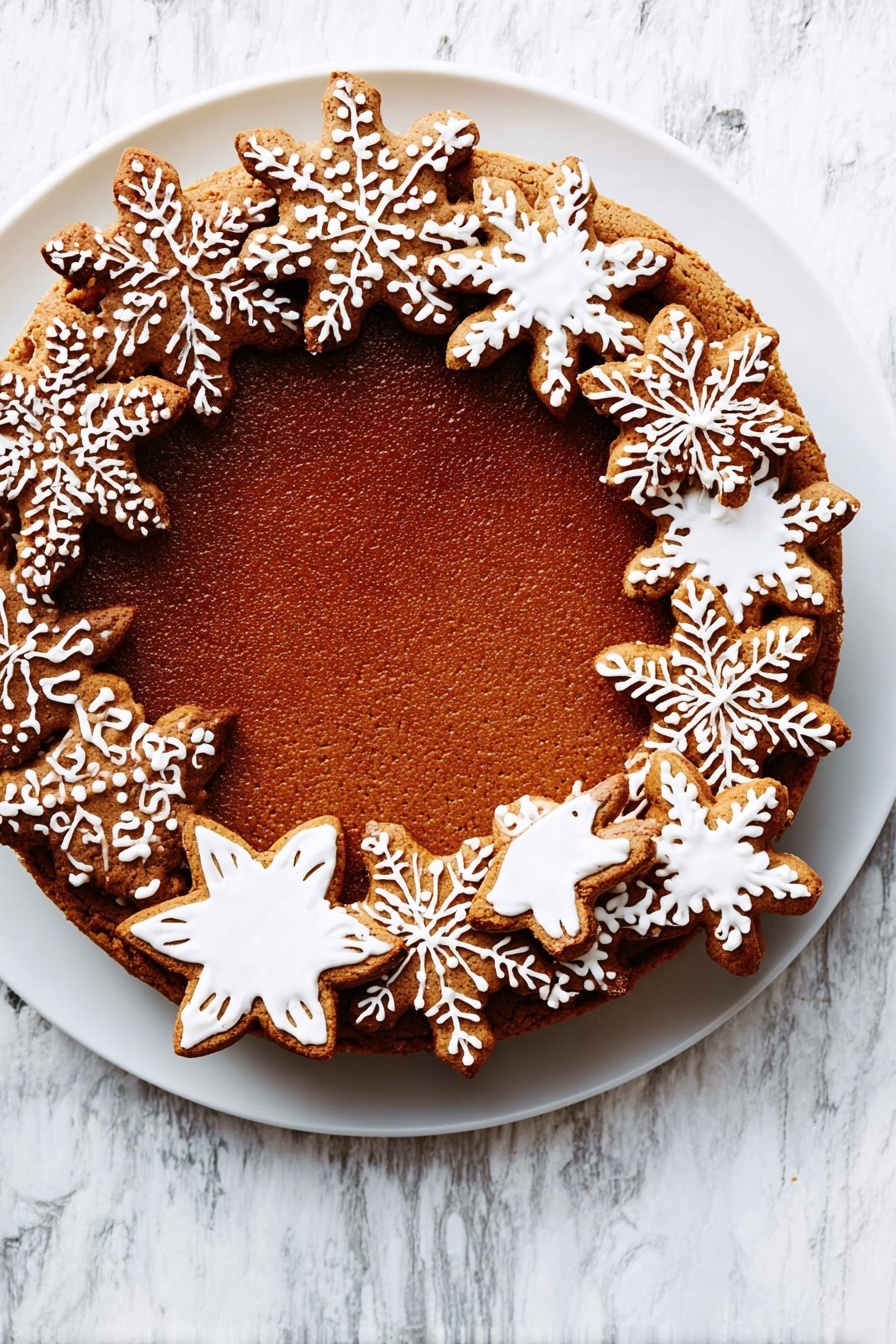
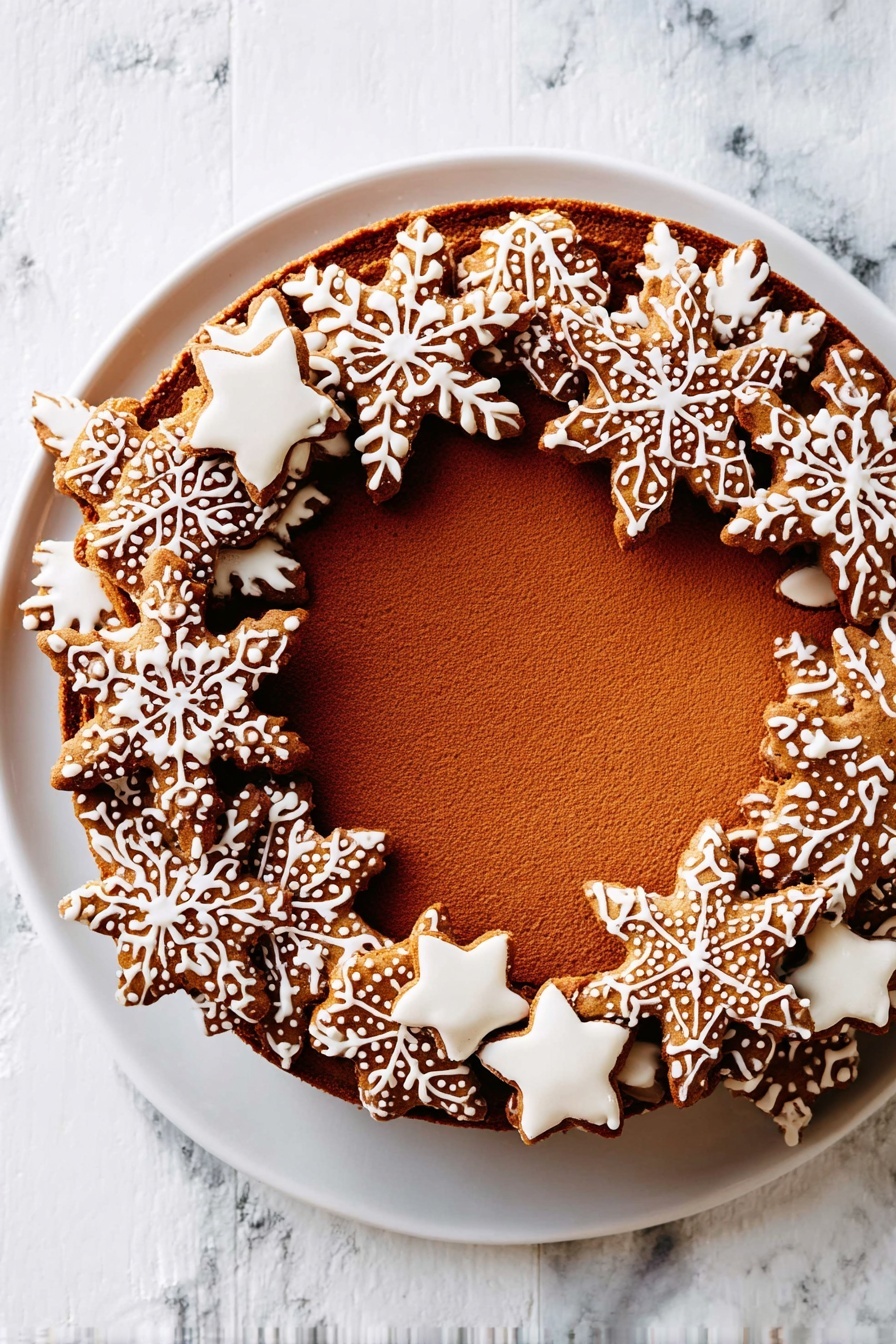
If you’re craving something utterly festive and indulgent, you’re going to flip for this Chocolate Caramel Gingerbread Pie Recipe. It’s like a party in your mouth — the rich, melty chocolate meets gooey caramel, all wrapped up in a spicy, buttery gingerbread crust. When I first tried this, I was amazed at how those flavors just balanced so perfectly. Stick with me, and I’ll walk you through every step so your pie turns out just like mine (if not better!).
Why You’ll Love This Recipe
- Delectably Layered Flavors: The warm gingerbread crust perfectly complements the smooth caramel and rich dark chocolate filling.
- Showstopper Presentation: The decorated royal icing snowflakes are not just pretty—they add a delicate crunch and festive flair.
- Made From Scratch: You’ll get the satisfaction of making your own gingerbread pastry instead of a store-bought crust.
- Perfect for Holidays or Special Occasions: This pie’s comforting spices and irresistible filling make it a family favorite year after year.

Ingredients You’ll Need
Every ingredient in this Chocolate Caramel Gingerbread Pie Recipe plays a star role — from the buttery golden syrup in the gingerbread to the luscious cooking cream in that caramel-chocolate filling. Here’s what I always keep on hand to make this magic happen.
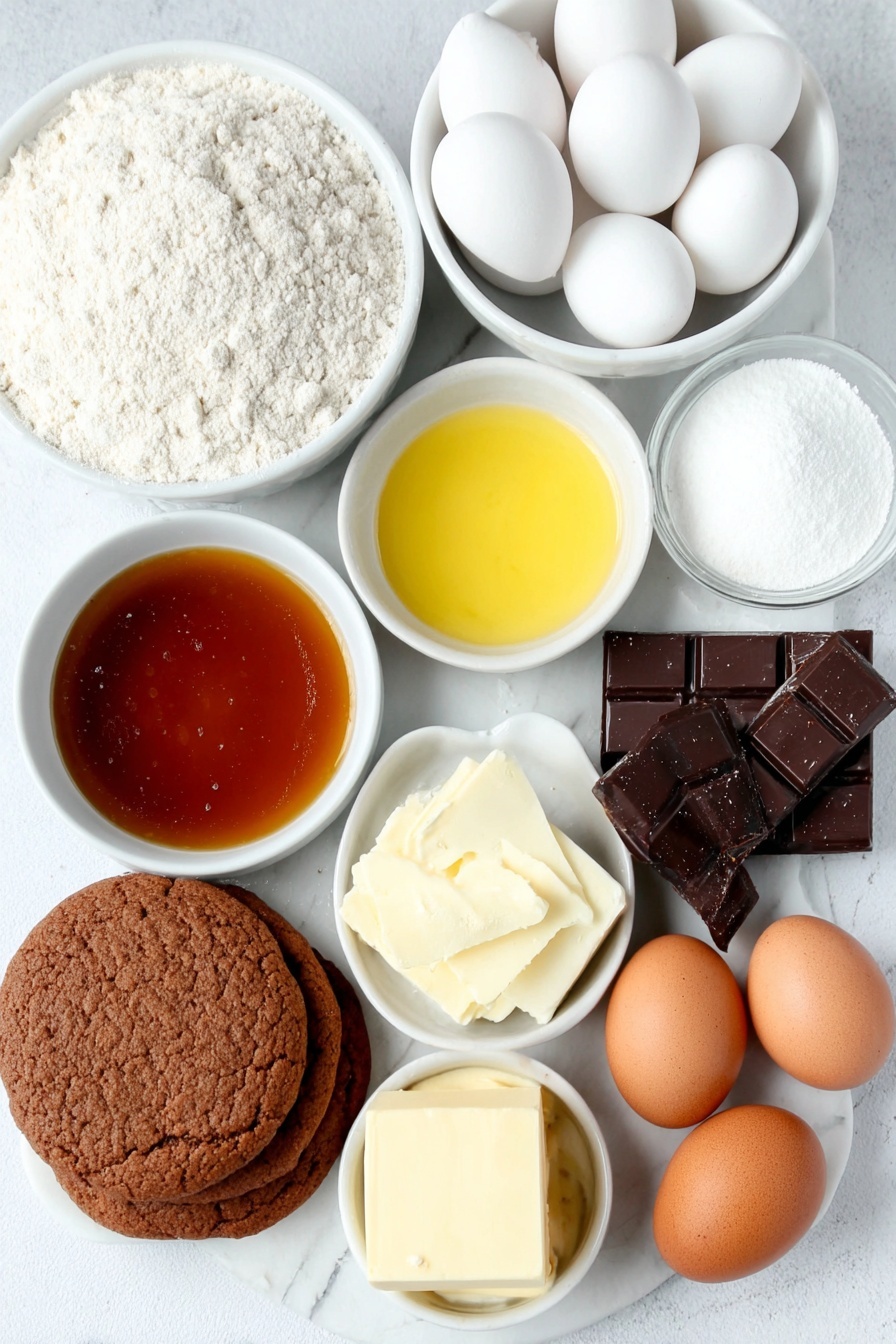
- Caramel Top ‘n’ Fill: This canned caramel is super smooth and perfect for whisking into the pie filling.
- Eggs: Eggs bind the filling and help set the pie perfectly—not too wobbly, just right.
- Bulla Cooking Cream: This adds a lovely richness while keeping the filling silky.
- Dark Chocolate: Melted and cooled, it brings that bittersweet depth to the pie filling.
- Royal Icing: You’ll use this to decorate delicate snowflakes—fun and festive!
- Fresh Lemon Juice: Just a splash helps lighten up the royal icing and makes it pipeable.
- Brown Sugar: Adds a deep molasses flavor to the gingerbread dough.
- Golden Syrup: Sweet and sticky, it helps give the gingerbread its classic chewiness.
- Butter: Use unsalted for best control over saltiness in your dough.
- Plain Flour and Self-Raising Flour: Combining these flours builds the perfect texture for your gingerbread crust.
- Ground Ginger, Mixed Spice, Ground Cloves: These spices give the pie its warm, holiday vibe.
- Bicarbonate of Soda: Helps your gingerbread dough rise just enough for a tender crust.
- Egg for Dough: Lightly whisked, it brings the dough together smoothly.
Variations
I love how versatile this Chocolate Caramel Gingerbread Pie Recipe is. You can tweak it to match your holiday mood or dietary needs without losing any of that soul-warming goodness.
- Nutty Twist: Sprinkling chopped toasted pecans on top of the caramel before pouring the chocolate filling adds a delightful crunch my family adores.
- Spice it Up: If you like a little extra zing, add a pinch of cayenne or black pepper to the gingerbread dough—it gives a nice subtle kick.
- Chocolate Variations: I sometimes swap dark chocolate for milk or even a mix to make it sweeter and creamier, depending on my mood.
- Dairy-Free Version: Use coconut cream instead of cooking cream and a dairy-free chocolate—you’ll still get that decadent filling without the dairy.
How to Make Chocolate Caramel Gingerbread Pie Recipe
Step 1: Make the Gingerbread Dough Base
Start by gently warming the brown sugar, golden syrup, and butter in a saucepan over low heat. Stir constantly for about 3 to 5 minutes until the butter melts and the sugar dissolves—you want it smooth but not boiling. Then, set it aside to cool slightly for about 5 minutes while you gather the dry ingredients.
Step 2: Combine Dry Ingredients and Form Dough
In a big bowl, whisk together your plain flour, self-raising flour, ground ginger, mixed spice, cloves, and bicarbonate of soda. Pour in your cooled sugar mixture and add the lightly whisked egg. Stir everything until it comes together, then turn out onto a floured surface. Knead gently until the dough is smooth. This is your gingerbread magic happening! Divide the dough into two discs, pop them in a bowl, cover tightly, and chill in the fridge for an hour. This resting time is key for flavor development and makes rolling out a breeze.
Step 3: Roll, Chill, and Blind Bake the Pie Shell
Preheat your oven to 170°C (or 150°C if you’re using a fan-forced oven). Lightly grease a 23cm pie dish. Roll out one dough disc between sheets of floured baking paper until it’s about 3-4mm thick—you want it thin but sturdy. Then carefully flip your dough over a rolling pin and peel off the paper. Line the pie dish, gently pressing into all edges but don’t stretch it, or you risk shrinkage later. Trim the edges for a clean look. Pop the lined pie into the fridge for 20 minutes to chill and firm up.
Next, line your pie dough with baking paper and add some pastry weights or dried rice to prevent puffing. Blind bake it on a tray for 10 minutes until the edges start to look lightly golden. Remove the weights and paper, wrap foil around the edges to avoid burning, and bake for another 10 minutes until the base and edges are fully golden and crisp. Let it cool completely before moving on. This step took me a couple of tries to get perfect—trust me, don’t hurry it!
Step 4: Prepare the Luscious Filling and Bake
In a large bowl, whisk the caramel until it’s smooth and glossy—this helps prevent lumps and makes the filling silky. Add the eggs and cooking cream, stirring until fully combined. Then fold in the melted cooled chocolate carefully—don’t rush, or you might scramble the eggs. Pour the luscious filling into the cooled pie shell. Once again, wrap foil around the crust edges to keep them from burning because the filling needs a good 35-40 minutes to just set (it still has a little wobble in the middle—that’s perfect!). Remove from the oven and let it cool completely—that wait is the hardest part, but it’s worth every second.
Step 5: Bake and Decorate the Snowflake Cookies
While the pie bakes, roll out your remaining dough on floured baking paper to 3-4mm thick. Use snowflake cookie cutters (or any festive shapes you love) to cut out shapes. Arrange them on baking trays lined with baking paper and chill in the fridge for 30 minutes—this chills the dough to keep the shapes crisp when baked.
Bake the snowflakes for 10-12 minutes until just lightly golden and crisp around the edges. Let them cool on the trays. During this time, whip up your royal icing by mixing the icing with lemon juice, whisking for 3-5 minutes until thick and voluminous. If the icing feels too stiff to pipe, a tiny splash of hot water loosens it up beautifully. Transfer the icing to a piping bag fitted with a small plain nozzle and decorate your snowflakes delicately. Let these little art pieces set for 3-4 hours—it’s magical to see them harden into crisp, snowy decorations.
Finally, whisk any remaining royal icing smooth and use it as edible “glue” to attach your snowflakes on top and around the sides of the pie. This finishing touch completely elevates the pie into a festive masterpiece.
Pro Tips for Making Chocolate Caramel Gingerbread Pie Recipe
- Don’t Rush the Chilling: Let your dough chill as instructed—it keeps the gingerbread from shrinking or cracking during baking.
- Use Foil to Protect Edges: Wrapping foil around the pie crust edges is a game changer—it prevents burning while the filling sets.
- Whisk Caramel Until Smooth: I learned the hard way—if the caramel isn’t fully smooth, the filling can become grainy.
- Let Filling Slightly Wobble: The center should jiggle slightly when done; it firms up beautifully while cooling.
How to Serve Chocolate Caramel Gingerbread Pie Recipe
Garnishes
I usually finish the pie with those beautiful royal icing snowflakes because they’re not only visually stunning but also add a charming sweetness and little crunch. For an extra touch, a dusting of powdered sugar or a few shavings of dark chocolate on top look gorgeous and enhance the flavor.
Side Dishes
This pie pairs wonderfully with a scoop of vanilla bean ice cream or a dollop of freshly whipped cream to balance the richness. A simple cup of coffee or spiced chai tea is also my go-to pairing—it really brings out the spices in the gingerbread.
Creative Ways to Present
For special occasions, I like to serve this pie on a rustic wooden board with an assortment of cinnamon sticks and festive greenery around—it makes the whole dessert table feel cozy and inviting. You can also nestle each slice on a dessert plate with a drizzle of caramel sauce and a sprinkle of crushed gingerbread crumbs for extra texture.
Make Ahead and Storage
Storing Leftovers
I keep leftover pie covered loosely with foil or plastic wrap in the fridge—it stays fresh for up to 3 days. Because of the caramel, the filling is wonderfully moist even after a day or two. Always let it come to room temperature before serving for the best taste and texture.
Freezing
Freezing this pie is doable but I recommend skipping freezing the royal icing snowflakes on top—those are best fresh. Wrap the pie tightly in plastic wrap and then in foil before freezing. When you’re ready, thaw it overnight in the fridge. The gingerbread crust holds up surprisingly well.
Reheating
If you want to warm leftover slices, pop them in a preheated oven at 150°C (300°F) for 8-10 minutes. This refreshes the gooey filling and revives the crust’s crispness without melting the icing decorations if you remove them first.
FAQs
-
Can I use store-bought gingerbread dough for this recipe?
While you could substitute store-bought gingerbread dough, I highly recommend making the dough from scratch for this Chocolate Caramel Gingerbread Pie Recipe. The homemade dough has a deeper spice flavor and better texture that really holds up during baking and pairs beautifully with the caramel chocolate filling.
-
How do I prevent the pie crust edges from burning?
Wrapping foil around the pie crust edges during baking is key. It protects the edges from intense heat while allowing the center to bake fully. I do this twice—once during blind baking and again when baking with the filling—to keep everything perfectly golden.
-
Can I prepare the pie in advance?
Yes! You can make the gingerbread dough and bake the pie shell a day ahead. The pie itself is best assembled and baked on the same day you plan to serve it for the freshest taste. The royal icing snowflakes take 3-4 hours to set, so you can prepare those the day before and store them in an airtight container.
-
What’s the best way to melt chocolate for the filling?
I melt my dark chocolate gently in a heatproof bowl over simmering water (double boiler method), stirring often to avoid overheating. Then, I let it cool slightly before mixing into the caramel mixture—that prevents cooking the eggs prematurely and keeps the filling silky.
-
Can I make this recipe gluten-free?
To make a gluten-free version of this Chocolate Caramel Gingerbread Pie Recipe, use a gluten-free flour blend suitable for baking instead of plain and self-raising flour. Be sure to check your baking powder or bicarb is gluten-free as well. The texture may vary slightly but will still be delicious.
Final Thoughts
Honestly, this Chocolate Caramel Gingerbread Pie Recipe holds a special place in my kitchen and heart. It’s the kind of dessert that gets everyone talking, from the first bite through to the last crumb. The combination of smooth chocolate, buttery caramel, and that perfectly spiced gingerbread crust is nothing short of magic. I can’t recommend it enough if you want to impress your friends or just treat yourself to something truly special. So go on, roll up your sleeves — I promise you’ll love baking and savoring this as much as I do!
Print
Chocolate Caramel Gingerbread Pie Recipe
- Prep Time: 5 hours 20 minutes
- Cook Time: 1 hour 20 minutes
- Total Time: 6 hours 40 minutes
- Yield: 10 servings
- Category: Dessert
- Method: Baking
- Cuisine: Western
Description
This decadent Chocolate Caramel Gingerbread Pie combines a spiced gingerbread crust with a luscious caramel-chocolate filling, topped with delicate royal icing snowflakes for a festive and indulgent dessert perfect for holiday celebrations.
Ingredients
Caramel Chocolate Filling
- 380g can caramel top ‘n’ fill
- 2 eggs
- 185ml (3/4 cup) Bulla Cooking Cream
- 100g dark chocolate, melted, cooled
Royal Icing & Decoration
- 330g pkt royal icing
- 60ml (1/4 cup) fresh lemon juice, strained
Gingerbread Dough
- 100g (1/2 cup, firmly packed) brown sugar
- 125ml (1/2 cup) golden syrup
- 50g butter
- 340g (2 1/4 cups) plain flour
- 75g (1/2 cup) self-raising flour
- 1 1/2 tbsp ground ginger
- 1 1/2 tsp mixed spice
- 1 tsp ground cloves
- 1/2 tsp bicarbonate of soda
- 2 eggs (1 for dough, lightly whisked; 1 for filling)
Instructions
- Prepare Gingerbread Syrup: Place the brown sugar, golden syrup and butter in a saucepan over low heat. Cook, stirring constantly, for 3-5 minutes until butter melts and sugar dissolves. Remove from heat and let cool for 5 minutes.
- Make Gingerbread Dough: In a large bowl, sift together plain flour, self-raising flour, ground ginger, mixed spice, ground cloves, and bicarbonate of soda. Add the cooled sugar syrup mixture and one lightly whisked egg. Stir until dough forms, then turn onto a lightly floured surface and knead until smooth. Divide into two discs, cover, and refrigerate for 1 hour.
- Preheat Oven and Prepare Pie Crust: Preheat oven to 170°C (150°C fan forced). Grease a 23cm pie dish. Roll out one dough disc on floured baking paper to 3-4mm thickness. Flip dough onto rolling pin and transfer to pie dish, gently pressing to line the dish without stretching. Trim excess edges and chill in fridge for 20 minutes.
- Blind Bake Pie Shell: Place pie dish on baking tray. Line crust with baking paper and fill with pastry weights or rice. Bake for 10 minutes until lightly golden. Remove weights and paper, wrap foil around edges to prevent burning, and bake an additional 10 minutes until crust is golden. Cool completely.
- Make Caramel Chocolate Filling: In a large bowl, whisk caramel until smooth. Add 2 eggs and cooking cream, whisk to combine. Add melted and cooled dark chocolate and whisk until smooth. Pour filling into cooled pie crust. Wrap foil around edges again and bake for 35-40 minutes until filling is just set. Cool completely.
- Prepare and Bake Snowflake Decorations: Roll remaining dough on floured baking paper to 3-4mm thick. Using assorted snowflake cookie cutters, cut shapes and place on lined baking trays. Chill in fridge for 30 minutes. Bake for 10-12 minutes until lightly golden and crisp. Cool on trays.
- Prepare Royal Icing for Decoration: In a large bowl, combine royal icing mix and lemon juice. Whisk for 3-5 minutes until thick and voluminous. If too thick to pipe, add a little hot water and whisk again to loosen. Transfer to piping bag with 1-2mm plain nozzle. Pipe icing onto cooled snowflakes to decorate. Cover remaining icing with plastic wrap to prevent drying. Allow snowflakes to set for 3-4 hours.
- Assemble the Pie: Whisk remaining royal icing until smooth and use it to secure the decorated snowflakes around the cooled pie, creating a beautiful snowy finish.
Notes
- Allow sufficient chilling time for dough to ensure ease of rolling and shaping.
- Wrap foil around pie crust edges during baking to prevent over-browning.
- The pie should be cooled completely before decorating with royal icing to ensure decorations set properly.
- Use a piping bag with a fine nozzle for delicate snowflake detailing with royal icing.
- Store pie in a cool place and consume within 2 days for best texture and flavor.
Nutrition
- Serving Size: 1 slice (based on 10 slices)
- Calories: 410
- Sugar: 30g
- Sodium: 160mg
- Fat: 22g
- Saturated Fat: 13g
- Unsaturated Fat: 7g
- Trans Fat: 0.2g
- Carbohydrates: 48g
- Fiber: 2g
- Protein: 5g
- Cholesterol: 85mg


