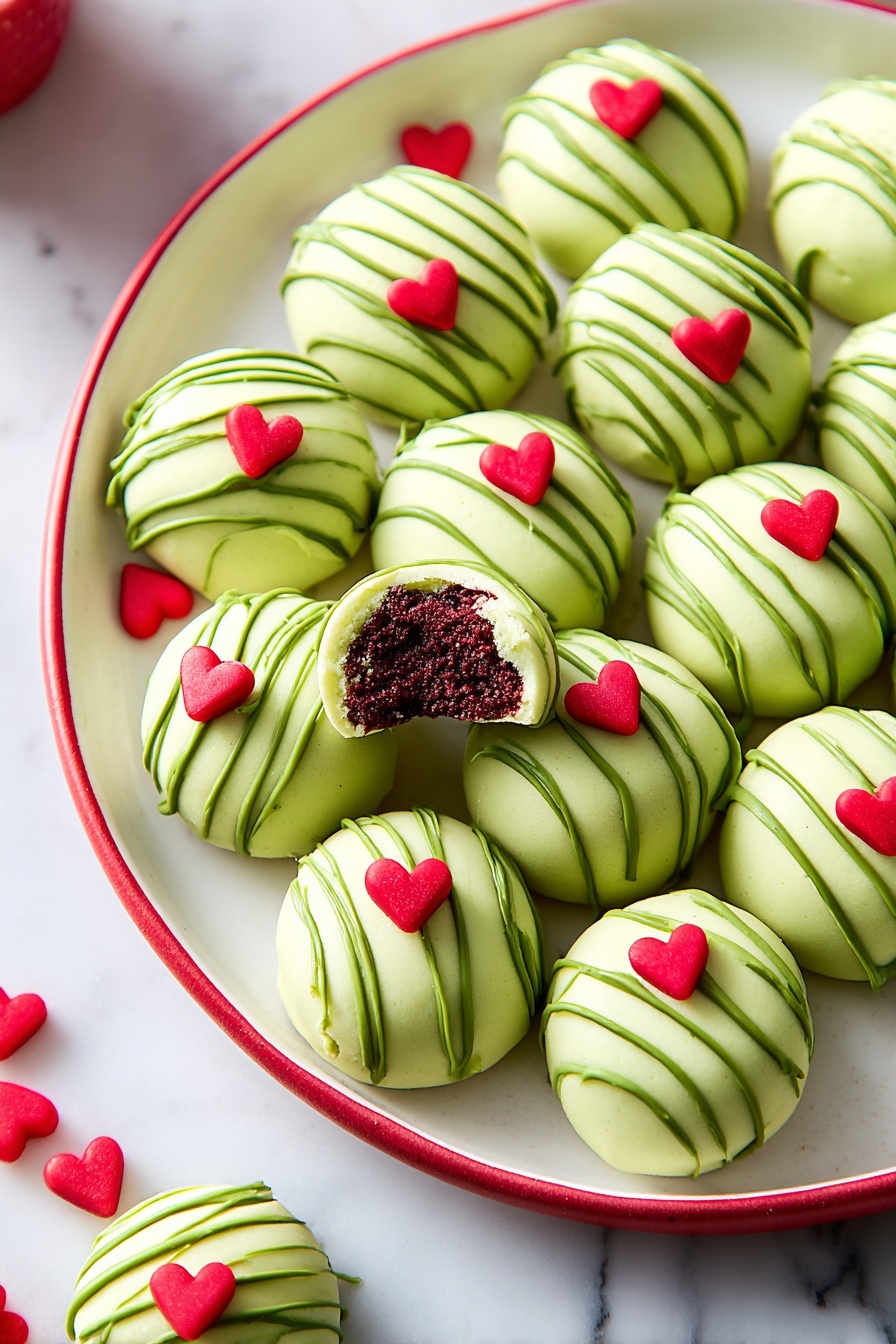
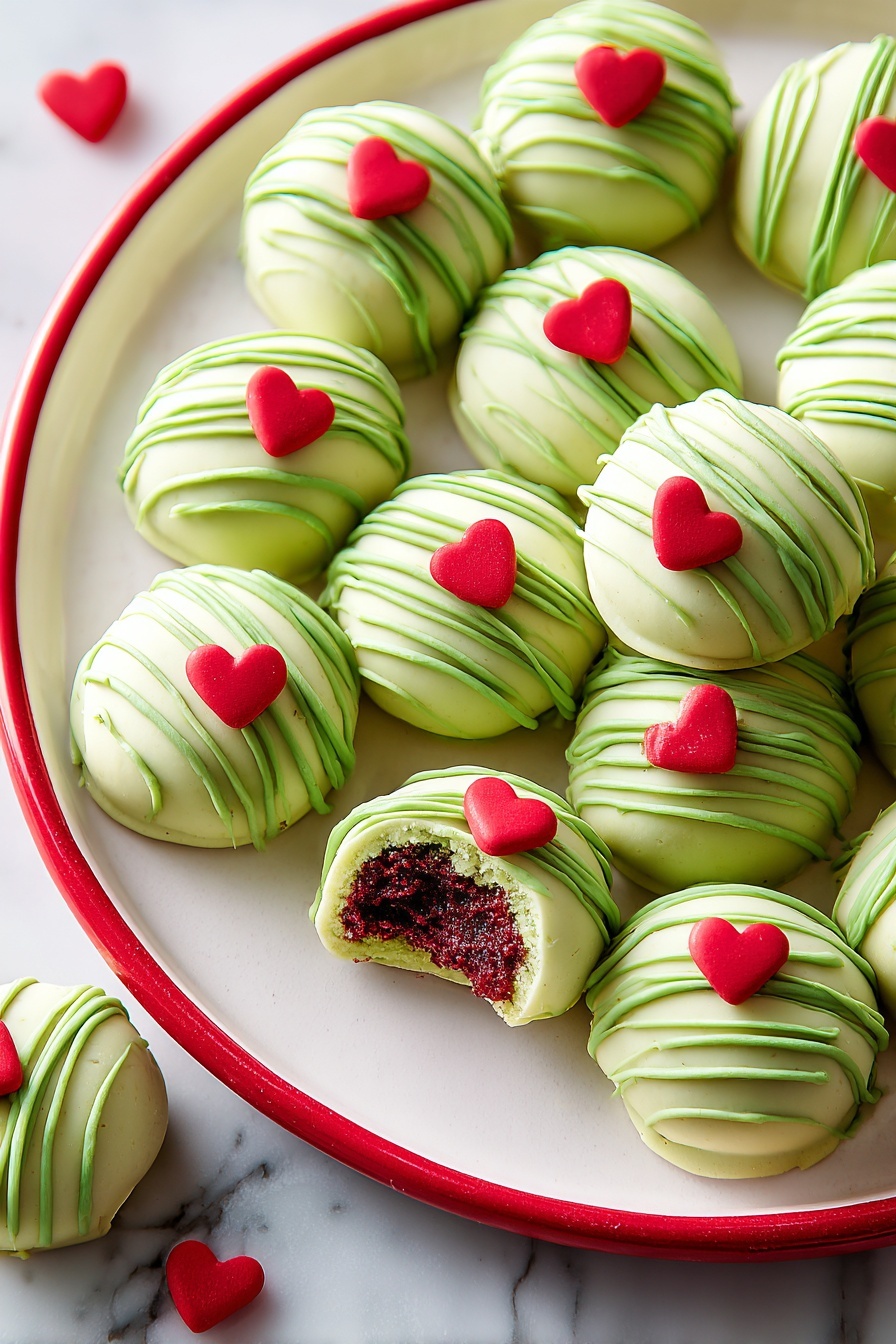
If you’re looking for a festive, bite-sized treat that screams holiday cheer, then you’re in the right spot! I absolutely love this Grinchy Red Velvet Cake Bites Recipe because it combines the rich decadence of red velvet with a fun, chocolaty twist that’s perfect for Christmas parties or cozy nights in. Trust me, once you try these cute little cake bites, you’ll want to make them every holiday season!
Why You’ll Love This Recipe
- No-bake simplicity: It’s incredibly easy — no oven required, which means less stress and more fun.
- Perfect festive colors: The vibrant green and red details bring that Grinchy holiday vibe that everyone loves.
- Crowd-pleasing flavor: The creamy cheesecake and red velvet cookie combo is an unbeatable duo.
- Great make-ahead treat: You can prepare them well in advance for easy stress-free entertaining.

Ingredients You’ll Need
Each ingredient in this Grinchy Red Velvet Cake Bites Recipe works together to create that perfect balance of creamy, chocolaty, and festive flavors. When shopping, look for quality cream cheese and white chocolate chips to get that smooth, rich texture. Also, chip selection matters — red velvet cookies lay the tasty foundation here!
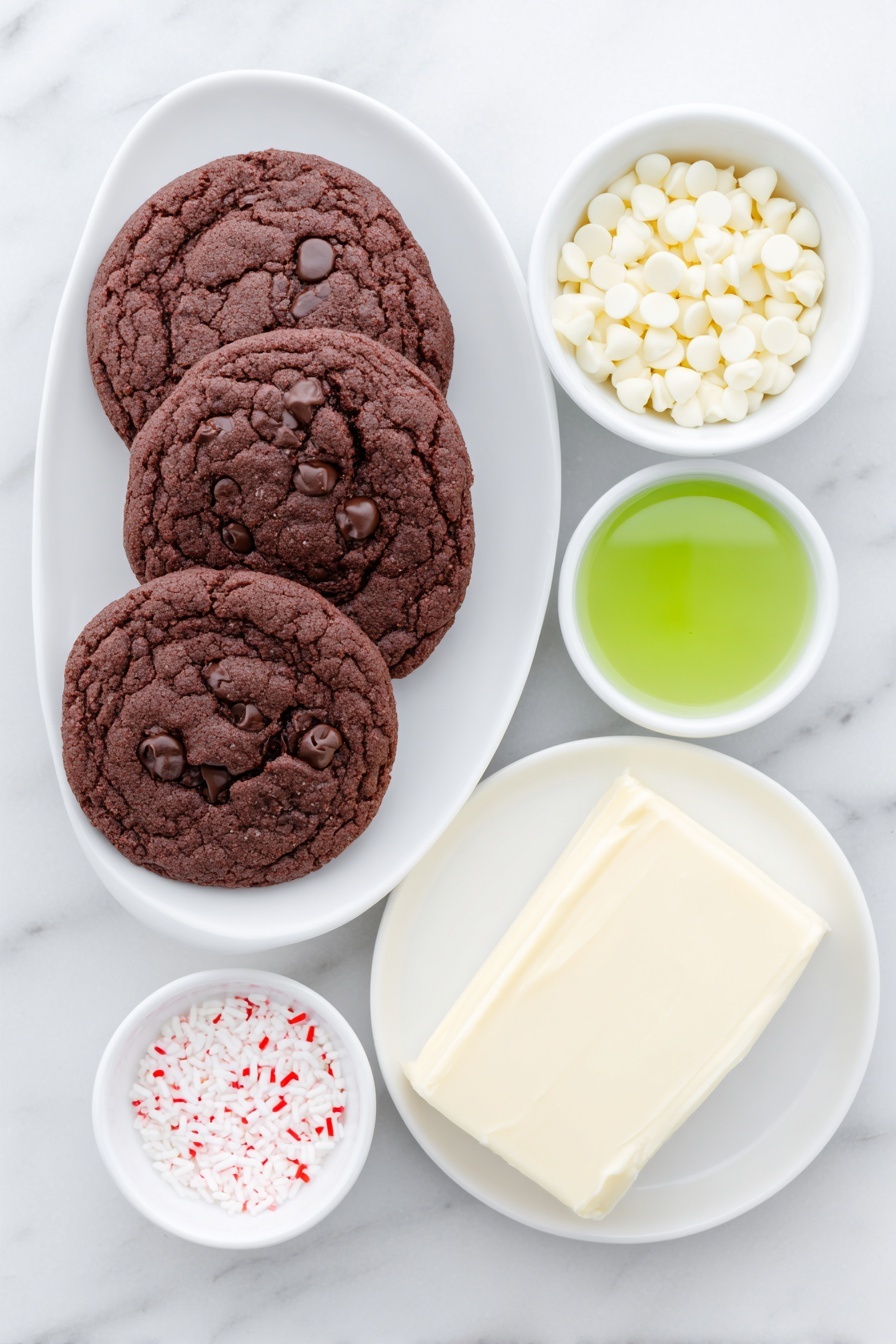
- Chips Ahoy Chewy Red Velvet Cookies: These give you that deep red velvet flavor and chewy texture without extra baking.
- Cream Cheese: Make sure it’s room temperature for easy mixing and a velvety bite.
- White Chocolate Chips: Divided use here — for coating and drizzling, choose good-quality chips that melt smoothly.
- Green Food Coloring Gel: Gel works better than liquid to keep chocolate consistency perfect.
- Red Heart Sprinkles: Fun, festive little decorations to top off your Grinchy bite masterpieces.
Variations
I love tweaking this Grinchy Red Velvet Cake Bites Recipe depending on the occasion, and you should definitely make it your own, too! Feel free to play around with the flavors or decorations to fit your style or dietary needs.
- Chocolate Lovers’ Twist: Swap out some of the white chocolate coating for dark chocolate — I tried this once, and the bittersweet contrast was divine.
- Dairy-Free Version: Use plant-based cream cheese and dairy-free white chocolate chips to keep it festive and allergy-friendly.
- Seasonal Decorations: Instead of heart sprinkles, use mini candy canes or edible glitter for a wintery sparkle.
- Mini Bites: Roll smaller balls for bite-sized nibbles — perfect for party platters and little fingers.
How to Make Grinchy Red Velvet Cake Bites Recipe
Step 1: Crumble Cookies Into Fine Crumbs
Start by lining a baking sheet with parchment paper and setting a wire rack on top — this little setup is key for easy chocolate coating later. Then pop those red velvet cookies into your food processor and pulse until you get fine crumbs. This is the base of our cake bites, so don’t skip this step! If you don’t have a processor, just crush them in a sealed bag with a rolling pin – it works if you’re patient.
Step 2: Blend Cookies and Cream Cheese
Using the paddle attachment on your stand mixer, beat the room temperature cream cheese on medium-high speed until it’s super smooth and creamy. I’ve found that this step makes the biggest texture difference — a lumpy mix just won’t give you the silky cake bites you’re aiming for. Next, add your cookie crumbs and beat everything together until fully combined. It should form a dough-like mixture ready to be scooped.
Step 3: Shape and Chill Your Bites
Use a 1-tablespoon scoop or measuring spoon to portion out the dough. Roll each portion into smooth 1 ½-inch balls and place them evenly spaced on the wire rack. Pop the whole tray into the fridge and let them chill for about 2 hours — this step solidifies the bites, making dipping easier.
Step 4: Melt and Color the White Chocolate
Set up a double boiler by simmering a pot of water with a heatproof bowl resting on top — just make sure the bottom of the bowl doesn’t touch the water. Melt two of the three white chocolate chip packages, stirring until smooth. Then, add a drop of green gel food coloring and stir well. Add more drops until you get that perfect Grinchy green. This took me a couple tries, so don’t be shy about adding color gradually!
Step 5: Dip Cake Bites and Chill Again
Using a fork, carefully dip each chilled cake ball into the melted green chocolate, letting excess drip off before placing it back onto the wire rack. If your coating feels too thin, a second dip after the first sets can give you a nice thick shell. Refrigerate again for about 30 minutes to firm up. This chilling step helps make the coating crisp and less messy!
Step 6: Drizzle With Striped Green Chocolate and Decorate
Wipe out the bowl and melt the reserved white chocolate chips in your double boiler. Add green food coloring again but this time, add a tablespoon of hot water at a time to loosen chocolate for drizzling consistency. Pour into a piping or plastic bag and snip the tip. Drizzle the green chocolate stripes over the coated bites and immediately top with red heart sprinkles before it sets. This final touch adds such festive pizzazz and a nice texture contrast!
Pro Tips for Making Grinchy Red Velvet Cake Bites Recipe
- Room Temperature Cream Cheese: Let it sit out for at least 30 minutes for smoother mixing and no lumps.
- Gradual Food Coloring: Adding the gel a drop at a time helps avoid over-coloring and keeps your chocolate texture perfect.
- Wire Rack for Dipping: Use a wire rack over parchment to catch drips and make cleanup a breeze.
- Avoid Overheating Chocolate: Melt chocolate gently over simmering water to prevent it from seizing or burning.
How to Serve Grinchy Red Velvet Cake Bites Recipe
Garnishes
I always stick to the red heart sprinkles because they add a delightful pop of color and a tiny crunch that feels just right. Sometimes, I mix in edible gold dust or tiny silver balls for an extra festive sparkle. It’s such an easy way to elevate your presentation and impress guests!
Side Dishes
These bites are pretty sweet and rich on their own, so I like pairing them with some light, refreshing options like sparkling water with lime or a simple cup of hot cocoa — the kind you can sip slowly between bites. They also go surprisingly well with a fruity salad or fresh berries if you want to balance sweetness.
Creative Ways to Present
For Christmas parties, I’ve arranged them on green and red tiered platters to showcase their festive vibe. Another fun idea: place each cake bite inside mini cupcake liners with tiny candy canes sticking out for a playful “grinchy” look. I even wrapped a few in clear cellophane bags tied with red ribbons as adorable gifts for neighbors.
Make Ahead and Storage
Storing Leftovers
I keep any leftovers in an airtight container in the fridge, where they stay fresh for up to 5 days. Make sure they’re fully chilled before sealing the container to avoid melting the coating. When I did this, the textures stayed perfect — creamy inside with a crisp outer shell!
Freezing
Freezing is a great option if you want to make these cake bites well ahead of time. I individually wrap each ball in plastic wrap, then place them all in a freezer-safe container. They freeze beautifully for up to 2 months. When I’ve done this, there was practically no change in texture upon thawing — just let them defrost overnight in the fridge.
Reheating
You don’t really have to reheat these since they’re delicious chilled. But if you prefer them a bit softer, let them come to room temperature for about 15-20 minutes before serving. Heating the chocolate coating is a no-go though; it can get sticky and lose that pretty shine.
FAQs
-
Can I use regular red velvet cake instead of cookies?
Absolutely! If you don’t have red velvet cookies, feel free to crumble red velvet cake (even day-old cake works great) into crumbs. Just make sure it’s finely ground and not too moist — otherwise, the mixture might be too soft to roll into balls.
-
What’s the best way to melt white chocolate without ruining it?
The double boiler method is my go-to—it gently melts chocolate using steam heat, which prevents burning. Stir frequently and remove from heat as soon as it’s smooth. Avoid microwaving directly; it can overheat quickly and seize.
-
Can I use a different color of food coloring?
Definitely! While green is traditional for the Grinch theme, you can pick any color to match your event or mood. Just be sure to use gel coloring to keep the chocolate consistency just right.
-
How do I prevent the chocolate from cracking after dipping?
Make sure your cake bites are fully chilled before dipping, and allow the coating to set in the fridge slowly. Avoid sudden temperature changes and resist poking or bending the coating until it’s hardened for a glossy, crack-free finish.
Final Thoughts
This Grinchy Red Velvet Cake Bites Recipe has quickly become one of my go-to festive treats because it’s fun, colorful, and absolutely delicious. What I love most is how easy it is to make without compromising that wow factor — trust me, your family and friends will go crazy for these. So next time you want to spread some holiday cheer without the fuss, give this recipe a try. I promise, you’ll be glad you did!
Print
Grinchy Red Velvet Cake Bites Recipe
- Prep Time: 10 minutes
- Cook Time: 10 minutes
- Total Time: 3 hours
- Yield: 36 cake bites
- Category: Dessert
- Method: No-Cook
- Cuisine: American
Description
These Grinchy Christmas Cake Bites are festive, bite-sized treats made by combining red velvet cookie crumbs with cream cheese, coated in green-colored white chocolate, and decorated with red heart sprinkles. Perfect for holiday parties, these no-bake delights look charming and taste delicious with a creamy, sweet, and festive twist.
Ingredients
Base Mixture
- 3 (9.6-oz.) packages Chips Ahoy Chewy Red Velvet cookies
- 1 (8-oz.) package cream cheese, room temperature
White Chocolate Coating
- 3 (12-oz.) packages white chocolate chips, divided
- Green food coloring gel
Decoration
- Red heart sprinkles, for decorating
Instructions
- Prepare Parchment and Process Cookies: Place a wire rack on a parchment-lined baking sheet. In a food processor, pulse the Chips Ahoy Chewy Red Velvet cookies until fine crumbs form, ensuring a smooth base mixture.
- Mix Cream Cheese and Crumbs: In the bowl of a stand mixer fitted with the paddle attachment, beat the room temperature cream cheese on medium-high speed until smooth and creamy. Add the cookie crumbs and continue beating until fully combined to form the dough.
- Shape Cake Bites: Using a 1-tablespoon measuring spoon, scoop out the dough and roll into balls about 1 1/2 inches in diameter. Arrange the balls on the prepared wire rack and refrigerate until firm and cold, about 2 hours.
- Melt First Portion of White Chocolate: Set a medium heatproof bowl over a pot of barely simmering water, making sure the bowl doesn’t touch the water. Reserve one package of white chocolate chips. Place the remaining two packages in the bowl and melt, stirring constantly until smooth, about 2 minutes. Remove from heat.
- Add Green Food Coloring to Chocolate: Add one drop of green food coloring gel to the melted white chocolate and stir. Add more drops as needed to achieve the desired vibrant green color.
- Dip Cake Bites in Green Chocolate: Using a fork, dip each chilled cake ball into the green chocolate, letting the excess drip off. Return the coated balls to the wire rack. If desired, apply a second coat of chocolate for a thicker layer. Refrigerate the coated balls until chocolate is set, about 30 minutes. Wipe out the bowl and retain the double boiler setup for the drizzle.
- Melt Remaining White Chocolate: Using the double boiler setup, melt the reserved 12 ounces of white chocolate chips, stirring until smooth and fully melted, about 2 minutes. Remove from heat.
- Add Green Food Coloring and Adjust Consistency: Add one drop of green food coloring gel and stir to color the chocolate. If the chocolate is too thick for drizzling, add hot water from the pot 1 tablespoon at a time, stirring vigorously after each addition until the chocolate reaches a smooth drizzling consistency.
- Drizzle Chocolate and Decorate: Transfer the green drizzle chocolate to a plastic or piping bag, snip off the tip, and drizzle over the chilled cake bites to create festive stripes. Immediately top each cake bite with a red heart sprinkle before the drizzle sets.
Notes
- Ensure the cream cheese is at room temperature for easier mixing and smoother texture.
- When melting chocolate, be careful not to let water get into the bowl as it can cause the chocolate to seize.
- You can refrigerate the cake bites for longer storage; bring to room temperature before serving for best taste.
- Use gel food coloring for vibrant colors without altering the chocolate’s consistency.
- For a quicker set time, place the coated cake bites in the freezer for 15 minutes instead of the refrigerator.
Nutrition
- Serving Size: 1 cake bite
- Calories: 150
- Sugar: 14g
- Sodium: 70mg
- Fat: 9g
- Saturated Fat: 5g
- Unsaturated Fat: 3g
- Trans Fat: 0g
- Carbohydrates: 17g
- Fiber: 1g
- Protein: 2g
- Cholesterol: 15mg


