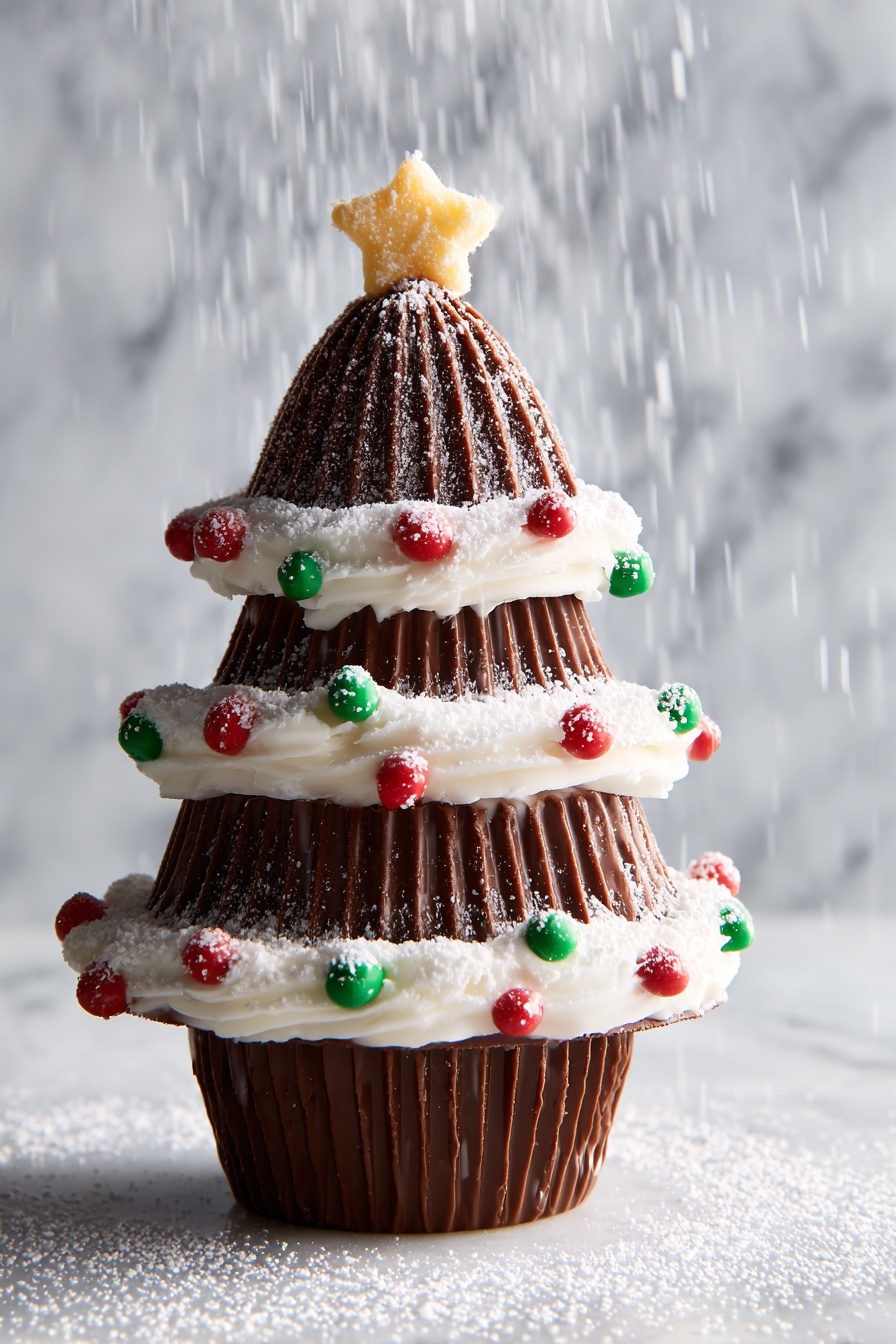
If you’ve been hunting for a festive, utterly charming Christmas treat that’s both quick and ridiculously cute, I’ve got just the thing for you—my Reese’s Tree Christmas Candy Recipe. I absolutely love how these stacked Reese’s Trees come together with just a handful of ingredients and no baking required, making them my go-to holiday candy project when time’s tight but the sweet tooth is mighty. Stick around, because I’ll share all my best tips so you’ll nail every single one, and trust me, your family (and friends) will go crazy for these edible Christmas trees!
Why You’ll Love This Recipe
- No Bake & Quick: You can have these adorable trees ready in under 15 minutes without even turning on the oven.
- Minimal Ingredients: Using classic Reese’s components makes this a simple, crowd-pleasing delight.
- Customizable Decorations: You get to pipe your own icing garlands and add sprinkles or stars, which feels so festive and fun.
- Perfect for Gift-Giving: These little trees double as thoughtful homemade gifts that’ll wow without any fuss.

Ingredients You’ll Need
I love how this recipe leans on trusty classic candies. The combination of mini and regular Reese’s cups plus Hershey’s kisses stacks up perfectly (literally!) and makes building the trees a breeze. Plus, the icing and sprinkles add that magical Christmas touch you just can’t beat.
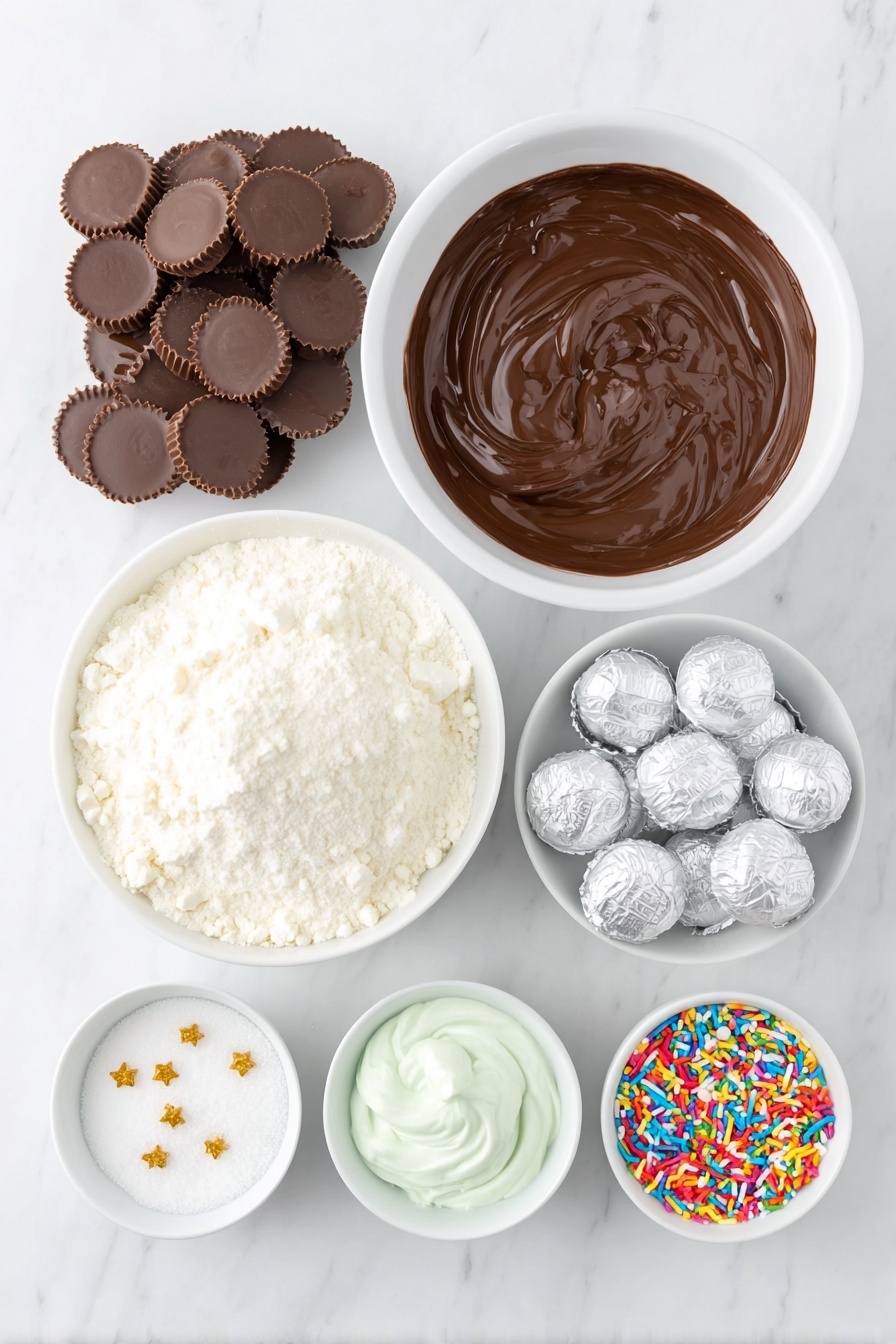
- Chocolate Chips: Use good-quality semi-sweet chocolate chips to melt; they act as the glue holding your tree layers.
- Mini Reese’s Cups: These are your base and top layers. I find the mini size perfect for delicate stacking.
- Regular Reese’s Cups: The mid-layer that gives the tree its shape—make sure they’re fresh and unwrapped carefully.
- Hershey’s Kisses: These crown the top like a star and add a sweet finishing touch.
- White and Green Decorating Icing: I prefer piping consistency icing here for easy garlands and stars.
- Sprinkles and Gold Stars: Optional but highly recommended for that festive sparkle!
- Confectioners’ Sugar: Just a dusting mimics snow and takes your Reese’s Tree Christmas Candy Recipe to the next level.
Variations
I love mixing things up with this Reese’s Tree Christmas Candy Recipe depending on my mood or the crowd. It’s great for playing around because you can shift decorations or even swap candies to make it your own.
- Nut-Free Option: I sometimes substitute the Hershey’s kisses for plain chocolate chips if I need to keep things nut-free, and it still tastes amazing.
- Extra Colorful: When I’m feeling extra, I swap out sprinkles for mini candy pearls or edible glitter—I’m telling you, it makes the trees party-ready!
- Peanut Butter Lovers: Adding a tiny dab of peanut butter between layers amps up that Reese’s flavor and makes for an addictive twist.
- Chocolate Lovers: Swap the Hershey’s Kiss for a small chocolate truffle or a dollop of ganache for a decadent upgrade I discovered recently.
How to Make Reese’s Tree Christmas Candy Recipe
Step 1: Melt the Chocolate and Prep Your Layers
Start by gently melting your chocolate chips—microwave in 20-second bursts and stir in between until smooth. This melted chocolate is your edible glue, so be sure not to overheat it or it can seize up. While that’s going, unwrap all your Reese’s cups and Hershey’s kisses. Having everything ready makes assembly so much faster and easier.
Step 2: Build Your Reese’s Trees
Place a small dab of melted chocolate on the bottom of a mini Reese’s cup to create a sticky base. Then, take a regular-size Reese’s cup and place it upside down right on top. Add another little drop of melted chocolate on top of this cup, and carefully place another mini Reese’s cup (this one upside down!) on top. Finally, add a last dab of melted chocolate and top everything off with a Hershey’s kiss. I like to press gently so it feels firm but don’t squish the chocolate cups; you want each layer to stack neatly without smudging the chocolate.
Step 3: Decorate Your Candy Trees
This is the fun part! Use your white and green decorating icing to pipe festive garlands around the trees. Think of it like wrapping them in icing tinsel. Sprinkle on your festive sprinkles generously, then add a bit of icing on top of each Hershey’s kiss and stick on those cute little gold stars. This step truly brings your Reese’s Tree Christmas Candy Recipe to life—it’s like frosting the perfect little sugar Christmas tree, and it never fails to make me smile.
Step 4: Optional Snowy Finish
If you want to add a winter wonderland vibe, lightly dust your trees with confectioners’ sugar right before serving. It adds that gentle “snow” touch that makes these Reese’s Trees feel extra festive and cozy.
Pro Tips for Making Reese’s Tree Christmas Candy Recipe
- Keep Chocolate Smooth: Stir your chocolate between microwave bursts to avoid overheating and get that perfect glue consistency.
- Stack with Care: Be patient and gentle when layering so the candy cups don’t crack or break, keeping your trees looking pristine.
- Pipe Icing Slowly: I found taking your time on the garlands makes decorating look more polished and festive.
- Avoid Melting Mishaps: Chill assembled trees briefly if your hands get warm while decorating to keep the chocolate firm.
How to Serve Reese’s Tree Christmas Candy Recipe

Garnishes
I usually stick with the gold star on top of the Hershey’s kiss because it looks so festive and perfect, but adding edible glitter or tiny pearl sprinkles really ups the wow factor. Sometimes, I even use tiny candy cane pieces or crushed peppermint around the base for an extra Christmas crunch—those little details make your presentation pop!
Side Dishes
When I serve these Reese’s Trees at holiday gatherings, I like to pair them with hot cocoa or a peppermint mocha. The warm drinks match the rich chocolate and peanut butter flavors perfectly. Also, a simple cheese board or fresh fruit won’t compete with the sweetness and helps balance the plate.
Creative Ways to Present
One of my favorite presentation ideas is arranging these trees on a festive platter lined with evergreen sprigs or cinnamon sticks, creating a miniature winter forest vibe. Another time, I packaged them individually in clear treat bags tied with red ribbon—such a charming homemade gift! You can even skew them on lollipop sticks for an easy-to-handle party treat.
Make Ahead and Storage
Storing Leftovers
I store leftovers in an airtight container at room temperature, keeping them away from heat or direct sunlight to prevent melting. They stay fresh and tasty for about a week, though fair warning: they rarely stick around that long in my house!
Freezing
I’ve tried freezing these once or twice, and while it’s possible, I noticed the chocolate can lose a bit of its shine and the icing decoration may crack upon thawing. If you want to freeze, I recommend wrapping each tree tightly in plastic wrap and then placing them in a freezer bag to minimize moisture. Thaw overnight in the fridge before serving for best results.
Reheating
This recipe is best served cold or at room temperature, so reheating isn’t usually needed. If you want to revive some softness for the chocolate, just let them sit at room temp for 15-20 minutes. I avoid any heat source because the candies can become greasy or the decorations can melt.
FAQs
-
Can I make Reese’s Tree Christmas Candy Recipe ahead of time?
Absolutely! You can prepare and assemble the trees a day or two ahead. Just store them in an airtight container at room temperature and decorate as soon as you’re ready to serve or gift.
-
What if I can’t find mini Reese’s cups?
No worries! You can substitute with another small peanut butter cup or even use chopped peanut butter candies for the bases and tops, though it may change the look slightly.
-
How do I prevent the layers from sliding?
Use enough melted chocolate “glue” between each layer and allow it to set briefly before stacking the next piece. Keeping your hands cool while assembling also helps keep the chocolate firm.
-
Can I make the garlands without piping icing?
Yes! If you don’t have a piping bag, you can use a zip-top bag with a tiny corner snipped off or even use a toothpick to apply small dots of icing for decoration instead.
Final Thoughts
This Reese’s Tree Christmas Candy Recipe has become a staple in my holiday tradition—not just because it’s simple and scrumptious, but because it brings such a playful, joyful vibe to any gathering. I love how it doubles as a gift and a dessert, and the smiles from friends and family make all the effort worth it. Give it a try this season—I promise you’ll find making (and eating) these little chocolate peanut butter trees as delightful as I do. Happy holidays and happy stacking!
Print
Reese’s Tree Christmas Candy Recipe
- Prep Time: 10 mins
- Cook Time: 0 mins
- Total Time: 10 mins
- Yield: 24 trees
- Category: Dessert
- Method: No-Cook
- Cuisine: American
Description
These delightful Reese’s Trees are a fun and festive no-bake treat perfect for holiday celebrations. Made by stacking various Reese’s peanut butter cups and Hershey’s Kisses with melted chocolate, then decorated with icing, sprinkles, and gold stars, they resemble miniature Christmas trees that are both delicious and visually charming.
Ingredients
Chocolate Base
- 1/2 cup chocolate chips, melted
Tree Components
- 24 mini Reese’s peanut butter cups
- 12 Reese’s peanut butter cups (regular size)
- 12 Hershey’s Kisses
Decoration
- White and green decorating icing
- Sprinkles
- Gold stars (for decorating)
- Confectioners’ sugar (optional, for dusting)
Instructions
- Assemble the Base Layers: Place a small amount of melted chocolate on the bottom of a mini Reese’s peanut butter cup to act as glue. Arrange a regular-size Reese’s peanut butter cup upside down on top of it, then add another small drop of melted chocolate on this larger cup.
- Add the Middle Layer: Place another mini Reese’s peanut butter cup upside down on top of the regular Reese’s cup. Dab more melted chocolate on top of the mini cup to secure the next piece.
- Top with Hershey’s Kiss: Place a Hershey’s Kiss on top of the last mini Reese’s cup, pressing gently to adhere with the melted chocolate, completing the tree shape.
- Decorate the Trees: Use white and green decorating icing to pipe garlands around the assembled tree. Sprinkle colorful sprinkles over the icing to add festive flair. Pipe some frosting on top of the Hershey’s Kiss and place a gold star to crown each tree.
- Optional Snow Effect: Lightly dust with confectioners’ sugar to mimic snow on the trees, enhancing the holiday look.
Notes
- Ensure the chocolate chips are fully melted and slightly cooled before assembling to avoid melting the candy cups.
- For easier handling, assemble the trees on a parchment-lined tray.
- Store the completed trees in an airtight container at room temperature or in the refrigerator to keep them firm.
- Can be made a day ahead to allow decorations to fully set.
Nutrition
- Serving Size: 1 tree
- Calories: 150
- Sugar: 14g
- Sodium: 55mg
- Fat: 9g
- Saturated Fat: 4.5g
- Unsaturated Fat: 3.5g
- Trans Fat: 0g
- Carbohydrates: 17g
- Fiber: 1g
- Protein: 2g
- Cholesterol: 5mg


