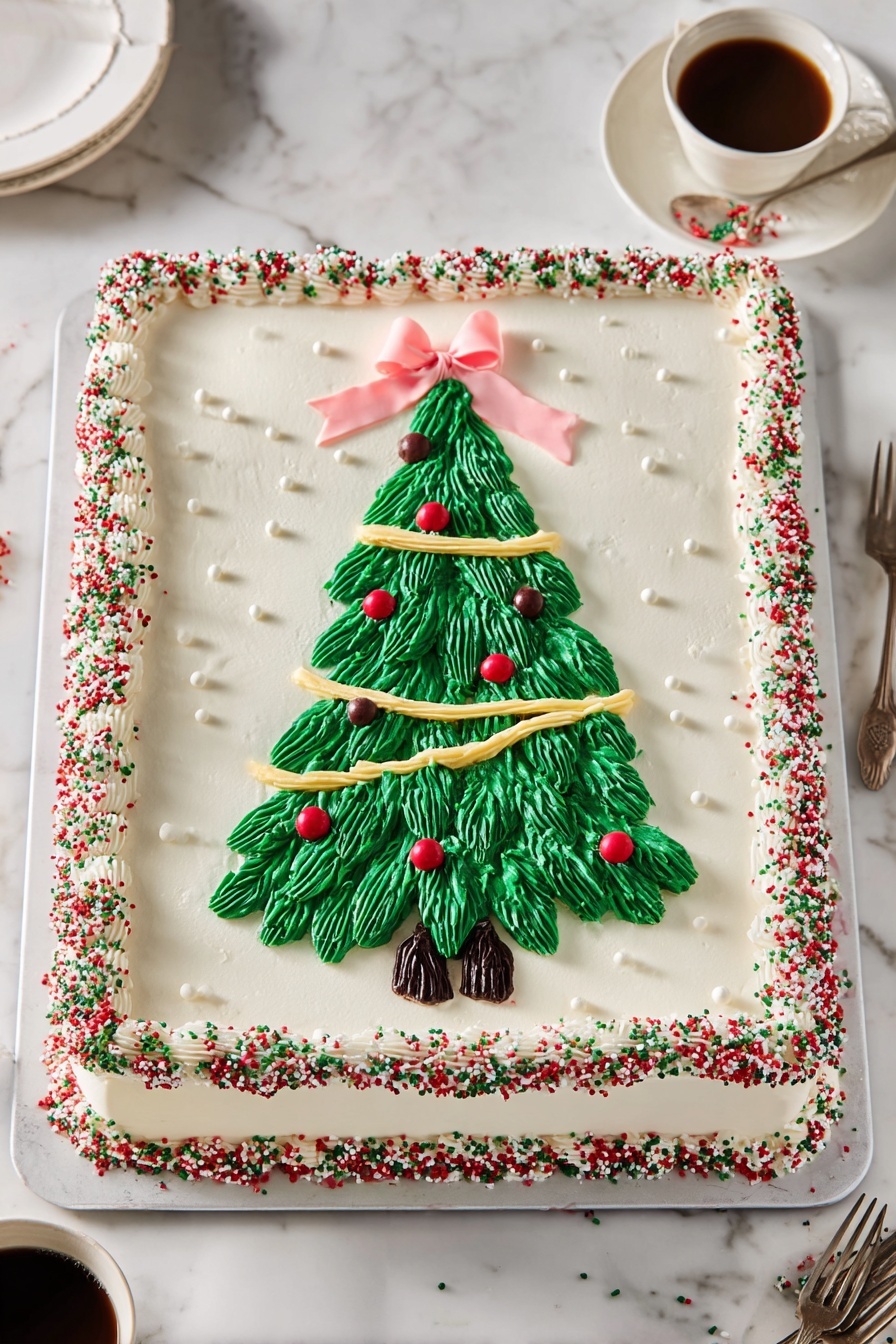
There’s something truly magical about a dessert that’s as colorful as it is delicious, especially when it’s made to celebrate the holidays. If you’re looking for a crowd-pleaser that’s easy to share and absolutely delightful, I’ve got you covered with this Festive Christmas Sheet Cake with Green Frosting Recipe. It’s one of those recipes I love pulling out every year—because it’s not only gorgeous, but also incredibly moist with a fun burst of holiday sprinkles and that vibrant green frosting that everyone raves about.
Why You’ll Love This Recipe
- Big Flavor with Simple Ingredients: The combination of buttermilk and buttercream frosting makes this cake moist and flavorful without a lot of fuss.
- Fun & Festive Look: The green frosting, colorful sprinkles, and candy decorations give it the perfect holiday vibe that guests instantly adore.
- Easy to Make in Large Batches: Sheet cakes are my go-to when I need to feed a crowd, and this one slides effortlessly out of the pan every time.
- Great for Making Ahead: You can bake the cake in advance, freeze it, or make the frosting ahead—ideal for holiday prepping stress relief.

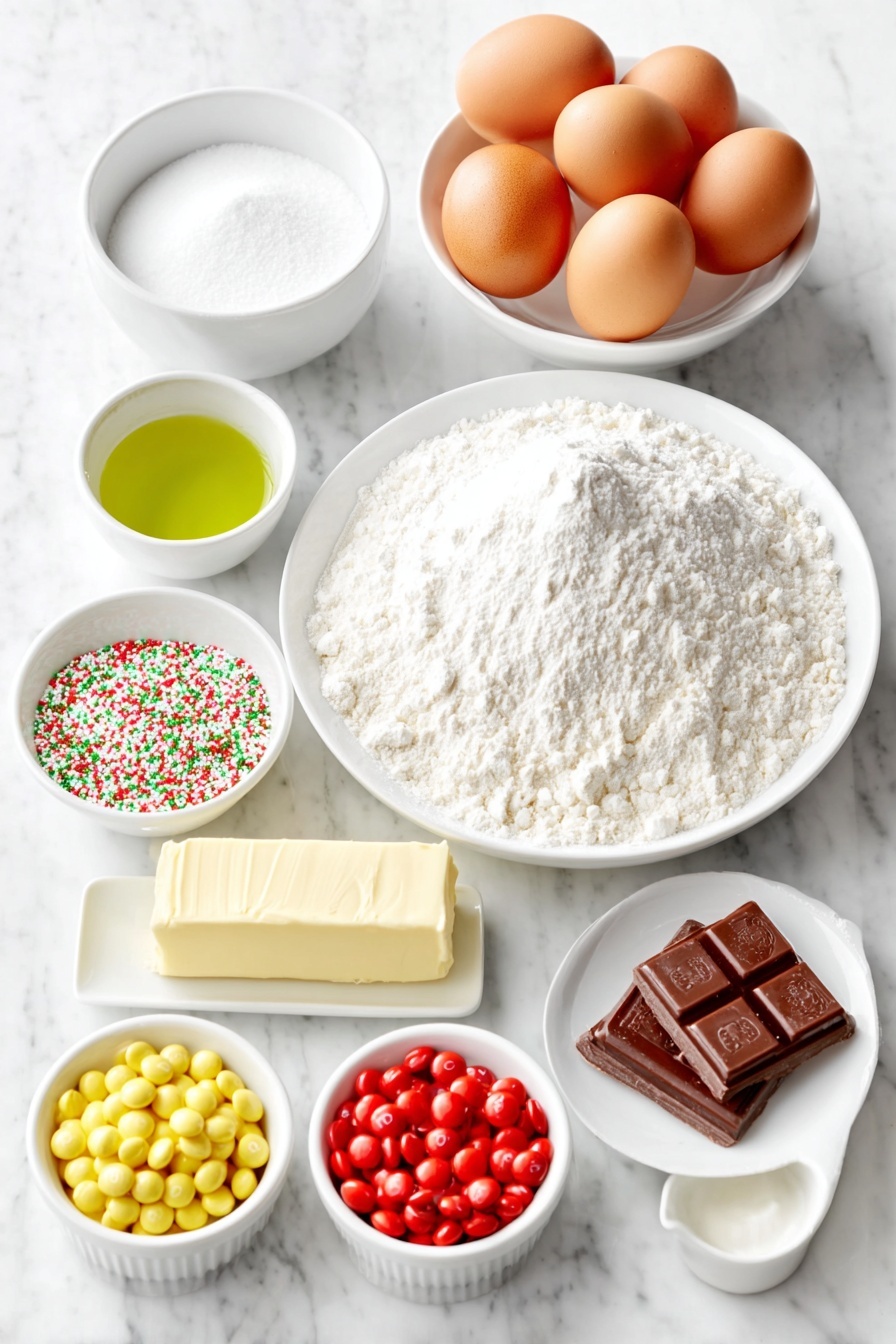
Ingredients You’ll Need
Each ingredient here plays a role in crafting that perfect balance of cake texture and frosting flavor. I always recommend using good quality vanilla and fresh eggs—trust me, you’ll notice the difference in the final taste. And don’t swap out the buttermilk unless you’re ready to experiment; it’s what keeps the crumb so tender!
- All-purpose flour: The base for a sturdy yet soft cake crumb; I like to sift it so it’s light and fluffy.
- Baking powder and baking soda: These give the cake the right lift and a smooth crumb.
- Kosher salt: It brightens all the flavors, so don’t skip it.
- Granulated sugar: For sweetness and that classic cake texture.
- Eggs: I make sure they’re at room temperature—they mix better for a smoother batter.
- Vegetable oil: Keeps the cake moist without a strong flavor.
- Vanilla extract: Pure vanilla is a game-changer in this simple cake.
- Buttermilk: This gives the cake a tender crumb and slight tang, making it irresistible.
- Holiday sprinkles (red, green, white): Add festive crunch and color inside the batter.
- Salted butter: The foundation of the rich frosting—softened is key for easy whipping.
- Powdered sugar: For that smooth, sweet frosting texture.
- Milk: Helps achieve the perfect frosting consistency.
- Forest green gel food coloring: Creates that iconic Christmas tree green you want for decorating.
- Blue gel food coloring (optional): Just a drop or two deepens the green to a richer hue.
- Mini candy-coated chocolates (brown, yellow, red): Perfect tiny decorations for the tree trunk, lights, and ornaments.
- Red sour candy belt: For that cute bow topper adding a fun sugary twist.
Variations
One of the things I love most about this Festive Christmas Sheet Cake with Green Frosting Recipe is how adaptable it is. Over the years, I’ve tried a few tweaks to keep things fresh while still capturing that classic holiday spirit. Feel free to make this your own!
- Gluten-Free Version: I once swapped in a gluten-free blend and added a little xanthan gum to hold it together. It was a hit, especially with friends who need to avoid gluten.
- Vegan Adaptation: You can substitute non-dairy milk (with a splash of apple cider vinegar for acidity) and a flax egg, and use vegan butter for the frosting—just keep in mind the texture will be slightly different but still tasty!
- Chocolate Twist: My family adores a chocolate version — just add ½ cup cocoa powder to the dry ingredients for a festive twist on this cake.
- Different Frosting Colors: Sometimes I’ll play with blue or red frosting instead of green just to switch up the holiday palette, and it’s still festive and fun.
How to Make Festive Christmas Sheet Cake with Green Frosting Recipe
Step 1: Get Your Pan Prepped and Start the Batter
Preheat your oven to 350ºF and grease a half-sheet pan (18×13 inches) with a nonstick baking spray, preferably one with a touch of flour. This combo always helps me get that perfect springy cake release. Next, whisk together the all-purpose flour, baking powder, baking soda, and salt in a medium bowl—getting this mix ready means no lumps in your batter later on.
Step 2: Whisk the Wet Ingredients
In a large bowl, beat the granulated sugar and eggs until the mixture is light and foamy—this step really helps the cake rise and gives it a lovely texture. Then, whisk in the vegetable oil and vanilla extract. The batter might look thin now, but that’s exactly how we want it to be before adding the dry ingredients.
Step 3: Combine Dry and Wet Ingredients Alternately
Slowly mix the flour mixture into the wet ingredients, alternating with the buttermilk, and whisk gently after each addition. This alternating method keeps the batter smooth and prevents overmixing, which can toughen the cake. Don’t forget to fold in those festive red, green, and white sprinkles—this little surprise inside every slice always makes me smile.
Step 4: Bake and Cool
Pour the batter into your prepared pan and bake for about 20 minutes, or until the top is lightly golden and a toothpick inserted in the center comes out clean. I recommend letting the cake cool completely in the pan—this can take at least an hour, so maybe use this time to make that frosting or wrap presents!
Step 5: Whip Up That Dreamy Frosting
Beat the softened salted butter on medium-high speed until it’s light and fluffy, about 2 to 3 minutes. Then, switch to low speed and add half of the powdered sugar, mixing until just combined. Pour in the milk, mix, then add vanilla and the remaining powdered sugar. Crank the mixer back up to medium-high and beat until the frosting is pillowy and smooth. This can take another 3 minutes—don’t rush it!
Step 6: Spread Base Layer and Color the Rest
Reserve about 3 cups of the buttercream and spread it evenly on the cooled cake using an offset spatula. Then, take a small portion (about 1/4 cup) and set it aside in a piping bag with a tiny opening for detailing later. To the remaining frosting, add forest green gel food coloring and a touch of blue if you want a darker shade, then transfer it into a larger piping bag for decorating the tree.
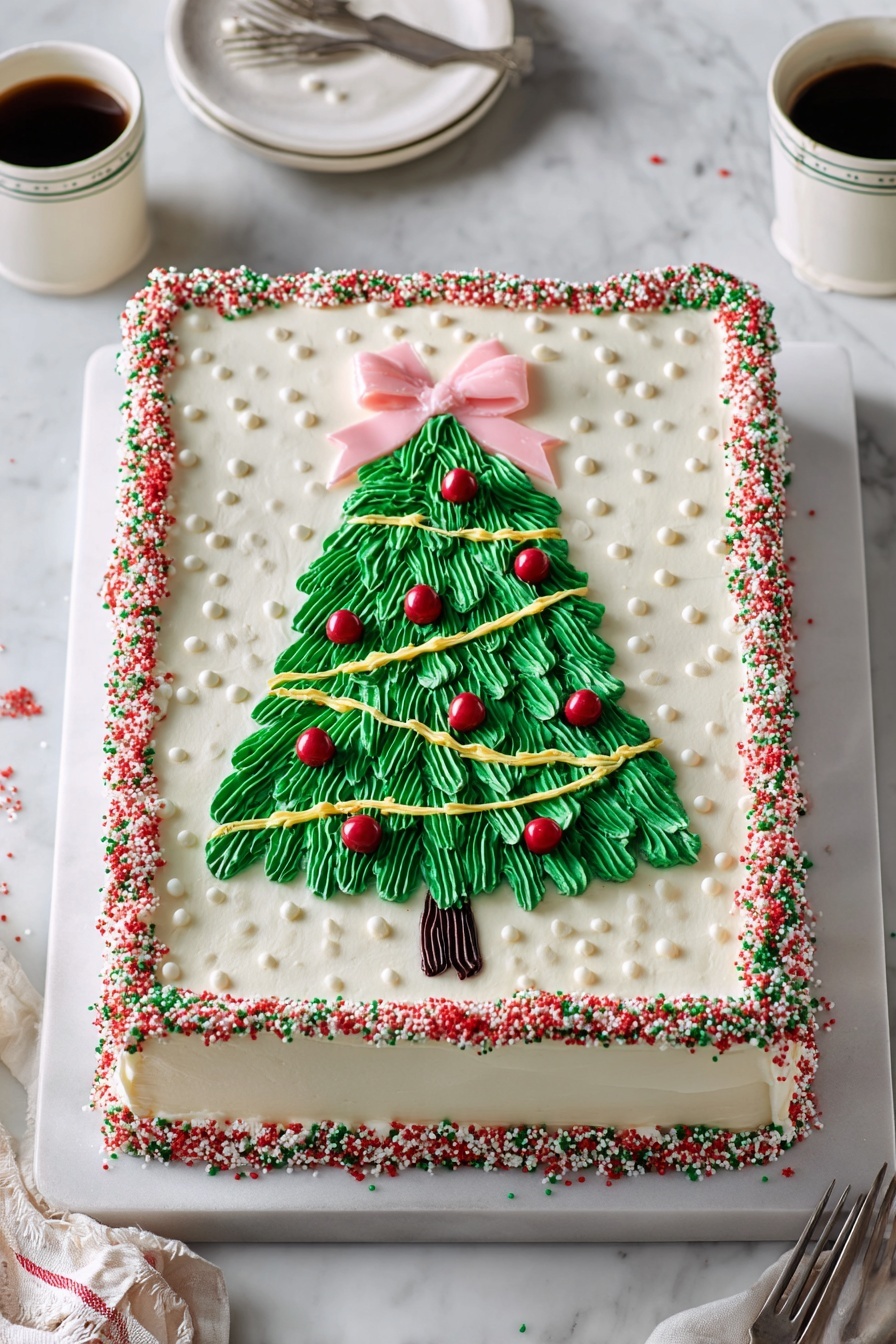
Step 7: Decorate Your Festive Christmas Sheet Cake with Green Frosting Recipe
Using a ruler and a light hand, gently trace a large triangle on the frosted cake as your Christmas tree outline. Place the brown mini candy-coated chocolates in three rows beneath the triangle as the tree trunk (5 candies in each row). Pipe rows of ¾-inch green frosting dots across the triangle’s base, then use a small spatula to drag each dot downward to create branch shapes. Build up layers with this technique until the tree shape is full and festive.
Make a sprinkle border around the cake to give it that snowy effect. Use the white frosting to pipe small dots mimicking snowflakes across the white frosting surrounding the tree. For the tree garland, pipe gentle swooping white frosting lines across the tree and press yellow candies on them as twinkling Christmas lights. Dot the red candies flat on the green branches as cute ornaments.
To finish, cut the red sour candy belt lengthwise, fold one strip into a bow, and place it atop the tree like a festive bow on your present. The leftover strip… well, I admit—I often eat it!
Pro Tips for Making Festive Christmas Sheet Cake with Green Frosting Recipe
- Perfect Cake Release: Using baking spray with flour prevents the cake from sticking, and letting it cool fully before frosting ensures it won’t slide off.
- Frosting Consistency: Beat the frosting long enough to make it fluffy but not too soft—you want it pipeable but stable for those branch shapes.
- Use an Offset Spatula: It gives you more control when dragging the frosting dots downward for natural-looking pine branches.
- Sprinkle Placement: Add sprinkles to the batter last to avoid their color bleeding, and sprinkle decorations after frosting is fully set.
How to Serve Festive Christmas Sheet Cake with Green Frosting Recipe
Garnishes
I love topping this cake with colorful mini candies and sprinkles—they instantly up the festive factor. The red sour candy bow on top adds a delightful tang and looks charming. If I’m feeling extra, I’ll dust a little powdered sugar around the plate for a snow effect when serving.
Side Dishes
Pair this cake with a cup of spiced hot cocoa or a creamy eggnog for that full holiday vibe. If serving during a meal, a simple platter of fresh fruit works well to balance the sweet richness of the cake.
Creative Ways to Present
One year, I baked several smaller versions and presented them as individual mini sheet cakes on festive plates for friends who came to my holiday party—it was such a hit! You can also place the cake on a wooden board for rustic charm or wrap it with a merry ribbon if gifting it.
Make Ahead and Storage
Storing Leftovers
I usually keep leftover frosted cake covered at room temperature for up to 3 days, which keeps it moist and fluffy. If your house is warm, I recommend popping it in the fridge, tightly covered, but bring it back to room temp before serving for the best flavor.
Freezing
This cake freezes wonderfully. I like to bake it, cool fully, then wrap it tightly in plastic wrap and foil before freezing for up to 3 months. Frost the cake after thawing if you prefer fresh frosting texture, or freeze already frosted if you’re short on time.
Reheating
For a fresh-baked feel, I gently warm slices in the microwave for 10-15 seconds before serving. That little zap brings out the buttery notes and softens the frosting just right, there’s something so comforting about this simple step.
FAQs
-
Can I make the Festive Christmas Sheet Cake with Green Frosting Recipe dairy-free?
Absolutely! Substitute the butter in the frosting with your favorite dairy-free margarine or vegan butter, and swap the buttermilk with a plant-based milk mixed with a bit of lemon juice or vinegar to mimic acidity. Keep in mind the texture may be slightly different but still delicious!
-
How do I prevent the green frosting from turning blue or dull?
Use gel food coloring, which is more concentrated and won’t water down the frosting. Start with small amounts and build up gradually. A tiny drop of blue can deepen the green without changing the tone too much, but too much can shift it to blue, so take it slow.
-
What’s the best way to get the tree shape perfectly centered on the cake?
I learned this trick: place the cake pan so a short side faces you and mark a triangle by measuring 2½ inches in from each side bottom corner and 2 inches down from the top center. Using a ruler, lightly trace this with a small offset spatula before piping—it helps everything line up beautifully.
-
Can I prepare the frosting in advance?
Yes! You can make the buttercream frosting up to 3 days ahead and store it airtight in the fridge. Before decorating, bring it to room temp and beat again for a few minutes to restore that fluffy texture.
Final Thoughts
This Festive Christmas Sheet Cake with Green Frosting Recipe is more than just a dessert for me—it’s a piece of holiday joy that I love sharing with friends and family. Every happy face that bites into those tender, sprinkle-studded slices reminds me why I keep making it year after year. If you want a dessert that looks amazing, tastes fantastic, and feels like celebration in every bite, this recipe is the one. Trust me, once you try it, it’ll become a holiday tradition in your kitchen, too!
Print
Festive Christmas Sheet Cake with Green Frosting Recipe
- Prep Time: 1 hr
- Cook Time: 20 mins
- Total Time: 2 hrs 20 mins
- Yield: 12 servings
- Category: Dessert
- Method: Baking
- Cuisine: American
Description
Celebrate the holidays with this festive Christmas Sheet Cake featuring a moist vanilla cake studded with colorful holiday sprinkles and topped with a rich, creamy buttercream frosting decorated like a Christmas tree. Perfect for holiday gatherings, this fun and easy-to-make cake is sure to impress with its vibrant colors and delightful flavors.
Ingredients
For the Cake:
- Nonstick baking spray with flour, for the pan
- 2 3/4 cups all-purpose flour
- 2 tsp. baking powder
- 1/4 tsp. baking soda
- 1/2 tsp. kosher salt
- 2 cups granulated sugar
- 3 large eggs, at room temperature
- 1 cup vegetable oil
- 2 tsp. vanilla extract
- 1 cup buttermilk, at room temperature
- 1/2 cup red, green, and white holiday sprinkles
For the Frosting:
- 1 1/2 cups salted butter (3 sticks), at room temperature
- 1 1/2 lb. powdered sugar (6 cups)
- 1/4 cup milk
- 1 Tbsp. vanilla extract
- Forest green gel food coloring
- Blue gel food coloring (optional)
- 5 brown mini candy-coated chocolates (about 1/2 tsp.), such as mini M&M’s
- 2 Tbsp. red, green, and white holiday sprinkles
- 30 yellow mini candy-coated chocolates (about 2 tsp.), such as mini M&M’s
- 40 red mini candy-coated chocolates (about 2 1/2 tsp.), such as mini M&M’s
- 1 (6-in.) piece red sour candy belt
Instructions
- Prepare the pan: Preheat your oven to 350˚F. Spray an 18-by-13-inch half-sheet pan thoroughly with nonstick baking spray to ensure easy cake release.
- Mix dry ingredients: In a medium bowl, whisk together the all-purpose flour, baking powder, baking soda, and kosher salt until well combined.
- Combine wet ingredients and batter: In a large bowl, whisk the granulated sugar and eggs until the mixture is foamy and lightened in color, which takes about 1 to 2 minutes. Then whisk in the vegetable oil and vanilla extract. Gradually add the flour mixture to the wet ingredients, alternating with the buttermilk, whisking well after each addition for a smooth batter. Finally, fold in the red, green, and white holiday sprinkles gently.
- Bake the cake: Pour the batter into the prepared sheet pan and spread evenly. Bake for about 20 minutes, or until the cake surface is lightly golden and a toothpick inserted in the center comes out clean. Let the cake cool completely in the pan, which takes at least 1 hour.
- Prepare the frosting: Using a stand mixer with a paddle attachment or a hand mixer in a large bowl, beat the salted butter on medium-high speed until light and fluffy, around 2 to 3 minutes. Reduce speed to low and add half of the powdered sugar, mixing until combined. Mix in the milk, then add vanilla extract and the remaining powdered sugar, mixing each time to incorporate fully. Increase the speed to medium-high again and beat until the frosting is light and fluffy, about 3 more minutes.
- Begin decorating the cake: Spread about 3 cups of the buttercream evenly over the cooled cake using an offset or rubber spatula. Reserve 1/4 cup of the remaining frosting in a piping bag with a small opening (~1/8 inch).
- Color the frosting: Add forest green gel food coloring to the remaining 1 3/4 cups of frosting to achieve a deep green shade. For a deeper hue, optionally add a few drops of blue food coloring. Transfer this green frosting to another piping bag with a larger tip (about 1/4 inch).
- Pipe the Christmas tree: Using a ruler and small offset spatula, lightly mark a large triangle in the center of the frosted cake to outline the Christmas tree’s shape. Place three rows of brown mini candy-coated chocolates in 5 chocolates per row directly beneath the triangle to form the tree trunk. Pipe a row of 3/4-inch green frosting dots along the bottom edge of the triangle just above the trunk, then use a small offset spatula or butter knife to drag each dot downward and outward in a curved motion, forming branches. Repeat piping additional rows of dots, dragging each down to overlap the prior row, until the triangle is completely filled with green branches.
- Add decorative accents: Make a border around the cake with the red, green, and white sprinkles. Pipe small white frosting dots over the white icing on the tree to mimic falling snow. Then pipe swooping garland lines across the tree using the white icing. Press yellow mini candy-coated chocolates sideways into the garland lines about 1 inch apart to represent Christmas lights. Place red mini candies flat on the tree to simulate ornaments.
- Top with a bow: Cut the red sour candy belt lengthwise in half. Fold one strip into a bow shape and position it on the top of the tree as a festive topper. Save or enjoy the remaining strip separately.
Notes
- The unfrosted cake can be baked, wrapped tightly in plastic wrap, and frozen for up to 3 months for convenience.
- The cake can be frosted up to 3 days ahead and stored at room temperature or refrigerated for up to 1 week.
- For a perfectly centered Christmas tree decoration, position your cake pan with one short side facing you. Measure and lightly outline the triangle for the tree: Place the base 2 ½ inches up from the bottom and 2 ½ inches in from each side, with the top point 2 inches down from the top edge of the pan.
- Ensure eggs and buttermilk are at room temperature to help the batter mix smoothly and achieve the best texture.
- You can customize the colors of the frosting and sprinkles to fit your holiday theme or personal preference.
Nutrition
- Serving Size: 1 slice
- Calories: 480
- Sugar: 45g
- Sodium: 210mg
- Fat: 25g
- Saturated Fat: 12g
- Unsaturated Fat: 10g
- Trans Fat: 0g
- Carbohydrates: 60g
- Fiber: 1g
- Protein: 4g
- Cholesterol: 55mg

