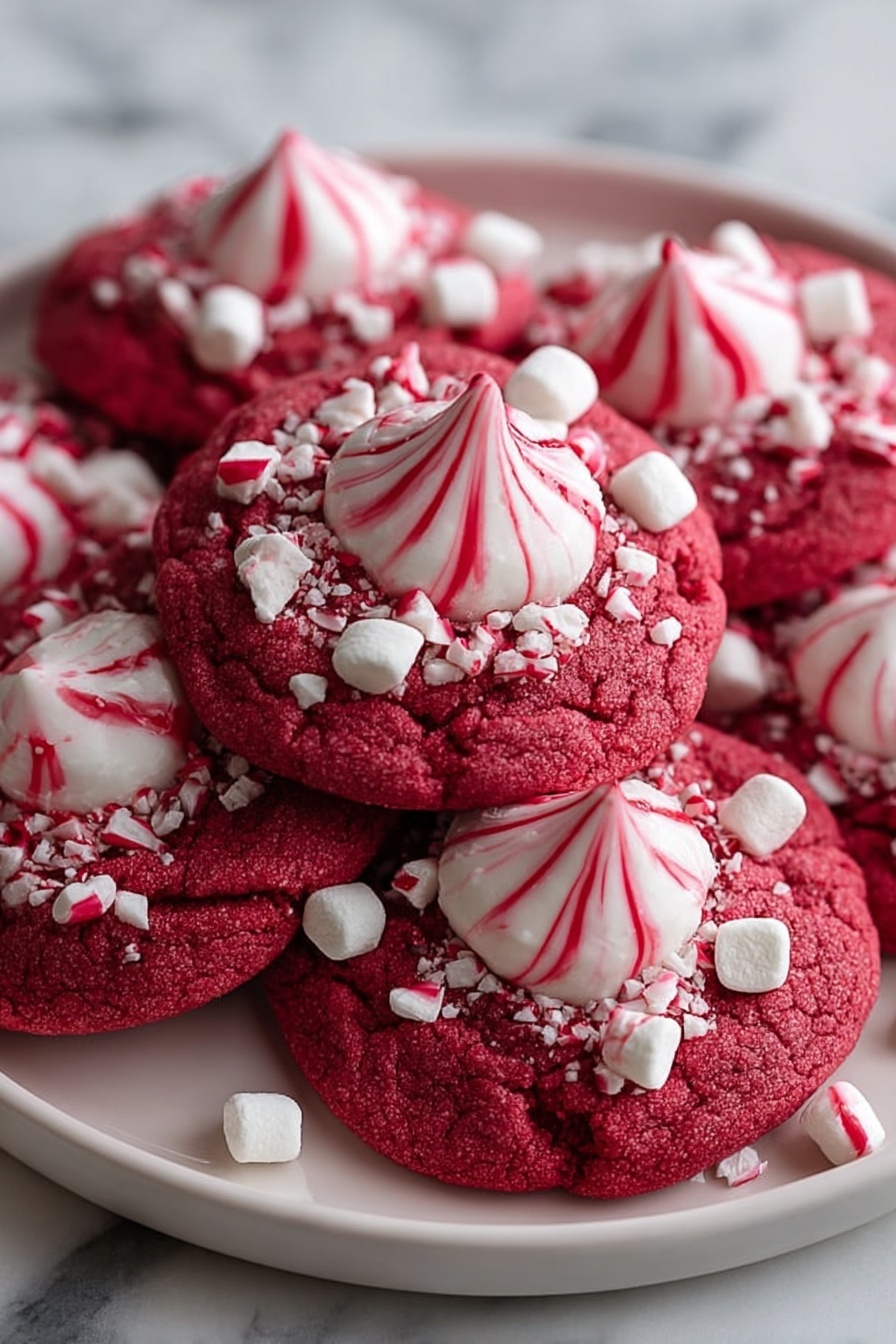
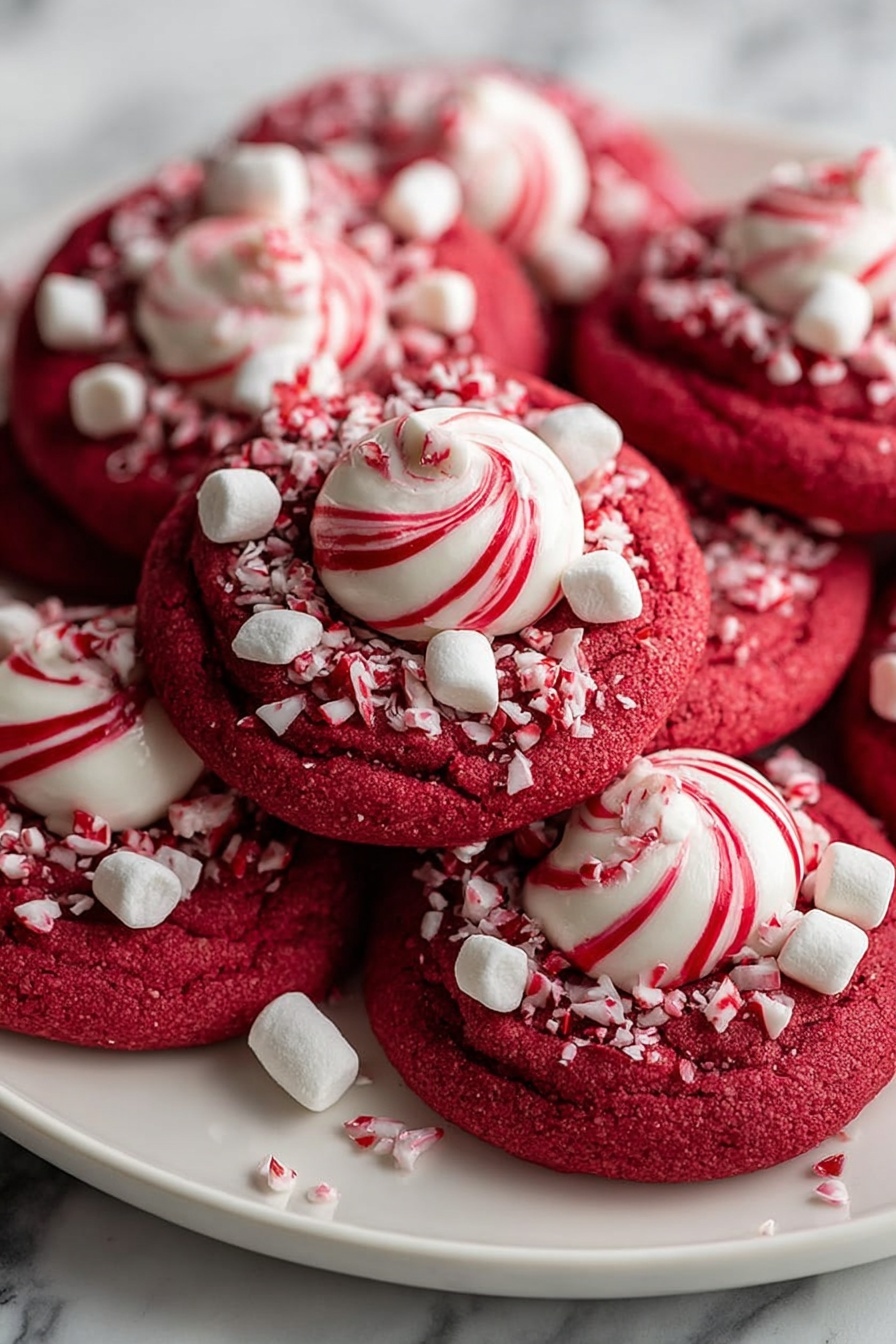
If you’re on the hunt for a festive treat that combines classic holiday flavors with a fun twist, I’ve got just the thing for you: a Red Velvet Peppermint Cookies Recipe that will honestly steal the show at any holiday gathering. These cookies are soft, vibrant, and topped with a peppermint kiss that melts just right—trust me, once you try them, they’ll become your new seasonal favorite.
Why You’ll Love This Recipe
- Festive Flavor Combo: The classic red velvet with peppermint adds that perfect holiday cheer to every bite.
- Soft & Chewy Texture: These cookies stay tender yet hold their shape beautifully, thanks to chilling the dough.
- Easy to Make: The recipe is straightforward, even if you’re a bit intimidated by candy-topped cookies.
- Show-Stopping Presentation: The peppermint kisses and crushed candy canes on top make these cookies picture-perfect for gifting or entertaining.

Ingredients You’ll Need
Each ingredient plays a special role in bringing this Red Velvet Peppermint Cookies Recipe together. Using good quality cocoa and soft butter really boosts the flavor, while the red food coloring gives that iconic holiday pop. Oh, and be sure to grab peppermint candy kisses—they’re the magic touch on top!
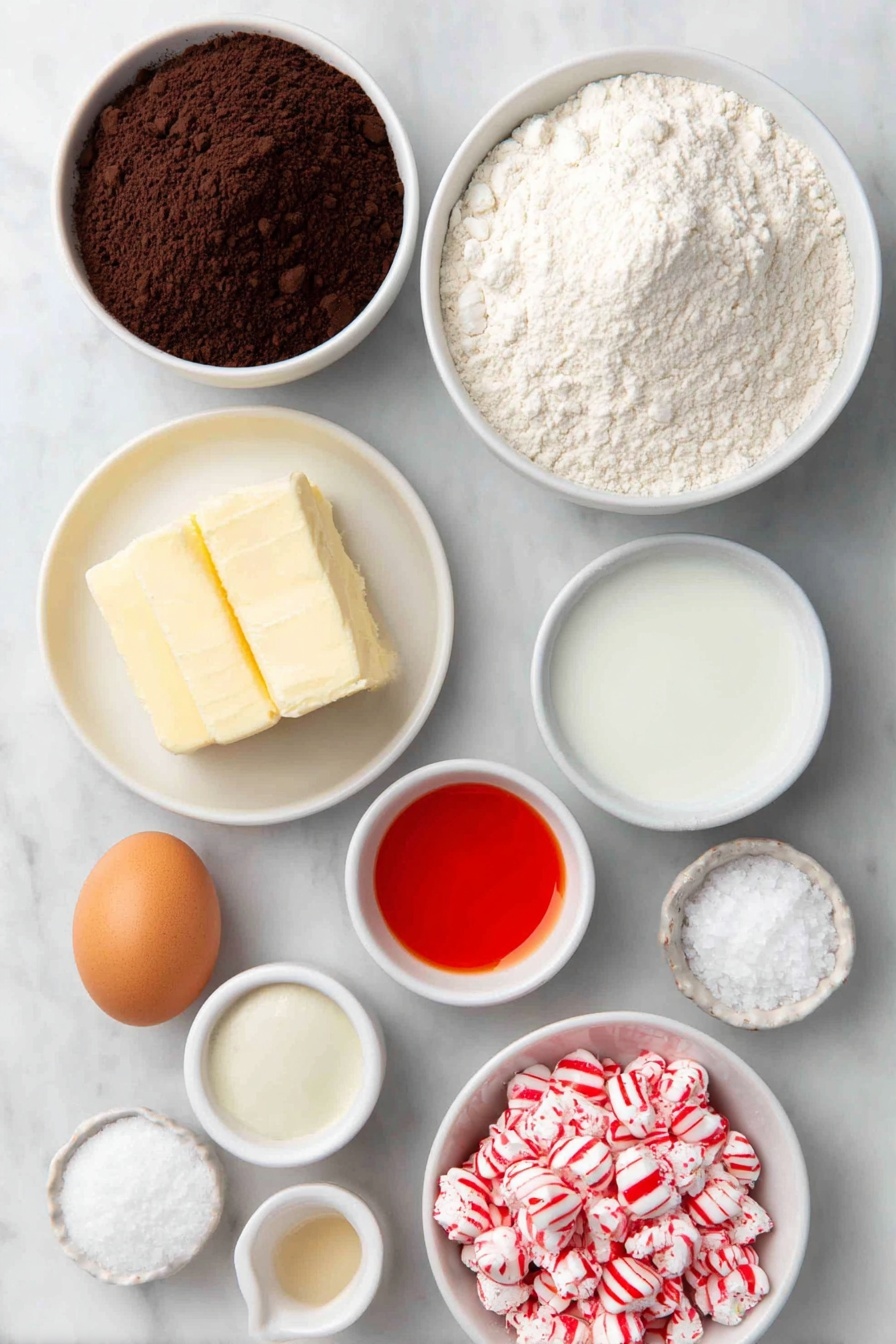
- All-purpose flour: Provides structure to the cookies; spoons and levels will give you the best results.
- Unsweetened cocoa powder: Adds that subtle chocolate depth essential for red velvet.
- Baking powder and baking soda: Work together to give a gentle rise and soft texture.
- Salt: Enhances flavor and balances sweetness.
- Unsalted butter: Soften it well for smooth creaming and flavor control without extra salt.
- Granulated sugar: Sweetens and helps with the texture.
- Large egg: Binds everything and adds richness.
- Vanilla extract: Complements the cocoa and peppermint; don’t skip!
- Red food coloring (gel preferred): Gel gives a vibrant color without thinning the dough.
- Buttermilk: Gives that classic tangy note and tender crumb.
- Peppermint candy kisses (unwrapped): The star topping—use your favorite brand for best melt.
- Crushed candy canes or peppermint candies: Adds crunch and extra festive flair.
Variations
I like to mix things up depending on the occasion or who’s coming over. This Red Velvet Peppermint Cookies Recipe is versatile, so feel free to add your own twist to make it truly your own—after all, that’s what home baking is all about!
- Mint Chocolate Lover’s Variation: Swap out the peppermint kisses for mini Andes mints for a smoother chocolate-mint finish—I tried this last year and my family went crazy for how creamy it was.
- Less Sweet Version: Use dark chocolate peppermint candies and cut back a bit on sugar for a more balanced flavor; perfect if you want to avoid over powering sweetness.
- Gluten-Free Option: Substitute the flour with a 1-to-1 gluten-free blend—just be sure to chill the dough a bit longer to help with texture.
- Vegan Adaptation: Use plant-based butter and an egg replacer; just keep in mind the texture will be a tad different but still delicious!
How to Make Red Velvet Peppermint Cookies Recipe
Step 1: Whisk together your dry ingredients for a smooth blend
Start by combining your all-purpose flour, cocoa powder, baking powder, baking soda, and salt in a medium bowl. I like to whisk them a bit to get everything distributed evenly—that way your cookies bake consistently every time.
Step 2: Cream butter and sugar for that fluffy base
Using a mixer, cream your softened butter and granulated sugar until it looks pale and fluffy, roughly 2 to 3 minutes. Don’t rush this part—it really helps the cookies have that melt-in-your-mouth texture. Then beat in your egg and vanilla extract until fully combined.
Step 3: Add the red velvet magic and mix in dry ingredients
On low speed, add the red food coloring and buttermilk to your wet mixture. You’ll love how the batter turns this beautiful bright red—gel color works best here so you don’t alter the dough’s consistency. Slowly add your dry ingredients and mix until just combined; the dough will be soft and slightly sticky, which is perfect.
Step 4: Chill the dough to keep perfect shape
Pop your dough in the fridge for at least 30 minutes. This step is key to prevent the cookies from spreading too much while baking, and I found chilling really sharpens their texture.
Step 5: Prep your oven and baking sheets
Preheat your oven to 350°F (175°C). Line two baking sheets with parchment paper to prevent sticking and help with even cooking—trust me, cleanup will be a breeze.
Step 6: Shape your cookies, bake, then add peppermint kisses
Roll the chilled dough into 1-inch balls and space them about 2 inches apart on your baking sheets. Give each ball a gentle flattening with your palm. Bake for 10-12 minutes until edges set but centers remain soft. Right out of the oven, gently press a peppermint candy kiss into the center of each cookie, then sprinkle crushed peppermint candies around the base while the cookie’s still warm. This is my favorite part because the warm cookies soften the kisses just enough without losing that delightful snap.
Step 7: Cool completely before diving in
Let the cookies sit on the baking sheet for 5 minutes, then transfer them to a wire rack to cool fully. This helps the peppermint kisses firm back up and ensures your cookies don’t crumble when you pick them up.
Pro Tips for Making Red Velvet Peppermint Cookies Recipe
- Use Gel Food Coloring: I switched to gel after struggling with runny dough; it keeps the color vibrant without affecting texture.
- Don’t Skip Chilling: Chilling really saved my cookies from spreading into flat disks—30 minutes is the sweet spot.
- Press Peppermint Kisses Right Away: I learned that waiting too long means the candy won’t stick perfectly, so time it to your oven’s timer.
- Bake in Batches: Baking two trays at once evenly speeds things up; just swap the trays halfway through for even browning.
How to Serve Red Velvet Peppermint Cookies Recipe
Garnishes
I love finishing these cookies with extra crushed peppermint sprinkled on top—it adds a nice crunch and festive sparkle. Sometimes I also sprinkle a tiny pinch of sea salt for a sweet-salty twist that really elevates the flavor.
Side Dishes
These cookies pair wonderfully with a mug of hot cocoa topped with whipped cream or a classic peppermint mocha. For a grown-up touch, try serving them alongside a glass of creamy Irish cream or spiced eggnog.
Creative Ways to Present
For holidays, I like arranging these cookies in a wreath shape on a platter, alternating with fresh pine sprigs and red berries for a stunning festive centerpiece. If gifting, package them in clear cellophane bags tied with red and green ribbons—everyone loves unwrapping that charm!
Make Ahead and Storage
Storing Leftovers
I store leftover Red Velvet Peppermint Cookies in an airtight container at room temperature—this keeps them soft for up to 4 days. Placing a slice of bread inside the container helps maintain moisture; it’s a little trick I picked up that really works wonders.
Freezing
If you want to make these cookies ahead of the season, you can freeze the dough balls on a baking sheet, then transfer to a freezer bag. When ready to bake, no need to thaw—just add a couple extra minutes to the baking time. I love having dough ready for last-minute baking sessions.
Reheating
To refresh your cookies, warm them in the microwave for 10-15 seconds or place in a 300°F oven for 5 minutes. This brings back the soft texture and gently melts the peppermint kiss for that fresh-baked feel.
FAQs
-
Can I use regular food coloring instead of gel?
You can, but regular liquid food coloring might thin your dough slightly and give a less vibrant red. Gel food coloring is concentrated and won’t alter your cookie’s texture, so I recommend it for best results.
-
What type of peppermint kisses work best?
Classic peppermint candy kisses melt beautifully and add that signature minty flavor. Choose high-quality ones with natural peppermint extract for the best taste and smooth melting.
-
Can I freeze baked cookies with peppermint kisses on top?
Freezing baked cookies is possible but the peppermint kisses might become brittle or lose their texture. I recommend freezing the dough instead and baking fresh cookies when needed for the best quality.
-
How do I prevent my cookies from spreading too much?
Chilling the dough for at least 30 minutes helps tremendously. Also, make sure your butter is softened but not melted when mixing—the temperature plays a big role in spreading.
Final Thoughts
I absolutely love how this Red Velvet Peppermint Cookies Recipe brings a festive sparkle to my holiday baking. It’s no-fuss, looks stunning, and tastes like a cozy winter hug in cookie form. Whether you’re baking for friends, family, or just yourself, these treats never fail to impress—so go ahead, give them a try this season. I promise you’ll want to make them again and again!
Print
Red Velvet Peppermint Cookies Recipe
- Prep Time: 15 minutes
- Cook Time: 10-12 minutes
- Total Time: 40-45 minutes
- Yield: 18-20 cookies
- Category: Dessert
- Method: Baking
- Cuisine: American
- Diet: Vegetarian
Description
Celebrate the holidays with these festive Christmas Peppermint Red Velvet Blossoms! These soft, red velvet cookies are infused with cocoa and a splash of buttermilk, featuring a vibrant red color from gel food coloring. Each cookie is topped with a melted peppermint candy kiss and garnished with crushed candy canes for a perfect blend of chocolate and mint flavors, ideal for gifting or sharing at holiday parties.
Ingredients
Dry Ingredients
- 1 ¼ cups all-purpose flour
- ¼ cup unsweetened cocoa powder
- 1 tsp baking powder
- ½ tsp baking soda
- ¼ tsp salt
Wet Ingredients
- ½ cup unsalted butter, softened
- ¾ cup granulated sugar
- 1 large egg
- 1 tsp vanilla extract
- 1 tbsp red food coloring (gel preferred for vibrant color)
- 1 tbsp buttermilk
Toppings
- 18-20 peppermint candy kisses (unwrapped)
- Crushed candy canes or peppermint candies for garnish
Instructions
- Prepare the dry ingredients: In a medium bowl, whisk together the all-purpose flour, unsweetened cocoa powder, baking powder, baking soda, and salt. Set aside to ensure even distribution of leavening agents.
- Cream the butter and sugar: In a large bowl, use a hand mixer or stand mixer to cream the softened unsalted butter and granulated sugar together until the mixture is light and fluffy, about 2-3 minutes. Then beat in the egg and vanilla extract until fully combined.
- Add the red velvet magic: On low speed, add the red gel food coloring and buttermilk to the wet ingredients, mixing until vibrant and uniform in color. Gradually add the dry ingredients into the wet mix, mixing just until the dough forms. The dough should be soft and slightly sticky.
- Chill the dough: Cover the dough with plastic wrap and refrigerate for at least 30 minutes. This helps the dough firm up, which prevents spreading and preserves the cookie shape during baking.
- Preheat and prep: Preheat your oven to 350°F (175°C). Line two baking sheets with parchment paper to prevent sticking and facilitate easy cleanup.
- Shape and bake the cookies: Roll the chilled dough into 1-inch balls and place them 2 inches apart on the prepared baking sheets. Lightly flatten each ball with your palm. Bake for 10-12 minutes until cookies are set around the edges but remain soft in the centers.
- Top with peppermint kisses: Immediately upon removing from the oven, gently press one unwrapped peppermint candy kiss into the center of each cookie. While the cookies are still warm, sprinkle crushed candy canes or peppermint candy pieces around the base of the kiss so they adhere.
- Cool completely: Allow the cookies to cool on the baking sheet for about 5 minutes, then transfer them to a wire rack to cool fully. The peppermint kisses will soften from residual heat and harden again as they cool, creating a luscious minty topping.
Notes
- Using gel food coloring helps achieve a more vibrant red color without altering the dough consistency.
- Be sure to chill the dough to prevent cookies from spreading too much during baking.
- Crushed candy canes add festive crunch but can be substituted with finely chopped peppermint candies if preferred.
- Store cookies in an airtight container at room temperature for up to 5 days to maintain freshness.
- These cookies can also be frozen after baking and cooling for up to 1 month; thaw at room temperature before serving.
Nutrition
- Serving Size: 1 cookie
- Calories: 150 kcal
- Sugar: 12 g
- Sodium: 95 mg
- Fat: 7 g
- Saturated Fat: 4 g
- Unsaturated Fat: 2.5 g
- Trans Fat: 0 g
- Carbohydrates: 20 g
- Fiber: 1 g
- Protein: 2 g
- Cholesterol: 25 mg


