
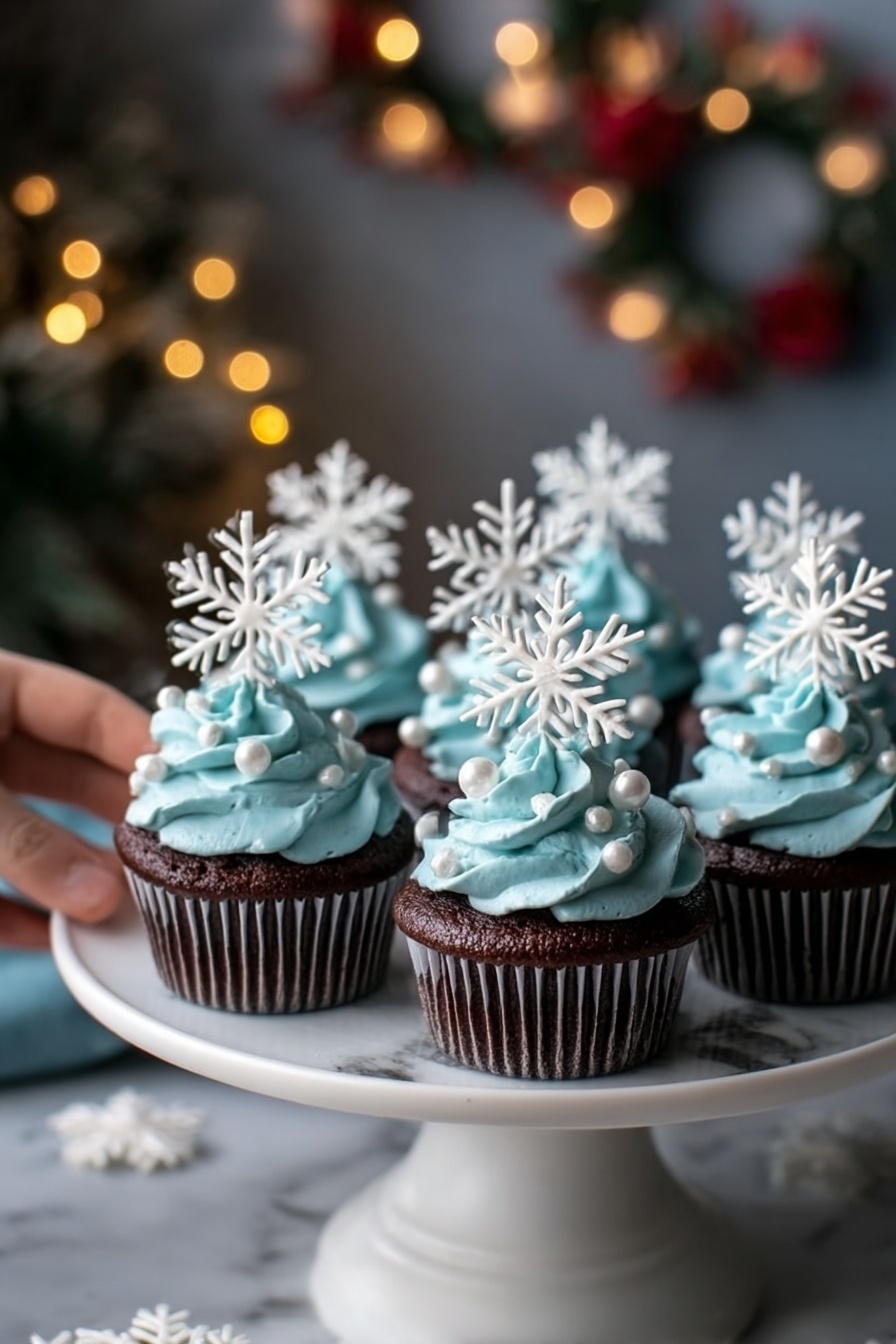
If you’ve been looking for a showstopper dessert that perfectly captures the magic of winter, you’re going to adore this Winter Blue Chocolate Cupcakes with Snowflake Frosting Recipe. These cupcakes have this incredible rich chocolate taste paired with a dreamy, fluffy blue buttercream frosting dotted with delicate snowflake decorations. I absolutely love how these come out — they’re moist, festive, and just the right touch of cozy and elegant for chilly days. Stick with me here because I’m about to share every little insider tip to help you nail these cupcakes, whether it’s your first time or you’re a seasoned baker.
Why You’ll Love This Recipe
- Perfectly Moist Chocolate Cupcakes: The blend of cocoa and buttermilk keeps the texture tender and rich without being heavy.
- Winter-Blue Frosting Magic: The bright blue buttercream brings a cheerful color that’s festive yet classy.
- Pretty Snowflake Decoration: It’s those little edible snowflakes and pearls that take these cupcakes from tasty to a true winter wonderland.
- User-Friendly Steps: I’ve broken down the recipe with simple, practical instructions so you won’t feel overwhelmed.

Ingredients You’ll Need
The magic behind this Winter Blue Chocolate Cupcakes with Snowflake Frosting Recipe is in the balance between rich cocoa and the bright, creamy buttercream with just a hint of vanilla. When shopping, try to grab good quality cocoa powder for the best flavor, and fresh butter for that delicious frosting texture.
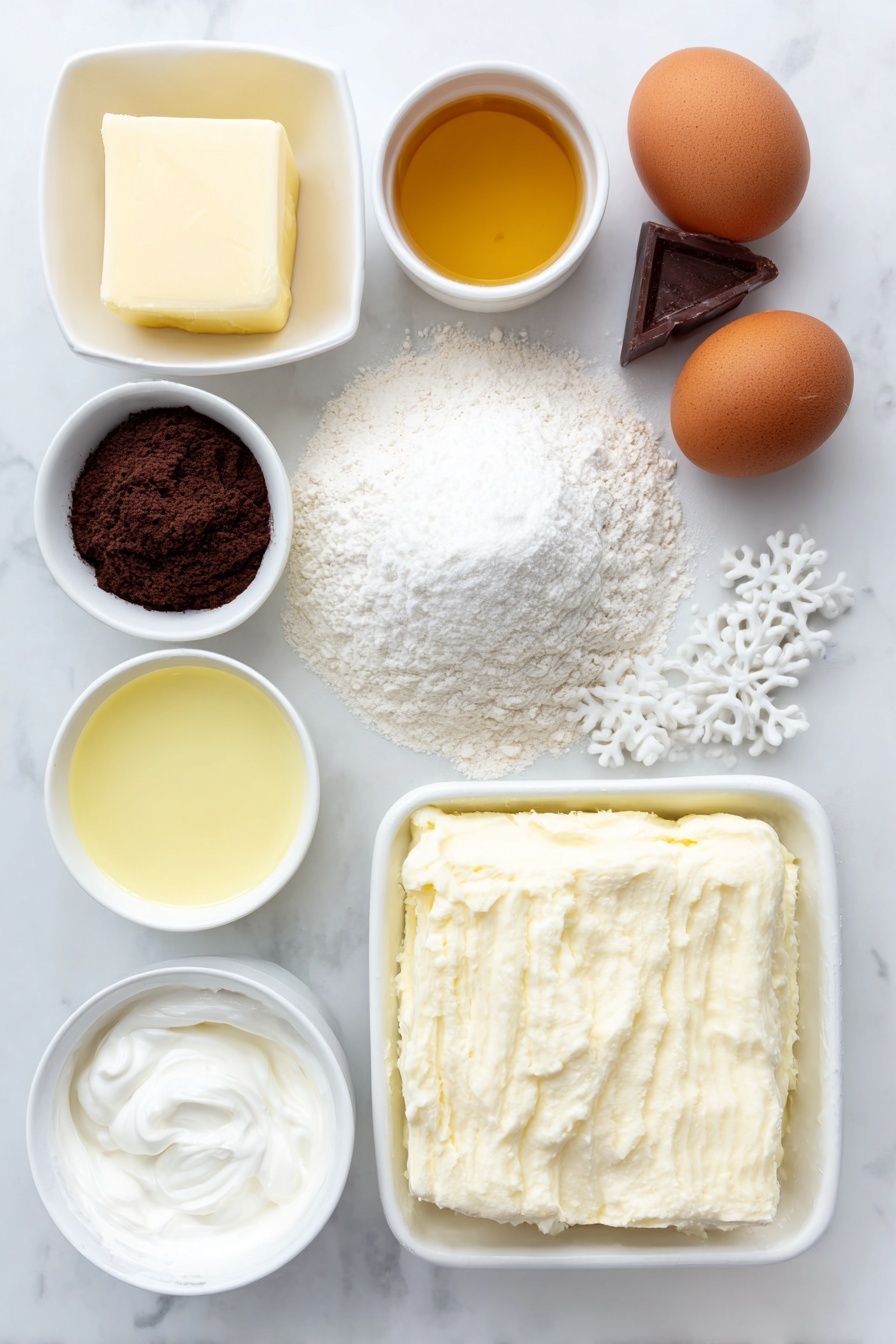
- All-purpose flour: The base that gives these cupcakes their structure and a tender crumb.
- Unsweetened cocoa powder: Go for Dutch-processed if you can, it offers a smoother chocolate flavor.
- Baking powder and baking soda: These little leaveners ensure your cupcakes rise just right.
- Salt: Enhances the chocolate flavor while balancing sweetness.
- Unsalted butter: Room temperature butter creams up beautifully with sugar for a light texture.
- Granulated sugar: Sweetens and adds tenderness to the cupcakes.
- Large eggs: Adds richness and structure.
- Vanilla extract: A little goes a long way to deepen the flavor.
- Buttermilk: Adds moisture and a slight tang that complements chocolate perfectly.
- Powdered sugar: Essential for smooth, sweet buttercream frosting.
- Heavy cream: Helps achieve that perfect fluffy frosting consistency.
- Blue gel food coloring: Provides vibrant winter-blue hue without watering down frosting.
- Edible snowflake toppers and edible pearls: For that signature frosty look—store-bought work great, or make your own if you’re feeling adventurous.
Variations
I love making this recipe my own depending on the occasion or who I’m baking for. You should definitely feel free to tweak it! It’s super forgiving and versatile, so you can easily customize for dietary needs or just for fun.
- Gluten-Free Version: I swapped in a cup-for-cup gluten-free flour blend and the cupcakes turned out just as moist and tender.
- Dairy-Free Twist: Using coconut oil instead of butter and almond milk in place of buttermilk with a splash of lemon works well and still keeps great texture.
- Chocolate Intensity: For a deeper chocolate flavor, I occasionally add a touch of espresso powder to the batter—it really makes the chocolate pop!
- Frosting Flavors: Mixing a little white chocolate into the buttercream or adding peppermint extract is a cozy seasonal upgrade I recommend trying.
How to Make Winter Blue Chocolate Cupcakes with Snowflake Frosting Recipe
Step 1: Prepping the Batter for Perfect Cupcakes
Start by preheating your oven to 350°F (175°C) and lining a 12-cup muffin tin with cupcake liners. I like to whisk together the dry ingredients—flour, cocoa powder, baking powder, baking soda, and salt—in one bowl. This ensures your cupcakes bake evenly without clumps of cocoa powder or uneven rise. Then, in a separate bowl, cream the unsalted butter and sugar until light and fluffy. This part really sets the stage for tender yet structurally sound cupcakes. Add eggs one at a time, then mix in your vanilla for that warm, homey aroma.
Step 2: Mixing It All Together
Next, gradually add your dry ingredients alternating with the buttermilk, starting and ending with the dry mix. Don’t overmix here—stir just until everything is combined. I used to struggle with overmixing, which made my cupcakes tough, but once I mastered this gentle folding method, I noticed a huge difference in softness. Then, spoon your batter evenly into the cupcake liners—about two-thirds full works best to avoid spills but still get a nice dome.
Step 3: Baking and Cooling
Bake for 18-20 minutes, but start checking at 18 minutes by gently inserting a toothpick. If it comes out clean, you’re golden. I personally like to rotate my cupcake tray halfway through baking for even browning—some ovens can be tricky. After baking, let cupcakes cool completely before frosting; warm cupcakes will melt your buttercream, and nobody wants that mess.
Step 4: Whipping Up the Snowflake Buttercream
While the cupcakes cool, beat your butter until creamy and smooth. Slowly add powdered sugar, mixing on a low speed so sugar doesn’t fly everywhere—a little messy but worth it. Then add heavy cream and vanilla extract, and beat on medium-high for about 3-5 minutes until fluffy. Add blue gel food coloring a few drops at a time to get that perfect, winter-blue hue. I love using gel color because it’s super concentrated and doesn’t thin the frosting.
Step 5: Decorating with Frosting and Snowflakes
Transfer your frosting to a piping bag fitted with a large star tip, then swirl generous rosettes on top of each cupcake. Add edible snowflake toppers and scatter silver, white, or mixed edible pearls around to create that magical snowy effect. When I first tried this, my family went crazy for how festive and professional they looked—plus, they’re just fun to eat!
Pro Tips for Making Winter Blue Chocolate Cupcakes with Snowflake Frosting Recipe
- Room Temperature Ingredients: Making sure your butter and eggs are at room temperature helps them blend easier, giving a smoother batter and frosting.
- Don’t Overmix the Batter: Stir only until the dry and wet ingredients combine to keep the cupcakes tender, not dense.
- Pipe When Frosting is Cold: Chill your buttercream slightly if it’s too soft; firmer frosting pipes beautifully and holds shapes well.
- Test Doneness Early: Oven temperatures vary, so start checking your cupcakes a couple minutes before the suggested bake time to prevent overbaking and dryness.
How to Serve Winter Blue Chocolate Cupcakes with Snowflake Frosting Recipe
Garnishes
I personally love to top mine with a mix of edible snowflake toppers and a sprinkle of silver and white edible pearls—it adds that wintry sparkle that really sets the tone for holiday parties or cozy nights in. Sometimes, a light dusting of powdered sugar gives an extra frosted snow effect that’s just delightful.
Side Dishes
These cupcakes pair wonderfully with hot drinks like peppermint tea, spiced cocoa, or a classic latte. For a holiday gathering, I like serving them alongside fresh berries or a light vanilla bean panna cotta to balance out the rich chocolate flavor.
Creative Ways to Present
For holiday parties, I’ve arranged these cupcakes on a tiered stand sprinkled with fake snow and pine sprigs—it looks like a mini winter wonderland centerpiece. Another fun idea is wrapping each cupcake in cellophane tied with a silver ribbon for gorgeous edible gifts that everyone raves about.
Make Ahead and Storage
Storing Leftovers
Once frosted, store cupcakes in an airtight container at room temperature for up to 2 days. I usually keep them in a cool spot to preserve the frosting texture. If your home is warm, refrigerate them but bring to room temp before serving to get the softness back.
Freezing
You can freeze unfrosted cupcakes by wrapping them tightly in plastic wrap and placing them in a freezer bag for up to 3 months. I like to freeze the frosting separately in a ziplock bag. When you’re ready, thaw completely and frost fresh for best results.
Reheating
To refresh leftover cupcakes, warm them in the microwave for about 10 seconds (don’t overdo it!) to bring back moisture. Avoid heating frosted cupcakes because it can melt the buttercream and ruin the look.
FAQs
-
Can I make these Winter Blue Chocolate Cupcakes without buttermilk?
Absolutely! If you don’t have buttermilk, mix 1/2 cup of milk with 1/2 tablespoon of lemon juice or white vinegar and let it sit for 5 minutes—it mimics buttermilk’s acidity and helps keep cupcakes tender.
-
How do I prevent my frosting from being too runny?
Use softened, not melted, butter and add heavy cream slowly. If your frosting gets too soft, chill it in the fridge for 15-20 minutes before piping. Gel food coloring is best to avoid adding too much liquid.
-
Can I make the edible snowflake decorations at home?
You sure can! You can use royal icing piped into snowflake shapes on parchment paper and let them dry overnight. It’s a fun activity but store-bought decorations also work great if you’re short on time.
-
How should I store frosted cupcakes for longer than two days?
Keep them in an airtight container in the fridge. Before serving, allow them to come back to room temperature so your frosting regains that easy, creamy texture.
Final Thoughts
This Winter Blue Chocolate Cupcakes with Snowflake Frosting Recipe is truly a go-to when I want to wow guests or add a little extra magic to my winter baking. The contrast between the deeply chocolatey base and the bright, frosty buttercream makes every bite feel festive and comforting. I hope you’ll try it out and maybe even make it your own with some creative twists. Trust me, once you master these cupcakes, they’ll be a recurring star in your dessert lineup all season long!
Print
Winter Blue Chocolate Cupcakes with Snowflake Frosting Recipe
- Prep Time: 25 minutes
- Cook Time: 20 minutes
- Total Time: 45 minutes
- Yield: 12 cupcakes
- Category: Dessert
- Method: Baking
- Cuisine: American
Description
These Winter Wonderland Chocolate Cupcakes are rich, moist chocolate cupcakes topped with a creamy blue snowflake buttercream frosting. Perfect for festive occasions, the cupcakes are decorated with edible snowflake toppers and silver pearls to capture a magical winter theme.
Ingredients
Chocolate Cupcakes:
- 1 cup all-purpose flour
- ½ cup unsweetened cocoa powder
- 1 tsp baking powder
- ½ tsp baking soda
- ¼ tsp salt
- ½ cup unsalted butter, room temperature
- ¾ cup granulated sugar
- 2 large eggs
- 1 tsp vanilla extract
- ½ cup buttermilk
Buttercream Frosting:
- 1 cup unsalted butter, room temperature
- 4 cups powdered sugar
- 2-3 tbsp heavy cream
- 1 tsp vanilla extract
- Blue gel food coloring
Decorations:
- Edible snowflake toppers (store-bought or homemade)
- Silver, white, or mixed edible pearls
Instructions
- Preheat and prepare pans: Preheat your oven to 350°F (175°C) and line a 12-cup muffin tin with cupcake liners to prevent sticking and ensure easy removal.
- Mix dry ingredients: In a medium bowl, whisk together the all-purpose flour, unsweetened cocoa powder, baking powder, baking soda, and salt. Set aside.
- Cream butter and sugar: In a large mixing bowl, beat the softened unsalted butter and granulated sugar together using a mixer at medium speed until the mixture becomes light and fluffy. This usually takes around 2-3 minutes.
- Add eggs and vanilla: Add the eggs one at a time to the butter and sugar mixture, beating well after each addition. Then stir in the vanilla extract for flavor.
- Combine wet and dry ingredients: Gradually add the dry ingredients to the wet mixture in three additions, alternating with the buttermilk in two additions, starting and ending with the dry ingredients. Mix gently just until combined to avoid overmixing which can make cupcakes dense.
- Fill and bake: Evenly divide the cupcake batter among the lined muffin cups, filling each about two-thirds full. Bake in the preheated oven for 18-20 minutes, or until a toothpick inserted into the center comes out clean.
- Cool cupcakes: Remove cupcakes from the oven and let them cool in the pan for about 5 minutes, then transfer to a wire rack to cool completely before frosting.
- Prepare buttercream frosting: In a large bowl, beat the softened unsalted butter with a mixer on medium speed until creamy and smooth, about 2 minutes.
- Add powdered sugar and cream: Gradually add powdered sugar one cup at a time on low speed to prevent sugar clouds. Add 2 to 3 tablespoons of heavy cream and the vanilla extract, then increase speed to medium-high and beat for 3-5 minutes until the frosting is fluffy and spreadable.
- Color the frosting: Add a few drops of blue gel food coloring and mix thoroughly until the frosting reaches your desired shade of winter blue.
- Decorate cupcakes: Transfer the buttercream to a piping bag fitted with a large star tip. Swirl the frosting on the cooled cupcakes in a circular motion to create a snowflake effect.
- Add toppers and pearls: Carefully place an edible snowflake topper on each cupcake and scatter silver, white, or mixed edible pearls around the frosting for an elegant wintery finish.
Notes
- Use room temperature butter and eggs for best mixing results and smoother batter.
- Do not overmix the batter to keep the cupcakes light and fluffy.
- If you don’t have buttermilk, you can substitute with milk plus 1 teaspoon of lemon juice or vinegar, let sit for 5 minutes.
- Adjust the amount of heavy cream in the frosting to achieve your preferred consistency for piping.
- Store cupcakes in an airtight container at room temperature for up to 2 days or refrigerate for up to 5 days.
- Allow refrigerated cupcakes to come to room temperature before serving for best flavor and texture.
Nutrition
- Serving Size: 1 cupcake
- Calories: 320
- Sugar: 30g
- Sodium: 150mg
- Fat: 18g
- Saturated Fat: 11g
- Unsaturated Fat: 6g
- Trans Fat: 0g
- Carbohydrates: 38g
- Fiber: 3g
- Protein: 4g
- Cholesterol: 65mg


