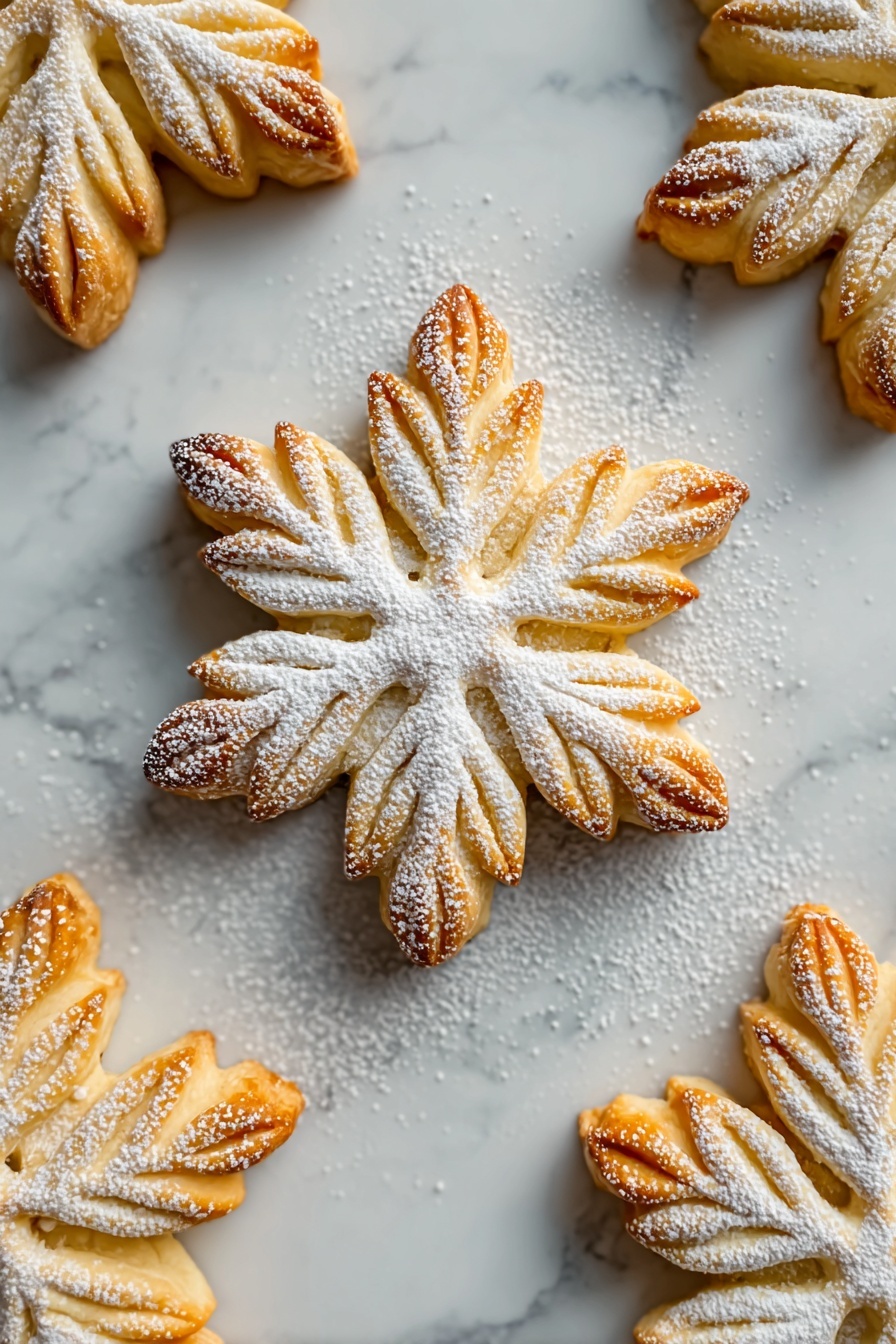
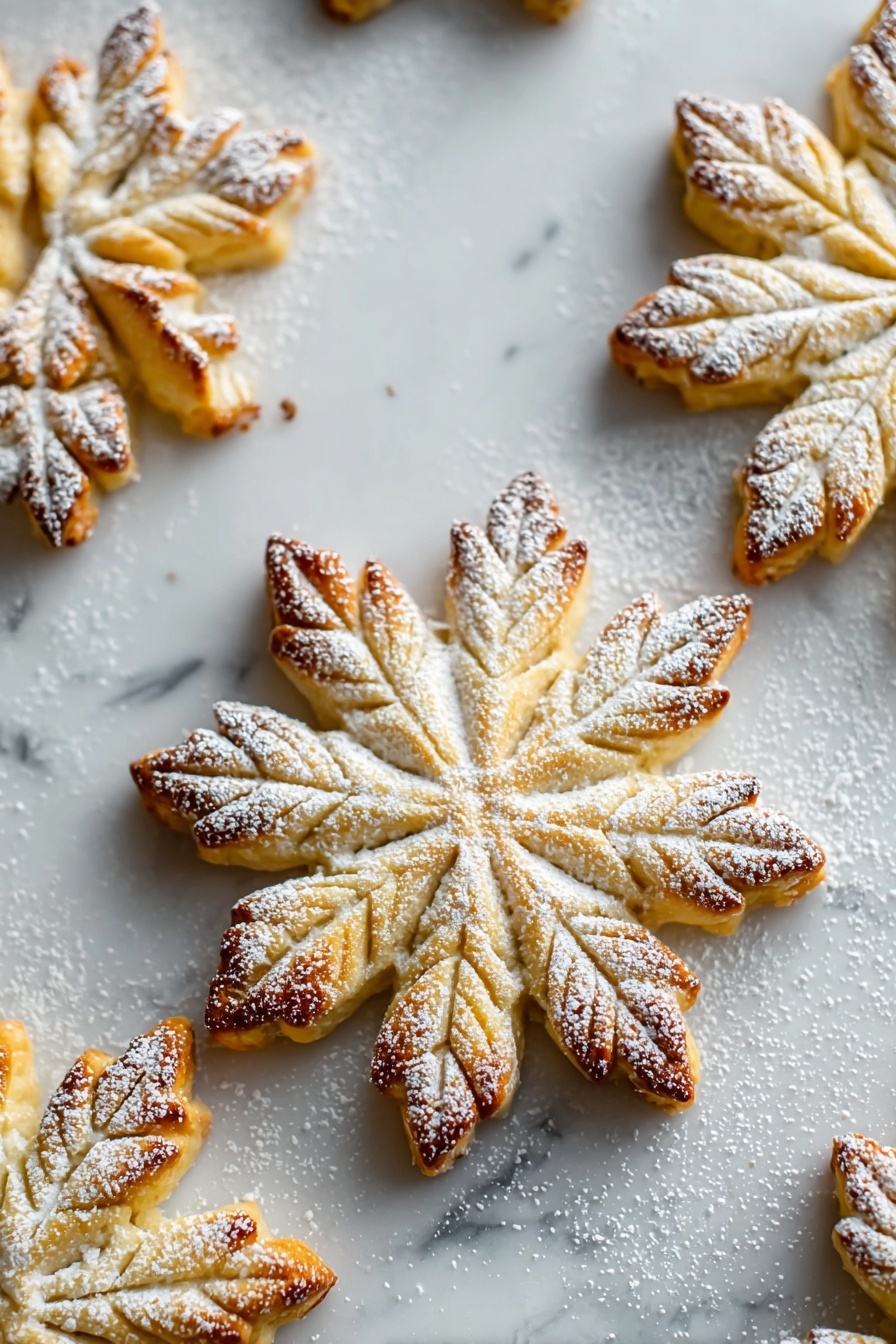
If you’ve been hunting for the perfect winter treat, I’ve got a real gem for you. This Snowflake Cookie Recipe is a fan-freaking-tastic way to bring a touch of magic and elegance to your holiday baking. I absolutely love how these delicate, buttery cookies turn out—light, tender, and dusted with just the right amount of powdered sugar to look like little snowflakes that can’t help but make you smile. Trust me, once you make these, you’ll want to keep this recipe in your holiday rotation year after year.
Why You’ll Love This Recipe
- Beautifully Shaped Cookies: The six and seven-point snowflake designs make these cookies a standout on any cookie tray.
- Buttery, Tender Texture: The combination of butter and sugars yields a melt-in-your-mouth experience every single time.
- Simple Ingredients: You likely have all of what you need on hand, making it an easy, go-to holiday recipe.
- Fun to Make: The cookie shaping is a creative project that’s playful for all ages.

Ingredients You’ll Need
For this Snowflake Cookie Recipe, the ingredients are straightforward but come together to create a cookie that’s soft, tasty, and holds its shape beautifully. I always recommend using real unsalted butter and fresh vanilla extract for the best flavor — it truly makes a difference.
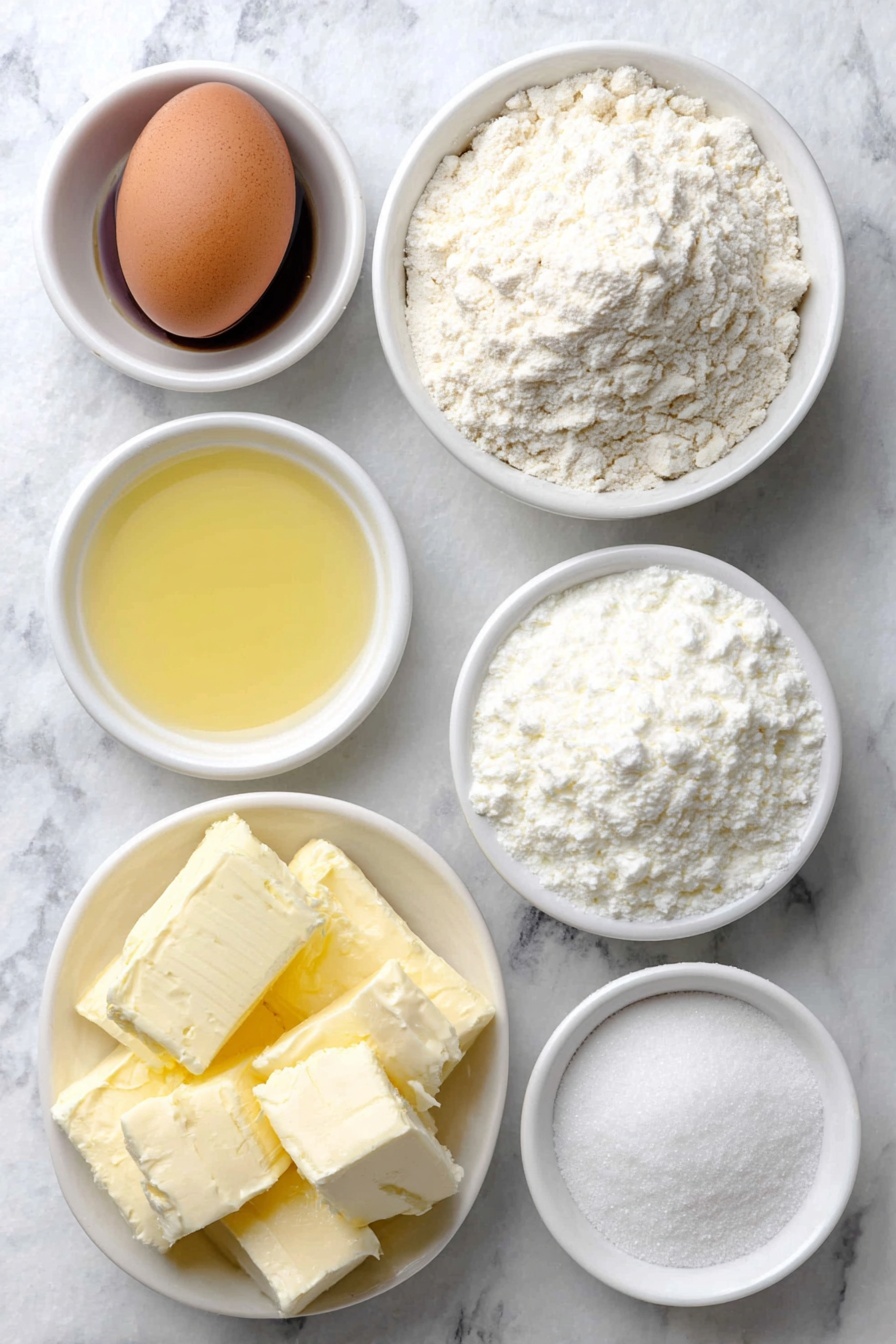
- All-purpose flour: The base for structure; be sure to measure accurately to avoid dry or tough cookies.
- Powdered sugar: Adds a lovely sweetness and helps the dough stay tender.
- Granulated sugar: Balances texture and flavor, giving a slight crisp edge.
- Unsalted butter: I find softer butter creamier and gives the best crumb—no substitutes for me here!
- Vanilla extract: Pure vanilla adds warmth and depth to the dough.
- Almond extract (optional): Just a hint enhances the nutty undertones, but it is totally optional—don’t worry if you skip it.
- Salt: Just a pinch to bring out all the flavors.
- Large egg: Helps bind everything together and adds richness.
Variations
I love how versatile this Snowflake Cookie Recipe is. You can easily customize it depending on your taste or dietary preferences, and it still tastes amazing every time. Here are a few ways I like to mix it up when I’m baking these beauties.
- Gluten-Free Variation: I’ve swapped in a cup-for-cup gluten-free flour blend, and it worked wonderfully—just keep an eye on the dough’s consistency since some blends are thirstier.
- Dipped in Chocolate: After cooling, dip half the cookie in dark or white chocolate for an elegant twist my family adores.
- Spiced Snowflakes: Adding a pinch of cinnamon or nutmeg gives a subtle warmth that’s perfect around the holidays.
- Nut Toppings: Sprinkle finely chopped toasted nuts on top before baking for an extra crunch and pretty finish.
How to Make Snowflake Cookie Recipe
Step 1: Cream Your Butter and Sugars Just Right
Start by softening your butter—but not melted! I learned the hard way that butter that’s too soft or melted makes cookies spread too much. Using a hand mixer or stand mixer, beat the butter with the powdered and granulated sugars on medium speed until the mixture is light and fluffy, around 3 minutes. You’ll notice it looks creamy and smooth—this is the secret to tender cookies that hold their shape perfectly.
Step 2: Add the Egg and Extracts
Next, add your egg, vanilla extract, and almond extract if you’re using it. Beat until everything is combined well. This is where the dough comes alive with flavor, so don’t skip the vanilla—it’s a game changer.
Step 3: Mix in the Dry Ingredients Gently
Whisk together the flour and salt in a separate bowl, then add it gradually to your wet mixture on low speed. Stop mixing as soon as you get a smooth dough—overmixing can lead to tougher cookies, and we want tender and melt-in-your-mouth!
Step 4: Chill the Dough
This chilling step is key for these snowflake cookies. Divide the dough into two discs, wrap tightly in plastic, and refrigerate for at least an hour. I usually do this part in the morning and bake in the afternoon. It makes rolling and shaping a dream, plus helps the cookies keep their intricate snowflake shapes while baking.
Step 5: Roll and Shape Into Pretty Snowflakes
Lightly flour your surface and roll out one disc to about 1/4 inch thickness. Use a round cookie cutter to cut circles. Now here’s a little decorating magic: use a knife or toothpick to mark six evenly spaced points around each circle’s edge, then gently pinch at each point to create classic six-point snowflake arms. For a twist, try dividing into seven points for a unique snowflake shape—it’s just as stunning!
Step 6: Bake to Perfection
Place your shaped cookies on parchment-lined baking sheets, spacing them about 2 inches apart. Bake at 350°F (175°C) for 10 to 12 minutes, or until the edges just start turning a light golden brown. Keep a close eye here; overbaking dries them out and ruins that tender texture we’re all after.
Step 7: Cool and Snow-Dust Your Cookies
Once baked, transfer cookies to wire racks to cool completely before dusting lightly with powdered sugar. This step is my favorite—it gives them this magical snowy finish that makes your heart smile (and your Instagram feed, too!).
Pro Tips for Making Snowflake Cookie Recipe
- Keep It Cold: Chilled dough is easier to shape and prevents spreading, which is essential for the delicate snowflake edges.
- Don’t Overmix the Dough: Once you add flour, mix just until combined to keep cookies tender—trust me on this one!
- Use a Light Hand When Pinching: Gently pinch the dough for snowflake arms to avoid tearing, and your cookies will come out looking perfect every time.
- Watch Your Bake Time: Removing the cookies as soon as edges turn lightly golden keeps them soft inside and beautifully crisp around the edges.
How to Serve Snowflake Cookie Recipe
Garnishes
I love to dust these snowflake cookies with extra powdered sugar right before serving for that fresh snowfall look. Sometimes I’ll brush a little melted white chocolate on top and sprinkle edible glitter for parties—makes them look gorgeous and festive.
Side Dishes
These cookies pair beautifully with a warm cup of spiced chai, hot cocoa, or your favorite holiday tea. My family also enjoys them alongside a sharp cheddar or slices of tangy fruit for contrast—it’s a surprisingly delightful combo.
Creative Ways to Present
One year, I arranged these snowflakes on a large platter layered with frosted evergreen branches as a centerpiece—it looked stunning and guests kept raving about the presentation. You could also string them on a ribbon with little holes poked before baking, turning them into edible ornaments or gift tags!
Make Ahead and Storage
Storing Leftovers
I store leftover cookies in an airtight container at room temperature, layering parchment paper between batches to keep them from sticking. They stay fresh and tender for up to a week, which is perfect for nibbling over coffee or packing into lunchboxes.
Freezing
I often freeze the dough discs wrapped tightly in plastic wrap before rolling and shaping. When I’m ready, I thaw in the fridge overnight and then proceed with rolling and cutting. You can also freeze baked cookies layered with parchment paper in an airtight bag for up to 3 months. Just thaw at room temp before serving.
Reheating
To revive cookies that have softened a bit, pop them in a 300°F oven for 5 minutes before serving. This brings back their slight crispness without drying them out. Just be careful not to overbake in this step.
FAQs
-
Can I make the snowflake shapes without a cookie cutter?
Absolutely! While a round cookie cutter helps keep the shape consistent, you can use the rim of a glass or even freehand cut with a knife. Just be gentle when marking the six or seven points around the edges to form your snowflake arms.
-
What if my dough is too sticky to roll?
If your dough feels sticky, pop it back into the fridge for 15-20 minutes to firm up. You can also dust your rolling surface and dough lightly with flour, but don’t overdo it, or your cookies might become dry.
-
Why do my snowflake cookies lose their shape when baking?
This usually happens if the dough is too warm or overworked. Make sure your dough is well chilled and handle it gently when shaping. Baking on a parchment-lined sheet and monitoring closely will help your snowflakes keep their crisp edges.
-
Can I add food coloring to this Snowflake Cookie Recipe?
Yes! Adding a few drops of gel food coloring to the wet batter before mixing in the flour can give you colorful snowflakes. Just keep the quantity small so it doesn’t affect the dough consistency.
Final Thoughts
Making this Snowflake Cookie Recipe quickly became a favorite holiday tradition in my kitchen. I love the way each batch turns out uniquely beautiful and how everyone lights up the moment they see these delicate snowflakes on the table. It’s a simple recipe with ingredients you probably already have, but one that rewards your effort with stunning results and plenty of smiles. So warm up your mixer, grab some powdered sugar, and give these a try—you won’t regret it!
Print
Snowflake Cookie Recipe
- Prep Time: 25 minutes
- Cook Time: 12 minutes
- Total Time: 1 hour 37 minutes
- Yield: 24 cookies
- Category: Dessert
- Method: Baking
- Cuisine: American
Description
Delightfully crisp and beautifully shaped Snowflake Cookies, perfect for holiday baking and festive occasions. These buttery cookies are flavored with vanilla and a hint of almond extract, rolled into delicate six or seven-point snowflake shapes, baked to golden perfection, and finished with a light dusting of powdered sugar for a snowy effect.
Ingredients
Dry Ingredients
- 2 cups all-purpose flour
- 1/2 teaspoon salt
- 1/2 cup powdered sugar (plus extra for dusting)
- 1/4 cup granulated sugar
Wet Ingredients
- 1 cup unsalted butter, softened
- 1 large egg
- 1 teaspoon vanilla extract
- 1/4 teaspoon almond extract (optional)
Instructions
- Prepare the Dough: Cream together the softened butter, granulated sugar, and powdered sugar in a large bowl using a hand mixer or stand mixer on medium speed until light and fluffy, about 3 minutes. Add the egg, vanilla extract, and almond extract (if using), and beat until fully combined.
- Add Dry Ingredients: In a separate bowl, whisk together the flour and salt. Gradually add the dry mixture to the wet ingredients, mixing on low speed just until a smooth dough forms. Be careful not to overmix to keep the cookies tender.
- Chill the Dough: Divide the dough into two equal portions. Flatten each into a disc, wrap tightly in plastic wrap, and refrigerate for at least 1 hour or until firm enough to roll out.
- Roll and Shape (Six-Point Snowflakes): On a lightly floured surface, roll one disc of dough to 1/4-inch thickness. Use a round cookie cutter to cut circles. Use a knife or toothpick to mark six evenly spaced points around the edge of each circle, then gently pinch the dough at each point to create snowflake arms.
- Roll and Shape (Seven-Point Snowflakes): For a variation, mark the edges of the dough circles into seven segments instead of six, and pinch each segment to form a seven-point snowflake shape.
- Bake the Cookies: Preheat your oven to 350°F (175°C) and line baking sheets with parchment paper. Arrange the shaped cookies 2 inches apart. Bake for 10–12 minutes or until the edges are lightly golden. Avoid overbaking to maintain tenderness.
- Cool and Dust: Allow the cookies to cool completely on wire racks. Once cooled, lightly dust with powdered sugar for a snowy finish before serving or packaging.
Notes
- To prevent sticking, keep the dough cold and use a dusting of flour as needed when rolling and shaping.
- These cookies hold their shape well, making them ideal for detailed snowflake designs.
- Store cookies in an airtight container at room temperature for up to 1 week to maintain freshness.
Nutrition
- Serving Size: 1 cookie
- Calories: 110
- Sugar: 6g
- Sodium: 55mg
- Fat: 7g
- Saturated Fat: 4.5g
- Unsaturated Fat: 2g
- Trans Fat: 0g
- Carbohydrates: 12g
- Fiber: 0.3g
- Protein: 1.2g
- Cholesterol: 25mg


