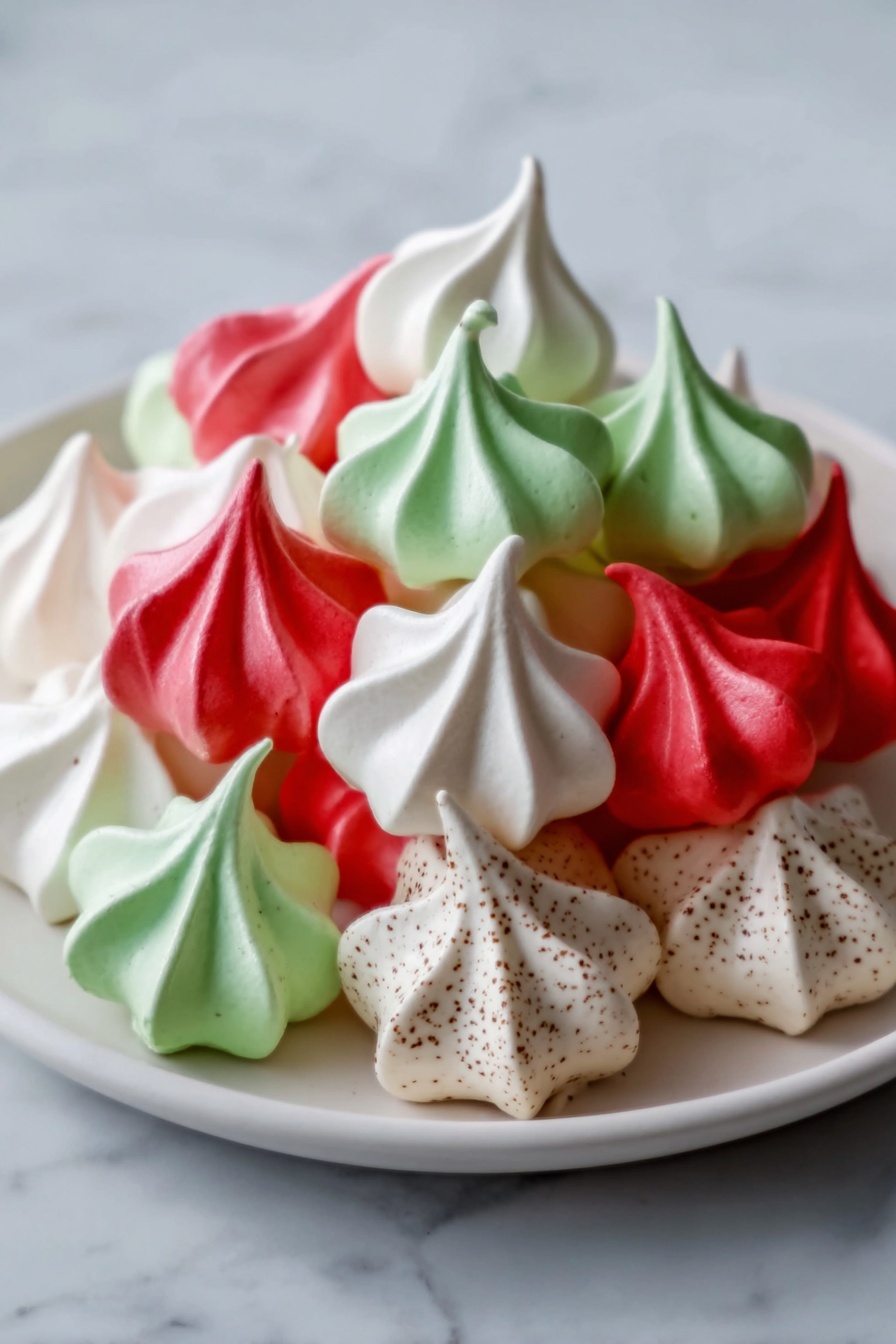
If you’ve been searching for a delightful, festive treat that’s light, airy, and bursting with holiday cheer, you’re going to love this Christmas Meringue Kisses Recipe. These little cloud-like sweets are not only fun to make but absolutely addicting to eat. I remember the first time I tried this recipe—I was amazed at how such simple ingredients transformed into these charming, melt-in-your-mouth kisses. Whether you’re looking for a charming addition to your holiday dessert table or a sweet gift for friends and family, this recipe will quickly become a favorite of yours, too. Let me walk you through everything you need to know to make perfect Christmas Meringue Kisses every time!
Why You’ll Love This Recipe
- Simple Ingredients: You only need a handful of pantry staples you probably already have.
- Perfect Holiday Colors: Easily customize with red and green gel colors to fit the Christmas spirit.
- Light & Crunchy Texture: These meringue kisses are crisp on the outside and gently melt in your mouth.
- Great Make-Ahead Treat: Bake in advance and store for up to two weeks, perfect for busy holiday days.

Ingredients You’ll Need
For Christmas meringue kisses, you’ll want to make sure your egg whites are at room temperature because they whip up better and give you more volume. Also, using gel food coloring instead of liquid keeps your meringue from getting watery and losing that perfect texture.

- Egg Whites: Make sure they’re fresh and at room temperature for maximum volume when whipped.
- Cream of Tartar: This little acid helps stabilize the egg whites, giving a stronger structure.
- Granulated Sugar: Adds sweetness and helps create that glossy, firm meringue.
- Vanilla or Peppermint Extract: Personalize the flavor to either keep it classic or get festive.
- Gel Food Coloring (red and green): These vibrant colors bring the Christmas spirit without affecting texture.
Variations
I love to mix things up with this Christmas Meringue Kisses Recipe by playing with flavor and color. You can totally make these your own, and it’s so fun to see what festive combinations you come up with!
- Chocolate Drizzle: After baking, try drizzling melted dark chocolate over the kisses for a rich contrast; my family can’t get enough of this touch.
- Different Extracts: Swap peppermint for almond or lemon extract to switch up the flavor profile when you want something unique.
- Mini Meringue Trees: Stack and glue (with frosting) these kisses into little tree shapes for an impressive holiday centerpiece.
- Nutty Addition: Fold finely chopped toasted pistachios or almonds into your meringue for added texture and nutty flavor.
How to Make Christmas Meringue Kisses Recipe
Step 1: Preheat and Prepare Your Baking Sheets
First things first, set your oven to a low 200°F (93°C). This slow baking is key for drying out the meringues without browning them. Line two baking sheets with parchment paper—avoid foil because the meringues stick and can break when you try to remove them. I always double-check my parchment fit because you want smooth surfaces to help release those delicate kisses later.
Step 2: Whip the Egg Whites to Perfection
Using a clean, grease-free bowl and whisk (this is so important!), start beating the room temperature egg whites on medium speed until they become foamy—about a minute. Next, add cream of tartar, which strengthens those whites, and keep whisking until soft peaks form. Here’s a tip: the mixture should hold soft lines but still be a little wobbly when you lift the whisk. It’s the perfect foundation.
Step 3: Slowly Add Sugar for That Glossy Shine
You need to add sugar one tablespoon at a time with the mixer running, and be patient here! Rushing this step is a common pitfall. Let each spoonful dissolve into the egg whites fully before adding more—it’ll take some time but trust me, it’s worth it. This slow addition leads to that shiny, firm texture every bite of meringue needs. When all the sugar’s in, crank the speed to high and whip for another 6–8 minutes until you get stiff peaks that stand tall without flopping. If you feel any grit when you rub the mixture between your fingers, keep whipping until it feels silky smooth.
Step 4: Flavor and Color Your Meringues
For that classic holiday twist, add either vanilla or peppermint extract now—just a quick short beat to incorporate it. If you want to get colorful (and I hope you do!), divide the meringue into bowls and add red or green gel food coloring with a toothpick, gently folding it in. If you want the striped effect, here’s a trick I learned: paint thin stripes of gel color inside the piping bag before filling it with white meringue. It looks so festive and professional!
Step 5: Pipe and Bake Your Kisses
Fit a piping bag with a star tip and start piping little mounds about 1 to 1.5 inches wide onto your parchment-lined sheets. You can get playful with shapes, but keep them close since meringues don’t spread during baking. Pop them into the oven for 90 minutes—resist opening the door! This low-and-slow bake ensures they dry out perfectly and stay pale. Once baking is done, turn off the oven and crack the door open slightly to let the meringues cool for about an hour. This gradual cool-down helps prevent cracks and keeps them from becoming chewy.
Step 6: Store and Enjoy Your Christmas Meringue Kisses
After your kisses are fully cool, gently peel them off the parchment. Store them in an airtight container at room temperature, and they’ll stay fresh and crisp for up to two weeks. The first batch I made disappeared before I realized—they’re that good!
Pro Tips for Making Christmas Meringue Kisses Recipe
- Ensure No Grease: I always wipe my mixing bowl and whisk with vinegar before starting; even a tiny bit of oil can stop egg whites from whipping properly.
- Patience with Sugar: Adding sugar slowly is key—if you rush, your meringue will be gritty and won’t hold stiff peaks.
- Low and Slow Baking: Baking at a low temperature keeps your meringues white and crisp; high heat can cause browning or cracking.
- Cool Gradually: Leaving the meringues to cool inside the oven prevents sudden temperature changes that cause cracks.
How to Serve Christmas Meringue Kisses Recipe

Garnishes
Personally, I like to top some of the meringue kisses with a tiny sprinkle of crushed candy canes or edible glitter—just enough to add sparkle and a pop of color. A light dusting of powdered sugar also adds a snowy effect that makes these treats even more magical.
Side Dishes
These kisses are fantastic alongside a warm cup of hot cocoa or mulled wine. At holiday parties, I often serve them with fresh berries and whipped cream, making for an elegant yet simple dessert platter.
Creative Ways to Present
One fun way I like to present these is in a clear glass jar tied with a festive ribbon—perfect as a gift or to decorate the table. You can also arrange meringue kisses in holiday-themed shapes on a platter for party gatherings, or even stack them to create meringue Christmas trees for a charming centerpiece.
Make Ahead and Storage
Storing Leftovers
I store leftover meringue kisses in an airtight container at room temperature, away from humidity. This keeps them crisp for up to two weeks—just make sure the container seals well to avoid moisture creeping in.
Freezing
Freezing works surprisingly well for meringue kisses! I place them in a single layer on a baking sheet to freeze, then transfer to a sealed container. When thawed at room temperature, the texture stays beautifully crunchy.
Reheating
If your meringue kisses lose a bit of their crispness, you can refresh them by popping them in a low oven (around 200°F) for 5–10 minutes—just keep an eye on them to prevent browning. It’s a quick fix that brings back their delightful crunch.
FAQs
-
Can I use liquid food coloring instead of gel?
Gel food coloring is the best choice because it’s concentrated and won’t add extra moisture that can affect the meringue’s texture. Using liquid food coloring might make the meringue too soft or sticky.
-
Why didn’t my egg whites whip properly?
Make sure your bowl and whisk are completely clean and grease-free—any oil residue prevents whipping. Also, using aged egg whites at room temperature helps achieve better volume.
-
Can I make these meringue kisses without cream of tartar?
Cream of tartar stabilizes the egg whites and helps them hold shape. If you don’t have it, you can substitute with a few drops of lemon juice or white vinegar, but it’s best not to skip entirely for the best results.
-
How do I prevent my meringue kisses from cracking?
Gradual cooling is essential. Leaving the meringues to cool inside the oven with the door slightly ajar prevents sudden temperature changes that cause cracks.
Final Thoughts
I absolutely love how this Christmas Meringue Kisses Recipe turns out every single time. It’s such a simple way to add festive sweetness to your holidays without baking something heavy or complicated. Whenever I make these, I think about the smiles around the table and how something so airy and light can bring so much joy. If you’re looking to impress with a treat that’s as charming as it is delicious, this recipe is your new best friend. Trust me, once you try it, you’ll want to keep these kisses in your holiday baking rotation forever!
Print
Christmas Meringue Kisses Recipe
- Prep Time: 20 minutes
- Cook Time: 1 hour 30 minutes
- Total Time: 2 hours 50 minutes
- Yield: About 60 small meringue kisses
- Category: Dessert
- Method: Baking
- Cuisine: American
- Diet: Kosher
Description
This Christmas Meringue Kisses recipe delivers light, airy, and delightfully sweet little treats perfect for holiday celebrations. Made with simple ingredients like egg whites, sugar, and a hint of vanilla or peppermint, these meringues are carefully baked low and slow to achieve a crisp exterior and melt-in-your-mouth texture. Optional festive red and green food coloring makes them colorful and joyful additions to any holiday dessert table or gift.
Ingredients
Meringue Base
- 4 large egg whites, at room temperature
- ½ teaspoon cream of tartar
- 1 cup granulated sugar
- 1 teaspoon vanilla extract or ¼ teaspoon peppermint extract
- Red and green gel food coloring (optional)
Instructions
- Preheat the Oven: Set the oven to 200°F (93°C) and line two baking sheets with parchment paper, avoiding foil to prevent sticking.
- Whip the Egg Whites: In a clean, grease-free stand mixer bowl with the whisk attachment, beat egg whites on medium speed until foamy, about 1 minute.
- Add Cream of Tartar: Add cream of tartar and continue beating until soft peaks form; the mixture should hold lines when whisk is drawn through.
- Incorporate Sugar: With mixer running, add sugar one tablespoon at a time, allowing each addition to dissolve fully, ensuring a smooth, glossy meringue.
- Whip to Stiff Peaks: Increase speed to high and beat for 6–8 minutes until stiff, glossy peaks form that feel smooth when rubbed between fingers; continue beating if gritty.
- Flavor the Meringue: Add vanilla or peppermint extract and beat briefly just to combine, avoiding over-whipping.
- Color the Meringue: Divide into bowls if coloring; fold in small amounts of gel food coloring gently. For stripes, paint stripes inside piping bag before adding white meringue.
- Pipe the Meringue: Fit piping bag with a star tip and pipe 1 to 1.5 inch wide kisses onto prepared sheets, spacing close as they won’t spread.
- Bake the Meringues: Bake for 90 minutes without opening oven door; meringues remain pale and dry to touch.
- Cool in Oven: Turn off oven, crack door slightly, and leave meringues inside for 1 hour for gradual cooling to prevent cracking and set texture.
- Remove and Store: Once cool, gently lift off parchment and store in airtight container at room temperature for up to 2 weeks.
Notes
- Ensure all utensils and bowls are completely clean and grease-free to allow proper whipping; wipe with vinegar if needed and dry thoroughly.
- Use gel food coloring instead of liquid to maintain the meringue’s texture and prevent softening.
- Do not open the oven door during baking to avoid cracking.
- Gradual cooling inside the oven is key to crisp, crack-free meringues.
Nutrition
- Serving Size: 1 meringue kiss (approx. 5g)
- Calories: 15
- Sugar: 3.5g
- Sodium: 5mg
- Fat: 0g
- Saturated Fat: 0g
- Unsaturated Fat: 0g
- Trans Fat: 0g
- Carbohydrates: 4g
- Fiber: 0g
- Protein: 0.3g
- Cholesterol: 0mg


