
If you’re on the hunt for a bread recipe that feels special yet never overwhelming, I’ve got just the thing: my No-Knead Cranberry Walnut Bread Recipe. Seriously, this loaf is one of those magical kitchen wins where the most work you do is waiting—and trust me, it’s worth every second of patience. It’s tender, slightly tangy from cranberries, chunky with walnuts, and wrapped in a golden, crisp crust that makes your kitchen smell like a cozy autumn morning. Let me walk you through exactly how to get this on your table with no fuss and all the flavor.
Why You’ll Love This Recipe
- Super Simple Process: No kneading means less mess and effort, but the dough still produces incredible texture and flavor.
- Perfect Balance of Flavors: Tart cranberries and toasted walnuts with bright orange zest create a harmonious fall-inspired loaf.
- Beautiful Crust Every Time: Baking in a Dutch oven traps steam to give you that bakery-style crunchy crust without fancy equipment.
- Make-Ahead Friendly: The long rise builds flavor and allows you to prep in advance—no last-minute hustle required.

Ingredients You’ll Need
Each ingredient in this No-Knead Cranberry Walnut Bread Recipe plays a crucial part in flavor, texture, and rise. I love how simple pantry staples combine with a few special additions like orange zest to create something truly festive. And a quick tip: make sure your dried cranberries are plump and fresh for the best chewy burst in every bite.

- Active dry yeast: Look for fresh yeast so your dough rises beautifully—expired yeast means flat bread, so test it by blooming in warm water and sugar.
- Warm water: Keep it between 110° to 115°F for optimal yeast activation; too hot or too cold can slow or kill the yeast.
- Granulated sugar: Feeds the yeast and adds a touch of sweetness to balance tart cranberries.
- Kosher salt: Enhances flavor and controls yeast fermentation for a great rise.
- Bread flour: Higher protein content gives this loaf superior structure and chew—don’t substitute with all-purpose if you can help it.
- Dried cranberries: Adds tartness and texture; soak in warm water if they feel too tough.
- Dried walnuts: Coarsely chopped for crunch and a nutty accent that pairs so well with sweet and tart.
- Honey: Natural sweetness and moisture to enrich the dough.
- Orange zest: A bright, citrusy note that livens every slice and perfectly complements cranberries.
Variations
I often tweak this No-Knead Cranberry Walnut Bread Recipe to suit the season or my pantry. Feel free to customize—the recipe’s forgiving nature means you can swap nuts, add spices, or even throw in extra dried fruit to make it your own.
- Swap walnuts for pecans: I tried this once, and the pecans gave the bread a slightly sweeter, softer nutty chew that my family adored.
- Add warming spices: Cinnamon or nutmeg bring cozy fall vibes—perfect if you want a bread that smells like the holidays.
- Use fresh orange juice: Replace some of the water with orange juice for an even brighter citrus pop.
- Make it gluten-free: While this bread loves bread flour, experimenting with gluten-free blends and xanthan gum can work with some practice.
How to Make No-Knead Cranberry Walnut Bread Recipe
Step 1: Activate Your Yeast Like a Pro
Begin by dissolving your yeast and sugar in warm water (110 to 115°F). This little magic trick wakes up the yeast, so after about 10 minutes, you should see a bubbly, foamy surface—which means the yeast is alive and kicking. If it doesn’t foam, don’t be discouraged—just toss it and try again. This step saved me from failed dough more than once!
Step 2: Mix It All Together Gently
In a large bowl, whisk together the bread flour and salt. Pour in your yeast mixture and honey, then stir just until all the flour is moistened. Don’t overwork it! You’ll see a very sticky, wet dough—this is exactly what you want. Fold in the dried cranberries, walnuts, and orange zest until evenly distributed.
Step 3: Let It Rest and Rise—Patience is Key
Cover your bowl with plastic wrap (making sure it doesn’t touch the dough) and leave it on your countertop for 18 hours. This long, slow fermentation helps develop deep flavor and a tender crumb without any kneading on your part. I’ve learned that at least 16 hours works, but 18 hours is magic for flavor.
Step 4: Shape Without Punching
After your dough has risen, it will be very sticky and bubbly—don’t punch it down! Instead, lightly flour your work surface and hands, then gently fold the dough over itself from the edges to the center to form a ball. This gentle handling keeps the air bubbles intact, which means a lovely airy loaf. Transfer it, smooth side up, onto floured parchment paper and cover with plastic wrap for a 30-minute rest.
Step 5: Bake with Steam for Perfect Crust
About 30 minutes before baking, preheat your oven to 450°F with your Dutch oven (including the lid) inside—this helps get the pot scorching hot. Score an “X” or your favorite pattern on the top of the dough to let steam escape. Carefully transfer the parchment with dough into the hot Dutch oven, cover tightly with the lid, and bake for 30 minutes. Resist opening the lid—a steamy environment is what creates that tantalizing crust. After 30 minutes, remove the lid and bake another 8-10 minutes until your bread shines golden brown. Let it cool completely before slicing.
Pro Tips for Making No-Knead Cranberry Walnut Bread Recipe
- Perfect Water Temperature: Use a kitchen thermometer to get water just right—too hot kills yeast, too cold slows rise.
- Flour Generously When Shaping: The dough is sticky, so keep your hands and surface well-floured to avoid frustration.
- Don’t Skip the Long Rise: That 18-hour wait deepens flavor and texture—worth planning for!
- Hot Dutch Oven is Key: Preheat it fully to get steam and crisp crust; cold pot = sad crust.
How to Serve No-Knead Cranberry Walnut Bread Recipe

Garnishes
I’m a big fan of simply slathering this bread with salted butter or a smear of cream cheese to highlight the bread’s sweet and nutty notes. For brunch or holidays, a drizzle of honey or a sprinkle of flaky sea salt on top just before serving takes it to the next level.
Side Dishes
This bread pairs beautifully with warm soups—think butternut squash or tomato bisque—or alongside a cheese platter for a festive snack. My family also enjoys it toasted with smashed avocado and a pinch of chili flakes.
Creative Ways to Present
When I serve this at holiday dinners, I slice it thick and fan the pieces out on a rustic wooden board garnished with fresh rosemary and a few extra walnuts. It’s great for gifting too—wrap in parchment and tie with a twine bow for a cozy homemade present.
Make Ahead and Storage
Storing Leftovers
Once cooled, I store this bread loosely wrapped in a paper bag or a bread box—this keeps the crust crisp while preserving the tender crumb inside. Avoid sealing it airtight, or you’ll lose that beautiful crust.
Freezing
I like to slice the loaf before freezing, then wrap individual slices tightly in foil and place them inside a resealable freezer bag. This way, you can take out just what you need. It freezes well for up to three months without losing flavor or texture.
Reheating
Reheat slices in a toaster oven or under a broiler for a few minutes to refresh the crust’s crunch while warming the inside. You can also wrap the whole loaf in foil and place it in an oven at 350°F for about 10 minutes.
FAQs
-
Can I use all-purpose flour instead of bread flour for this recipe?
You could, but bread flour’s higher protein content helps develop gluten structure that supports the chewy texture and rise, especially important in a no-knead bread. If you use all-purpose flour, expect a slightly softer, less chewy crumb.
-
What if my dough doesn’t rise after 18 hours?
This often means the yeast was inactive or water temperature was off. Make sure your yeast blooms properly before mixing, and keep the dough in a warm area around 70-75°F. If it’s cooler, the rise will slow. You can give it more time or try again with fresh yeast.
-
Can I add other dried fruits or nuts to this bread?
Absolutely! I’ve experimented with cherries, apricots, and even toasted almonds. Just keep the overall quantity similar so the dough isn’t overwhelmed and the loaf bakes evenly.
-
Do I really need a Dutch oven to bake this bread?
A Dutch oven helps trap steam, which is key for that crisp crust and soft interior. If you don’t have one, you can try baking on a baking stone with a tray of water in the oven to create steam, but results may vary.
Final Thoughts
I absolutely love how this No-Knead Cranberry Walnut Bread Recipe turns out every single time, and I hope you’ll enjoy baking it as much as I do. It’s a recipe that feels fancy but is totally achievable—even if you don’t consider yourself a baker. The long rise gives you time to forget about it (cue the perfect excuse for a relaxed morning), then ends with a deliciously impressive loaf that’s bursting with flavor and nostalgia. Give it a try, and I promise it’ll become one of your go-to cozy breads! Happy baking!
Print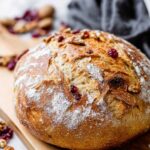
No-Knead Cranberry Walnut Bread Recipe
- Prep Time: 15 minutes
- Cook Time: 40 minutes
- Total Time: 19 hours 25 minutes
- Yield: 12 slices
- Category: Bread
- Method: Baking
- Cuisine: American
- Diet: Vegetarian
Description
This no-knead Thanksgiving Cranberry Walnut Bread is a delightful artisan-style loaf that combines the tartness of dried cranberries and the crunch of walnuts with subtle hints of orange zest and honey. Baked in a Dutch oven to achieve a crisp, golden crust and soft, flavorful interior, this bread is perfect for holiday meals or cozy mornings.
Ingredients
Yeast Mixture
- ½ teaspoon active dry yeast
- 1 ½ cups warm water (110 to 115 degrees F)
- 1 teaspoon granulated sugar
Dough
- 2 teaspoons Kosher salt
- 3 cups bread flour, plus 2 tablespoons (plus more for surface)
- ¾ cup dried cranberries
- ½ cup dried walnuts, roughly chopped
- 1 tablespoon honey
- 1 tablespoon orange zest
Instructions
- Prepare the Yeast Mixture: Dissolve the active dry yeast and granulated sugar in the warm water (110 to 115°F). Let sit for 10 minutes until foamy to activate. If it doesn’t foam, discard and restart to ensure proper yeast activation.
- Mix the Dough: In a large bowl, whisk the bread flour with Kosher salt. Add the yeast mixture and honey, stirring gently until no dry flour remains, avoiding over-mixing. Fold in dried cranberries, walnuts, and orange zest until evenly incorporated. The dough will be sticky and wet—that’s expected.
- First Rise: Cover the bowl tightly with plastic wrap without touching the dough and let it rest at room temperature for 18 hours. This long fermentation develops flavor and texture.
- Shape the Dough: After rising, transfer the sticky dough to a well-floured surface. Sprinkle flour on top and on your hands. Gently fold edges to the center to form a ball without deflating the air bubbles. Place the dough seam side down on lightly floured parchment paper, smooth side up.
- Second Rest: Cover the dough ball with plastic wrap and let it rest on the counter for 30 minutes to relax.
- Preheat Oven and Dutch Oven: Place a 5 to 6-quart Dutch oven with its lid inside your oven and preheat to 450°F for at least 30 minutes to get the pot thoroughly heated.
- Score the Dough: Using a sharp knife, score an X or your preferred pattern on top of the dough to allow expansion during baking.
- Bake Covered: Carefully remove the hot Dutch oven from the oven, lift the parchment paper with the dough, and place it inside. Cover with the lid and bake for 30 minutes without opening to retain steam and moisture.
- Bake Uncovered: Remove the lid and continue baking for an additional 8 to 10 minutes until the crust turns a deep golden brown.
- Cool and Serve: Lift the bread out with the parchment paper and let it cool completely on a wire rack before slicing for the best texture and flavor.
Notes
- Allow the dough to rise for the full 18 hours to maximize flavor and achieve the ideal texture. A minimum of 12 hours is possible but results may vary.
- The dough will be sticky and wet before and after rising; this high hydration creates steam for a crispy crust when baked in the Dutch oven.
- A Dutch oven is essential for trapping steam and forming the perfect crust, replicating professional baking conditions at home.
- Store the bread in a semi-open paper bag to maintain crust crispness while preventing it from drying out.
- For longer storage, freeze wrapped first in aluminum foil and then in a resealable freezer bag for up to 3 months. Thaw fully at room temperature before slicing.
Nutrition
- Serving Size: 1 slice (approx. 1/12 of loaf)
- Calories: 180
- Sugar: 6g
- Sodium: 350mg
- Fat: 3.5g
- Saturated Fat: 0.3g
- Unsaturated Fat: 3g
- Trans Fat: 0g
- Carbohydrates: 34g
- Fiber: 3g
- Protein: 5g
- Cholesterol: 0mg


