
If you’ve ever wondered how to make fresh, creamy, and ridiculously delicious butter right at home, you’re going to adore this Homemade Butter Recipe with Heavy Cream Recipe. It’s surprisingly simple, and once you try it, you’ll never look at store-bought butter the same way again. I absolutely love how fresh butter tastes straight from the whisk, and I can’t wait to share this easy process with you so you can taste that magic too!
Why You’ll Love This Recipe
- Simplicity: Only one key ingredient—heavy cream—means it’s easy and approachable.
- Freshness: Your homemade butter tastes rich and pure, way better than store-bought.
- Customizable: Add sea salt or leave it unsalted to suit your tastes perfectly.
- Quick Results: From start to finish, this recipe takes about 25 minutes.

Ingredients You’ll Need
This recipe keeps things beautifully simple—just quality heavy cream and a pinch of salt if you want that classic butter taste. I always recommend using fresh, high-fat heavy whipping cream for the best result, as it whips up easily and yields rich, creamy butter.
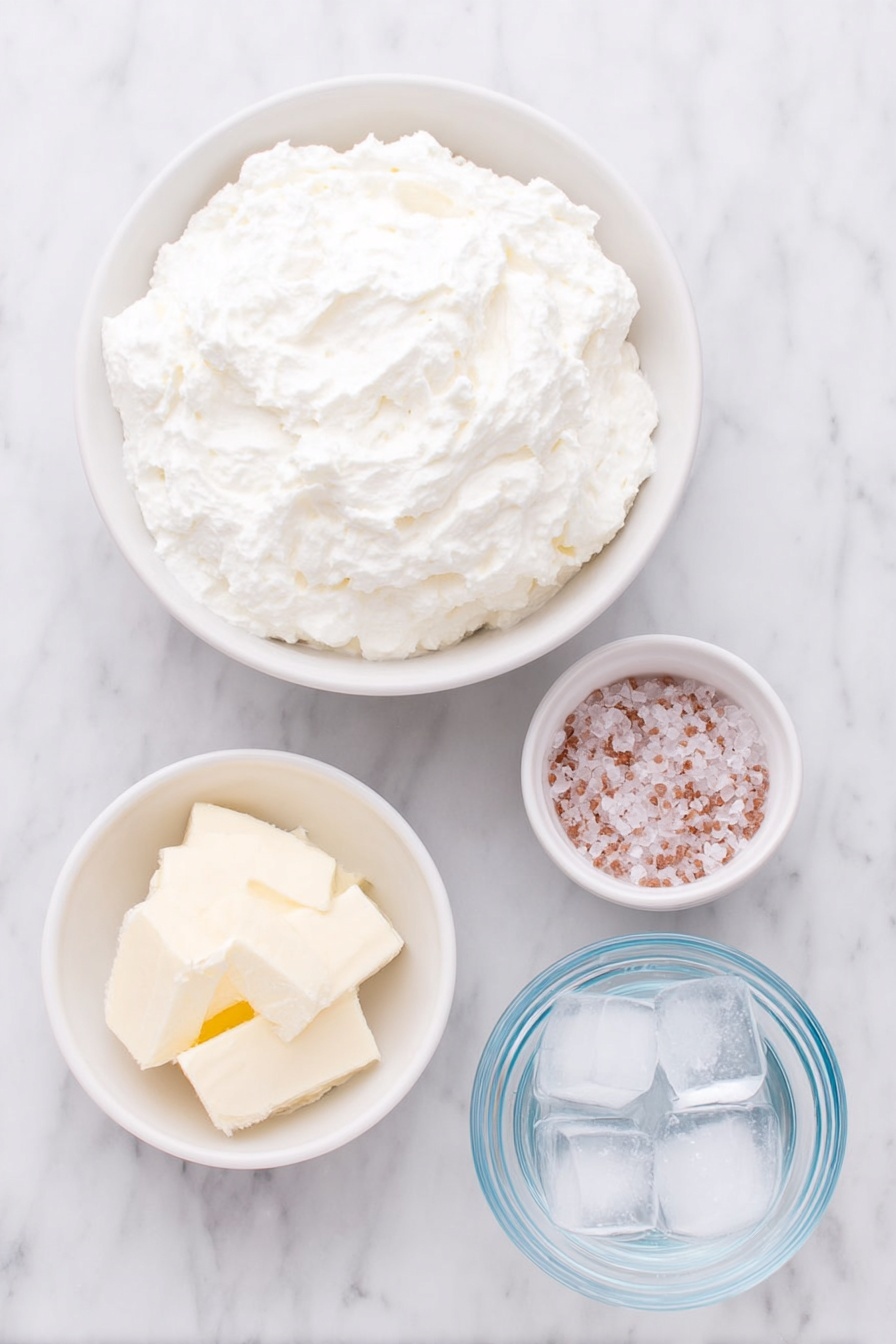
- Heavy whipping cream: The star of the show—opt for organic or local cream if you can find it for extra flavor.
- Sea salt (optional): Adds a nice balance to your butter if you like a little salty kick; you can adjust to your preference.
- Ice water: Helps rinse and solidify the butter after you separate it from the buttermilk.
Variations
I love making my homemade butter pure and simple, but once in a while, I like to get creative by adding a little twist. Feel free to experiment, because personalizing this recipe is what makes it truly yours!
- Herb-Infused Butter: I once whisked in fresh chopped rosemary and thyme right after straining, and wow, it elevated my garlic bread game big time.
- Sweetened Butter: Adding a touch of honey during the whisking process creates a lovely, slightly sweet butter perfect for breakfast pastries.
- Lactose-Free Option: Unfortunately, this recipe requires heavy cream, so it’s tough to substitute—but clarified butter made from this recipe is lactose minimal.
How to Make Homemade Butter Recipe with Heavy Cream Recipe
Step 1: Whip the Cream until It Separates
Start by pouring your heavy whipping cream into the bowl of a stand mixer fitted with the whisk attachment. If you don’t have a stand mixer, a large bowl and hand mixer will do—just make sure the bowl can handle the cream expanding. Whisk on medium speed for about 10 minutes. At first, the cream will turn into whipped cream with stiff peaks—this is your sign you’re halfway there! If you like your butter salted, sprinkle the sea salt now to incorporate the flavor.
Step 2: Watch Butter and Buttermilk Separate
Keep whisking past the whipped cream stage. This is always the fun part because suddenly, the fat and liquid will split—the butterfat will clump up and cling to your whisk, while the buttermilk stays liquid at the bottom. It can take a few more minutes, so be patient and keep an eye out! When the separation is clear, you’re ready for the next step.
Step 3: Strain and Rinse the Butter
Set up a mesh sieve over a bowl to catch the butter and strain out the buttermilk. Pour the contents of your mixer into the sieve—don’t throw away the buttermilk! It’s great for baking or cooking. Now, use your hands or a spatula to squeeze out any remaining liquid from the butter. For a final rinse, dip the butter into a bowl of ice water, then squeeze again to get rid of excess buttermilk. This step helps your butter last longer.
Step 4: Shape and Store Your Butter
Next, place your butter onto parchment or wax paper and mold it into a log or block shape—whatever you prefer! I like wrapping mine up and tying the ends with kitchen twine because it feels just like those wrapped store-bought sticks. For even more convenience, slice into smaller sticks before wrapping. Keep it in the fridge to firm up, and it’s good for about three weeks—or pop it in the freezer if you want to keep it longer.
Pro Tips for Making Homemade Butter Recipe with Heavy Cream Recipe
- Room Temperature Cream: Let your heavy cream sit out for 15 minutes before whipping to speed up the process and get better separation.
- Don’t Rush the Whip: I learned the hard way that turning up the speed only slows things down—keep it at medium for best results.
- Save the Buttermilk: The leftover buttermilk is fantastic for pancakes, biscuits, and even salad dressings—don’t toss it!
- Proper Storage: Wrapping the butter tightly and keeping it cold prevents it from picking up fridge smells and helps with longevity.
How to Serve Homemade Butter Recipe with Heavy Cream Recipe

Garnishes
I like to sprinkle just a tiny pinch of flaky sea salt on top of my homemade butter before serving—it adds a beautiful texture and bite. Sometimes I mix in a bit of fresh herbs like chives or parsley for a fresh, vibrant finish that pairs perfectly with warm bread.
Side Dishes
Your homemade butter is a dream companion to crusty artisan bread, warm rolls, or even fresh corn on the cob. I’ve also enjoyed it spread on baked potatoes and stirred into mashed potatoes for that extra luscious richness.
Creative Ways to Present
For special occasions, I’ve formed my butter into fun shapes—little butter curls using a butter curler or shaping it into hearts with cookie cutters placed over parchment paper. Adding a few edible flowers or fresh herbs around the platter can make your butter the star of the table.
Make Ahead and Storage
Storing Leftovers
I usually keep my homemade butter wrapped tightly in parchment and stored in a resealable bag in the fridge. It stays fresh for about three weeks, which is plenty of time for me to enjoy it before making more. The key is minimizing exposure to air and strong smells.
Freezing
Freezing homemade butter is a game-changer—I portion mine into sticks before freezing, so I can grab exactly what I need. It holds up beautifully for up to nine months, and defrosting is quick and convenient.
Reheating
When you want to soften frozen butter, just leave it out at room temperature for about 20-30 minutes or microwave it on a very low setting for a few seconds. Be careful not to melt it completely—you want soft, spreadable butter, not liquid!
FAQs
-
Can I make homemade butter without a stand mixer?
Absolutely! A hand mixer with a whisk attachment and a large bowl works just as well. It might take a little longer and require more effort, but the results are just as delicious.
-
What’s the difference between homemade butter and store-bought?
Homemade butter is incredibly fresh, free from preservatives, and you control the salt level and flavor additions. It also has a unique texture that’s creamier and feels so much richer on the palate.
-
How do I know when the butter is done separating?
You’ll see a clear separation: the solid butter will clump around the whisk, and a milky liquid (buttermilk) will collect at the bottom of your bowl. The butter will look slightly grainy and may stick together when squeezed.
-
Can I use lower fat cream or milk instead of heavy cream?
This recipe works best with heavy whipping cream because of its high fat content. Lower fat creams or milk won’t separate properly and won’t turn into butter.
-
What do I do with the leftover buttermilk?
Don’t throw it away! Use it in pancakes, biscuits, salad dressings, or even as a marinade. It adds wonderful tang and richness to many recipes.
Final Thoughts
Making butter from scratch might sound intimidating, but with this Homemade Butter Recipe with Heavy Cream Recipe, it’s downright fun and surprisingly easy. I hope you give it a try because nothing compares to that fresh, creamy taste you get when you make it yourself. Plus, sharing homemade butter with friends and family always earns you some serious kitchen cred. So grab that heavy cream, whisk away, and enjoy your beautiful homemade butter—you’re going to love it as much as I do!
Print
Homemade Butter Recipe with Heavy Cream Recipe
- Prep Time: 25 minutes
- Cook Time: 0 minutes
- Total Time: 25 minutes
- Yield: 32 tablespoons (approximately 1 lb or 4 sticks)
- Category: Dairy
- Method: Blending
- Cuisine: American
Description
Learn how to make fresh, homemade butter using just heavy whipping cream and optional sea salt. This simple process whips cream until the butterfat separates from the buttermilk, resulting in creamy, delicious butter that you can shape and store. Ideal for those who enjoy fresh dairy and want full control over their butter’s flavor and saltiness.
Ingredients
Butter
- 4 cups heavy whipping cream
- 2 tsp sea salt (optional, for salted butter)
- Ice water (for rinsing)
Instructions
- Prepare the equipment. Get out a stand mixer fitted with the whisk attachment, or alternatively, a large mixing bowl with a hand mixer and whisk attachment. Ensure your bowl is large enough to accommodate the expanding cream as it whips.
- Whip the heavy cream. Pour the heavy cream into the mixing bowl and whisk on medium speed for about 10 minutes. As you whisk, watch for the cream to reach stiff peaks. If using salt, add it now and continue whisking. Keep going until the butterfat separates from the buttermilk, and you see the butter collecting on the whisk while liquid buttermilk pools in the bowl.
- Strain the mixture. Set a mesh sieve over a smaller bowl. Carefully pour the contents of the mixing bowl into the sieve, allowing the buttermilk to drain into the bowl below while the butter stays in the sieve.
- Squeeze out excess liquid. Pick up the butter mass and squeeze to remove remaining buttermilk. Then, dip the butter into the ice water bowl and squeeze again to wash and remove any residual liquid.
- Shape the butter. Place the wet butter onto parchment or wax paper and shape it into a log or a rectangular block similar to store-bought butter sticks. Wrap tightly with the paper and secure with kitchen twine or string.
- Store and chill. Optionally, slice into individual sticks and wrap each separately. Place the wrapped butter in the refrigerator to firm up. Homemade butter stays fresh for up to 3 weeks refrigerated or can be frozen for up to 9 months.
Notes
- This recipe yields approximately 1 lb of butter, equivalent to 4 standard sticks or about 32 tablespoons.
- Use only heavy whipping cream; alternatives will not yield proper butter.
- Adding sea salt is optional and can be adjusted based on taste preference.
- Ensure the cream is chilled before starting for best results.
- Homemade butter contains no preservatives, so store properly and consume within recommended timeframes.
Nutrition
- Serving Size: 1 tablespoon
- Calories: 102
- Sugar: 0g
- Sodium: 85mg
- Fat: 11g
- Saturated Fat: 7g
- Unsaturated Fat: 3g
- Trans Fat: 0.5g
- Carbohydrates: 0g
- Fiber: 0g
- Protein: 0.1g
- Cholesterol: 31mg


