
If you’re looking for a show-stopping, sweet treat that’s a bit different from your usual cookies, you’re going to adore this Red Velvet Rose Cookies Recipe. These delicate little rosettes are as beautiful as they are delicious—perfect for gifting, special occasions, or just because you want to treat yourself to something totally fancy-feeling without hours in the kitchen. I absolutely love how this recipe combines that classic red velvet flavor with a fun, elegant twist that you can bake right at home.
Why You’ll Love This Recipe
- Beautiful Presentation: The rosette shapes look stunning and impress everyone.
- Classic Flavor with a Twist: Red velvet with cocoa and a hint of buttermilk makes every bite irresistible.
- Quick and Easy: Despite the fancy look, this recipe comes together quickly and easily.
- Versatile Serving: Perfect as simple cookies or filled sandwich style with marshmallow buttercream.

Ingredients You’ll Need
Each ingredient in this Red Velvet Rose Cookies Recipe has a role to play, working together to create that melt-in-your-mouth texture, that lovely red color, and the rich flavor you expect from red velvet. I always recommend using good-quality cocoa powder and gel food coloring to get the most vibrant color without making the dough too wet.

- Shortening: Gives the cookies their tender, soft texture and helps the rosettes hold their shape when piped.
- White sugar: Sweetens the dough and helps with the right structure for these delicate cookies.
- Eggs: Bind the ingredients together and add moisture.
- Vanilla extract: Adds warmth and depth to the flavor.
- Buttermilk: Brings that signature hint of tanginess and enhances the red velvet taste.
- Red gel food coloring: Creates that iconic red hue without watering down the dough.
- All-purpose flour: The base that gives these cookies structure while keeping them light.
- Unsweetened cocoa powder: Adds that subtle chocolate note key to red velvet.
- Salt: Balances the sweetness and boosts overall flavor.
Variations
I like to switch things up based on the occasion or my mood, and this Red Velvet Rose Cookies Recipe is surprisingly flexible. You can customize it with different frostings or add-ins, making it as simple or as fancy as you’d like.
- Chocolate Ganache Filling: Swapping the marshmallow buttercream for a classic chocolate ganache creates a richer, more decadent cookie sandwich. My family goes crazy for this twist!
- Vegan Version: You can substitute shortening with coconut oil and use a flax egg instead of eggs to make these vegan-friendly. It takes a bit of experimenting with drying time, but totally doable.
- Spiced Red Velvet: Adding a pinch of cinnamon and cayenne pepper to the dry ingredients gives these cookies a fun, unexpected warmth that’s perfect for colder months.
- Gluten-Free: Replacing all-purpose flour with a blend of almond flour and gluten-free flour mix works well, just be careful with dough consistency and piping.
How to Make Red Velvet Rose Cookies Recipe
Step 1: Cream Shortening and Sugar
Start by heating your oven to 350°F. Then, in a stand mixer fitted with the paddle attachment, cream together the shortening and sugar until it’s light and fluffy. This is where a lot of the cookie’s tenderness comes from, so take your time—about 3-4 minutes on medium speed is perfect.
Step 2: Add Eggs, Vanilla, Buttermilk, and Food Coloring
Once your shortening and sugar are combined, add the eggs one at a time, mixing on medium-low speed. Then lower your mixer speed and add vanilla extract, buttermilk, and the red gel food coloring. I discovered this slow, gentle mixing is key to keeping your dough smooth and evenly colored without getting it too runny.
Step 3: Combine Dry Ingredients
In a separate bowl, whisk together the all-purpose flour, cocoa powder, and salt. This step is important because it helps everything blend seamlessly into the wet ingredients without clumps of cocoa sunshine. I always sift mine to be extra sure.
Step 4: Mix Dry Ingredients into Wet
With your mixer on low speed, gradually add the dry mixture to the wet ingredients. The dough will start to thicken. If it feels surprisingly dry, you can carefully add up to 1/4 cup more buttermilk—but no more than that! You want a piping-dough consistency that’s not too runny but smooth enough to hold each rosette shape.
Step 5: Pipe the Rosettes
This part is my favorite. Fill a piping bag fitted with a 1M or 2D tip with small amounts of dough, and pipe individual rosettes onto parchment-lined baking sheets. Keep your rosettes about 1.5 inches wide so they bake evenly. I love this easy decorating technique—it makes the cookies look like art!
Step 6: Bake and Cool
Bake your cookies for 6-8 minutes. Here’s a trick I learned: when they come out, they might still look a little wet on top, but that’s completely fine. The cookies set up as they cool, so resist the urge to overbake or they’ll dry out. Let them cool fully to room temperature before handling.
Step 7: Sandwich with Marshmallow Buttercream
To take these cookies to the next level, spread about 1 tablespoon of marshmallow buttercream on the bottom of one cookie, then gently sandwich another cookie on top. The contrast between the fluffy buttercream and the tender cookie is what makes this Red Velvet Rose Cookies Recipe a total crowd-pleaser in my house.
Pro Tips for Making Red Velvet Rose Cookies Recipe
- Use Gel Food Coloring: Liquid coloring can make dough too wet—gel gives vibrant color without altering texture.
- Don’t Overbake: Cookies look wet right out of the oven—this is normal; they’ll firm up as they cool to the perfect texture.
- Piping Bag Technique: Restart your piping with small amounts of dough to keep shapes defined; clean the tip if dough gets stuck.
- Adjust Buttermilk Slowly: If the dough feels dry, add buttermilk gradually—too much makes the rosettes lose their shape in the oven.
How to Serve Red Velvet Rose Cookies Recipe

Garnishes
I like to dust my cooled cookies with a tiny pinch of powdered sugar for extra charm, but honestly, their natural beauty shines through without much fuss. Sometimes I add edible rose petals for a fancy party—such a fun wow factor if you’re serving guests!
Side Dishes
These cookies pair perfectly with a cup of strong coffee or a glass of cold milk. For an afternoon tea party, I serve them alongside lemon scones or fresh berries, which balance out the rich chocolate flavor beautifully.
Creative Ways to Present
Layering these cookies on a tiered dessert stand instantly glamorizes your spread. I’ve also tried wrapping small stacks tied with ribbon as gifts for friends—everyone loves receiving edible roses that taste like a dream!
Make Ahead and Storage
Storing Leftovers
I store my leftover Red Velvet Rose Cookies in an airtight container at room temperature, layered with parchment paper to prevent sticking. They stay soft and fresh for up to 3 days, but honestly, mine never last that long!
Freezing
You can freeze both baked cookies and unbaked dough. For cookies, wrap them tightly in plastic wrap, then pop them in a freezer bag. Thaw overnight at room temperature before serving. For dough, pipe rosettes onto parchment-lined trays and freeze until firm, then transfer to freezer bags for quick baking later.
Reheating
Warm the cookies gently in a 300°F oven for 3-5 minutes to bring back that fresh-baked softness, especially if frozen. Avoid microwaving, as it can make them chewy or hard.
FAQs
-
Can I use butter instead of shortening in this Red Velvet Rose Cookies Recipe?
Butter can technically be used, but shortening helps the cookies hold their rosette shape better because it’s solid at room temperature and has a neutral flavor. Using butter might make your cookies spread more and lose their defined look.
-
Why do the cookies look wet right after baking?
This is completely normal—the cookies keep setting as they cool. Overbaking leads to dry cookies, so it’s best to trust the recipe timing and let them finish firming up on the tray.
-
What’s the best tip for piping the rosettes if I’m a beginner?
Practice on parchment first to get a feel for your piping bag pressure and speed. Keep your wrist steady and pipe in a circular motion starting from the center outward. Don’t overload the bag—small batches make cleaner shapes.
-
Can I make these cookies without the sandwich filling?
Absolutely! These rosette cookies are delightful on their own if you prefer a lighter treat, or simply dusted with powdered sugar for an elegant look.
Final Thoughts
I’ve made the Red Velvet Rose Cookies Recipe several times now, and somehow, it never fails to impress both my family and visitors. There’s just something magical about seeing those perfect little swirls come out of the oven, soft but structured, with that gorgeous red tint. Plus, pairing them with marshmallow buttercream feels like a little luxury you can create in your own kitchen without fuss or fancy equipment. Give these a try—you’ll be surprised at how much fun piping and baking them is, and I bet you’ll find yourself reaching for this recipe whenever you want to add a touch of elegance to your cookie game.
Print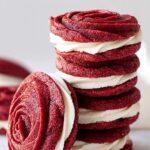
Red Velvet Rose Cookies Recipe
- Prep Time: 10 minutes
- Cook Time: 8 minutes
- Total Time: 18 minutes
- Yield: 8 sandwich cookies
- Category: Dessert
- Method: Baking
- Cuisine: American
- Diet: Vegetarian
Description
These Red Velvet Rose Cookies are delightful, visually stunning treats featuring a soft, cocoa-infused red velvet dough piped into delicate rosette shapes. They’re baked to perfection and sandwiched with a sweet marshmallow buttercream, making them perfect for special occasions or as a charming gift.
Ingredients
Cookie Dough
- 2/3 cup shortening
- 1 3/4 cup white sugar
- 2 eggs
- 1 teaspoon vanilla extract
- 1/4 cup buttermilk (plus up to 1/4 cup more if needed)
- 1 teaspoon red gel food coloring
- 2 cups all-purpose flour
- 1/2 cup unsweetened cocoa powder
- 1/2 teaspoon salt
Filling
- Marshmallow buttercream (about 1 tablespoon per sandwich)
Instructions
- Preheat Oven: Heat the oven to 350°F (177°C) and line a baking sheet with parchment paper to ensure easy removal and even baking.
- Cream Shortening and Sugar: In a stand mixer, beat together the shortening and sugar until the mixture is light and fluffy, ensuring a smooth texture for the cookies.
- Add Eggs: Gradually add the eggs one at a time on medium-low speed, ensuring each egg is fully incorporated before adding the next to maintain the batter’s consistency.
- Mix Wet Ingredients: Lower the mixer speed to low and blend in the vanilla extract, buttermilk, and red gel food coloring until the mixture is evenly colored and combined.
- Combine Dry Ingredients: In a separate bowl, whisk together the all-purpose flour, unsweetened cocoa powder, and salt to evenly distribute all dry components.
- Add Dry to Wet: With the mixer still on low, gradually add the dry ingredients into the wet mixture, mixing until a dough forms. If the dough feels dry, add up to an additional 1/4 cup of buttermilk for proper consistency, but do not exceed this amount.
- Pipe Rosettes: Transfer the dough to a piping bag fitted with a 1M or 2D tip. Pipe out small rosette shapes onto the prepared baking sheet, spacing them evenly apart.
- Bake Cookies: Bake the cookies for 6-8 minutes. The cookies may still look slightly wet when done, which is normal. Remove them from the oven and allow them to cool completely to room temperature on the baking sheet.
- Assemble Sandwiches: Once cooled, spread about 1 tablespoon of marshmallow buttercream on the bottom of one cookie, then gently place another cookie on top to form a sandwich. Press lightly to adhere.
Notes
- If the dough is too dry, add buttermilk gradually, but do not add more than 1/4 cup extra to avoid overly wet dough.
- Use gel food coloring for vibrant color without thinning the dough.
- Piping the dough with a star tip creates the visually appealing rosette shape.
- Cookies will appear slightly wet out of the oven; this is expected and they will firm up as they cool.
- Store assembled cookies in an airtight container to keep them fresh and the filling creamy.
Nutrition
- Serving Size: 1 sandwich cookie
- Calories: 250
- Sugar: 18g
- Sodium: 120mg
- Fat: 15g
- Saturated Fat: 6g
- Unsaturated Fat: 8g
- Trans Fat: 0g
- Carbohydrates: 28g
- Fiber: 1g
- Protein: 2g
- Cholesterol: 40mg


