
If you’re looking for a delightfully sweet treat that’s as pretty as it is delicious, this Pink White Chocolate Fudge Recipe is going to be your new best friend in the kitchen. I absolutely love how creamy and smooth this fudge turns out, with that gorgeous blush pink hue that makes it perfect for celebrations—or just because. Seriously, it’s one of those recipes you’ll want to share with everyone once you make it because it tastes way better than it looks (and it looks amazing!). So let’s dive in and get you all set up for some seriously scrumptious fudge-making fun.
Why You’ll Love This Recipe
- Simple Ingredients: You need only a handful of pantry staples—no complicated shopping required.
- Quick & Easy: It comes together in under 30 minutes, making it perfect for last-minute treats.
- Visually Stunning: The soft pink tint makes it a showstopper for holidays, birthdays, or baby showers.
- Versatile & Customizable: You can add your favorite mix-ins or tweak colors to match your vibe.

Ingredients You’ll Need
The magic of this Pink White Chocolate Fudge Recipe lies in its simple ingredients that come together beautifully. I like to use good-quality white chocolate melting wafers because they melt smoothly and give the fudge a silky finish, but chopped chocolate works too if you take a moment to prep it right. A few drops of gel food coloring is all you need to get that perfect pink shade without watering down the rich flavor.
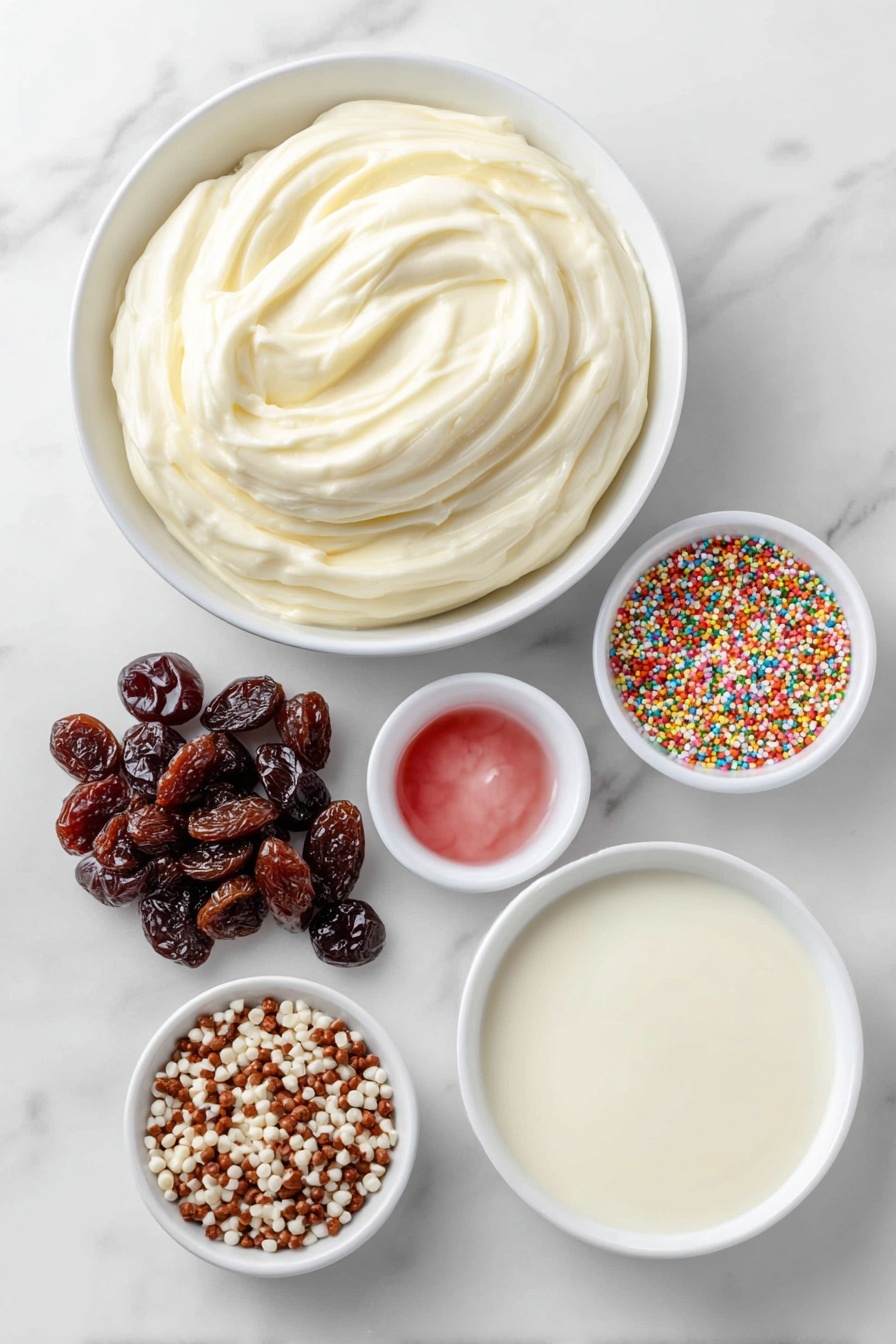
- White chocolate melting wafers or high-quality chopped chocolate: The type of chocolate you use impacts the fudge’s texture and taste, so pick something you love to eat straight from the bag.
- Sweetened condensed milk: This adds luscious creaminess and just the right amount of sweetness. I always use the full-fat kind for the best richness.
- Pink gel food coloring: Go slow with the drops—you can always add more to reach your desired shade without diluting the candy’s flavor.
- Optional sprinkles: For a fun festive touch, I sometimes add colorful sprinkles. Just sprinkle on top after pouring the fudge.
- Optional dried cherries: Adding dried cherries makes for a nice fruity surprise that complements the sweetness perfectly.
Variations
I love that this Pink White Chocolate Fudge Recipe is a fantastic blank canvas—you can easily personalize it depending on the occasion or your preferences. I’ve played around with a few versions, and each brings its own charm, so feel free to get creative!
- Add Nuts: Toss in some chopped pistachios or almonds to add a little crunch. My family goes crazy for the nutty texture against the creamy fudge.
- Flavor Boost: Stir in a teaspoon of rosewater or vanilla extract for a floral or classic twist. It elevates the fudge without overpowering it.
- Dairy-Free Version: Use coconut condensed milk and dairy-free white chocolate to make it vegan friendly—I’ve tried it and it’s still dreamy.
- Ombre Effect: For a fun look, mix the pink coloring into half the chocolate and gently swirl with the white before pouring.
How to Make Pink White Chocolate Fudge Recipe
Step 1: Prepare Your Pan
First things first, line a 9×9 inch baking pan with parchment paper. I like to let the parchment overhang on two sides—that way, it’s super easy to lift the fudge out without worrying about it sticking. Trust me, this little step saves you loads of time cutting later!
Step 2: Chop Chocolate (if needed)
If you’re using regular white chocolate bars instead of melting wafers, chop them into small, even pieces. This helps everything melt smoothly and avoids those annoying lumps. It’s a step I learned the hard way the first time I rushed it.
Step 3: Melt Chocolate & Condensed Milk
Put your white chocolate and sweetened condensed milk in a large microwave-safe bowl. Microwave in 20 to 30-second bursts, stirring really well between each one. In my experience, two rounds are usually enough, but stir well—the residual heat helps the last bits melt without burning. You’ll want a smooth, shiny mixture with no graininess.
Step 4: Add Pink Color & Mix-ins
Stir in a few drops of pink gel food coloring. For a sweet ombré effect, you can gently fold the colored part into some of the plain white fudge so parts stay beautiful white. If you want to add dried cherries or sprinkles, now’s the time—dried cherries add a lovely tart bite, and sprinkles just bring fun vibes.
Step 5: Chill & Cut
Pour your fudge mixture into the lined pan, smooth the top, and pop it into the fridge for about an hour until firm. When it’s fully set, I like to use a heart-shaped cookie cutter for a sweet presentation. Here’s a neat trick: place a kitchen towel on top of the cutter while pressing down gently—it makes cutting easier and kinder to your hands.
Step 6: Serve & Enjoy!
Pull out those adorable hearts and get ready for compliments. These little bites of pink-white chocolate heaven are perfect as party favors or just a special snack. I promise you, once you try this Pink White Chocolate Fudge Recipe, you’ll be hooked.
Pro Tips for Making Pink White Chocolate Fudge Recipe
- Gentle Melting: Stir thoroughly between microwave bursts to prevent overheating and seizing the chocolate.
- Color Control: Use gel food coloring, not liquid, to avoid thinning the fudge mixture and losing that perfect texture.
- Use Parchment Overhang: It’s a lifesaver for lifting fudge straight out without sticky fingers or a crumbly mess.
- Cutting Technique: Press cookie cutters gently over the fudge with a kitchen towel on top to protect your hands and get clean edges.
How to Serve Pink White Chocolate Fudge Recipe

Garnishes
I love topping this fudge with a sprinkle of edible glitter or crushed freeze-dried raspberries for a little extra sparkle and tartness. Sometimes I even add a few tiny edible flowers on top just to make it look extra fancy when guests come over.
Side Dishes
This fudge pairs beautifully with a hot cup of tea or coffee. For a light dessert spread, I often put it alongside fresh berries and some buttery shortbread cookies to balance the rich sweetness.
Creative Ways to Present
For baby showers or bridal parties, I love arranging the fudge hearts on a tiered dessert platter mixed with pastel macarons and mini cupcakes. Wrapping individual fudge pieces in cute cellophane bags tied with a ribbon also turns them into perfect little gifts.
Make Ahead and Storage
Storing Leftovers
Once your fudge is cut, store leftovers in an airtight container lined with parchment paper between layers. I keep mine in the fridge for up to two weeks, and I find it stays just as creamy and fresh as when it’s first made.
Freezing
If you want to save some for later, freezing works great! Wrap pieces individually in plastic wrap, then place them in a freezer-safe container. When you’re ready, thaw in the fridge overnight for the best texture.
Reheating
Since fudge is best enjoyed cold or at room temperature, I don’t usually reheat it. But if your kitchen is warm and it softens too much, just pop it back in the fridge for a bit—the texture bounces right back.
FAQs
-
Can I use regular white chocolate bars instead of melting wafers for this pink fudge?
Absolutely! Just make sure to chop the white chocolate bars into small, even pieces before melting. This helps the chocolate melt smoothly and prevents lumps or burning during microwaving. Melting wafers are great because they melt evenly, but good-quality chopped chocolate works just as well with a little prep.
-
How do I get that beautiful pink color without affecting the fudge’s texture?
Use gel food coloring instead of liquid coloring. It delivers a vibrant pink without adding extra moisture that could make the fudge grainy or too soft. Start with just a few drops and add more until you reach your perfect shade.
-
Can I add other flavors or mix-ins to the Pink White Chocolate Fudge Recipe?
Yes! This fudge is super versatile. You can fold in dried fruits like cherries, nuts for crunch, or even a hint of rosewater or vanilla extract for extra flavor. Just keep additional ingredients to a manageable amount so the fudge still sets nicely.
-
How should I store leftover fudge?
Store leftover fudge in an airtight container in the refrigerator. Separating layers with parchment or wax paper prevents sticking. It keeps well for up to two weeks, maintaining its creamy texture and flavor.
Final Thoughts
This Pink White Chocolate Fudge Recipe holds a special place in my heart because it’s one of those rare treats that’s quick, easy, and stunning all at once. Whether you’re making it for a party, gifting it, or just sneaking a sweet bite on a cozy afternoon, it never disappoints. Give it a try—you’ll discover how simple it is to make a fancy-looking, melt-in-your-mouth fudge with minimal effort. I’m excited for you to enjoy this recipe as much as I do!
Print
Pink White Chocolate Fudge Recipe
- Prep Time: 10 minutes
- Cook Time: 10 minutes
- Total Time: 1 hour 20 minutes
- Yield: 12 servings
- Category: Dessert
- Method: Microwaving
- Cuisine: American
Description
This Pink White Chocolate Fudge is a delightful, creamy treat featuring smooth white chocolate blended with sweetened condensed milk and a touch of pink gel food coloring for a charming visual appeal. Perfectly sweet and easy to make, this fudge can be customized with optional sprinkles or dried cherries to add texture and fruity notes, making it a festive and elegant dessert for any occasion.
Ingredients
Main Ingredients
- 20 ounces white chocolate melting wafers or high-quality chopped white chocolate
- ½ cup plus 1 tablespoon sweetened condensed milk
- Pink gel food coloring, a few drops
Optional Ingredients
- Sprinkles, as desired
- Dry cherries, as desired
Instructions
- Prepare the Pan: Line a 9×9 inch pan with parchment paper so it overhangs on two sides; this will make removing the fudge easier. Set the pan aside.
- Chop Chocolate if Needed: If using regular blocks of white chocolate rather than melting wafers, chop the chocolate into small pieces to ensure even melting in the microwave.
- Combine Ingredients: Place the white chocolate and sweetened condensed milk into a large, microwave-safe bowl.
- Microwave and Stir: Heat the chocolate mixture in 20 to 30-second increments, stirring thoroughly after each interval to aid melting. It usually takes around two intervals for the chocolate to melt completely. Stir well after microwaving as residual heat helps smooth out the mixture.
- Add Color: Mix in a few drops of pink gel food coloring. For an attractive ombre effect, leave part of the mixture white by not fully blending in all the coloring.
- Add Optional Mix-Ins: If desired, gently fold in dried cherries and/or sprinkles to enhance flavor and texture.
- Chill the Fudge: Pour the mixture evenly into the prepared pan and refrigerate for about 1 hour, or until the fudge is set and firm.
- Cut Shapes: Once set, use a heart-shaped cookie cutter to cut the fudge into heart shapes. To make pressing easier and protect your hands, place a kitchen towel on top of the cookie cutter while gently cutting.
- Serve and Enjoy: Arrange the heart-shaped fudge pieces on a plate and enjoy this sweet, creamy treat.
Notes
- Make sure to use high-quality white chocolate for the best creamy texture and flavor.
- When melting chocolate, stirring frequently is important to avoid burning and achieve smoothness.
- Gel food coloring is recommended over liquid to avoid changing the fudge’s consistency.
- For a more decorative look, use an ombre effect by partially mixing the pink coloring.
- Refrigerating thoroughly is key to ensure the fudge sets properly before cutting.
- Optional dried cherries add a pleasant tartness that complements the sweetness of white chocolate.
- If desired, sprinkles can add fun color and texture to the fudge.
Nutrition
- Serving Size: 1 piece (approximate)
- Calories: 200
- Sugar: 22g
- Sodium: 30mg
- Fat: 12g
- Saturated Fat: 7g
- Unsaturated Fat: 4g
- Trans Fat: 0g
- Carbohydrates: 24g
- Fiber: 0g
- Protein: 2g
- Cholesterol: 10mg


