
If you’re looking for a bread recipe that feels both fancy and totally doable, you’re going to love this Easiest No Knead Sourdough Bread Recipe. I absolutely love how this bread combines a crispy crust with an airy, chewy crumb — and the best part? You don’t have to wrestle with kneading or complicated steps. When I first tried this, I was amazed at how straightforward it was to get bakery-quality sourdough right from my own kitchen, and I bet you’ll feel the same!
Why You’ll Love This Recipe
- Effortless Process: No kneading means less elbow grease but all the flavor and texture you crave.
- Minimal Ingredients: Just flour, water, salt, and your starter – simple pantry staples coming together brilliantly.
- Perfect Artisan Crust: A gorgeous golden crust that shatters delightfully with each bite.
- Super Versatile: Whether you’re new to sourdough or a seasoned pro, this recipe adapts beautifully to your kitchen and schedule.

Ingredients You’ll Need
The magic of this easiest no knead sourdough bread recipe lies in using simple, quality ingredients that let the flavors shine. I always recommend using unbleached bread flour if you can find it—it really gives your bread that perfect structure and chew. And don’t skip the sea salt; it enhances every bit of flavor in the crumb and crust.

- Mature Starter: This is your live culture — make sure it’s bubbly and active for the best rise.
- Unbleached Bread Flour or All-Purpose Flour: Bread flour yields a chewier texture; all-purpose works well too if that’s what you have.
- Filtered Water: I’ve noticed my bread rises better with filtered water — chlorine in tap water can slow fermentation.
- Sea Salt: Adds subtle complexity and a nice balance to the sourdough tang.
Variations
I love tweaking this recipe depending on what I have around or the season. It’s super forgiving, so feel free to customize. You could add some herbs or whole grains to give it a fresh spin, or adjust hydration a bit if you like a denser loaf.
- Herb-Infused: Adding fresh rosemary or thyme to the dough gave my bread an amazing fragrant twist—my family went crazy for it!
- Whole Wheat Blend: Swapping half the bread flour for whole wheat adds a wholesome flavor and a bit more chew.
- Gluten-Free Option: While this recipe is best with wheat flours, you can use gluten-free sourdough starters and flours with some experimentation.
- Easy Overnight Rise: I sometimes do a slow, cold fermentation in the fridge overnight instead of at room temp—it deepens the flavor and fits my schedule.
How to Make Easiest No Knead Sourdough Bread Recipe
Step 1: Build Your Starter the Night Before
Start with 25 grams of your mature starter mixed with 75 grams of flour and 75 grams of warm water (around 90°F). I like to do this in a clean mason jar, stirring until everything’s combined with no dry bits. Cover it loosely—plastic wrap works great here—and leave it at room temperature overnight, about 8 to 12 hours. By morning, you’ll see your starter bubbly and doubled, which means it’s ready to take center stage.
Step 2: Mix Your Dough in the Morning
In a large bowl, combine 100 grams of that ripe starter with 300 grams of warm water. Stir it up until the starter dissolves into the water. Then add 500 grams of bread flour and 10 grams of sea salt. Mix everything until you get a shaggy, sticky dough. I used to worry about how messy sticky dough feels, but that’s exactly the texture you want for a beautiful crumb.
Step 3: Let It Rise – No Oven Required
Cover your bowl tightly with plastic wrap and pop it in your oven with just the light on to create a cozy, warm environment—around 80 to 85°F is perfect. I discovered this trick when my kitchen was too chilly for good fermentation. Let it rest for 5 to 6 hours or until the dough puffs up noticeably and leaves a slow-filling indent with a gentle poke. Just be careful if your oven light makes it warmer than that; if it gets too hot, crack the door slightly or turn the light off after the first hour.
Step 4: Shape Your Dough With Gentle Folds
Dust your clean counter lightly with flour and gently turn your dough out, seam side down. Starting from the top edge, gently pull the dough outward then fold it toward the center. Repeat this for the bottom, left, and right edges and pinch to seal. Then do this folding routine once more and flip the dough seam side down. Use your hands to gently rotate and stretch it into a taut, smooth ball — it should feel soft but pulled tight, like a little pillowy balloon. I watch tutorials to nail this step, and it always sets the stage for a perfect loaf.
Step 5: Second Rise in a Floured Basket
Generously flour a bread basket — if you don’t have one, no worries! A large bowl lined with a floured kitchen towel works just as well. Place your dough seam-side up into the basket, dust the top lightly with flour, and cover again with plastic wrap. Return it to the warm oven light spot for another 2 to 3 hours until it doubles again and feels airy when gently pressed. This second rise really blooms your dough, developing structure and flavor.
Step 6: Score and Bake in the Dutch Oven
Take your dough out of the oven and preheat to 450°F. Unlike some other recipes, you don’t preheat the Dutch oven for this one — it goes straight in. Place parchment paper on your counter, carefully turn the dough out seam side down onto it, and make a confident ½-inch-deep slash down the length of the loaf with a sharp knife or lame. This scoring guides the bread’s expansion so it doesn’t burst unpredictably. Using the parchment’s corners, lift your dough and place it inside the Dutch oven. Cover with the lid, reduce the heat to 425°F, and bake covered for 40 minutes. Then remove the lid and bake another 5 to 10 minutes until the crust is a deep golden brown and sounds hollow when tapped.
Step 7: Cool Completely Before Slicing
After baking, use the parchment corners to lift the bread onto a wire rack. This cooling step is crucial — it usually takes me at least 2 hours before slicing. The interior should finish setting, with an internal temperature between 190-205°F. Cut too soon, and your bread might be gummy. I learned that lesson the hard way, so patience here truly pays off!
Pro Tips for Making Easiest No Knead Sourdough Bread Recipe
- Starter Readiness: I always perform the float test—if your starter floats in water, it’s lively and ready for baking.
- Oven Light Warmth: Different ovens vary, so double-check the temp inside with a thermometer; too warm can overproof your dough.
- Confidence in Scoring: Don’t hesitate when cutting your dough—firm, decisive scores give beautiful oven spring.
- Avoiding Overproofing: If your dough feels overly soft or collapses, shorten the rising times slightly or keep your kitchen cooler.
How to Serve Easiest No Knead Sourdough Bread Recipe

Garnishes
I love slathering my warm sourdough slices with herb-infused butter or a sprinkle of flaky sea salt. Sometimes I toast a slice and add fresh smashed avocado with a pinch of chili flakes — so simple, yet it feels gourmet.
Side Dishes
Pairing this bread with homemade soups—like creamy tomato basil or a rich roasted butternut squash—is one of my favorite cozy meals. It’s also fantastic alongside a charcuterie board with soft cheeses, olives, and cured meats.
Creative Ways to Present
For special occasions, I turn this loaf into a centerpiece by cutting it into thick halves and hollowing out the middle for a warm dip bowl—spinach artichoke dip inside? Yes, please! You can also slice it thick, stack with layers of turkey and pesto, wrap in parchment, and gift to friends for brunch.
Make Ahead and Storage
Storing Leftovers
I store leftover sourdough at room temperature in a paper bag to keep the crust crisp and avoid mold. This usually keeps well for about 3 days. If your kitchen is humid, a bread box works wonders too.
Freezing
Freezing this bread is easy and life-saving. I slice it first and freeze pieces in airtight bags. When you want a quick fix, pull out slices and toast directly from frozen — no thawing needed!
Reheating
My go-to for reheating leftover sourdough is a quick wrap in foil and warming in a 350°F oven for 10 minutes. This refreshes the crust and softens the crumb beautifully, like it’s just out of the oven.
FAQs
-
How active should my sourdough starter be for this recipe?
Your starter should be bubbly and doubled in size within 6-12 hours after feeding. A good test is the float test—drop a spoonful in water, and if it floats, it’s ready to use.
-
Can I use all-purpose flour instead of bread flour?
Absolutely! Bread flour gives more chew and structure, but all-purpose flour works fine if that’s what you have on hand. Just expect a slightly softer crumb.
-
What if my dough feels too sticky to handle?
This dough is meant to be sticky—that’s key for that airy texture. Use lightly floured hands and resist adding too much extra flour; instead, rely on gentle folding techniques.
-
How can I tell when the bread is fully baked?
The crust should be a deep golden brown and sound hollow when tapped. If you have a food thermometer, the internal temperature should read between 190-205°F for perfect doneness.
-
Can I refrigerate the dough for a slow fermentation?
Yes! Refrigerating slows fermentation and develops flavor. Just extend the rise times and bring the dough to room temperature before baking.
Final Thoughts
This easiest no knead sourdough bread recipe has truly been a game-changer in my baking journey. It’s approachable enough for busy days yet yields that classic artisan loaf everyone raves about. Whether you’re gifting loaves to friends or simply savoring fresh slices with your morning coffee, this bread always feels special and comforting. Give it a try—I promise you’ll feel proud biting into your own perfectly crusty, chewy sourdough. Happy baking!
Print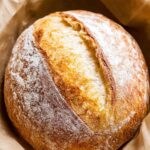
Easiest No Knead Sourdough Bread Recipe
- Prep Time: 15 minutes
- Cook Time: 50 minutes
- Total Time: 10 hours 5 minutes
- Yield: 8 servings
- Category: Bread
- Method: Baking
- Cuisine: Sourdough
Description
This Easiest Ever Sourdough Bread recipe is a no-knead, simple method that yields a beautifully crusty, artisan-style loaf with minimal effort. Utilizing a ripe sourdough starter and long, slow fermentation, this bread has a soft, pillowy crumb and a rich, tangy flavor. Perfect for beginners and seasoned bakers alike, it requires only basic ingredients and gentle hand folding, baked in a Dutch oven to achieve a classic crusty exterior.
Ingredients
Starter Build (Night Before)
- 25 grams mature starter (about 2 tablespoons)
- 75 grams unbleached bread flour or all-purpose flour (½ cup + 1 teaspoon)
- 75 grams water, 90°F (⅓ cup)
Dough
- 100 grams ripe starter (heaping ⅓ cup)
- 300 grams filtered water, 90°F (1¼ cups + 1 tablespoon)
- 500 grams white bread flour or unbleached all-purpose flour (3½ cups + ½ teaspoon)
- 10 grams sea salt (2⅛ teaspoons)
Instructions
- Build the starter: The evening before baking, combine 25 grams mature starter with 75 grams flour and 75 grams warm water (90°F) in a clean mason jar. Mix until no dry flour remains, cover loosely with plastic wrap, and let it rest at room temperature for 8-12 hours until doubled and bubbly.
- Mix the dough: The next morning, combine 100 grams of the ripe starter with 300 grams of warm water in a large mixing bowl. Stir thoroughly until fully dispersed. Add 500 grams of bread flour and 10 grams sea salt. Mix until a shaggy, sticky dough forms and then use your hands to bring it together into a sticky ball.
- Bulk fermentation: Cover the bowl with plastic wrap and place it inside the oven with the light on to maintain a warm environment (~80-85°F). Let the dough rise for 5-6 hours until it has doubled in size and is noticeably puffy. A gentle poke should leave an indent that slowly fills back in.
- Shape the dough: Lightly flour your countertop and turn the dough out seam-side down. Gently pull and fold the top edge to the center, repeat with each side, pinch the seams to seal, then repeat the folds once more. Flip the dough seam-side down, and with cupped hands, rotate and tighten the dough ball until the surface is smooth, taut, yet soft and pillowy.
- Second rise: Dust a bread basket with flour and place the dough seam-side up inside. Lightly dust the top with flour and cover with plastic wrap. Return it to the oven (light on) for 2-3 hours until doubled and airy. When pressed, it should hold the indentation.
- Preheat oven and prepare dough: Remove dough from oven and preheat oven to 450°F. Transfer dough onto parchment paper seam-side down. Using a sharp knife or lame, score a ½-inch deep lengthwise cut along the top.
- Baking: Using the parchment corners, lift the dough into an unheated Dutch oven. Cover with the lid, reduce oven temperature to 425°F, and bake covered for 40 minutes. Remove the lid and bake uncovered for an additional 5-10 minutes until dark golden brown and crust sounds hollow when tapped.
- Cooling: Remove the bread from the Dutch oven using parchment corners and place on a cooling rack. Cool completely for at least 2 hours; internal temperature should reach 190-205°F. The crust will crisp, and the crumb will be fully set. Slice and enjoy!
Notes
- Use an active, bubbly starter that floats in water for best results.
- If you don’t have a proofing basket, a large bowl lined with a well-floured kitchen towel works well.
- The dough will be sticky when mixing; this is normal and creates the ideal texture.
- Cold kitchens may require longer fermentation times; the oven light method offers a stable warm environment.
- Score dough confidently with a decisive cut to help even rising; a simple straight line is perfect for beginners.
- While bread flour is preferred for structure, all-purpose flour works well too.
- Store your bread at room temperature in a paper bag for up to 3 days; for longer storage, slice and freeze in an airtight container for up to 3 months.
Nutrition
- Serving Size: 1 slice (approx. 80g)
- Calories: 180
- Sugar: 0.2 g
- Sodium: 320 mg
- Fat: 1 g
- Saturated Fat: 0.2 g
- Unsaturated Fat: 0.6 g
- Trans Fat: 0 g
- Carbohydrates: 38 g
- Fiber: 2 g
- Protein: 6 g
- Cholesterol: 0 mg


