
If you’re on the hunt for a delightful, colorful treat that’s as fun to make as it is to eat, you’re in the right place! My Pastel Sugar Cookie Sandwiches Recipe is an absolute gem that never fails to bring smiles. I love how these cookies turn out soft, tender, and perfectly sweet, sandwiched with a creamy vanilla filling that adds just the right touch of indulgence. Whether you’re baking for a party, a special occasion, or just because, this recipe is your new go-to. Let me walk you through everything you need to know to nail these pastel beauties every single time!
Why You’ll Love This Recipe
- Vibrant Pastel Colors: The gel food coloring gives you beautiful shades without messing up the dough texture.
- Soft & Tender Cookies: These aren’t your average crunchy sugar cookies; they’re delightfully soft and melt in your mouth.
- Creamy Vanilla Filling: The smooth, fluffy filling pairs perfectly, turning cookie sandwiches into little bites of heaven.
- Kid-Friendly & Festive: Perfect for family baking sessions, kids love rolling dough into colorful balls and assembling the sandwiches.

Ingredients You’ll Need
These ingredients work like a dream together. The key is using softened butter for that luscious, rich base and gel coloring to keep your dough the right texture while adding those fun pastel hues. I always recommend using real vanilla extract because it adds warmth that turns simple sugar cookies into something special.
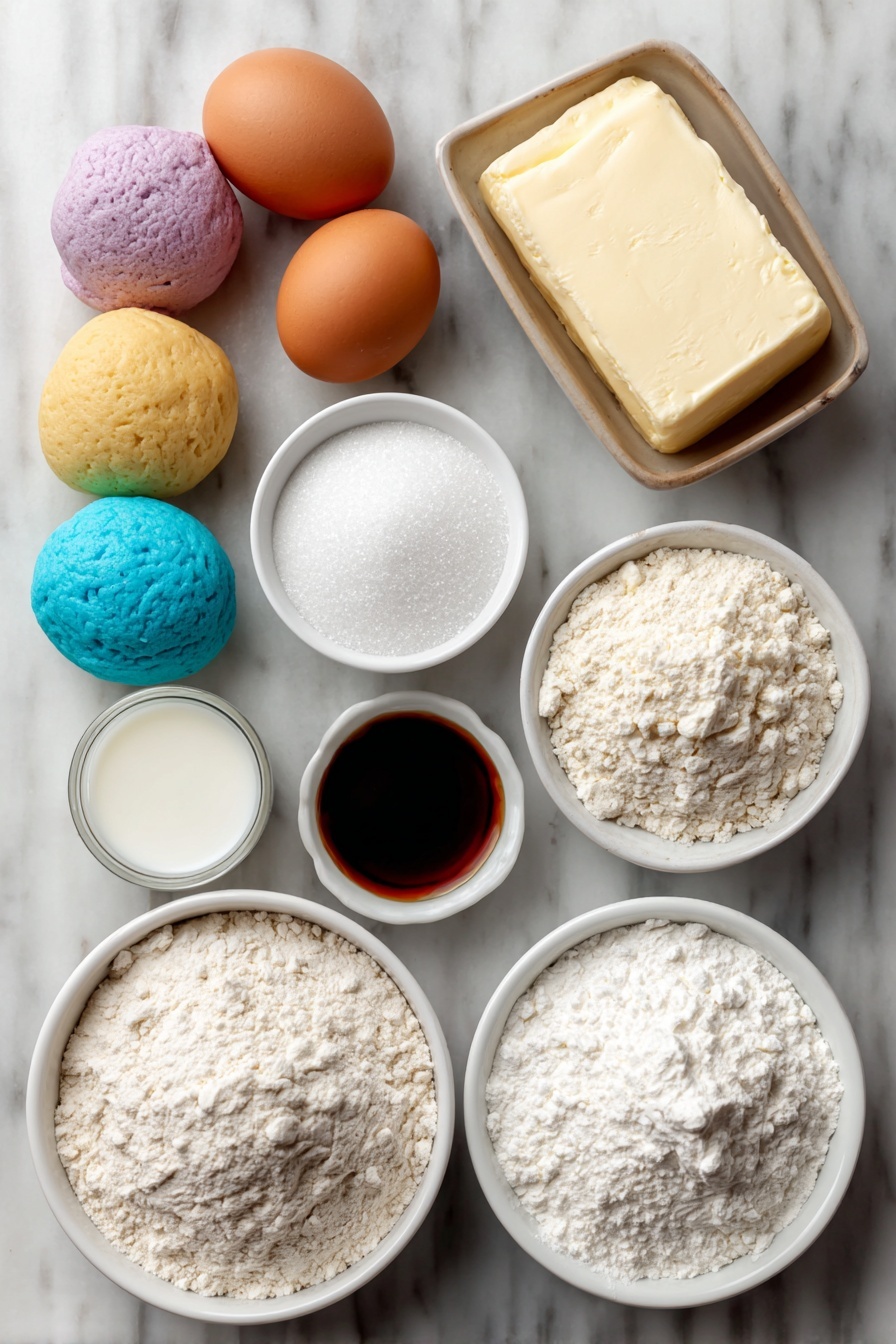
- Unsalted Butter: Make sure it’s softened at room temperature for easy creaming and smooth dough.
- Granulated Sugar: For sweetness and a slight crisp edge on the cookies.
- Egg: Helps with binding and gives the cookie a tender crumb.
- Vanilla Extract: Adds wonderful flavor depth; don’t skip it!
- All-Purpose Flour: The backbone of the dough, providing structure.
- Baking Soda & Baking Powder: Both help the cookies rise just right – don’t swap or skip.
- Salt: To balance sweetness and enhance flavors.
- Milk: Adds moisture and helps the dough come together smoothly.
- Gel Food Coloring: These provide vibrant pastels without thinning the dough – I like pink, yellow, green, blue, and purple.
- Powdered Sugar: For that luxuriously smooth vanilla filling.
- Heavy Cream or Milk (for filling): Gives the filling its perfect creamy, spreadable texture.
- Pinch of Salt (for filling): Balances sweetness and rounds out the vanilla flavor.
Variations
I love how versatile this pastel sugar cookie sandwich recipe is! You can easily play with different colors or even flavors with small tweaks. It’s your chance to get creative and make it your own.
- Flavor Twist: I once added a bit of lemon zest to the dough and swapped vanilla for almond extract in the filling – totally brightened things up and gave it a fresh spring vibe.
- Diet-Friendly: For a dairy-free version, swap the butter for coconut oil and use a plant-based milk alternative. The texture changes slightly but still tasty!
- Color Variations: Sometimes I use only three pastel colors for a simpler look—just pick your favorites to suit the party theme.
- Chocolate Filling: Try a chocolate buttercream filling instead of vanilla for a rich surprise inside.
How to Make Pastel Sugar Cookie Sandwiches Recipe
Step 1: Cream Butter and Sugar Until Fluffy
Start by beating your softened butter and sugar together. This step is crucial because it incorporates air, giving your cookies a tender texture. I usually use a stand mixer with the paddle attachment, but a hand mixer works just fine. Beat for about 2 minutes until the mixture is pale and fluffy—don’t rush it!
Step 2: Add Egg and Vanilla
Mix in the egg and vanilla extract until everything is smooth. The batter might look a little shiny here, which is a good sign that everything is well combined.
Step 3: Combine Dry Ingredients and Add to Wet
Whisk together the flour, baking soda, baking powder, and salt in a separate bowl. Add this dry mix gradually to your wet ingredients on low speed to avoid a floury cloud. The dough should come together as a soft, thick mass. Then stir in the milk to help loosen the dough just enough for easy handling.
Step 4: Divide Dough and Color
Now for the fun part: split the dough into five equal parts. Use gel food coloring to tint each portion a pretty pastel shade. I usually wear gloves for this because the dye can stain your hands. Knead each until the color is evenly distributed—these dough balls will brighten your kitchen and mood alike!
Step 5: Shape Cookies and Bake
Roll each colored dough into smooth balls, about a tablespoon each. Space them on a parchment-lined baking sheet about 2 inches apart to prevent spreading. Bake in your preheated 350°F (175°C) oven for 8-10 minutes – watch for slightly cracked tops without letting them brown. This is the sweet spot for tenderness. Let them cool on the tray for about 5 minutes before transferring to a wire rack.
Step 6: Whip up the Vanilla Filling
Beat softened butter alone first until smooth, then gradually add powdered sugar for fluffy sweetness. Mix in heavy cream (or milk), vanilla extract, and a pinch of salt. Keep beating until the filling is airy and spreadable. If it feels too thick, add a splash more cream; if too thin, a bit more powdered sugar will help.
Step 7: Assemble the Sandwiches
Once the cookies are completely cool, pair them up by similar size and color. Using a piping bag is my personal favorite for a neat finish, but a spoon works great too. Spread a generous amount of filling on one cookie, then press the second cookie gently on top to make a sandwich. Let them sit a few minutes so the filling firms up just a bit before digging in.
Pro Tips for Making Pastel Sugar Cookie Sandwiches Recipe
- Use Gel Food Coloring: I learned the hard way that liquid colors can make dough too sticky; gel colors keep the dough perfect for shaping.
- Don’t Overbake: Those cracked tops signal perfection here—pull them out before browning to keep them tender.
- Chill Dough if Too Soft: If your kitchen is warm and the dough feels sticky, a quick 15-minute chill helps immensely for rolling.
- Match Cookie Sizes: Pair cookies by size for even sandwiches—tall cookie with tiny one leads to filling squeeze-out.
How to Serve Pastel Sugar Cookie Sandwiches Recipe

Garnishes
I like to dust the finished cookie sandwiches with a tiny sprinkle of edible glitter or pastel-colored sprinkles to add a bit of sparkle and extra festivity, especially for kids’ parties. It’s a small touch but it makes them feel even more special.
Side Dishes
These cookies pair beautifully with a tall glass of cold milk or a cup of hot tea. For gatherings, I love serving them alongside fresh fruit platters or light finger sandwiches – the pastel colors really brighten up a dessert table.
Creative Ways to Present
If I’m making these for a baby shower or springtime party, I arrange the cookie sandwiches on pretty plates grouped by color, or stack them in cute little towers tied with pastel ribbons—super simple but so charming and impressive!
Make Ahead and Storage
Storing Leftovers
I keep my leftover Pastel Sugar Cookie Sandwiches in an airtight container at room temperature for up to three days. It’s key to keep them sealed so the cookies don’t dry out and the filling stays soft and creamy.
Freezing
Freezing these cookie sandwiches works really well! I wrap each sandwich individually in plastic wrap, then place them in a freezer bag. When you want one, just thaw in the fridge overnight. The texture stays just as lovely as fresh.
Reheating
If your cookies have been chilled, I recommend letting them sit at room temperature for about 30 minutes before serving. This softens the filling and lets all those flavors shine again without melting the filling completely like microwaving would.
FAQs
-
Can I use regular food coloring instead of gel for pastel colors?
You can, but gel food coloring is definitely your best bet. Regular liquid colors add extra moisture, which can make the dough too soft and sticky. Gel colors give you vibrant pastels without affecting dough consistency.
-
How do I keep my sugar cookies soft?
The key is not to overbake them—pull the cookies from the oven once the edges are set but before they brown. Also, the butter-to-sugar ratio and the addition of baking powder help keep them tender.
-
Can I make the dough ahead of time?
Absolutely! You can make and color the dough up to a day in advance, wrap it tightly, and refrigerate. Let it come to room temperature briefly before shaping and baking for the best results.
-
What if my filling is too thick or too thin?
If the filling is too thick, add a little more cream or milk a teaspoon at a time; if it’s too thin, add more powdered sugar. Beat well after each addition until you reach the desired consistency.
-
Can I use a different flavored filling?
Definitely! Vanilla is classic, but you can try chocolate, lemon, or even cream cheese-based fillings for a fun twist that complements the pastel cookies beautifully.
Final Thoughts
I absolutely love how these pastel sugar cookie sandwiches turn out – they’re cheerful, tasty, and always a hit wherever I bring them. When I first made this recipe, I struggled with dry cookies and dull colors, but now I’ve perfected the method and can’t wait to share it with you. Give it a try and enjoy a sweet baking experience filled with colorful creativity and satisfying results. Trust me, your friends and family will go crazy for these little slices of happiness!
Print
Pastel Sugar Cookie Sandwiches Recipe
- Prep Time: 30 minutes
- Cook Time: 10 minutes
- Total Time: 40 minutes
- Yield: 24 cookie sandwiches
- Category: Dessert
- Method: Baking
- Cuisine: American
- Diet: Vegetarian
Description
These Pastel Sugar Cookie Sandwiches are delightful, soft sugar cookies tinted in vibrant pastel hues and sandwiched with a creamy vanilla filling. Perfect for festive occasions or a colorful treat, they combine classic buttery flavors with a light, fluffy frosting.
Ingredients
For the Sugar Cookies:
- 1 cup unsalted butter, softened
- 1 ½ cups granulated sugar
- 1 large egg
- 2 teaspoons vanilla extract
- 2 ¾ cups all-purpose flour
- 1 teaspoon baking soda
- ½ teaspoon baking powder
- ½ teaspoon salt
- 2 tablespoons milk
- Gel food coloring (pink, yellow, green, blue, and purple)
For the Vanilla Filling:
- ½ cup unsalted butter, softened
- 2 cups powdered sugar
- 2 tablespoons heavy cream or milk
- 1 teaspoon vanilla extract
- Pinch of salt
Instructions
- Preheat the Oven: Set your oven to 350°F (175°C). Line a baking sheet with parchment paper to prevent the cookies from sticking and to ensure easy cleanup.
- Make the Cookie Dough: In a large bowl, beat together the softened butter and granulated sugar until the mixture is light and fluffy, which should take about 2 minutes. Then, add the egg and vanilla extract, mixing thoroughly until everything is combined smoothly.
- Combine the Dry Ingredients: In a separate bowl, whisk together all-purpose flour, baking soda, baking powder, and salt. Gradually add these dry ingredients into the wet mixture on low speed until the dough forms. Add the milk and mix just until combined; the dough will be thick but soft.
- Color the Dough: Divide the dough evenly into five portions. Use gel food coloring to tint each portion a different pastel shade—pink, yellow, green, blue, and purple. Knead the coloring into each dough portion until fully and evenly incorporated.
- Shape and Bake: Scoop about 1 tablespoon of dough per cookie and roll each into a smooth ball. Arrange the dough balls on the prepared baking sheet, leaving about 2 inches of space between each. Bake in the oven for 8 to 10 minutes, until the edges are set and the tops show slight cracking but no browning. Allow cookies to cool on the baking sheet for 5 minutes before transferring to a wire rack to cool completely.
- Make the Vanilla Filling: Beat the softened butter in a mixing bowl until smooth. Gradually add the powdered sugar, then mix in the heavy cream (or milk), vanilla extract, and a pinch of salt. Continue beating until the filling becomes fluffy and spreadable. Adjust the consistency with more cream if too thick, or more powdered sugar if too thin.
- Assemble the Cookie Sandwiches: Pair cookies of similar size once they are fully cooled. Pipe or spoon a generous layer of vanilla filling onto the flat side of one cookie, then gently press a matching cookie on top to form a sandwich, spreading the filling evenly.
- Set Before Serving: Let the cookie sandwiches rest for about 10 minutes to allow the filling to firm up slightly for perfect texture when served.
Notes
- Use gel food coloring for vibrant pastel colors without affecting dough texture.
- If the dough gets too soft while handling, chill it in the refrigerator for 15-20 minutes before rolling.
- Store assembled cookie sandwiches in an airtight container at room temperature for up to 3 days or refrigerate for up to a week.
- For the best texture, bring refrigerated cookies to room temperature before serving.
Nutrition
- Serving Size: 1 cookie sandwich
- Calories: 180
- Sugar: 16g
- Sodium: 80mg
- Fat: 9g
- Saturated Fat: 5g
- Unsaturated Fat: 3g
- Trans Fat: 0g
- Carbohydrates: 24g
- Fiber: 0.5g
- Protein: 2g
- Cholesterol: 25mg


