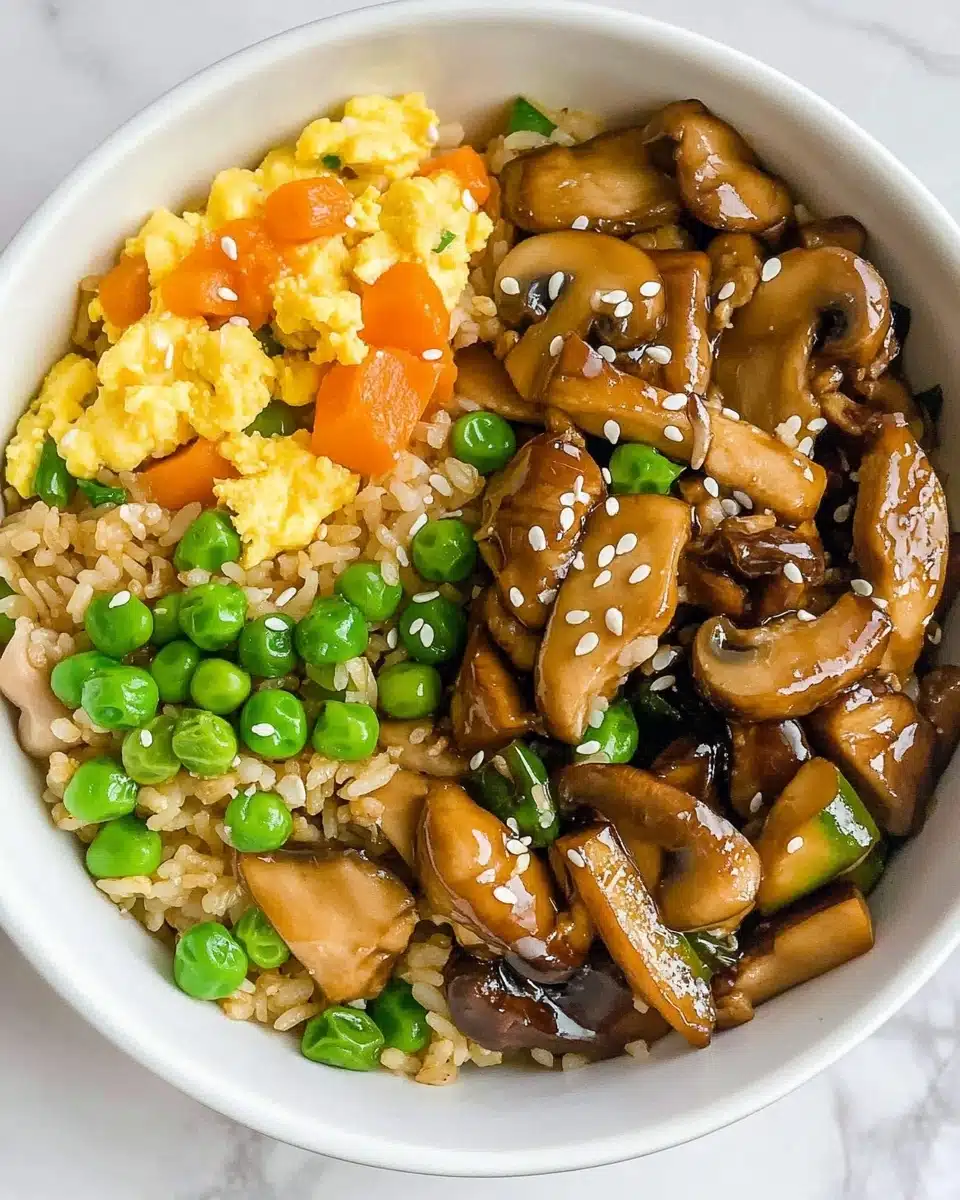
If you’re craving Japanese steakhouse magic without leaving your kitchen, this Instant Pot Hibachi Chicken is your new best friend! Juicy bite-sized chicken, tender veggies, and that savory-sweet hibachi sauce come together in one pot for a lightning-fast dinner that’s every bit as crave-worthy as your favorite teppanyaki spot.
Why You’ll Love This Recipe
- One-Pot Magic: Everything comes together in your Instant Pot—sauce, chicken, veggies—meaning less mess and more time to savor every bite.
- Fast and Flavorful: Dinner on the table in under 30 minutes, with layers of bold, restaurant-style hibachi flavors thanks to fresh ginger, garlic, and soy.
- Customize It Your Way: Swap veggies or protein for whatever you love (or need to use up) and make it gluten-free or low-carb with simple twists.
- Crowd Pleaser: It’s a weeknight lifesaver that will satisfy both picky eaters and foodies craving Japanese takeout at home!

Ingredients You’ll Need
The magic of Instant Pot Hibachi Chicken is in its straightforward ingredient list. Each item, from the ginger-garlic sauce to the savory chicken and crisp veggies, brings its own splash of color and burst of flavor—nothing fancy, just bold, essential flavors that shine together!
- Low-sodium soy sauce: Lays down that classic, umami-packed base for your hibachi sauce. The reduced salt lets the other flavors pop.
- Water: Lightens the sauce without muting the punchy flavors—just enough to help everything blend beautifully in the pot.
- Wine vinegar (or apple cider vinegar): Adds a gentle tang, balancing sweetness and salt in the sauce. Either option works, grab what’s on hand!
- Fresh ginger (grated): The essential zing factor—grate it fresh or use jarred for ease, but don’t skip it for that hibachi aroma.
- Garlic (minced): For richness and depth—every hibachi sauce needs that garlicky note.
- Granulated sugar, honey, or maple syrup: Your pick! Adds a soft, sweet backbone that rounds out the salty and tangy notes.
- Ground white pepper (or black): For gentle heat and warmth. White pepper keeps the sauce more traditional but black works fine.
- Chicken breasts: Bite-sized pieces cook fast and stay extra juicy in the Instant Pot. Thighs work too, for even more flavor!
- Zucchini: Sliced and halved, it soaks up flavor and provides tender-crisp bites with gorgeous color contrast.
- Onion: Quartered or sliced, it softens and sweetens as it cooks—key for that classic hibachi vibe.
- Mushrooms: Sliced thick to soak up sauce and add earthy goodness. Try cremini or button mushrooms for best results.
- Green onion and toasted sesame seeds (to garnish): A sprinkle at the end adds pop, crunch, and that little something extra to your dish.
Variations
One of my favorite things about Instant Pot Hibachi Chicken is how flexibly you can adapt it to whatever’s in your fridge. Don’t be afraid to riff and tweak—there’s plenty of room to make it uniquely yours according to taste, dietary needs, or what you have on hand!
- Swap the Protein: Try bite-sized steak, shrimp, or even tofu for a different spin—just adjust cook time if using seafood!
- Veggie Lovers’ Style: Toss in bell peppers, broccoli florets, or snap peas with the other veggies for even more color and crunch.
- Low-Carb Twist: Skip the sugar and serve over cauliflower rice—it’s just as satisfying, and extra veggie-packed.
- Make It Gluten-Free: Use tamari instead of soy sauce for a version that’s safe for gluten-sensitive guests.
How to Make Instant Pot Hibachi Chicken
Step 1: Build Your Classic Hibachi Sauce
Start by adding the soy sauce, water, vinegar, grated ginger, minced garlic, sugar (or your sweetener of choice), and white or black pepper straight into your Instant Pot. Stir everything together to dissolve the sugar and let the bold flavors mingle—this is the secret that infuses every bite with that signature hibachi goodness.
Step 2: Pile in Chicken and Veggies
Add the bite-sized chicken pieces, sliced onion, zucchini, and mushrooms into the pot, giving everything a gentle toss to coat in the sauce. (If you prefer ultra-crisp veggies, see my pro tips below before adding them at this stage!) Every piece will soak up that delicious marinade as it cooks.
Step 3: Pressure Cook for Perfect Tenderness
Lock the Instant Pot lid and set the steam vent to SEALING. Choose the PRESSURE COOK or MANUAL setting, then set the timer for 3 minutes on high pressure. It’ll take about 7–10 minutes to come to pressure, then the magic happens. When the timer beeps, do a quick release—careful, that steam is hot!
Step 4: Thicken the Sauce for Restaurant Results
Switch over to SAUTÉ mode, and when the sauce starts to bubble, add your cornstarch slurry (a quick mix of cornstarch and water works perfectly). Stir until the sauce thickens up and clings to each piece—this extra step gives your dish that glossy, luxurious hibachi-style finish.
Step 5: Finish and Serve
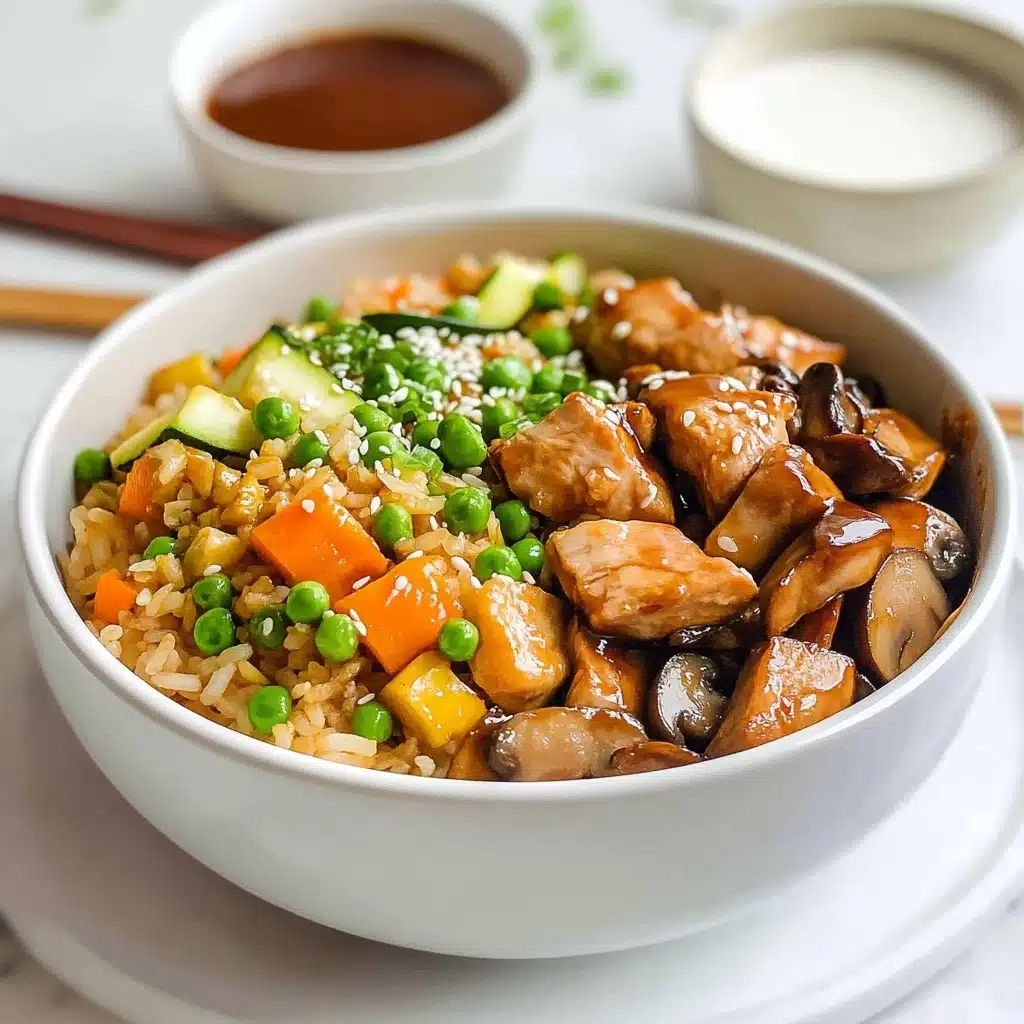
Spoon the Instant Pot Hibachi Chicken and veggies over fluffy steamed rice, then go wild with your garnishes: sprinkle with toasted sesame seeds and fresh chopped green onion for color, crunch, and a final pop of flavor. Voilà—your homemade hibachi dinner awaits!
Pro Tips for Making Instant Pot Hibachi Chicken
- Veggie Timing Trick: If you like super crisp-tender vegetables, steam or sauté them separately, then stir them in after the pressure cooking step for the freshest texture.
- Thickening Shortcut: Mix your cornstarch with cold water before adding—this ensures a smooth, lump-free glossy sauce that coats every bite just like at the steakhouse.
- Flavor Boost: For even deeper flavor, marinate your chicken in the sauce for 10–30 minutes before cooking if you have the extra time.
- Rice Ready: Start your rice before beginning the Instant Pot Hibachi Chicken so everything finishes at the same time and dinner’s a breeze to assemble.
How to Serve Instant Pot Hibachi Chicken
Garnishes
To truly channel that Japanese steakhouse vibe, shower each bowl of Instant Pot Hibachi Chicken with a flurry of chopped green onions and toasted sesame seeds. They add brightness, crunch, and a pop of color—plus, your dinner just looks plain irresistible with these finishing touches!
Side Dishes
Nothing beats a simple bowl of steamed rice to soak up all that saucy goodness. But feel free to get creative: try it over fried rice, with a side of sautéed bean sprouts, or alongside a cool cucumber salad for a complete Japanese-inspired spread.
Creative Ways to Present
For a fun twist, serve Instant Pot Hibachi Chicken in individual bento bowls, layer it over cauliflower rice for a lighter option, or plate it up family-style in a big serving platter with chopsticks or skewers to really mimic hibachi-table theatrics at home!
Make Ahead and Storage
Storing Leftovers
Leftover Instant Pot Hibachi Chicken keeps beautifully—just pack it in an airtight container and stash in the fridge for up to 3 days. The flavors get even better as they meld, making for a super tasty next-day lunch.
Freezing
For longer storage, freeze cooled hibachi chicken and veggies in individual freezer-safe containers or bags for up to 2 months. Thaw in the fridge overnight or reheat straight from frozen for a quick meal fix.
Reheating
Reheat leftovers gently in the microwave or in a skillet over medium heat, adding a splash of water if the sauce has thickened too much. This brings everything back to steamy, saucy perfection!
FAQs
-
Can I use chicken thighs instead of chicken breasts for Instant Pot Hibachi Chicken?
Absolutely! Boneless, skinless chicken thighs work just as well and will be extra juicy and flavorful. Just cut them into bite-size pieces like the breast meat and use the same cook time.
-
How can I make Instant Pot Hibachi Chicken vegetarian?
Simply swap the chicken for extra-firm tofu (cut into cubes), or use a medley of your favorite sturdy vegetables like broccoli, bell peppers, and snap peas. Adjust the cook time for tofu to keep its texture intact.
-
Can I double the Instant Pot Hibachi Chicken recipe?
Yes! Just make sure not to fill your Instant Pot above the ‘max fill’ line. The cooking time remains the same, but it may take a little longer to come up to pressure with a bigger batch.
-
Is it possible to prep Instant Pot Hibachi Chicken ahead of time?
Definitely. You can mix the sauce and chop all veggies and chicken up to a day ahead, keeping them separate in the fridge until you’re ready to cook. It makes mealtime feel absolutely effortless!
Final Thoughts
If you’re ready to bring Japanese steakhouse flavors home without a lot of fuss, give this Instant Pot Hibachi Chicken a try. It’s quick, endlessly flexible, and bursting with the fun and flavor you love—so gather your favorite people, serve up a plate, and watch everyone swoon. Enjoy every bite!
Print
Instant Pot Hibachi Chicken Recipe
- Prep Time: 5 minutes
- Cook Time: 15 minutes
- Total Time: 20 minutes
- Category: Main Course
- Method: Pressure Cooking
- Cuisine: Japanese
- Diet: Gluten Free
Description
This Instant Pot Hibachi Chicken recipe brings the flavors of a hibachi grill to your own kitchen in a quick and easy way. Tender chicken and vibrant vegetables are cooked in a savory sauce, perfect for serving over a bed of rice.
Ingredients
For the sauce:
- 1/4 cup low-sodium soy sauce
- 1/4 cup water
- 2 tablespoons wine vinegar or apple cider vinegar
- 1 tablespoon fresh ginger, grated
- 2 cloves garlic, minced
- 1 tablespoon granulated sugar or honey or maple syrup
- 1/4 teaspoon ground white pepper or black pepper
For the chicken and vegetables:
- 1 1/2 pounds (700 grams) chicken breasts, cut into bite-size pieces
- 2 zucchini, sliced into 1/4-inch rounds then halved
- 1 onion, sliced or quartered
- 6 mushrooms, sliced into 1/4-inch slices
Instructions
- Add the sauce ingredients to the Instant Pot: Combine soy sauce, water, vinegar, ginger, garlic, sugar, and white or black pepper.
- Add the chicken and vegetables: Include chicken, onion, zucchini, and mushrooms in the Instant Pot.
- Cook under pressure: Secure the lid, set the vent to SEALING, and pressure cook on high for 3 minutes. Quick release the steam once done.
- Thicken the sauce: Switch to SAUTE mode, add cornstarch mixed with water, and whisk until the sauce thickens.
- Serve: Serve the chicken and vegetables over rice, garnished with sesame seeds and chopped green onion.
Notes
- For a quicker release of pressure, you can use quick release after the cooking time is up.
- Adjust the sauce’s sweetness or seasoning to suit your taste preferences.
Nutrition
- Serving Size: 1 serving
- Calories: 320 kcal
- Sugar: 6g
- Sodium: 780mg
- Fat: 7g
- Saturated Fat: 2g
- Unsaturated Fat: 4g
- Trans Fat: 0g
- Carbohydrates: 15g
- Fiber: 2g
- Protein: 45g
- Cholesterol: 120mg


