
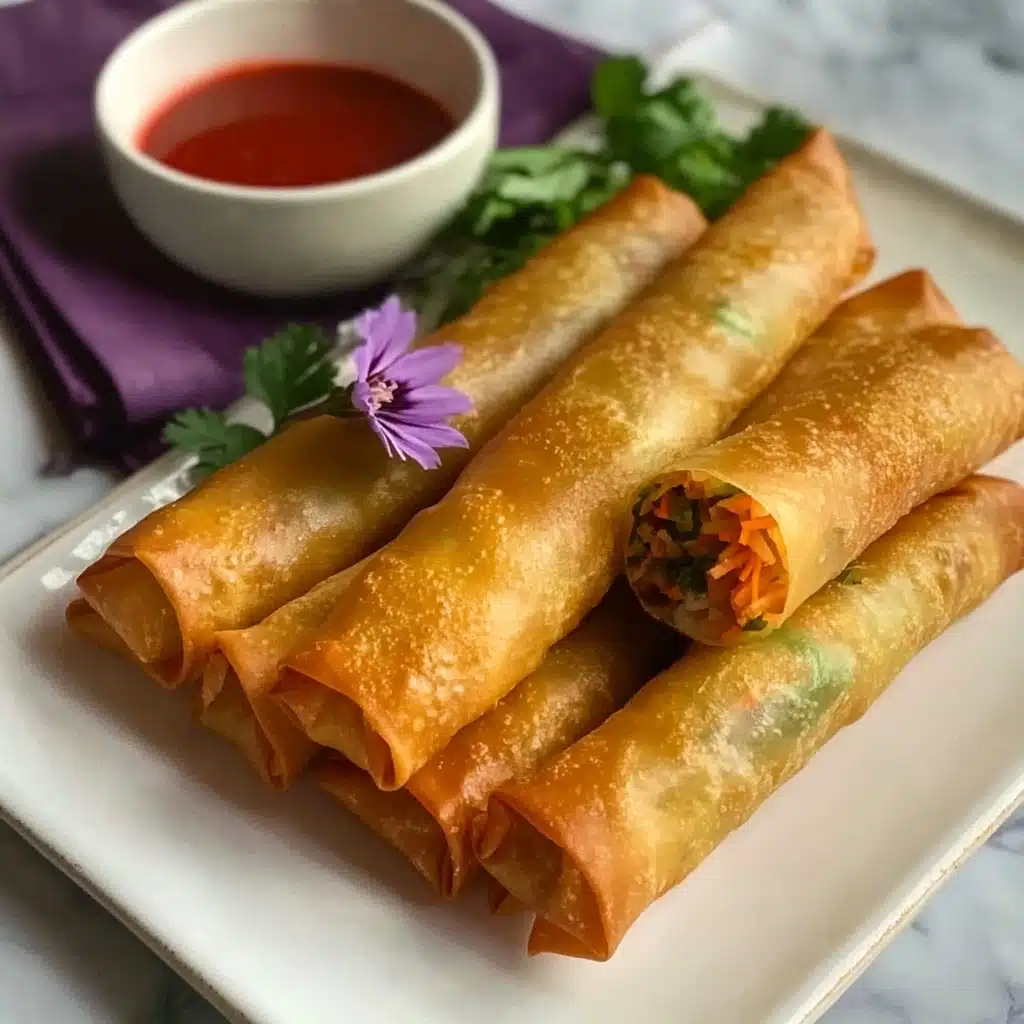
There’s nothing quite like biting into piping hot Best Crispy Spring Rolls – Thai Style, with their golden, delicate shells and savory, aromatic fillings. This recipe captures all of the irresistible crunch and lively flavor you’d expect from your favorite Thai appetizer – and with a handful of pantry staples, you can make these irresistible rolls at home, any night of the week!
Why You’ll Love This Recipe
- Supremely Crunchy: Each bite delivers that shatteringly crisp shell you crave, just like the best restaurant spring rolls.
- Vibrant Thai Flavors: A savory mix of pork, mushrooms, glass noodles, and fragrant herbs brings authentic street-food magic into your own kitchen.
- Versatile & Adaptable: These Best Crispy Spring Rolls – Thai Style work beautifully as appetizers, party snacks, or even a lunchbox treat – and you can easily customize them!
- Freezer-Friendly: Make a big batch, freeze, and fry whenever cravings strike for a lightning-fast homemade snack.

Ingredients You’ll Need
Everything you’ll need for Best Crispy Spring Rolls – Thai Style is easy to find, but every ingredient plays a key role! From the chewy glass noodles and juicy pork to the earthy mushrooms and fresh veggies, each component adds texture, flavor, or a brilliant pop of color that makes these spring rolls downright irresistible!
- Glass noodles (mung bean vermicelli): These become deliciously springy inside the filling, making each bite chewy and substantial.
- Ground pork (optional): Adds rich, savory flavor—skip it for a vegetarian version and the rolls will still turn out amazing.
- Soy sauce: Brings depth and umami, seasoning both the pork and veggie mixture for a layered taste.
- Ground black and white pepper: Using both delivers gentle heat and a classic Thai aroma without overwhelming spice.
- Garlic: A must for that unmistakable Thai fragrance—freshly minced delivers the best flavor!
- Dried shiitake mushrooms: After a soak, these create a savory, meaty bite even without meat—and add satisfying chew.
- Green cabbage: Finely shredded, it wilts perfectly and bulks up the filling with crunch and sweetness.
- Carrots: Grated for pops of color and a subtle sweetness that pairs beautifully with earthy notes.
- Cilantro stems: Chopped stems are herbaceous and citrusy, adding classic Thai brightness.
- Salt & sugar: Balances and enhances all the other flavors so nothing is too salty or too bland.
- Spring roll wrappers: Store-bought, 8-inch size for convenience—thaw before using for easier handling.
- Egg: Whisked and used to seal the rolls, keeping everything tucked in during frying.
- Oil for frying: Choose a neutral oil (like canola or peanut) for the crispiest, most golden result.
Variations
The joy of homemade Best Crispy Spring Rolls – Thai Style? You get to make them your own! Whether you’re aiming for vegetarian, craving a spicy kick, or want to use up whatever veggies are in your fridge, these rolls are endlessly customizable and still utterly delicious.
- Vegetarian Delight: Skip the pork and load up on mushrooms for a hearty filling packed with umami flavor.
- Shrimp Lovers: Finely chopped raw shrimp can be folded in for a sweet seafood twist.
- Spicy Thai Style: Add a little chopped fresh chili or a spoonful of chili paste to the filling for a gentle burn.
- Tofu Boost: Crumble in some firm tofu for extra protein and a pleasantly soft interior.
- Gluten-Free Option: Use gluten-free wrappers and tamari to make these a treat for everyone at the table!
How to Make Best Crispy Spring Rolls – Thai Style
Step 1: Soak and Prep the Glass Noodles
Start by soaking your glass noodles in room temperature water for about 7 to 10 minutes, just until they’re pliable but not mushy. After draining, give them a few rough chops so they’ll blend seamlessly into the filling—you want manageable, 2-inch strands that won’t tangle as you wrap!
Step 2: Season and Sizzle the Pork
If using pork, mix it with some soy sauce to infuse every bite with flavor. Heat a splash of oil in your wok or skillet, sauté the garlic and both peppers for irresistible aroma, then add the pork and stir-fry on medium-high until it’s nearly cooked and beautifully browned.
Step 3: Add Veggies and Mushrooms
Now it’s time to pile in the finely chopped shiitake mushrooms, pre-soaked noodles, cabbage, carrots, and cilantro stems. Sprinkle in the sugar, salt, and remaining soy sauce. Keep tossing everything together—add a splash of water if things get sticky—until the noodles are tender and vegetables are just wilted but still vibrant. Taste and adjust the salt if needed.
Step 4: Cool and Wrap
Spoon the cooked filling into a bowl and let it cool before wrapping—this keeps the wrappers crisp and easier to handle. While it cools, separate your wrappers (doing this now makes wrapping so much easier and prevents torn edges). Beat the egg for sealing, then you’re ready to roll!
Step 5: Roll Like a Pro
Place a wrapper in a diamond shape in front of you. Add a heaping ¼ cup of filling to the lower third, fold up the point, tuck in the sides, and roll tightly—brush the edge with beaten egg to seal. Repeat with the rest. Take your time; you’ll get faster (and neater!) with each one.
Step 6: Fry to Golden Perfection
Heat 2 inches of oil in a heavy pot to 350°F. Fry rolls in batches, turning occasionally, until deeply golden and crisp—about 5 minutes. If they’re browning too fast or too slow, adjust your heat as needed. Drain on paper towels while you finish the rest, and resist snacking until they’re just cool enough to handle!
Pro Tips for Making Best Crispy Spring Rolls – Thai Style
- Noodle Cutting Know-How: Snip your soaked noodles into short lengths; long strands can poke through wrappers and make rolling tricky.
- Wrapper Magic: Gently peel the wrappers apart while the filling cools—they’re easier to separate when still cold and pliable, not after they warm.
- Oil Temperature Accuracy: Keep your frying oil right at 350°F; use a thermometer if possible so your rolls are golden but not greasy.
- Filling Cool-Down: Always let the filling cool completely before wrapping to avoid soggy, torn wrappers—even a few extra minutes makes a difference!
How to Serve Best Crispy Spring Rolls – Thai Style
Garnishes
For a stunning finish, pile your Best Crispy Spring Rolls – Thai Style high on a platter and shower with fresh cilantro leaves, thinly sliced scallions, or extra carrots for color. A sprinkle of finely chopped Thai chili adds a pop of heat for those who love it spicy!
Side Dishes
These rolls are show-stealers on their own, but they’re also perfect alongside jasmine rice, a cooling cucumber salad, or a big bowl of tom yum soup. Don’t forget a bowl of Thai sweet chili sauce or even a tangy tamarind dip for dunking!
Creative Ways to Present
For parties, slice each crispy roll on a diagonal and arrange them upright on a platter, tucking in fresh herbs for a natural “bouquet.” Or serve in mini cups with just a splash of dipping sauce at the bottom for effortless, mess-free snacking!
Make Ahead and Storage
Storing Leftovers
If you have leftover Best Crispy Spring Rolls – Thai Style (and that’s a big “if”!), let them cool completely and store them in an airtight container in the fridge for up to 3 days. For best results, keep a little paper towel in the container to absorb moisture.
Freezing
Freeze uncooked, tightly wrapped spring rolls in a single layer on a baking sheet until solid, then transfer to a zip-top bag for up to 2 months. Fry straight from frozen, just increasing the oil temperature to 375°F to ensure a wonderfully crisp crust!
Reheating
To revive that signature crunch, reheat in a 375°F oven or air fryer for about 6–8 minutes until hot and crisp again. Skip the microwave—it makes the wrapper soggy, and what good is a spring roll without the crunch?
FAQs
-
Can I make Best Crispy Spring Rolls – Thai Style ahead of time?
Absolutely! Prepare and fill your spring rolls, then freeze them before frying. When ready to enjoy, fry straight from frozen—they’ll be just as delicious and crispy as freshly made.
-
What kind of oil is best for frying spring rolls?
Choose a neutral oil with a high smoke point—canola, peanut, or vegetable oil are all excellent choices for getting that perfectly crisp finish without any off flavors.
-
Can I bake Best Crispy Spring Rolls – Thai Style instead of frying?
You can, though they won’t be quite as shatteringly crisp as fried ones. Brush rolls generously with oil, bake at 425°F, and turn once until golden; or, for a closer dupe, give the air fryer a try!
-
How do I prevent the wrappers from tearing?
Always handle wrappers gently, and be sure your filling is cool before wrapping. If wrappers are sticking, try covering them with a damp cloth as you work to keep them supple and easy to fold.
Final Thoughts
I hope you’ll gather your ingredients, roll up your sleeves, and treat yourself to these Best Crispy Spring Rolls – Thai Style! They’re fun to make, incredibly satisfying to eat, and guaranteed to be a hit with anyone lucky enough to share your table. Don’t be surprised if they disappear the moment you set them down—enjoy every crunchy, herb-laced bite!
Print
Best Crispy Spring Rolls – Thai Style Recipe
- Prep Time: 30 mins
- Cook Time: 45 mins
- Total Time: 1 hour 15 mins
- Yield: Makes 12-14 pieces
- Category: Frying
- Method: Stovetop
- Cuisine: Thai
Description
These Thai-style crispy spring rolls are filled with a delicious mixture of glass noodles, pork (optional), shiitake mushrooms, cabbage, carrots, and cilantro. Perfectly crispy on the outside and flavorful on the inside, they make a fantastic appetizer or snack.
Ingredients
For the Filling:
- 40 g (1.4 oz) dry glass noodles
- 120 g (4.2 oz) ground pork (optional)
- 3 teaspoons soy sauce, divided
- 1/4 teaspoon ground black pepper
- 1/2 teaspoon ground white pepper
- 4 cloves garlic, minced
- 3 medium dried shiitake mushrooms, soaked and chopped
- 1 1/2 cups finely shredded green cabbage
- 1 cup grated carrots
- 6 cilantro stems, finely chopped
- 1/2 – 1 teaspoon salt
- 1 tablespoon sugar
- 2-3 tablespoons water, as needed
For Assembly:
- 12-14 pieces of 8-inch spring roll wrappers, thawed
- 1 egg, beaten, for sealing the wrapper
- Oil for frying
Instructions
- Prepare the Filling: Soak glass noodles, mix pork with soy sauce. Cook garlic and peppers, add pork, mushrooms, noodles, cabbage, carrots, cilantro, sugar, salt, and soy sauce. Cook until done.
- Wrap the Spring Rolls: Cool the filling, peel the wrappers, beat the egg for sealing. Use ¼ cup of filling per roll and wrap according to instructions.
- Fry the Spring Rolls: Heat oil to 350°F, fry the spring rolls until golden brown, about 5 minutes. Drain on paper towels.
- Serve: Allow to cool slightly before serving. Enjoy with Thai sweet chili sauce if desired.
Notes
- Ensure the filling is cooled before wrapping to prevent the wrappers from becoming soggy.
- Separating the spring roll wrappers before wrapping makes the process smoother.
- Adjust salt levels according to taste preference.
Nutrition
- Serving Size: 1 spring roll
- Calories: 145
- Sugar: 2g
- Sodium: 250mg
- Fat: 5g
- Saturated Fat: 1g
- Unsaturated Fat: 4g
- Trans Fat: 0g
- Carbohydrates: 20g
- Fiber: 2g
- Protein: 5g
- Cholesterol: 20mg

