
I absolutely love this Chocolate Crinkle Cookies Recipe because it combines that irresistible fudgy richness with a slightly crisp outside that cracks beautifully while baking. When I first tried making these cookies, I was amazed at how effortlessly they turned out, leaving my whole kitchen smelling like a chocolate lover’s dream. They work perfectly for holiday gatherings, cozy weekends, or simply when you need a little chocolate magic to brighten your day.
You’ll find that this Chocolate Crinkle Cookies Recipe is a crowd-pleaser—you can bring them to parties, gift them during the holidays, or just enjoy them alongside your afternoon coffee. What makes this recipe especially worth trying is how minimal the ingredients are, yet the flavor and texture pack so much depth. Trust me, once you try it, you’ll be making these over and over!
Why You’ll Love This Recipe
- Easy to Make: The dough is straightforward with simple mixing and no fancy equipment needed.
- Perfect Texture: You get that melt-in-your-mouth fudgy center with a gorgeous cracked exterior every time.
- Great for Gifting: These cookies hold well in containers, making them a sweet homemade gift idea.
- Versatile Flavor: You can easily customize with nuts, extracts, or toppings to suit your taste buds.

Ingredients You’ll Need
These ingredients work beautifully together to give you that deep chocolate flavor and crinkle effect. When shopping, look for high-quality cocoa powder to really boost the chocolate punch.
- All-purpose flour: Provides the perfect structure without making the cookies tough.
- Cocoa powder: Use unsweetened for rich chocolate flavor; Dutch-processed works wonderfully here.
- Baking powder: Helps create those signature cracks on the cookie surface.
- Salt: Just a pinch to balance and enhance the chocolate taste.
- Sugar: Both granulated and powdered sugar are used for sweetness and the classic cookie crackle effect.
- Vegetable oil or melted butter: I prefer oil here for moist, fudgy cookies.
- Eggs: For binding and richness.
- Vanilla extract: Adds a subtle warmth that complements the chocolate perfectly.
- Powdered sugar (for coating): This helps create the adorable crinkle look once baked.
Variations
I love playing around with this Chocolate Crinkle Cookies Recipe to suit different moods or occasions. You can easily customize it, making each batch feel like your own special creation.
- Add Nuts: Toss in some chopped walnuts or pecans—I always add them for a satisfying crunch that contrasts the soft cookie.
- Extract Twist: Swap vanilla for peppermint or almond extract during the holidays for a festive flavor upgrade.
- Spicy Kick: Add a pinch of cayenne pepper or cinnamon to the dough if you’re feeling adventurous—it’s surprisingly delicious!
- Gluten-Free: Use a gluten-free flour blend with xanthan gum for a gluten-free version that still cracks up beautifully.
How to Make Chocolate Crinkle Cookies Recipe
Step 1: Mix the Dry Ingredients
Start by whisking together your flour, cocoa powder, baking powder, and salt in a medium bowl. This step ensures everything is evenly distributed, which helps prevent uneven cracks and keeps your cookies consistent. I always sift the cocoa powder and flour for an extra smooth texture.
Step 2: Combine the Wet Ingredients
In a large mixing bowl, beat together the granulated sugar and vegetable oil until well combined. Add in the eggs one at a time, beating well after each addition. Finally, stir in the vanilla extract. This mixture will become the luscious base for your batter. I like to beat eggs separately to check freshness before adding.
Step 3: Blend Wet and Dry Ingredients
Slowly add the dry ingredients into the wet, mixing just until combined. Over-mixing here can make cookies cakier rather than fudgy, and that’s not what we want. The dough will look thick and chocolatey—perfect for forming those signature cracks.
Step 4: Chill the Dough
This is a crucial step for the best results. Cover the dough and chill it for at least 4 hours or overnight if you can. I learned early on that chilling makes the dough easier to handle and helps create those beautiful contrasting crinkle patterns when baking. Patience pays off!
Step 5: Form and Coat the Cookies
Scoop out dough balls with a tablespoon or medium cookie scoop, then roll each ball in powdered sugar until fully coated. The generous coating ensures the cracking happens and gives the cookies their signature snowy look. Don’t skimp on the powdered sugar here—it’s part of the magic!
Step 6: Bake to Perfection
Place the coated dough balls on a parchment-lined baking sheet with about 2 inches of space between them. Bake in a preheated 350°F (175°C) oven for 10-12 minutes. You’ll notice the cracks forming as the cookies expand—that’s your cue they’re almost done. Take them out just before the edges get too firm, so the centers stay fudgy and soft.
Step 7: Cool and Enjoy
Let the cookies cool on the baking sheet for 5 minutes before transferring them to a wire rack to cool completely. I sometimes sneak a warm one—they’re dangerously delicious fresh from the oven with a glass of milk!
Pro Tips for Making Chocolate Crinkle Cookies Recipe
- Chill for Best Texture: Don’t skip chilling the dough—it’s key to thick, fudgy cookies that crack well.
- Use Good Cocoa: A high-quality cocoa powder makes a noticeable difference in flavor depth.
- Roll Generously in Sugar: The thick coating of powdered sugar is what creates that stunning crinkle effect.
- Watch Baking Time Closely: Slightly underbaking keeps the centers soft and chewy, which I prefer and my family loves.
How to Serve Chocolate Crinkle Cookies Recipe
Garnishes
I usually keep it simple and let the powdered sugar shine, but on special occasions, I sprinkle a few mini chocolate chips on top right after rolling in sugar for an extra chocolate burst. Sometimes, a dusting of a touch of cinnamon powder adds a lovely warmth that pairs beautifully with the chocolate.
Side Dishes
These cookies go hand in hand with a cold glass of milk, rich coffee, or a scoop of vanilla ice cream if you’re looking to turn dessert into an event. For a festive party, I like to serve them alongside fresh berries or whipped cream for a fun contrast.
Creative Ways to Present
For holiday gatherings, I arrange the cookies in a pretty tin lined with parchment paper and tie it with a rustic ribbon—that always delights whoever receives it. I’ve also stacked cookies on a dessert platter and surrounded them with edible flowers and chocolate shavings for a fancy touch at parties.
Make Ahead and Storage
Storing Leftovers
I store leftover Chocolate Crinkle Cookies in an airtight container at room temperature, and they stay fresh and soft for about 5 days. Placing a slice of bread in the container helps keep moisture in and prevents the cookies from drying out too fast—a trick I learned and now never skip.
Freezing
These cookies freeze exceptionally well! Just freeze the dough balls on a baking sheet first, then transfer them to a freezer-safe bag. When you want a batch, bake them straight from frozen—just add a minute or two to the baking time. This hack has saved me many times when I needed fresh cookies on short notice.
Reheating
If you want to enjoy leftover cookies warm, pop them in the microwave for about 10 seconds or heat them for a few minutes in a low oven (300°F). This refreshes their soft, fudgy texture beautifully without drying them out.
FAQs
-
Can I use butter instead of oil in this Chocolate Crinkle Cookies Recipe?
Yes, you can substitute melted butter for the vegetable oil, but expect the cookies to be slightly less fudgy and a touch more cakey. I prefer oil because it keeps the cookies moist and tender, but butter works fine if that’s what you have on hand.
-
Why do my chocolate crinkle cookies not crack?
The cracks happen thanks to a few factors: quality cocoa, baking powder, and chilling the dough are key. Make sure to chill your dough thoroughly and generously coat each dough ball in powdered sugar before baking. Also, baking at a high enough temperature (around 350°F) encourages the cracking as the dough spreads.
-
How long should I chill the cookie dough?
Chilling the dough for at least 4 hours is ideal, but overnight is even better. This helps the fats solidify, making the dough easier to handle and ensuring those signature crinkles appear during baking. I’ve found that skipping this step often leads to flat, less textured cookies.
-
Can I make these cookies gluten-free?
Absolutely! Swap the all-purpose flour for a gluten-free flour blend that includes xanthan gum for best results. Keep in mind texture might vary slightly, but the fudgy, rich flavor remains delicious.
-
How should I store leftover Chocolate Crinkle Cookies?
Store leftovers in an airtight container at room temperature for up to 5 days. Adding a slice of bread inside helps keep them moist. For longer storage, freeze the dough or baked cookies—they reheat wonderfully.
Final Thoughts
This Chocolate Crinkle Cookies Recipe holds a special place in my heart—it’s the cookie recipe I reach for when I want something deliciously comforting without fuss. I hope you enjoy the process and the rewarding results as much as I do. Once you try it, I’m confident these fudgy, crackly cookies will become your go-to chocolate treat. So, grab your mixing bowl and let’s bake some happiness into your day!
Print
Chocolate Crinkle Cookies Recipe
- Prep Time: 45 minutes
- Cook Time: 20 minutes
- Total Time: 1 hour 5 minutes
- Yield: 12 servings
- Category: Dessert
- Method: Baking
- Cuisine: American
Description
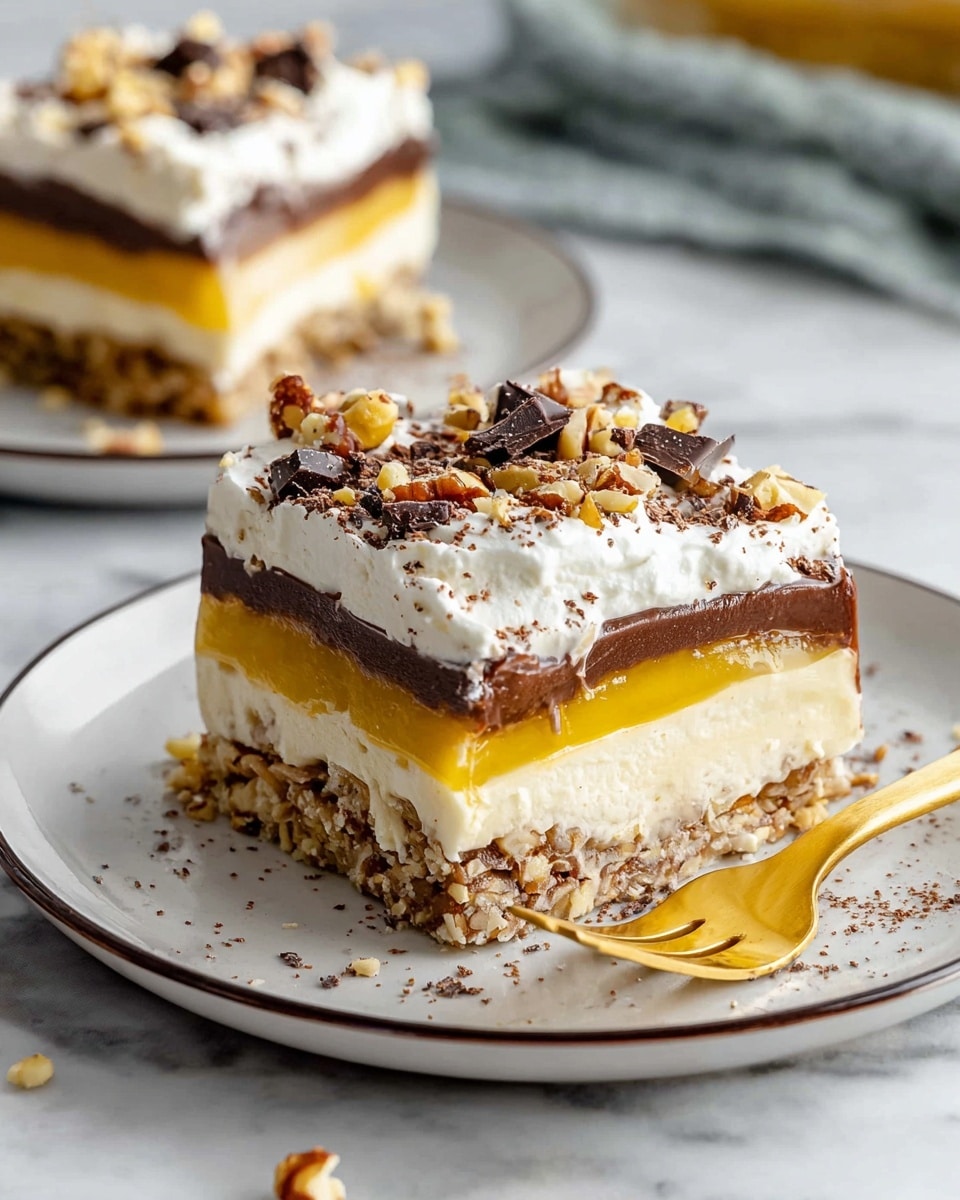
Sex in a Pan is a rich, layered dessert featuring a buttery pecan crust, a creamy cream cheese layer, luscious vanilla and chocolate puddings, all topped with fluffy whipped cream and optional shaved chocolate. Perfect for potlucks or family gatherings, this easy no-fuss dessert combines textures and flavors that will delight any sweet tooth.
Ingredients
Crust
- 1 cup pecans, chopped
- 3 tablespoons granulated sugar
- 1/2 cup unsalted butter, melted
- 1 cup all-purpose flour
Cream Cheese Layer
- 8 ounces cream cheese
- 1 cup powdered sugar (use 1/2 cup for less sweetness)
- 1 cup Cool Whip or whipped cream
Vanilla Pudding
- 5.1 ounces instant vanilla pudding mix
- 2 cups milk
Chocolate Pudding
- 5.1 ounces instant chocolate pudding mix
- 2 cups milk
Toppings
- 2 cups Cool Whip or whipped cream
- Shaved chocolate (optional)
Instructions
- Preheat and Prepare Crust: Preheat your oven to 350°F (177°C). Spray a 9×13 inch baking dish with cooking spray to prevent sticking.
- Make Crust Mixture: In a mixer, combine chopped pecans, granulated sugar, melted butter, and all-purpose flour. Mix thoroughly until the ingredients form a crumbly but pressable mixture.
- Bake Crust: Press the crust mixture evenly into the prepared baking dish. Bake in the preheated oven for about 20 minutes until golden and set. Remove from oven and allow to cool completely.
- Prepare Puddings: Following the package instructions but using 2 cups of milk instead of 3 (to achieve a firmer pudding), prepare the instant vanilla pudding and instantly set aside. Repeat this step for the chocolate pudding as well.
- Make Cream Cheese Layer: In a mixer, beat the cream cheese, powdered sugar, and 1 cup of Cool Whip or whipped cream together until light and fluffy, ensuring a smooth and airy texture.
- Assemble Layers: Once the crust is cool, spread the cream cheese mixture evenly over the crust. Then layer the vanilla pudding on top of the cream cheese, followed by the chocolate pudding.
- Top and Chill: Finally, spread the remaining 2 cups of Cool Whip or whipped cream over the pudding layers. Optionally, garnish with shaved chocolate on top for extra decadence.
- Set and Serve: Refrigerate the assembled dessert for at least a couple of hours until it has fully set. Slice and serve chilled for best results.
Notes
- Using 2 cups of milk instead of 3 cups to prepare the puddings results in a firmer set, making layering easier.
- You can adjust the powdered sugar amount in the cream cheese layer to your taste for sweetness.
- Shaved chocolate is optional but adds a decorative and flavorful touch.
- Ensure the crust is completely cooled before adding the next layers to prevent melting or mixing.
- For a lighter option, use whipped cream instead of Cool Whip.
Nutrition
- Serving Size: 1 slice (about 1/12th of the recipe)
- Calories: 350 kcal
- Sugar: 28 g
- Sodium: 210 mg
- Fat: 22 g
- Saturated Fat: 7 g
- Unsaturated Fat: 13 g
- Trans Fat: 0 g
- Carbohydrates: 32 g
- Fiber: 1.5 g
- Protein: 4 g
- Cholesterol: 30 mg


