
If you’re craving that perfectly crispy, golden chicken snack without the greasy mess of deep frying, this Crispy Baked Chicken Tenders Recipe is going to become your new best friend. I absolutely love how these tenders turn out—crunchy on the outside yet juicy and tender inside, all thanks to a clever breadcrumb coating and baking technique that keeps things healthier without sacrificing flavor. You’ll find that they’re ideal for family dinners, game days, or simply whenever you want a comforting, crowd-pleasing treat.
When I first tried this Crispy Baked Chicken Tenders Recipe, I was surprised by how easy it was to get that restaurant-style crunch from the oven. Plus, it’s super versatile—you can spice up the breading with your favorite herbs or enjoy them as a blank canvas for all sorts of dipping sauces. Trust me, once you master this recipe, you’ll never want to go back to frying!
Why You’ll Love This Recipe
- Healthier Crunch: Baking instead of frying means you get crispy chicken without all the extra oil.
- Super Simple Ingredients: You probably already have everything in your pantry for this recipe.
- Kid-approved: My family goes crazy for these tenders, making them a perfect weeknight winner.
- Versatile and Customizable: Adjust the seasoning or pair with any dipping sauce to suit your mood.

Ingredients You’ll Need
All the ingredients here combine to create a flavorful, crunchy coating and juicy chicken center. When shopping, keep an eye out for fresh chicken tenders or boneless chicken breasts that you can slice yourself for the best texture.
- Chicken tenders or boneless chicken breast: Fresh or thawed works best for even cooking.
- Buttermilk: This tenderizes the chicken beautifully; if you don’t have buttermilk, a yogurt and milk mix works as a substitute.
- All-purpose flour: Basic and perfect for the breading base.
- Cornstarch: Adds an extra layer of crispiness to the baked tenders.
- Egg: Helps the breading stick and adds richness.
- Seasoning mix (salt, pepper, paprika, garlic powder, onion powder, dried herbs like oregano and thyme): These give depth of flavor—you can customize or use your favorite blends.
- Cooking spray or a little oil: To lightly coat the tenders before baking and encourage browning.
Variations
I love mixing things up depending on the season or what’s on hand in the pantry. This Crispy Baked Chicken Tenders Recipe is a fantastic base for all sorts of flavor experiments.
- Gluten-Free Option: Swap the all-purpose flour with gluten-free flour blend and use cornstarch as usual; I’ve done this with great results for family members with sensitivities.
- Spicy Kick: Add cayenne pepper or chili powder to the seasoning mix when you want a little heat; it’s always a hit with my spice-loving friends.
- Parmesan Twist: Toss some freshly grated Parmesan in the breading for that irresistible cheesy crunch, which works amazingly for a special occasion.
- Herb Variations: Play around with dried basil, rosemary, or smoked paprika to tailor it to your favorite flavors.
How to Make Crispy Baked Chicken Tenders Recipe
Step 1: Marinate for Tender Juiciness
Start by marinating your chicken tenders in buttermilk mixed with a beaten egg and a pinch of salt and pepper. This step is a game changer—I usually let it sit in the fridge for at least an hour, but even 30 minutes works if you’re short on time. The buttermilk helps tenderize the chicken, ensuring it stays juicy even after baking.
Step 2: Prepare Your Crispy Breading Mix
While the chicken marinates, mix your flour, cornstarch, and all the seasonings together in a large bowl. This combination is what gives the tenders that unbeatable crunch. I’ve found that rubbing a little bit of marinade into the flour mix with your fingers before coating helps form tasty crispy clusters when baking—trust me, it’s a little secret that makes a huge difference.
Step 3: Dredge and Coat the Chicken
Lift each chicken tender out of the marinade, letting the excess drip away, then toss it into the breading mixture. Use your hands or a fork to coat the chicken evenly with the crispy mix. Don’t be shy about pressing the breading onto the chicken for maximum crispiness. Lay the tenders on a parchment-lined baking sheet—we’re getting close!
Step 4: Bake to Golden Perfection
Preheat your oven to 425°F (220°C). Arrange the coated chicken tenders on the baking sheet in a single layer, then lightly spray them with cooking spray or drizzle a little oil to encourage browning. Bake for about 15-20 minutes, flipping once halfway through, until the tenders are beautifully golden and crispy. I always check the internal temperature—it should hit 165°F (74°C) for safety and juiciness.
Pro Tips for Making Crispy Baked Chicken Tenders Recipe
- Double Dipping for Extra Crunch: For an ultra-crispy coating, dip your tenders back into the marinade and then the breading one more time before baking.
- Use a Wire Rack: Place tenders on a wire rack over your baking sheet so hot air circulates all around, giving you an even crispier texture.
- Don’t Overcrowd the Pan: Give your tenders enough space so they bake evenly instead of steaming each other.
- Check Oven Temperature: I learned the hard way that oven temps can vary; using an oven thermometer keeps your chicken from drying out or undercooking.
How to Serve Crispy Baked Chicken Tenders Recipe
Garnishes
I like to finish these crispy tenders with a sprinkle of fresh chopped parsley or a pinch of smoked paprika for color and an extra hit of flavor. A squeeze of fresh lemon over the top is also a personal favorite—brightens up those crispy bites beautifully.
Side Dishes
These chicken tenders pair wonderfully with crispy baked fries, a fresh garden salad, or even some creamy coleslaw. For a fun twist, I often serve them with roasted sweet potato wedges and a tangy honey mustard dip—my family can’t get enough!
Creative Ways to Present
For parties or game days, I like serving the tenders in small paper popcorn boxes or on mini wooden boards with an assortment of dipping sauces. It’s a simple way to elevate presentation and make eating fun, especially for kids or casual get-togethers.
Make Ahead and Storage
Storing Leftovers
After cooling completely, I store leftovers in an airtight container in the fridge for up to 3 days. To keep that crunch when you reheat, avoid covering them tightly with plastic wrap, which traps moisture.
Freezing
I’ve also frozen these tenders successfully by placing them on a baking sheet individually to freeze first, then transferring them to freezer bags for up to 2 months. This way, they don’t stick together and you can grab a handful anytime you want.
Reheating
The best way I’ve found to keep the crispiness is reheating the tenders in a 375°F (190°C) oven for about 8-10 minutes, flipping halfway through. Avoid the microwave—it turns them rubbery and sad!
FAQs
-
Can I use chicken thighs instead of tenders?
Absolutely! Boneless, skinless chicken thighs can be thinly sliced to mimic tenders and tend to stay even juicier during baking due to their higher fat content.
-
Is buttermilk necessary for marinating?
Buttermilk helps tenderize the chicken while adding subtle tang, but you can substitute it with a mix of plain yogurt and milk or even milk with a splash of lemon juice or vinegar as a quick fix.
-
How do I make the breading extra crispy?
Mixing cornstarch with flour, pressing the breading firmly onto the chicken, and baking on a wire rack are key tricks. Double-dipping the tenders in the marinade and breading also amps up the crunch.
-
Can I prepare this recipe ahead of time?
Yes! You can marinate the chicken in advance and keep it in the fridge for up to 24 hours before coating and baking. Also, freezing cooked tenders helps for quick meals later.
Final Thoughts
This Crispy Baked Chicken Tenders Recipe holds a special place in my kitchen routine because it’s reliable, delicious, and insanely easy. It’s one of those recipes I turn to when I want a comfort food fix without the guilt of deep frying. I hope you’ll give it a try soon—you might just find it as addictive (and versatile!) as I do.
Print
Crispy Baked Chicken Tenders Recipe
- Prep Time: 15 minutes (plus 1 hour marinating)
- Cook Time: 10 minutes
- Total Time: 1 hour 25 minutes
- Yield: 4 servings (as a meal)
- Category: Mains, Snack
- Method: Frying
- Cuisine: Southern, Western
Description
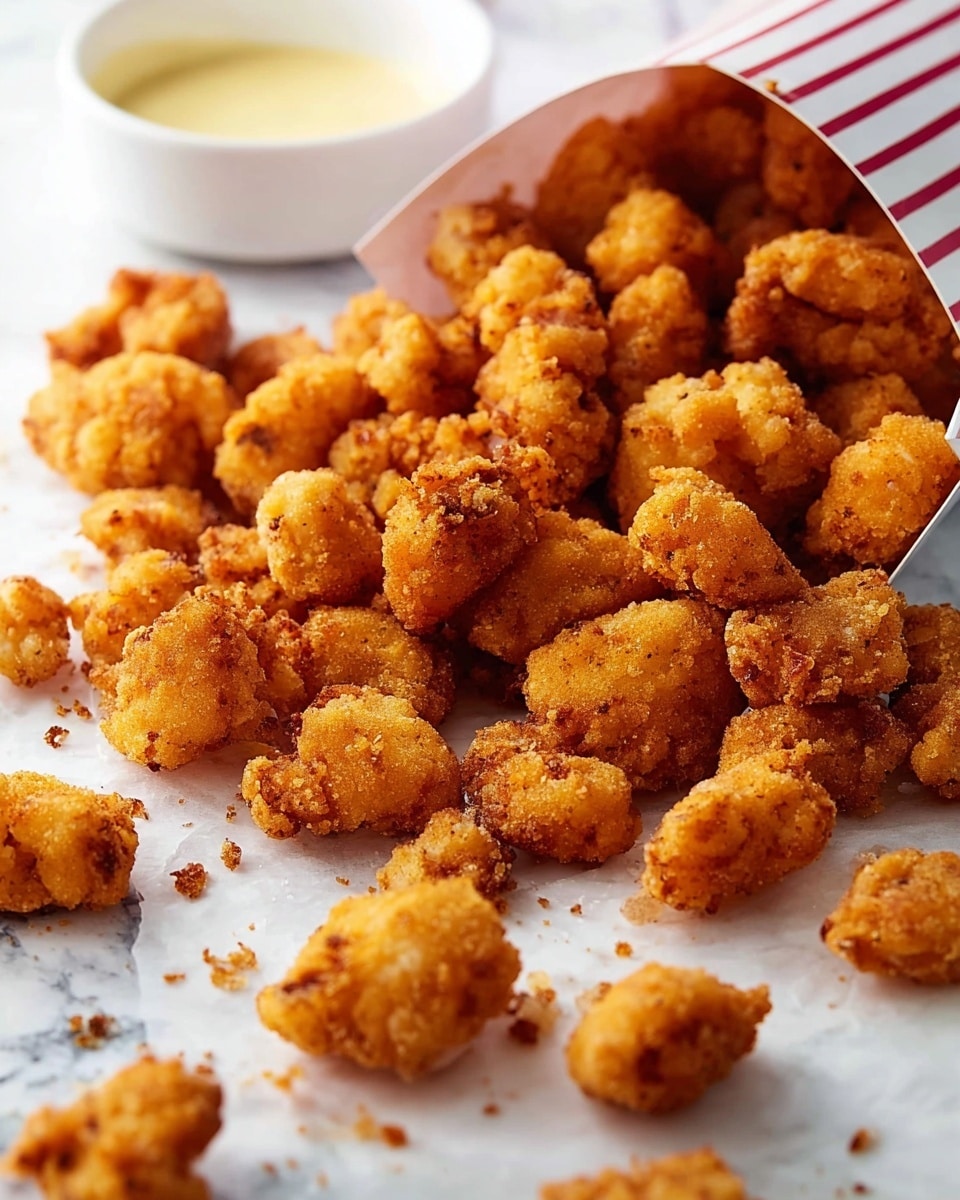
This Popcorn Chicken recipe offers a crispy, flavorful alternative to KFC’s version, using a buttermilk marinade and a secret blend of 11 herbs and spices in the breading to achieve a perfectly crunchy, golden bite-sized chicken. Fried to perfection and served with your favorite dipping sauces, this dish is ideal as a snack or main meal.
Ingredients
Chicken
- 500g / 1lb chicken breast, skinless boneless, tenderloin or boneless thighs
Buttermilk Marinade
- 3/4 cup buttermilk
- 1 1/2 tsp cooking salt / kosher salt
- 1 large egg (~50-55g, 2 oz in shell)
Popcorn Chicken Breading
- 1 1/2 cups plain / all-purpose flour
- 1/2 cup corn flour / cornstarch
KFC 11 Secret Herbs and Spices
- 1 tsp cooking salt / kosher salt
- 1/2 tsp celery salt (or substitute 1/4 tsp extra salt)
- 1 tsp black pepper
- 1 tsp regular (sweet) paprika
- 1 tsp dried thyme, crushed
- 1 tsp dried oregano, crushed
- 3/4 tsp onion powder
- 2 tsp garlic powder
- 1/2 tsp mustard powder
- 1/2 tsp ginger powder
- 1/4 tsp cayenne pepper (optional)
To Fry
- 2 1/2 – 3 1/2 cups canola oil (or vegetable or peanut oil), enough for 2.5 cm / 1″ depth
Dipping Sauce Suggestions
- 1/2 batch Honey mustard dipping sauce
- Ketchup, tomato sauce, sweet and sour sauce, pink sauce, BBQ, or any dipping sauce you love
Instructions
- Marinate the chicken: Cut chicken into small 1.25 cm / 1/2″ cubes. In a bowl, whisk together buttermilk, egg, and salt. Add chicken pieces and stir to coat. Refrigerate for at least 1 hour, up to 24 hours.
- Prepare the breading mixture: In a large bowl, mix flour, corn flour, and all the herbs and spices (salt, celery salt, black pepper, paprika, thyme, oregano, onion powder, garlic powder, mustard powder, ginger powder, cayenne pepper). This mix will evenly coat the chicken with the signature flavor.
- Create crunchy clumps in breading: Drizzle 3 tablespoons of the marinade into the flour mixture and rub it with fingers to form many small lumpy bits throughout. These clumps fry up as extra crunchy bits, a secret to the perfect texture.
- Bread the chicken pieces: Using your left hand, pick up a handful of marinated chicken and scatter it into the breading mix. Spoon flour over and toss to coat. Use your right hand to shake off excess flour through your fingers. Spread coated chicken on a tray and repeat with remaining chicken.
- Freshen coating before frying: Just before frying, briefly toss the chicken you’re about to cook in the residual flour on the tray to refresh the coating and ensure pieces aren’t stuck together.
- Prepare to fry: Line a tray with paper towels for draining. Preheat oven to 50°C / 125°F to keep cooked chicken warm. Pour oil into a heavy-based saucepan or deep skillet to a depth of 2.5 cm / 1″ and heat over medium-high until reaching 180°C / 350°F.
- Fry the chicken: Using a spider or scoop, shake off excess flour and carefully lower the chicken pieces into hot oil. Fry for 2 – 2.5 minutes until golden, separating any stuck pieces halfway through for even cooking.
- Drain and keep warm: Remove fried chicken with a spider and spread on paper towels. Keep chicken warm in the oven while frying remaining batches.
- Serve: Enjoy popcorn chicken in popcorn boxes for fun, accompanied by honey mustard, ketchup, or your favorite dipping sauces.
Notes
- Use skinless, boneless chicken breast, tenderloins, or thighs depending on preference.
- Buttermilk can be substituted by mixing yogurt with milk in equal parts.
- Salt amount can vary; kosher salt is used in recipe for seasoning balance.
- The secret herb and spice blend mimics KFC’s famous flavor; adjusting cayenne pepper controls slight heat.
- Use a heavy-based pan for safety and consistent heat retention during frying.
- Re-coating chicken just before frying refreshes the breading for maximum crunchiness.
- Maintain oil temperature at 180°C/350°F to ensure crispiness without oil absorption.
- Oil can be filtered and reused but discard if it darkens or smells off.
- Fried chicken can be kept warm in a low-temperature oven to maintain crispness without drying out.
Nutrition
- Serving Size: Approximately 125g (1/4 of recipe)
- Calories: 380 kcal
- Sugar: 1.5 g
- Sodium: 580 mg
- Fat: 20 g
- Saturated Fat: 3.5 g
- Unsaturated Fat: 15 g
- Trans Fat: 0 g
- Carbohydrates: 25 g
- Fiber: 1.5 g
- Protein: 30 g
- Cholesterol: 80 mg


