
If you’re looking for a festive, fun, and absolutely adorable treat to wow your guests this season, then this Halloween Emoji Cupcakes Recipe is your new best friend in the kitchen. I absolutely love how these cupcakes come out—each one a little spooky character with its own personality, and they’re surprisingly easy to decorate once you get the hang of it. Stick with me, and I’ll walk you through every step so you can impress your family and friends with these cute Halloween-themed goodies.
Why You’ll Love This Recipe
- Fun and Festive: These cupcakes bring Halloween to life with playful emoji-inspired faces.
- Customizable Colors: You’ll have the freedom to mix and match the icing colors to fit your vibe.
- Great for All Skill Levels: Whether you’re new to decorating or a pro, these cupcakes are totally achievable.
- Perfect for Parties: Your family and friends will go crazy for how cute and tasty these cupcakes are.

Ingredients You’ll Need
I like to keep things simple by starting with my favorite cake mix or recipe as the base—nothing beats a moist, fluffy cupcake for decorating. The fun really comes in with all the icing colors you’ll need to bring these Halloween emojis to life. When shopping, grab gel food colorings over liquid for the most vibrant results without watering down your icing.
- Favorite Cake Mix or Recipe: Choose one that you love to bake and yields moist cupcakes every time.
- Lemon Yellow Icing Color: Bright and sunny, perfect for mixing green shades.
- Leaf Green Icing Color: Essential for pumpkin stems and Frankenstein hues.
- Brown Icing Color: Great for adding depth and spooky tones.
- Ivory Icing Color: For softer brown shades and ghost highlights.
- Black Icing Color: Must-have for outlining faces and details.
- Rose Icing Color: A gentle pink for rosy cheeks or vampire hues.
- Violet Icing Color: Adds that perfect purple touch for more variety.
- Orange Icing Color: Pumpkin-orange that screams Halloween.
- Christmas Red Icing Color: A bright red to mix or use as is for playful details.
- Red-Red Icing Color: Deep red for blood effects or expressions.
- White Decorator Icing: A creamy base for ghost shapes and shining teeth.
- Creamy White Decorator Icing: Use for smooth icing surfaces and highlights.
Variations
I love to switch things up depending on the mood or crowd. Feel free to get creative with the colors and faces—there’s no one way to make these Halloween emoji cupcakes! More importantly, make the decorating fun for you and whoever’s helping out.
- Vegan or Gluten-Free Option: I once swapped the cake base for a gluten-free mix and used vegan buttercream—it still turned out adorable and delicious.
- Flavor Twists: Adding a bit of pumpkin spice or cinnamon to the batter can make these cupcakes even more seasonal.
- Simplified Faces: If you’re tight on time, you can stick to simple dot and smile patterns instead of detailed expressions.
- Mini Cupcakes: Bite-size emojis are so fun for parties and easier to decorate if you want to test out your skills first.
How to Make Halloween Emoji Cupcakes Recipe
Step 1: Bake Your Cupcakes with Festive Liners
Start by preparing your favorite cake batter and baking the cupcakes in a mix of purple, green, and orange liners—this adds a subtle extra pop of Halloween spirit. Bake them until a toothpick comes out clean and then let them cool completely on a wire rack. Trust me, decorating warm cupcakes is a recipe for a mess!
Step 2: Mix Your Icing Colors
I like to create custom shades from the basic icing colors for a more authentic and vibrant set of emojis. For example, mixing Leaf Green with Lemon Yellow makes a lively green, while combining Red-Red with Christmas Red gives you reds that really pop. Take about 1/4 cup of each combined color to tint, plus keep some pure orange, black, and white for detail work. If you’re nervous about colors, test a small amount first on parchment paper to get your ideal tone.
Step 3: Ice Cupcakes with Base Colors
Using a spatula, smooth the cupcakes with green, red, purple, orange, or brown icing depending on which emoji you’re aiming for. The smooth base is key because it gives you a clean canvas for the facial features. I find that chilling the cupcakes briefly after this step helps the icing set just enough to avoid smearing when piping details.
Step 4: Pipe the Cute Emoji Faces
Prepare several decorating bags with different tips and colors: tip 6 for broad shapes like ghosts, tip 3 for fine facial lines, and tip 5 for thicker hair and stems. Start by outlining the ghost shapes with white icing, then fill and smooth with a spatula. Use your black icing for mouth lines and eyes and add character with green scars for Frankenstein or red hearts for Dracula. Don’t worry if your designs aren’t perfect at first — the charm lies in their homemade look!
Pro Tips for Making Halloween Emoji Cupcakes Recipe
- Mix Your Own Shades: I discovered that blending basic icing colors makes the whole set look more cohesive and interesting.
- Chill Between Steps: Letting the icing set slightly between base layers and detailed piping keeps lines crisp and clean.
- Use Multiple Piping Tips: Different tips give your emojis definition and personality, so don’t hesitate to prep a few bags.
- Don’t Stress Perfect Faces: The handmade feel is part of the charm—embrace little quirks and smiles that aren’t exact.
How to Serve Halloween Emoji Cupcakes Recipe

Garnishes
I love finishing off these cupcakes with tiny edible decorations like colorful sugar pearls or sprinkle glitter for an extra festive sparkle. Occasionally, I’ve added mini candy eyes or even drawn on chocolate webs around the cupcakes for a spider-inspired twist. These little extras help your emojis feel even more lively and themed.
Side Dishes
Pair your Halloween emoji cupcakes with classic Halloween drinks like apple cider or a spooky punch. Popcorn with a dash of pumpkin spice or candy corn bowls make for a fun and easy snack lineup alongside the cupcakes.
Creative Ways to Present
I like to arrange these cupcakes on a tiered cake stand decorated with faux cobwebs and mini pumpkins for a Halloween party centerpiece that’s almost too cute to eat. You can also wrap them individually in clear cellophane with a little ribbon for party favors or classroom treats.
Make Ahead and Storage
Storing Leftovers
I usually keep leftover cupcakes in an airtight container in the fridge, especially because of the different icing colors and types. They hold up well for 3-4 days, just be sure to bring them back to room temperature before serving to get that perfect texture and flavor.
Freezing
If you want to prepare these ahead of time, you can freeze the undecorated cupcakes wrapped tightly in plastic wrap, then thaw and decorate right before your party. Frozen decorated cupcakes tend to lose some icing texture, so I recommend freezing before decorating for the best results.
Reheating
Reheating cupcakes is easy—just let them come to room temperature naturally or warm very briefly in the microwave (like 5-7 seconds max) to avoid melting the icing. This little trick helps the cupcake feel freshly baked again!
FAQs
-
Can I use homemade buttercream for this Halloween Emoji Cupcakes Recipe?
Absolutely! Homemade buttercream works great and gives you plenty of control over texture and sweetness. Just make sure it’s stiff enough to hold the piped details well, which you can achieve by chilling it slightly before decorating.
-
What if I don’t have all the icing colors listed?
No worries! You can mix basic gel colors to create most of the shades you need, or use just the primary colors and white/black to make unique variations. The charm of this Halloween Emoji Cupcakes Recipe is in customization, so get creative!
-
How do I keep the cupcakes from drying out while I decorate?
I recommend decorating in small batches and covering the finished cupcakes loosely with a cake dome or plastic wrap to maintain moisture. If you need to step away for a while, pop them in the fridge but let them return to room temp before serving.
-
Can kids help with decorating these cupcakes?
Definitely! I’ve had so much fun making these with my kids—they love piping faces and experimenting with colors. Just supervise the piping bags to avoid too much mess, and you’ll have a blast.
Final Thoughts
This Halloween Emoji Cupcakes Recipe holds a special place in my heart because it turns baking into a creative celebration. Whether you’re baking with kids or craving a playful way to impress guests, these cupcakes deliver smiles all around. I can’t wait for you to try them out—you’ll enjoy the smiles, the colors, and the deliciousness almost as much as I do. Happy baking and spooky decorating!
Print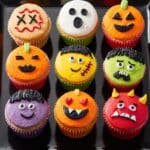
Halloween Emoji Cupcakes Recipe
- Prep Time: 20 minutes
- Cook Time: 25 minutes
- Total Time: 45 minutes
- Yield: 24 cupcakes
- Category: Dessert
- Method: Baking
- Cuisine: American
Description
Create festive Halloween emoji cupcakes with vibrant colored icing to decorate spooky faces including devils, ghosts, pumpkins, Frankenstein, Dracula, and zombies. These fun cupcakes combine a favorite cake mix with colorful gel icing to make your Halloween party extra special.
Ingredients
Base Ingredients
- Favorite Cake Mix or Recipe
Icing Colors
- Lemon Yellow Icing Color, 1 oz.
- Lemon Yellow Gel Food Coloring, 1 oz.
- Leaf Green Icing Color, 1 oz.
- Leaf Green Gel Food Coloring, 1 oz.
- Brown Icing Color, 1 oz.
- Brown Gel Food Coloring, 1 oz.
- Ivory Icing Color, 1 oz.
- Ivory Gel Food Coloring, 1 oz.
- Black Icing Color, 1 oz.
- Black Gel Food Coloring, 1 oz.
- Rose Icing Color, 1 oz.
- Rose Gel Food Coloring, 1 oz.
- Violet Icing Color, 1 oz.
- Violet Gel Food Coloring, 1 oz.
- Orange Icing Color, 1 oz.
- Orange Gel Food Coloring, 1 oz.
- Christmas Red Icing Color, 1 oz.
- Christmas Red Gel Food Coloring, 1 oz.
- Red-Red Icing Color, 1 oz.
- Red-Red Gel Food Coloring, 1 oz.
- White Decorator Icing – 4.5 lb.
- Creamy White Decorator Icing, 4 lb. Tub
Instructions
- Bake cupcakes: Prepare the cake batter following your favorite cake mix or recipe instructions. Bake the cupcakes in purple, green, and orange baking cups until set and a toothpick inserted comes out clean. Allow cupcakes to cool completely before decorating.
- Tint icing: Using the provided icing and gel food coloring colors, create the different colored icings by combining as follows: Leaf Green and Lemon Yellow for green; Red-Red and Christmas Red for red; Violet and Rose for purple; Brown and Ivory for brown. Tint 1/4 cup of each color icing: green, red, purple, and brown. Tint an additional 1/4 cup each of icing orange and black by mixing Orange and Black icing colors. Reserve the remaining white icing for additional decoration.
- Decorate cupcakes: Using a spatula, apply red, green, purple, orange, and brown icing to ice the cupcakes with a smooth finish. Prepare a decorating bag fitted with tip 6 and fill with white icing to outline and fill the ghost shapes. Prepare four decorating bags with tip 3 and fill separately with small amounts of green, black, white, and red icing. Also, prepare three decorating bags with tip 5 and fill separately with the remaining red, green, and black icing.
- Devil Cupcakes: Pipe facial features using black icing with tip 3 to create the devilish look.
- Ghost Cupcakes: Use white icing with tip 6 to pipe the ghost eyes and fill outlines, then add facial features with black icing with tip 3.
- Pumpkin Cupcakes: Pipe green stems with tip 5 and add facial features using black icing with tip 3 for the pumpkin faces.
- Frankenstein Cupcakes: Using black icing with tip 5, pipe hair; with green icing and tip 3, pipe scars; with white icing and tip 6, pipe mouth; and finish with black icing using tip 3 to add facial features and teeth.
- Dracula Cupcakes: Pipe hair using black icing with tip 5; create facial features with black icing and tip 3; add heart eyes with red icing and tip 3; and pipe teeth with white icing and tip 3.
- Zombie Cupcakes: Use red icing with tip 5 to pipe blood effects and black icing with tip 3 to pipe facial features for a spooky zombie look.
Notes
- Use gel food colorings for vibrant and consistent icing colors.
- Experiment with mixing colors to get the desired shades for icing.
- Ensure cupcakes are completely cooled before icing to avoid melting the decorations.
- Use piping tips as specified for best decorative results.
- Store cupcakes in an airtight container to keep them fresh.
- Feel free to personalize emoji faces with your own creative touches.
Nutrition
- Serving Size: 1 cupcake
- Calories: 220
- Sugar: 18g
- Sodium: 150mg
- Fat: 10g
- Saturated Fat: 3g
- Unsaturated Fat: 6g
- Trans Fat: 0g
- Carbohydrates: 30g
- Fiber: 1g
- Protein: 2g
- Cholesterol: 30mg


