
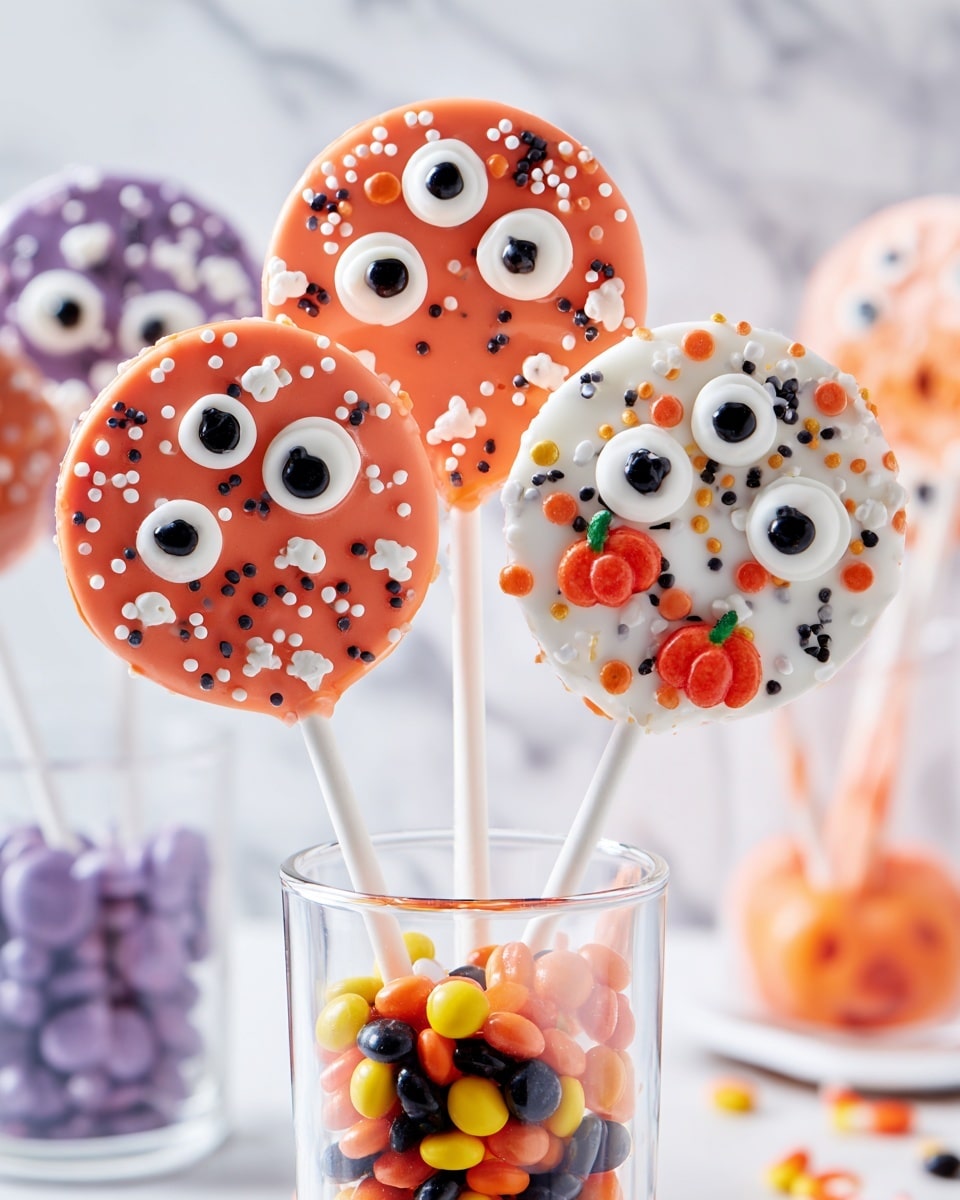
If you’re looking for a fun, spooky treat that’s as delightful to make as it is to eat, you’ve come to the right place. Here’s Looking at Boo Eyeball Pops Recipe is the perfect Halloween-inspired snack that’s sure to impress both kids and adults at any party. These eyeball pops are not only visually striking with their creepy, colorful sprinkles and candy eyes, but they also taste amazingly sweet and festive. Stick with me, and I’ll walk you through every quirky detail to get these pops just right!
Why You’ll Love This Recipe
- Eye-Catching Presentation: These eyeball pops look incredibly fun and are instant conversation starters for any Halloween gathering.
- Easy to Make: You don’t need to be a pro baker or decorator—simple steps and common candy melts get you there.
- Customizable Sprinkles Combos: Mixing spooky sprinkles means you can add your own flair and creativity every time.
- Quick Chill Time: In just 5 to 10 minutes, these pops set beautifully, perfect for last-minute party prep.

Ingredients You’ll Need
To make these creepy-cute eyeball pops, you’ll want to gather a vibrant mix of sprinkles and candy, plus some basics that are easy to find. The way the ingredients work together creates both fun textures and spooky aesthetics, so grab your favorite Halloween-themed sprinkles if you want to tweak things a bit!
- Pumpkins Sprinkles: These bring in that iconic jack-o’-lantern vibe—perfect for the season.
- Candy Eyeballs: Small and large versions both work; they’re the star of your eyeball pops.
- White Nonpareils: Tiny round sugar pearls add awesome texture, making your pops look professionally done.
- Icing Colors (4 Color Primary Set): Use these to tint your candy melts exactly how you want—orange for Halloween is a no-brainer.
- Black Sugar Pearls: These add a classy, dark crunch that contrasts beautifully with the bright colors.
- Bright White Candy Melts: The base for your pops; easy to melt and shape.
- Skull and Bones Sprinkles Mix: Adds a little spooky fun and variety to your sprinkle mix.
- Orange and Black Sanding Sugars: These chunky sugars give a sparkly look and a nice extra crunch.
Variations
One of the things I adore about Here’s Looking at Boo Eyeball Pops Recipe is how flexible it can be. I often switch up the sprinkles or the candy colors based on what I have or feel like that year. Don’t hesitate to make this recipe your own—it’s all about having fun in the kitchen!
- Variation: I’ve tried swapping the orange candy melts for neon green or purple to create alien eyeball pops—total crowd-pleasers with kids!
- Gluten-Free: Most sprinkles and candy melts are naturally gluten-free, but double-check labels if you’re picky.
- Vegan Version: Use vegan chocolate melts and look for vegan-friendly sprinkles; you won’t miss a thing.
- Mini Pops: Make smaller eyeballs for party favors or to decorate cupcakes—it’s just as fun but bite-sized.
How to Make Here’s Looking at Boo Eyeball Pops Recipe
Step 1: Sort Those Sprinkles Like a Pro
First things first, you want to create two sprinkle mixes. I like to divide the sprinkles so that one bowl has black sugar pearls, skull and bones mix, and half of the black nonpareils, while the other bowl holds orange and black sanding sugars, pumpkins sprinkles, and the rest of the black nonpareils. Each bowl should be about half a cup. This separation not only helps with easy decorating later but also gives your pops a beautiful contrasting texture and color when you sprinkle them on.
Step 2: Melt and Tint Your Candy Melts
Following the package instructions, gently melt your bright white candy melts. Here’s a trick I discovered: split your melted candy in half and tint one portion with orange icing color from the set to get that perfect Halloween hue. Pour each color into separate decorating bags. It’ll make application super easy, and you’ll have those signature orange and white eyeball bases ready to rock.
Step 3: Pipe the Candy Circles with Care
Cut a tiny hole at the tip of your decorating bag and pipe a roughly 2-inch diameter circle onto a parchment-lined cake board. Rotate the tip as you pipe to keep the shape even—it looks nicer and helps the candy set uniformly. Then, immediately insert about an inch of the popsicle stick into the candy while it’s still soft and tap gently to smooth out any bubbles. Work with one color at a time for best results.
Step 4: Sprinkle and Add the Eyeballs
This is the fun part! While the candy circles are still soft, scatter your prepped sprinkle mix generously over the top. Then place your candy eyeballs strategically right in the center to give the definitive “eyeball” look. You can mix large and small candy eyes for added creepiness. Don’t worry if your pops look a little uneven—it’s all part of their charm.
Step 5: Chill and Set
Pop those pans into the fridge for about 5 to 10 minutes to let everything firm up nicely. You’ll know they’re ready when the candy feels solid to the touch and the popsicle sticks hold firm. If you’re in a rush, the freezer works too, just keep an eye so you don’t freeze them solid and risk cracking your candy.
Pro Tips for Making Here’s Looking at Boo Eyeball Pops Recipe
- Sprinkle Separation: Sorting your sprinkles into two distinct bowls helps you achieve better color contrast and makes decorating much easier.
- Use Room Temperature Candy Melts: I learned that melting candy too hot can make them clumpy, so be patient and melt gently for smooth pouring.
- Tap to Even Out: After inserting your sticks, tapping the board lightly helps avoid air bubbles and keeps the pops flat and stable.
- Don’t Overcrowd Sprinkles: Too many sprinkles can weigh down the candy and cause them to slide off—less is more to maintain stickiness.
How to Serve Here’s Looking at Boo Eyeball Pops Recipe
Garnishes
I usually keep things simple with these pops because the sprinkles and candy eyes do the heavy lifting visually. Still, for extra flair, I love adding a tiny drizzle of dark chocolate or white chocolate on top for a creepy vein effect. Sometimes a little edible glitter adds that fun sparkle when the light hits just right.
Side Dishes
These eyeball pops are perfect as a standalone treat but pair wonderfully with pumpkin spice cupcakes or a bowl of candy corn. I like to set them up on a dessert table alongside spooky trail mix with nuts, dried cranberries, and candy-coated chocolates for guests to grab a bit of everything.
Creative Ways to Present
One of my favorite presentation ideas was creating a “mad scientist” theme—the eyeball pops were stuck into a foam block covered in faux moss and plastic bugs for a creepy lab effect. Another great idea is to use them as cupcake toppers, inserting a smaller eyeball pop into each cupcake to instantly upgrade your spooky dessert display!
Make Ahead and Storage
Storing Leftovers
If you happen to have leftovers (which is rare because they disappear fast!), store your eyeball pops in an airtight container at room temperature. They’ll keep well for up to 3 days without losing their crispiness or vibrant look.
Freezing
I’ve never needed to freeze these, but if you want to prep early, you can freeze them wrapped individually in wax paper and then placed in a freezer bag. Thaw them at room temp before serving to avoid condensation affecting the sprinkles.
Reheating
Luckily, no reheating is needed! These pops taste best chilled or at room temperature. Avoid the microwave as it melts the candy coating, ruining the texture and appearance.
FAQs
-
Can I use chocolate instead of candy melts for this recipe?
You can! Chocolate adds a richer flavor, but it’s a bit trickier to work with because it can seize or become grainy if overheated. Candy melts are designed to melt smoothly and are easier to tint with colors, which is key for getting those bright orange and white eyeball effects.
-
How long do the eyeball pops last?
Stored in an airtight container at room temperature, they’ll be good for about 3 days. Beyond that, the candy might start to sweat or lose its firmness, especially in humid environments.
-
Can I make these without a decorating bag?
Absolutely! You can use a zip-top bag with a small snip in the corner or even spoon the melted candy onto the parchment paper and shape it quickly with the back of a spoon. Just be mindful of shaping and inserting the stick fast before the candy hardens.
-
What if I don’t have all the sprinkles listed?
No worries! Any Halloween-themed sprinkles work great. I recommend having a mix of textures and colors—think sugar pearls, sanding sugar, and fun shapes to mimic the spooky feeling. Your pops will still look festive and delicious.
Final Thoughts
I absolutely love how here’s Looking at Boo Eyeball Pops Recipe brings such a playful spirit to Halloween treats. When I first tried this, the kids went wild over those creepy candy eyes, and honestly, it made me smile just as much watching them enjoy it. Making these pops gave me a fun afternoon of creativity and a delicious snack to share. If you’re after a treat that’s easy, colorful, and just a little bit spooky, trust me — give this recipe a try. You’ll be the star of your next Halloween party!
Print
Here’s Looking at Boo Eyeball Pops Recipe
- Prep Time: 15 minutes
- Cook Time: 10 minutes
- Total Time: 25 minutes
- Yield: 12 Treats
- Category: Dessert
- Method: No-Cook
- Cuisine: American
- Diet: Vegetarian
Description
These playful Halloween-themed Boo Eyeball Pops combine colorful candy melts and festive sprinkles to create spooky, fun treats perfect for parties or trick-or-treaters. Easy to assemble with melted candy, decorative sprinkles, and candy eyeballs, these pops deliver a visually striking and deliciously sweet snack.
Ingredients
Sprinkles and Decorations
- 3.5 oz. Pumpkin Sprinkles
- 0.88 oz. Candy Eyeballs
- 3 oz. White Nonpareils
- 4.8 oz. Black Sugar Pearls
- 1 oz. Large Candy Eyeballs
- 1 oz. Large Edible Black and White Candy Eyeball Sprinkles
- 3 oz. Skull and Bones Sprinkles Mix
- 3.25 oz. Orange Sanding Sugar
- 3.25 oz. Black Sanding Sugar
Candy Melts and Coloring
- Bright White Candy Melts
- 4 Color Primary Icing Colors Set (use orange to tint candy)
Instructions
- Make Sprinkles Mix: Separate the sprinkles into two bowls. In one bowl, combine black sugar pearls, skull and bones sprinkles, and half of the black nonpareils. In the second bowl, combine orange sanding sugar, black sanding sugar, pumpkin sprinkles (jack-o’-lantern sprinkles), and the remaining half of the black nonpareils. Each mix should measure approximately 1/2 cup.
- Prepare Melted Candy: Melt the bright white candy melts following package instructions. Tint half of the melted candy with orange from the icing color set, leaving the other half white. Transfer each colored melted candy into separate decorating bags for piping.
- Make Pops: Working with one decorating bag at a time, cut a small hole at the tip. Pipe a 2-inch diameter circle of melted candy onto a parchment paper-covered cake board. Insert about 1 inch of a treat stick into the center of the candy circle. Tap the board gently to smooth and even out the candy. Immediately scatter the corresponding sprinkle mix over the wet candy, then place candy eyeballs atop the sprinkles. Repeat for the desired number of pops using both colors.
- Chill to Set: Place the cake board with the pops into the refrigerator and chill for 5 to 10 minutes or until the candy has fully set and hardened.
Notes
- Use parchment paper or a silicone mat for easy removal of pops once set.
- Ensure the melted candy is not too hot to avoid melting the sprinkles and candy eyeballs upon application.
- Customize by adding other Halloween-themed sprinkles or edible glitter for extra sparkle.
- Store the pops in an airtight container at room temperature or in the refrigerator to keep them fresh.
Nutrition
- Serving Size: 1 treat
- Calories: 120
- Sugar: 18g
- Sodium: 15mg
- Fat: 3g
- Saturated Fat: 2.5g
- Unsaturated Fat: 0.3g
- Trans Fat: 0g
- Carbohydrates: 22g
- Fiber: 0.2g
- Protein: 0.3g
- Cholesterol: 0mg


