
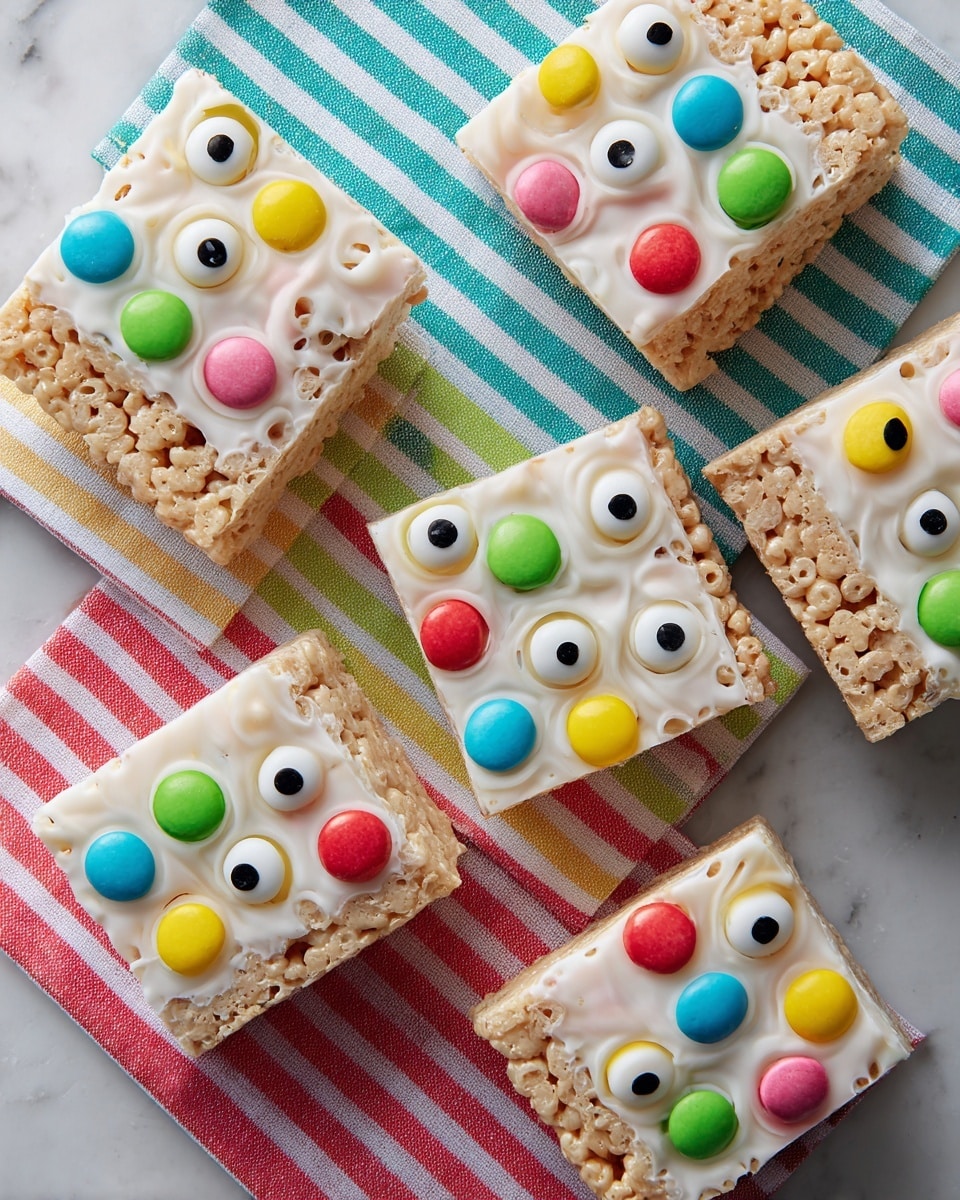
If you’re looking for a fun, festive, and utterly adorable treat, you’ve got to try this Eye Spy Rice Cereal Treats with Candy Eyeballs Recipe. Seriously, I absolutely love how these turn out — they’re light, crispy, and the juicy pop of colorful candy eyeballs makes every bite a delight. When I first made this recipe, it was an instant hit with my family and friends. You’ll find that these treats aren’t just tasty, but also great conversation starters at parties or Halloween gatherings. Stick around, and I’ll share everything you need to know to nail these eyeball-infused delights perfectly!
Why You’ll Love This Recipe
- Simplicity meets creativity: Classic rice cereal treats get an instant upgrade with candy eyeballs that are fun for all ages.
- Vibrant colors: Using different candy melts makes the treats visually stunning without complicated decorating.
- Great for parties: These treats are perfect for Halloween, kids’ events, or anytime you want a whimsical snack.
- Kid-friendly and customizable: You can easily switch up colors or eyeball sizes to fit your theme or season.

Ingredients You’ll Need
These ingredients come together beautifully for a treat that’s as fun to eat as it is to make. When choosing your candy melts and eyeballs, I recommend picking vibrant colors for the best “eye spy” effect that really pops!
- Rice Cereal Treats Base: I usually make my favorite homemade rice cereal treat recipe because it’s soft but holds its shape well.
- Bright White Candy Melts: These form the perfect smooth coating that lets your colorful eyeballs really shine.
- Dark Green Candy Melts: Adds a rich contrast; I love using this color for a spooky vibe.
- Red, Blue, Pink, Yellow, Turquoise, Vibrant Green Candy Melts: Having a variety lets you pipe fun “eye spots” underneath each eyeball for extra color variety.
- Candy Eyeballs (Large and Small): Key to this recipe; I get mine from a specialty baking store or online — trust me, they make all the difference!
Variations
I like to customize this recipe depending on the occasion and who I’m serving. Feel free to swap candy melt colors or eyeball sizes to fit the vibe you’re aiming for. Kids love making their own patterns!
- Seasonal Themes: For Halloween, I stick to dark green, red, and black eyeballs for a spooky look — but for baby showers, pastel melts and smaller eyeballs work beautifully.
- Dietary Tweaks: If you need gluten-free treats, just double-check your rice cereal and candy melts to ensure they fit your dietary needs.
- Extra Crunch: Adding a handful of mini chocolate chips inside the rice cereal treats before setting adds a surprise texture I discovered one day—delicious!
How to Make Eye Spy Rice Cereal Treats with Candy Eyeballs Recipe
Step 1: Prepare Your Rice Cereal Treats Base
Start by making your favorite rice cereal treats recipe. I find it easiest to press the mixture firmly into a cookie pan lined with parchment to get even thickness. Let it cool completely before cutting into approximately 2½ inch by 4 inch rectangles. Trust me, cutting too soon makes things crumbly and messy! You want those rectangles to hold their shape for coating and decorating.
Step 2: Coat with Bright White Candy Melt
Melt the bright white candy melts according to package instructions — I use a microwave in 20-second bursts stirring in between to avoid burning. Transfer the melted candy to a decorating bag with a medium hole. Place your rice cereal treats on a cooling rack set over a cookie sheet or wax paper.
Pipe the white candy generously over the top and sides, leaving about an inch of the bottom uncovered (makes handling easier). Transfer coated treats carefully to a waxed paper-covered cake board and chill for 10–15 minutes to set. You’ll see why this smooth white canvas makes the colorful eyeballs really pop!
Step 3: Decorate with Colorful Candy Melt Dot Base and Candy Eyeballs
Now the fun begins! Melt your dark green, red, blue, pink, yellow, turquoise, and vibrant green candy melts separately, each in its own bag. I knead my bags gently to ensure the candy melts are smooth and evenly melted.
Cut a small hole on the tip of each decorating bag. Starting with one color, pipe small dots randomly over the white-coated area of the treat. Quickly press a candy eyeball into the center of each dot before the candy sets. Keep changing colors to fill the surface with a playful mix of “eyes.” Chill again for 10–15 minutes until everything is set solid.
Pro Tips for Making Eye Spy Rice Cereal Treats with Candy Eyeballs Recipe
- Use Parchment Paper for Easy Handling: I always line my pans and boards with parchment or wax paper to easily transfer treats without sticking or breaking.
- Don’t Overheat Candy Melts: Melting slowly in short bursts helps prevent burning and keeps the candy smooth for piping.
- Work Quickly When Adding Eyeballs: Candy melts set fast once cooled, so press each eyeball in quickly for a secure hold.
- Cut Treats After Cooling: I used to cut treats too soon and ended up with crumbly edges—patience here means cleaner, sturdier shapes.
How to Serve Eye Spy Rice Cereal Treats with Candy Eyeballs Recipe
Garnishes
I often add a sprinkle of edible glitter or colored sugar around the edges of the white candy coating before it sets to give an extra shimmer that catches the light. Sometimes, I toss in some mini marshmallows or candy bats on the same board for a themed spread. It just amps up the fun factor!
Side Dishes
These treats are sweet and light, so I like pairing them with something salty like popcorn or pretzel sticks during parties. A fresh fruit platter with pineapple and grapes adds a nice balance for younger kids too.
Creative Ways to Present
For Halloween, I’ve arranged these treats in a “spooky eye garden” on a black cake stand with fake spider webs underneath for a dramatic look. Another favorite is wrapping each treat in cellophane tied with a colorful ribbon, making them perfect take-home favors.
Make Ahead and Storage
Storing Leftovers
I store leftover Eye Spy Rice Cereal Treats with Candy Eyeballs in an airtight container at room temperature for up to 3 days. The candy melts help preserve their freshness, but keeping them in a cool, dry place is key to avoid sweating or sticky candy eyes.
Freezing
Freezing works surprisingly well! I wrap each treat tightly in plastic wrap then place them in a freezer-safe container. When I’m ready, I thaw them at room temperature for about an hour. The texture stays surprisingly close to fresh.
Reheating
No reheating needed here — these treats are best enjoyed as is. But if you want to “freshen” the candy melts, a quick zap in the microwave for 3-5 seconds can soften them, just be careful not to melt the eyeballs!
FAQs
-
Can I use store-bought rice cereal treats for this recipe?
Absolutely! Using pre-made rice cereal treats can save time — just make sure they’re firm and not stale to hold the candy coating well.
-
What if I can’t find candy eyeballs?
If you’re short on candy eyeballs, you can use small chocolate chips or candy pearls to mimic eyes, or even pipe eyes using icing or colored candy melts for personalized designs.
-
How do I prevent candy melts from seizing or hardening too fast?
Melting candy slowly in short bursts and stirring constantly helps. Also, avoid getting water in the candy as that causes it to seize. You can add a tiny bit of vegetable oil or shortening if needed to smooth it out.
-
Can I make these treats vegan or gluten-free?
Yes, just choose vegan and gluten-free rice cereal and candy melts. Be sure to check labels carefully; some candy melts contain dairy or gluten.
Final Thoughts
I adore the whimsical charm of this Eye Spy Rice Cereal Treats with Candy Eyeballs Recipe. It’s a recipe that brings a smile to anyone’s face — from kids marveling at the eyeballs to adults appreciating the nostalgic crunch with a colorful twist. Having made these for birthdays, school parties, and Halloween, I can say without a doubt they’re a guaranteed crowd-pleaser. So go ahead and try this recipe out — you’ll find it’s as fun to make as it is to eat, and a sweet way to add some magic to any occasion!
Print
Eye Spy Rice Cereal Treats with Candy Eyeballs Recipe
- Prep Time: 20 minutes
- Cook Time: 15 minutes
- Total Time: 35 minutes
- Yield: 6 treats
- Category: Dessert
- Method: No-Cook
- Cuisine: American
- Diet: Vegetarian
Description
Eye Spy Rice Cereal Treats are colorful, fun-to-make sweet bars featuring classic rice cereal treats coated with a glossy layer of melted candy melts in bright colors. Adorned with cute candy eyeballs in various vibrant hues, these treats are perfect for parties, Halloween, or anytime you want a playful dessert that delights both kids and adults.
Ingredients
Rice Cereal Treats Base
- Favorite rice cereal treats recipe (yields approximately 6 treats)
Candy Coating and Decorations
- Bright White Candy Melts Candy
- Dark Green Candy Melts Candy
- Red Candy Melts Candy
- Blue Candy Melts Candy
- Pink Candy Melts Candy
- Yellow Candy Melts Candy
- Turquoise Candy Melts Candy
- Vibrant Green Candy Melts Candy
- Candy eyeballs (large and small), approximately 1 to 2 ounces total
Instructions
- Prepare Rice Cereal Treats Base: Make your favorite rice cereal treats according to its recipe instructions. Once prepared, press the mixture firmly into a cookie pan to form an even layer. Allow the treats to cool completely in the pan so they set properly. After cooling, remove the treats from the pan and cut into rectangles measuring approximately 2.5 inches by 4 inches.
- Melt and Apply White Candy Coating: Melt the Bright White Candy Melts Candy following the package instructions, usually using a microwave safe bowl or a double boiler. Transfer the melted candy into a decorating bag and cut a medium-sized hole at the tip for piping. Place the cut rice cereal treats onto a cooling grid positioned over a cookie pan or waxed paper to catch drips. Pipe the melted white candy over the top and sides of each treat, leaving about 1 inch at the bottom uncovered so the cereal is visible. Carefully transfer the coated treats onto a waxed paper-covered cake board and chill for 10 to 15 minutes until the candy sets and hardens.
- Melt Colored Candy Melts for Decoration: Separately melt each colored Candy Melts Candy (Dark Green, Red, Blue, Pink, Yellow, Turquoise, Vibrant Green) in their own decorating bags, kneading them to ensure the candy is fully melted and smooth. Cut a small hole at the tip of each bag for detailed piping.
- Decorate Treats with Candy Dots and Eyeballs: Using one colored candy melt at a time, pipe small dots of melted candy onto the white candy-coated portion of each treat. Immediately press a candy eyeball into the center of each dot to create a whimsical eye effect. Repeat this process, alternating colors and covering the white candy surface with colorful dots and eyeballs to fully decorate the treats. Once decorated, chill the treats again for 10 to 15 minutes until all candy decorations are firm.
Notes
- For best results, use high-quality candy melts designed for coating and decorating.
- Ensure each layer of candy sets fully before moving on to the next step to prevent colors bleeding.
- If you do not have multiple candy melt colors, you can substitute with colored icing or food-safe decorating gels.
- Store finished treats in an airtight container at room temperature for up to 3 days to maintain crispness.
- Use waxed paper or a silicone mat to prevent sticking during the candy coating and decorating process.
Nutrition
- Serving Size: 1 treat (approx. 2.5 x 4 inch rectangle)
- Calories: 230
- Sugar: 22g
- Sodium: 110mg
- Fat: 9g
- Saturated Fat: 6g
- Unsaturated Fat: 2g
- Trans Fat: 0g
- Carbohydrates: 33g
- Fiber: 1g
- Protein: 1g
- Cholesterol: 10mg


