
If you’re craving a spooky, fun treat that’s perfect for Halloween or any witchy gathering, I’ve got you covered with my absolutely delightful Witches Fingers Cookies Recipe. These creepy-cute cookies aren’t just fun to make—they’re irresistibly tasty and will have everyone asking for seconds. Stick with me, and I’ll share all my secrets so your cookies come out just right, every single time!
Why You’ll Love This Recipe
- Playful & Festive: Perfectly spooky without being too scary, these cookies are a hit with kids and adults alike.
- Buttery, Soft Texture: The dough bakes up tender with just the right amount of crumb, thanks to the butter and confectioners’ sugar combo.
- Easy Yet Impressive: With a few simple shaping tricks, your batch will look professionally haunted.
- Customizable Flair: You can easily swap colors or candies to make them your own creepy masterpiece.

Ingredients You’ll Need
The magic behind this Witches Fingers Cookies Recipe lies in simple ingredients that come together to create something truly spooky and delicious. The key is the texture—you want dough soft enough to shape but sturdy enough to hold those knuckle indentations.
- Confectioners’ Sugar: Gives the cookies their delicate sweetness and helps keep them tender.
- Butter: I always use unsalted butter, softened, for the best creamy richness.
- Leaf Green Icing Color: Just a touch to tint the dough—this adds a subtle eerie hue that’s perfect for the theme.
- Egg: Helps bind everything together while adding a little richness.
- Vanilla Extract: Pure vanilla is a must for that warm, inviting flavor.
- All-Purpose Flour: The backbone of the dough—make sure to spoon and level to avoid tough cookies.
- Salt: Enhances all the other flavors.
- Red Candy Melts: These are your “bloody” touch—essential for the creepy effect on the fingernails.
- Almond Slices: Thin almond slices make surprisingly realistic fingernails once attached.
Variations
One of my favorite things about the Witches Fingers Cookies Recipe is how easily you can personalize it depending on your mood or the occasion. I love experimenting with different candy colors, but you might enjoy trying some alternative textures too!
- Variation: For a bloodier effect, swap the red candy melts with raspberry or strawberry jam, dabbed on with a small brush for a fresh, sticky look—my family goes crazy for this twist.
- Variation: To make it nut-free, substitute almond slices with small drops of melted candy for the fingernails, which also works well if someone has allergies.
- Variation: Add a pinch of cinnamon or pumpkin spice in the dough for a subtle seasonal kick—great if you want a little more fall flavor in your Witches Fingers Cookies Recipe.
How to Make Witches Fingers Cookies Recipe
Step 1: Cream the Base and Color Your Dough
Start by beating together the confectioners’ sugar, softened butter, and a few drops of leaf green icing color with an electric mixer on medium speed. This is the moment where you’ll see the dough start to come alive with that spooky tint. Next, add in the egg and vanilla extract and continue beating until everything is fully combined and creamy. It’s important not to overmix here—just enough to get a smooth texture.
Step 2: Incorporate Flour and Salt for a Smooth Dough
Slowly add in your all-purpose flour and salt, mixing gently until a smooth dough forms. The key is to handle the dough gently here; you want it firm enough to hold shapes but not tough. If you feel it’s a little sticky, give it a brief chill before shaping. I learned the hard way that too much flour makes the fingers dry, so err on the side of caution.
Step 3: Shape the Spooky Fingers
Line your baking sheets with parchment paper. Divide the dough into 24 equal pieces, then roll each into a log about 4 to 4-1/2 inches long. Place them on your prepared pans. Now for the fun part: using a pairing knife, press slight indentations at one end to create a fingernail bed, then carve knuckle lines down each finger. I like to make these little shoulders and indentations a bit exaggerated—it really sells the “witchy” look. Don’t forget to make that slight depression at the nail end to hold the almond slice!
Step 4: Chill the Dough for Firmness
This chilling step is crucial. Pop your shaped fingers into the fridge for 2 to 3 hours until they’re nice and firm. This helps them keep their shape in the oven without spreading too much. I found this tip after a batch came out flat and sad—definitely don’t skip it!
Step 5: Bake to Golden Perfection
Preheat your oven to 325°F (163°C). Bake your cookies for 15–18 minutes, just until the edges turn a light golden brown. They might look soft in the middle—that’s perfect. Let them cool for a minute on the pan before transferring to a wire rack to cool completely.
Step 6: Add the Creepy Finishing Touches
While the cookies cool, melt your red candy melts according to package instructions. Use a tiny dab of melted candy to glue an almond slice at the nail depression. Then dip the opposite end of the cookie into the candy melts to create that “bloody” effect. Chill them for 10-15 minutes until set. I love this part—it’s like bringing your witches’ fingers to life!
Pro Tips for Making Witches Fingers Cookies Recipe
- Keep Dough Cool: Chilling the shaped dough before baking helped me avoid flat, misshapen cookies every time.
- Use Parchment Paper: This prevents sticking and helps cookies bake evenly—definitely a must-have.
- Perfect Almond Nails: When attaching almond slices, use just a touch of melted candy so they don’t slide off while baking or chilling.
- Mess-Free Candy Melts: Melting candy in short bursts with stirring in between avoids burning and gives you silky smooth coverage.
How to Serve Witches Fingers Cookies Recipe
Garnishes
I love finishing these cookies with a sprinkle of edible glitter or a dusting of cocoa powder around the serving plate to add an extra mysterious vibe. Sometimes I place them on wax paper with a few small plastic spiders for the full haunted house effect!
Side Dishes
These cookies pair wonderfully with a cold glass of milk or a steamy cup of spiced apple cider. For parties, I also like to serve them alongside other Halloween treats like caramel apples or pumpkin-flavored popcorn for variety.
Creative Ways to Present
Once, I arranged the fingers coming out of a “graveyard” cake (think crushed Oreo crumbs for dirt). Another fun idea is serving them in a cauldron-shaped bowl with dry ice for that smoky effect. It always gets a big reaction from guests!
Make Ahead and Storage
Storing Leftovers
I keep leftover cookies in an airtight container at room temperature for up to 4 days. If you want to keep them crisp, layering with parchment paper between each cookie prevents sticking or breaking.
Freezing
I’ve frozen unbaked shaped dough on a parchment-lined tray, then transferred the frozen pieces into a zip-top bag. When ready, bake them straight from frozen adding a few extra minutes to the bake time. This trick saved me when I wanted fresh cookies on Halloween morning.
Reheating
To refresh chilled cookies, I warm them in a 300°F oven for 3-4 minutes, just enough to soften the edges and bring back that fresh-baked vibe without melting the candy melts.
FAQs
-
Can I make these cookies gluten-free?
Absolutely! I recommend substituting the all-purpose flour with a gluten-free baking blend that includes xanthan gum for structure. Keep your eye on the dough’s consistency as some blends absorb moisture differently—you might need to adjust slightly.
-
What if I don’t have almond slices?
No worries! You can use whole cashews, pecans, or even small candies shaped like fingernails. Alternatively, piping the red candy melts in a fingernail shape can be a great nut-free option.
-
How do I make the knuckle indentations look realistic?
Using a small paring knife to gently press small curved lines works wonders. I also wiggle the dough a little bit to mimic finger joints. Don’t press too hard or the dough may tear—practice makes perfect here!
-
Can I prepare the cookies a day ahead?
Definitely! After shaping, chill the dough overnight and bake the next day for fresher cookies. You can also bake ahead and store in an airtight container, just add the candy nail and dipping frosting closer to serving.
Final Thoughts
I absolutely love how this Witches Fingers Cookies Recipe brings together the fun of Halloween decorations and the comfort of home-baked treats. When I first tried it, I was amazed at how easy it was to turn simple ingredients into something so whimsically spooky—and my family still raves about them every year. If you’re looking for a recipe that’s playful, tasty, and guaranteed to impress your guests, you really can’t go wrong here. Give it a try, and I’m sure it’ll become a go-to for your holiday baking too!
Print
Witches Fingers Cookies Recipe
- Prep Time: 20 minutes
- Cook Time: 18 minutes
- Total Time: 2 hours 45 minutes
- Yield: About 2 dozen (24 cookies)
- Category: Dessert
- Method: Baking
- Cuisine: American
Description
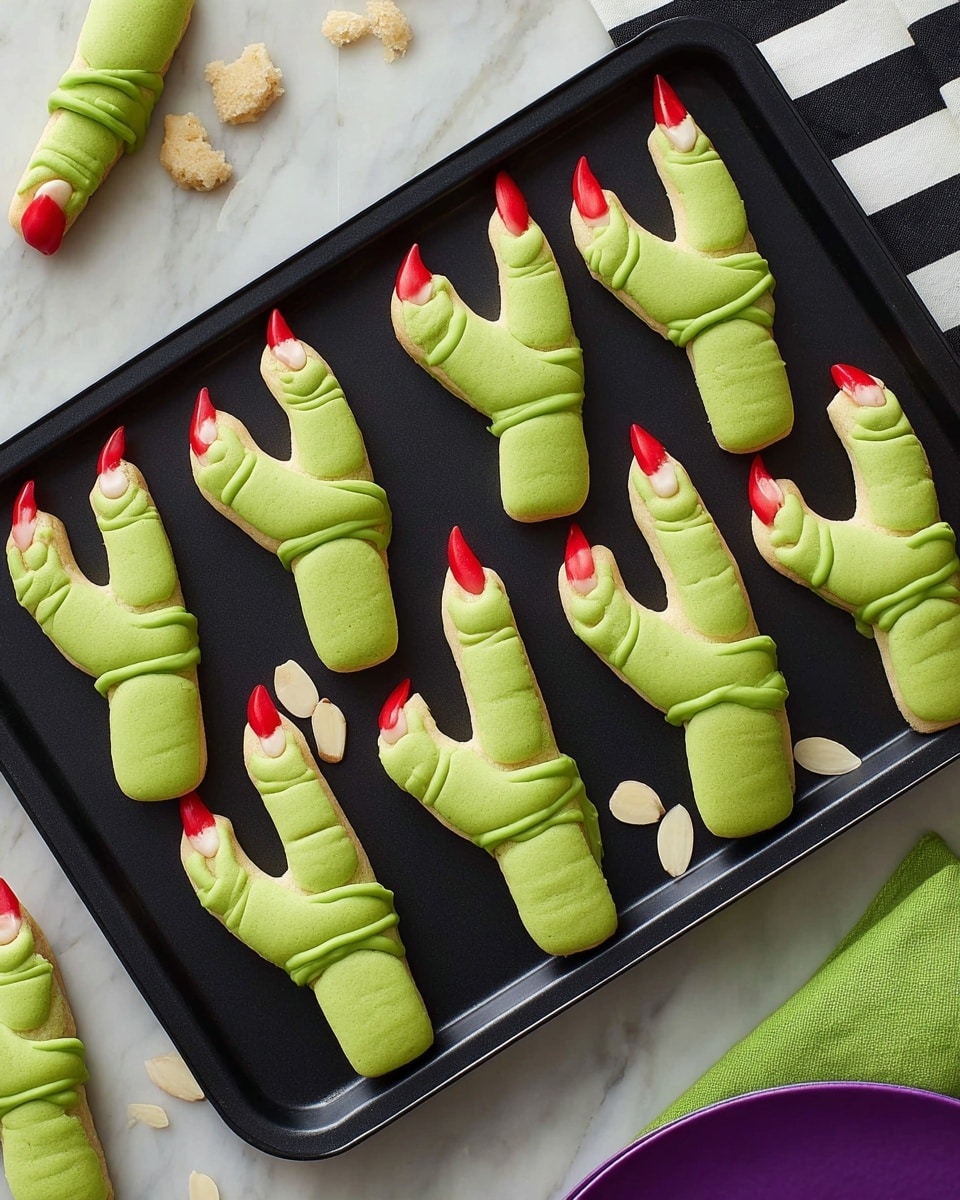
These spooky Witches Fingers Cookies are a perfect Halloween treat, featuring buttery, tender cookies shaped like witch fingers with knuckle indentations and almond slices as fingernails dipped in red candy melts for a ghoulish look. The dough is delicately flavored with vanilla and tinted with green icing color to enhance the eerie effect. Chilled to maintain shape, then baked to a light golden brown, these cookies are both festive and fun to make.
Ingredients
Cookie Dough
- 3/4 cup confectioners’ sugar
- 3/4 cup (1-1/2 sticks) butter, softened
- Leaf Green Icing Color
- 1 egg
- 2 teaspoons vanilla extract
- 2-1/2 cups all-purpose flour
- 1/4 teaspoon salt
Decoration
- 24 almond slices (about 1/4 cup)
- 1 cup Red Candy Melts Candy
Instructions
- Make the dough: In a large bowl, beat the confectioners’ sugar, softened butter, and leaf green icing color together with an electric mixer on medium speed. Add the egg and vanilla extract; beat until well combined. Gradually add the all-purpose flour and salt, mixing until a smooth dough forms.
- Shape the cookies: Prepare baking sheets by lining them with parchment paper. Divide the dough into 24 equal pieces. Roll each piece into a log about 4 to 4-1/2 inches long and place them on the prepared pans. At one end of each log, make a slight depression to represent the fingernail using a utensil, and use a paring knife to create knuckle indentations along the dough to simulate finger joints. Repeat for all pieces.
- Chill the dough: Refrigerate the shaped cookies for 2 to 3 hours or until they are firm to the touch, which helps preserve the detailed fingernail and knuckle shapes during baking.
- Preheat the oven: Set the oven temperature to 325°F (163°C) while the dough chills.
- Bake the cookies: Place the chilled cookies in the preheated oven and bake for 15 to 18 minutes, or until the edges turn a light golden brown. Remove from oven and cool on the pan for 1 minute, then transfer cookies to a wire cooling rack to cool completely.
- Melt the candy melts: Following package instructions, melt the red candy melts until smooth and ready for dipping.
- Decorate the cookies: Use a small amount of melted red candy to attach one almond slice to the fingernail indentation at the end of each cookie. Then dip the opposite end of the cookie into the remaining melted red candy to create a bloodied effect. Place dipped cookies on parchment or wax paper and chill for 10 to 15 minutes until the candy coating sets.
Notes
- Chilling the dough is essential to maintain the shape of the finger details during baking.
- If preferred, green gel food coloring can be used instead of leaf green icing color for stronger color.
- Use a paring knife carefully to create realistic knuckle indentations without cutting the dough through.
- Red candy melts can be substituted with red tinted white chocolate if desired.
- Store finished cookies in an airtight container at room temperature for up to 5 days.
Nutrition
- Serving Size: 1 cookie
- Calories: 120
- Sugar: 8g
- Sodium: 55mg
- Fat: 7g
- Saturated Fat: 4g
- Unsaturated Fat: 2g
- Trans Fat: 0g
- Carbohydrates: 14g
- Fiber: 0.5g
- Protein: 2g
- Cholesterol: 25mg


