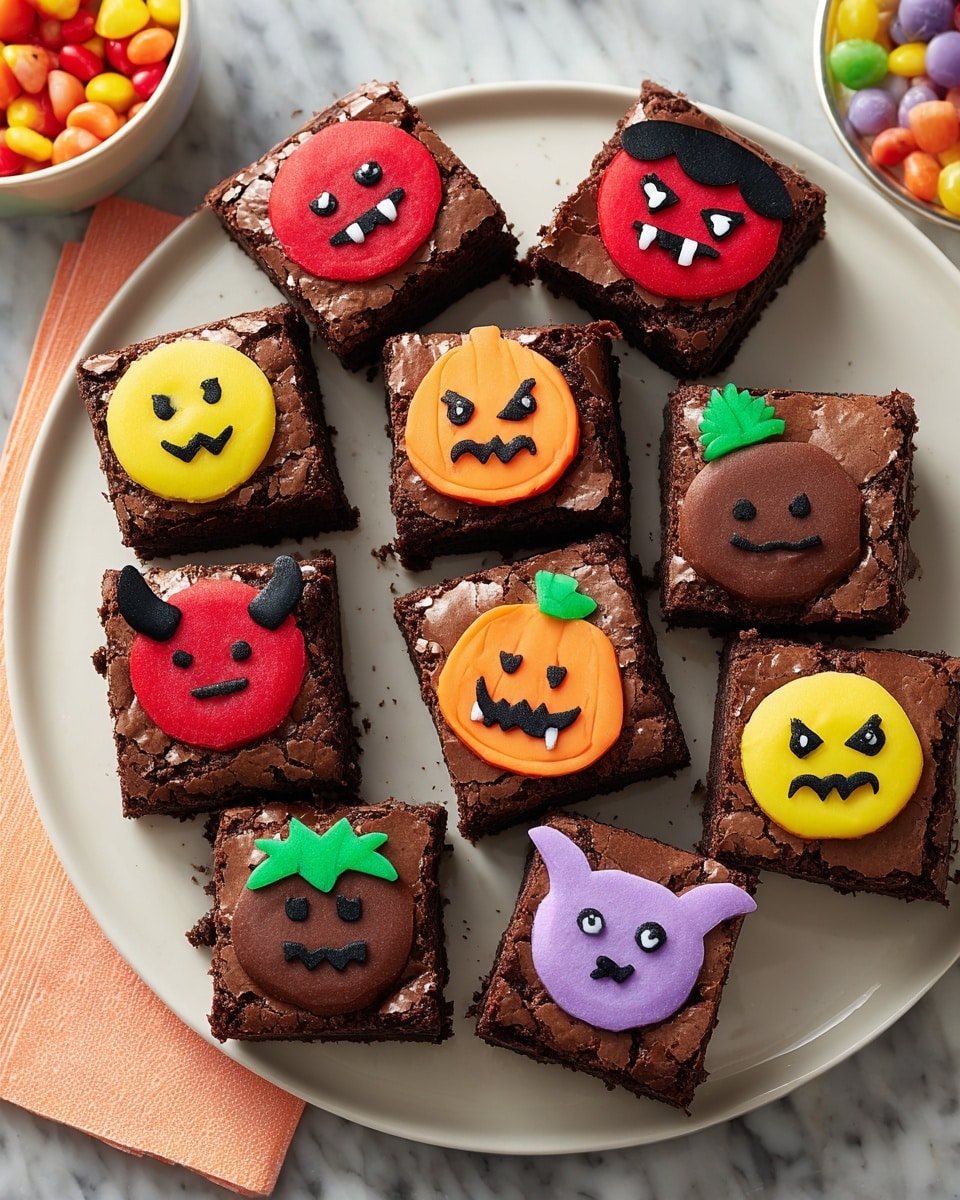
If you’re looking for a fun and festive way to celebrate the spooky season, you’re going to adore this **Cute Halloween Brownies Recipe**. It’s not just about tasty brownies; it’s about turning an ordinary treat into a playful Halloween masterpiece that’s as much fun to make as it is to eat. Whether you’re baking with the kids or preparing for a party, these brownies bring a cheerful and colorful twist to the dessert table that everyone will love.
Why You’ll Love This Recipe
- Festively Fun: The colorful candy dots and emoji decorations bring Halloween spirit in a cute, approachable way for all ages.
- Simple to Customize: You can easily swap colors and decorations to match your Halloween theme or creative mood.
- Beginner-Friendly: Even if you don’t bake often, the steps are straightforward and rewarding.
- Great Make-Ahead Treat: These brownies keep well and can be decorated in advance, saving you time on the big day.

Ingredients You’ll Need
To pull off this Cute Halloween Brownies Recipe, you’ll want ingredients that give you that perfect fudgy brownie base, plus colorful candy melts and icing to create your cute Halloween characters. The key is to have a variety of vibrant colors at hand, so your decorating options stay open and fun.
- Fudgy Brownie Batter: Choose your favorite brownie recipe or mix, just aim for fudgy, not cakey, to hold up under the candy decorations.
- Orange Candy Melts: Melts melt smoothly and hold their bright color really well—great for Halloween pumpkins and more.
- Kelly Green Food Coloring: Use gel-based for vibrant color without watery icing.
- Red Candy Melts Candy: Adds a rich red hue that’s perfect for accents like little blood drops or monster lips.
- Black Food Coloring: Essential for outlining and detail work in your icing designs.
- Lavender Candy Melts Candy: A soft purple that makes your Halloween treats stand out with subtle charm.
- Creamy White Decorator Icing: It’s your blank canvas—easy to tint and pipe for all the fun details.
- Christmas Red Food Coloring: A deeper red flavor tint, perfect for holiday-themed browns, too.
Variations
One thing I love about the Cute Halloween Brownies Recipe is how easily you can personalize it. Whether you want to tone down the colors or add a spooky twist, playing with the decorations makes this recipe uniquely yours.
- Gluten-Free Option: I switched to a gluten-free brownie mix once, and the recipe worked beautifully—just be sure to check the candy melts are gluten-free too.
- Vegan Adaptation: Using vegan brownie batter and dairy-free candy melts keeps this treat delicious and inclusive.
- Spooky Shapes: Instead of round candy dots, try making small candy shapes like pumpkins or bats—you can pipe these yourself with melted candy melts for a creative challenge.
- Flavor Boost: Adding a teaspoon of instant espresso powder to your brownie batter really deepens the chocolate flavor, something I discovered after a few batches.
How to Make Cute Halloween Brownies Recipe
Step 1: Bake the Base Brownies Just Right
Start by preparing your favorite fudgy brownie batter. I usually go for a tried-and-true recipe or a good quality mix. Once mixed, pour the batter into a greased or cooking spray–prepared pan. Bake according to your recipe, but here’s a crucial little tip: pull the brownies out about 2 to 3 minutes before they’re fully done. This slightly underbaked center helps hold the candy dots later without cracking or sinking.
Step 2: Make Your Colorful Candy Discs
While the brownies bake, melt your orange, red, green, and lavender Candy Melts separately following the package directions. I like to use piping bags for easy control—just pour the melted candy in, then pipe little 1-inch puddles on parchment paper. Pop them in the fridge for about 5 to 10 minutes until they’re set but still pliable enough to press into the brownies later.
Step 3: Attach Candy Dots to the Brownies
Take those slightly underbaked brownies out of the oven and gently press each candy dot onto the surface, flat side up. Mix and match colors to your heart’s content! Because the brownies are still warm and soft, the candy will stick perfectly. Then pop your pan back in the oven for just 2 to 3 more minutes so the candy softens lightly without fully melting.
Step 4: Cool and Chill Your Brownies
Remove the brownies from the oven and let them sit at room temperature until completely cooled. After that, I pop them into the refrigerator for about 30 minutes to let the candy firm up again. This step helps keep those cute candy decorations nice and solid while you prepare the icing.
Step 5: Tint and Pipe Your Decorative Icing
Here’s where the real fun begins! Tint portions of your creamy white decorator icing with black, green, and red food coloring as per your preference. I usually reserve some white for highlights or extra details. Using piping bags fitted with a small round tip (I use size 2), you’ll create little emoji faces or Halloween icons right on each candy dot. This decorating step truly brings the Cut Halloween Brownies Recipe to life.
Step 6: Slice and Serve
Once decorated, cut your brownies into squares or fun shapes depending on your pan and enjoy! I find a sharp knife wiped clean between cuts makes the neatest slices. I promise your family and friends will go crazy over these adorable spooky treats.
Pro Tips for Making Cute Halloween Brownies Recipe
- Don’t Overbake Your Brownies: Pulling brownies out slightly early ensures they stay soft enough to hold candy without cracking.
- Chill Candy Melts for Easy Handling: Quick chilling prevents the candy dots from spreading too much when pressed on brownies.
- Use Gel Food Coloring: It gives vibrant colors without thinning your icing, making piped designs crisp and beautiful.
- Clean Your Knife Often: This helps you get clean cuts and keeps your brownies looking as cute as you decorated them.
How to Serve Cute Halloween Brownies Recipe
Garnishes
I love adding a small sprinkle of edible glitter or orange and black Halloween-themed sprinkles around the edges to amp up the festive vibe. Sometimes, I add tiny candy eyes or sugar spiders to give the brownies just a hint of spooky fun without going overboard.
Side Dishes
These brownies pair wonderfully with a scoop of vanilla ice cream or a cup of warm spiced apple cider—perfect for chilly autumn evenings. For parties, I always like setting out fresh orange slices and a platter of mixed nuts alongside for a nice balance.
Creative Ways to Present
One Halloween, I arranged the brownies on a black slate board with edible cobwebs stretched across the corners—guests found it so fun! You can also stack smaller brownie bites on a tiered dessert stand or wrap individual brownies in cellophane bags tied with Halloween ribbon to give as festive party favors.
Make Ahead and Storage
Storing Leftovers
I store any leftovers in an airtight container in the fridge to keep the candy decorations firm. They usually last about 4 to 5 days this way without losing any flavor or texture, although around here, they rarely hang around that long!
Freezing
These brownies freeze really well. I recommend cutting them beforehand, then layering them between parchment paper in a freezer-safe container. When you’re ready to enjoy, thaw overnight in the fridge and decorate right before serving for the freshest look.
Reheating
For a warm treat, I gently reheat a single brownie in the microwave for about 10 to 15 seconds. Be careful not to overheat or the candy decorations might soften too much. If you want to keep the decoration intact, serving them at room temperature after thawing is usually your best bet.
FAQs
-
Can I use a boxed brownie mix for the Cute Halloween Brownies Recipe?
Absolutely! A quality boxed brownie mix works perfectly here, just be sure to slightly underbake as instructed so the brownies remain moist enough to hold the candy decorations well.
-
What if I don’t have candy melts? Can I use chocolate chips?
You can try using chocolate chips, but candy melts are designed to melt smoothly and set quickly, which makes them ideal for piping and shaping. Chocolate chips may not hold shapes as well or may be harder to color.
-
How do I prevent the candy decorations from melting too much in the oven?
Press the candy dots onto brownies just before finishing baking, then return the pan to the oven for only 2-3 minutes to soften the candy slightly without full melting. Watch closely to avoid over-melting.
-
Can I prepare these brownies a day ahead of a party?
Yes! You can bake, decorate, and store them in the fridge a day ahead. Just bring them to room temperature before serving for the best flavor and texture.
Final Thoughts
Making this Cute Halloween Brownies Recipe has become one of my favorite seasonal traditions because it’s equal parts delicious and delightful to look at. The way the colorful candy dots and playful emoji faces bring a smile is truly priceless. I encourage you to try it out yourself—even if you’re new to baking or decorating, you’ll find it’s accessible and rewarding. Trust me; once you see your family’s happy faces, you’ll be making these cuties every Halloween!
Print
Cute Halloween Brownies Recipe
- Prep Time: 2 hr
- Cook Time: 20 min
- Total Time: 4 hr
- Yield: 30 treats
- Category: Dessert
- Method: Baking
- Cuisine: American
Description
These Cute Halloween Brownies are festive, fudgy treats perfect for Halloween celebrations. Featuring colorful candy melt discs pressed into nearly baked brownies and decorated with vibrant tinted icing emojis, these brownies are as fun to make as they are to eat.
Ingredients
Fudgy Brownies
- Brownie batter (enough for a standard baking pan)
- Cooking spray for pan
Candy Melts Discs
- Orange Candy Melts
- Red Candy Melts
- Vibrant Green Candy Melts
- Lavender Candy Melts
Food Coloring for Icing
- Kelly Green Gel Food Coloring, 1 oz.
- Black Gel Food Coloring, 1 oz.
- Christmas Red Gel Food Coloring, 1 oz.
Decorator Icing
- Creamy White Decorator Icing, Vanilla Flavored (4 lb.)
Instructions
- Bake brownies: Prepare your chosen brownie recipe by spreading the batter evenly into a pan sprayed with cooking spray. Bake following your recipe instructions but remove the brownies 2 to 3 minutes before the end of the baking time.
- Make candy discs: While the brownies bake, melt orange, red, green, and lavender Candy Melts separately according to the package directions. Transfer melted candies into decorating bags and pipe 1-inch puddle dots onto parchment paper on a board. Chill the discs until set, about 5 to 10 minutes.
- Add candy dots to brownies: Once the brownies are out of the oven but still warm, gently press a candy disc with the flat side up into each brownie, alternating colors as desired.
- Finish baking brownies: Return the pan to the oven and bake for an additional 2 to 3 minutes until the candy dots soften but don’t fully melt. Remove from oven and allow brownies to cool completely to room temperature.
- Chill brownies: Place the cooled brownies in the refrigerator for up to 30 minutes until the candy discs harden completely.
- Tint icings: While chilling the brownies, tint small portions of creamy white decorator icing using gel food colors: tint 1/4 cup black, 1/8 cup green, and 1/4 cup red. Keep remaining icing white for decoration.
- Decorate brownies: Fit decorating bags with tip 2 and fill them with the tinted black, green, red, and white icings. Pipe cute Halloween emojis onto the candy discs. Once decorated, cut brownies into 30 treats and serve.
Notes
- Remove brownies slightly underbaked before adding candy discs so the discs can soften without fully melting.
- Use gel food coloring for vibrant icing colors and better consistency.
- Chilling the candy discs before pressing ensures they hold their shape and don’t melt into the brownie immediately.
- Decorate once brownies are fully cooled and candy discs are solid to prevent icing from melting.
- This recipe yields approximately 30 individual brownie treats, ideal for parties.
Nutrition
- Serving Size: 1 brownie (approx. 1/30th of recipe)
- Calories: 180
- Sugar: 18g
- Sodium: 90mg
- Fat: 9g
- Saturated Fat: 4.5g
- Unsaturated Fat: 3g
- Trans Fat: 0g
- Carbohydrates: 26g
- Fiber: 1g
- Protein: 2g
- Cholesterol: 25mg