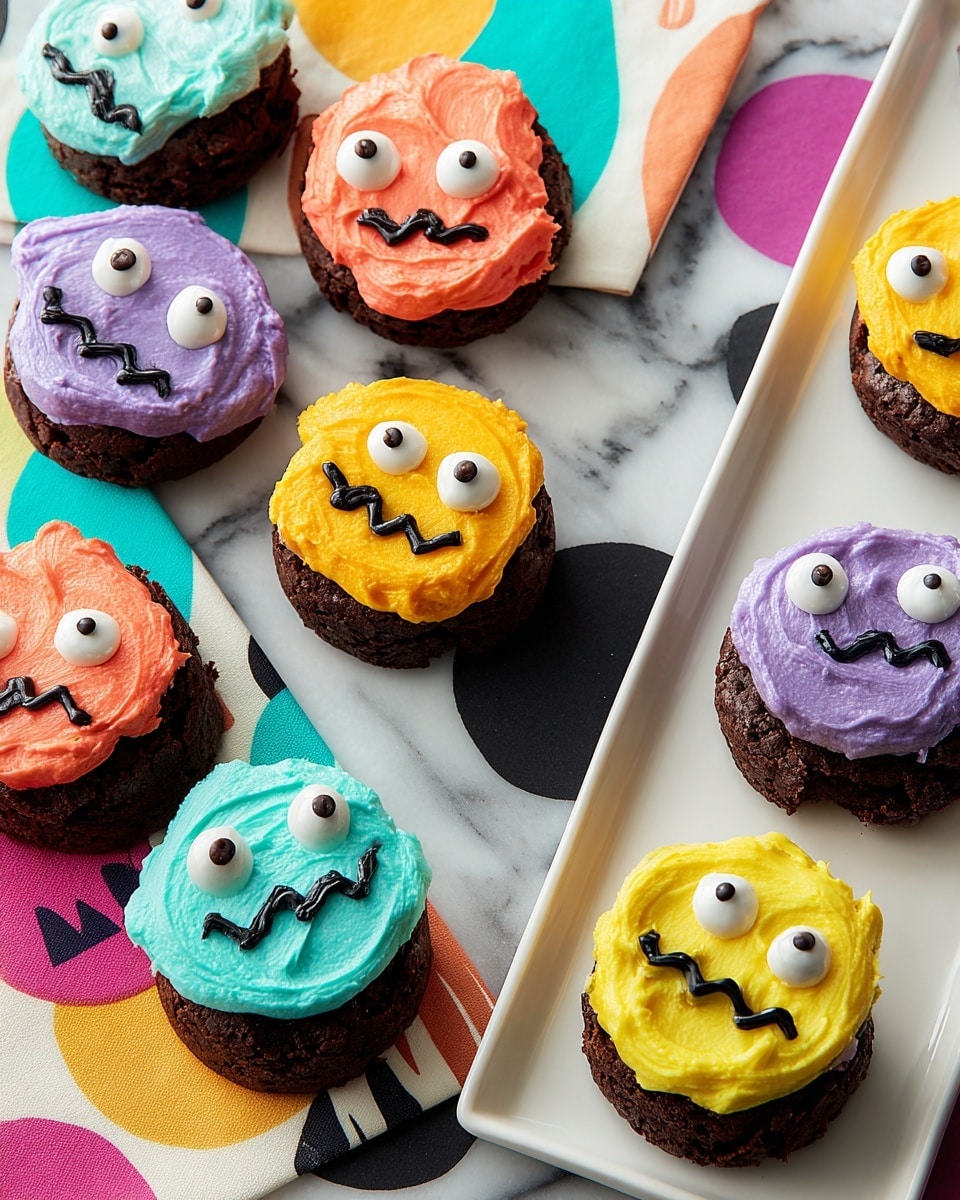
If you’re anything like me, fall means cozy flavors and festive treats galore—so I can’t wait to share this fun, adorable, and utterly delicious Pumpkin Faces Brownie Bites Recipe with you. These little pumpkin-shaped brownie bites are the perfect festive dessert that’ll wow your family, friends, or even just brighten up your solo snack time. Honestly, I absolutely love how these turn out because they’re cute, chocolatey, and just the right bite size for snacking without any guilt. Stick around—I’m about to walk you through every step, from baking to decorating, so your brownie bats will be the pumpkin patch hit!
Why You’ll Love This Recipe
- Festive & Fun: These brownie bites look like little pumpkin faces, making them perfect for Halloween or fall parties.
- Easy to Customize: You can play with icing colors and decorations to match your mood or theme.
- Perfect Bite Size: These aren’t your typical brownies — they’re perfectly portioned for snacking or sharing.
- Kid-Friendly Decorating: Kids love helping with coloring and decorating, which makes this a great family project.

Ingredients You’ll Need
Let’s start with the basics—this recipe builds on your favorite brownie base, and then we get creative with colorful icings and cute candy eyeballs to bring those pumpkin faces to life. I always recommend using a good quality brownie mix or recipe because the richer the brownie, the more irresistible these bites become.
- Your Favorite Brownie Recipe or Mix: This is your canvas—choose a fudgy or cakey brownie depending on what you love best.
- Vegetable Oil Spray: Essential for greasing the mold so your brownie bites pop out perfectly without sticking.
- Lemon Yellow & Golden Yellow Icing Color: Combine these for a vibrant pumpkin yellow that’s just right.
- Orange Icing Color: Use this to add that warm, classic pumpkin shade along with some lemon yellow for depth.
- Teal & Violet Icing Colors: These add a fun splash of fall-themed colors to the frosting — you can use them to mix up the faces’ flair.
- Buttercream Frosting: This is your base for the colored icings—smooth and creamy for easy decorating.
- Candy Eyeballs: The secret sauce to making these brownie bites adorable and full of personality.
- Black Ready-to-Use Icing Tube: Perfect for piping the pumpkin mouths with precision—no mess, all fun.
Variations
One of the best things about the Pumpkin Faces Brownie Bites Recipe is how easy it is to tailor it exactly to you—whether that’s switching up colors, trying different frostings, or even tweaking the brownie base for dietary needs. I encourage you to get creative and find what suits your style best.
- Gluten-Free Option: I’ve swapped in a gluten-free brownie mix before and it worked like a charm—just make sure your candy eyeballs and icing are GF-friendly.
- Spiced Brownies: My family goes crazy when I add a little cinnamon and nutmeg into the brownie batter for an autumnal twist.
- Vegan Version: Using a vegan brownie base and dairy-free buttercream works well if you have plant-based preferences; just be mindful of the candy decorations.
- Double Chocolate Pumpkin Bites: I once added cocoa powder to the frosting to create a richer look that contrasts beautifully with the orange icing.
How to Make Pumpkin Faces Brownie Bites Recipe
Step 1: Bake Your Brownies in a Mold
Start by prepping your brownie batter like you normally would—whether you use a mix or a homemade recipe, make sure it’s smooth and well combined. Now the fun part: spray your brownie mold generously with vegetable oil spray to avoid any stubborn sticking. Fill each mold cavity about two-thirds full with batter. This ensures you get nice, thick bites without spillage. Bake for 22 to 25 minutes, but keep an eye on it—every oven is a little different, and you want them just set so they’re fudgy but fully cooked. Once baked, let them cool completely inside the mold before carefully popping them out from the back. If you try to remove them too soon, you risk crumbling. Trust me on this one—I learned the hard way!
Step 2: Tint Your Icing for Pumpkin Faces
While your brownie bites cool, it’s time to get your colors ready! Prepare your buttercream frosting and divide it into small bowls. I like to mix about half a cup per color to have enough for decorating without waste. For the perfect pumpkin yellow, blend Golden Yellow and Lemon Yellow icing colors—that mix gives you that warm, bright shade you see in classic pumpkins. For the orange color, I add a touch of Lemon Yellow to the Orange gel color as it softens the tone for a friendlier look. Don’t forget to prepare some teal and violet if you want to add more colorful accents or switch up the traditional palette. This step is where your Pumpkin Faces Brownie Bites Recipe really starts to shine visually, so have fun mixing your shades!
Step 3: Decorate the Pumpkin Faces
Now comes the part everyone loves—decorating. Using a spatula, frost the tops of each brownie bite with your colored icings, leaving a small patch bare for the stem area. Stick a couple of candy eyeballs on each pumpkin—they instantly add charm and character. Once the eyes are in place, grab your black icing tube (tip 2 works perfectly) and pipe pumpkin mouths right under the eyes. You can get creative with smiling, spooky, or silly expressions—my kids always insist on the quirky faces! Don’t worry if your piping isn’t perfect; part of the charm is their homemade look. These little details turn your pumpkin brownie bites from tasty treats into little personalities on a plate.
Pro Tips for Making Pumpkin Faces Brownie Bites Recipe
- Use a Silicone Mold: Silicone makes releasing the brownie bites so much easier and helps keep their cute pumpkin shape intact.
- Temper Your Icing Colors: Mix colors in small batches and adjust gradually for the perfect tone—I like to test a small dollop on wax paper before frosting my brownies.
- Chill Before Decorating: Cold brownies hold their shape better and make icing application smoother, so a quick chill in the fridge doesn’t hurt.
- Steady Hand for Piping: If freehand piping feels tough, practice on parchment paper first or use a toothpick to sketch mouth shapes before filling them in.
How to Serve Pumpkin Faces Brownie Bites Recipe
Garnishes
I like to add a sprinkle of edible glitter or shimmer dust over the pumpkin faces to make them extra festive, especially if I’m serving at a party. Fresh mint leaves or candied pumpkin seeds make cute little “vines” beside the bites on the serving platter, adding a touch of green to contrast with the orange.
Side Dishes
This recipe pairs beautifully with a warm cup of spiced apple cider or a rich hot chocolate. I often set out a mini dessert bar with these bites alongside pumpkin spice cookies and cinnamon popcorn for a festive fall spread.
Creative Ways to Present
For Halloween gatherings, I’ve arranged the brownie bites on a dark platter with cobweb-patterned doilies beneath, plus a few small decorative pumpkins around. You can even place them on cupcake liners shaped like leaves or pumpkins for an extra fun touch. Another idea I love is stacking them like a pumpkin pyramid on tiered trays—with eyes looking in all directions, it’s a guaranteed conversation starter!
Make Ahead and Storage
Storing Leftovers
After decorating, I usually keep any leftovers in an airtight container at room temperature for 2 to 3 days. If your kitchen is warm, the fridge is safer, though I recommend letting them come to room temp before eating so the frosting softens up again.
Freezing
I’ve frozen these brownies both frosted and unfrosted. For best results, freeze them unfrosted, then thaw and decorate fresh. If freezing decorated bites, wrap each one gently in plastic wrap and place them in a freezer-safe container—unwrap and thaw in the fridge overnight to avoid condensation ruining your icing.
Reheating
Since these are brownies with delicate icing decorations, reheating isn’t usually necessary or recommended. But if you want a warm bite, briefly microwave (5–7 seconds) a brownie off the icing side or pop it in a warm spot to soften the chocolate. Just be mindful not to overheat or melt the icing!
FAQs
-
Can I use a boxed brownie mix for the Pumpkin Faces Brownie Bites Recipe?
Absolutely! A boxed brownie mix is a great shortcut and often makes for reliably delicious brownies. Just make sure to follow the package instructions and adjust the baking time to fit the mold size so the brownie bites don’t dry out.
-
What if I don’t have candy eyeballs—any substitutions?
No worries! You can pipe eyes using white and black icing, use small chocolate chips, or even tiny marshmallows with a dab of black icing for pupils. Get creative with what you have—it’ll still look cute!
-
How long do Pumpkin Faces Brownie Bites last?
Stored properly in an airtight container, they’ll stay fresh for about 3 to 4 days at room temperature. If refrigerated, they can last up to a week—but remember to bring them back to room temp before serving.
-
Can I make the icing ahead of time?
Yes! Colored buttercream can be made a day or two in advance and stored tightly covered in the fridge. Just bring it back to room temperature and give it a quick stir before decorating to get that perfect spreadable texture.
Final Thoughts
Honestly, this Pumpkin Faces Brownie Bites Recipe is one of those little joyful finds in my kitchen that brings smiles every time. It’s festive enough to impress guests but easy enough to throw together on a whim. Whether you’re baking with kids or looking for a sweet snack to make the season brighter, these pumpkin bites deliver on flavor and fun. Give it a try—you won’t regret adding these charming treats to your fall repertoire!
Print
Pumpkin Faces Brownie Bites Recipe
- Prep Time: 15 minutes
- Cook Time: 25 minutes
- Total Time: 40 minutes
- Yield: 24 brownie bites (depending on mold size)
- Category: Dessert
- Method: Baking
- Cuisine: American
Description
These Pumpkin Faces Brownie Bites are a festive and fun holiday treat perfect for Halloween or fall celebrations. Made with your favorite brownie recipe or mix, these bite-sized brownies are baked in molds, decorated with brightly colored icing, candy eyeballs, and black icing to create adorable pumpkin faces. They’re easy to customize with vibrant colors and bring a playful touch to any dessert table.
Ingredients
Brownie Base
- Your Favorite Brownie Recipe or Mix
- Vegetable oil spray (for greasing molds)
Icing Colors and Decorations
- Buttercream Frosting (amount as per recipe, to divide and tint)
- Lemon Yellow Icing Color – 1 oz.
- Lemon Yellow Gel Food Coloring – 1 oz.
- Golden Yellow Icing Color – 1 oz.
- Orange Icing Color – 1 oz.
- Orange Gel Food Coloring – 1 oz.
- Teal Icing Color – 1 oz.
- Teal Gel Food Coloring – 1 oz.
- Violet Icing Color – 1 oz.
- Violet Gel Food Coloring – 1 oz.
- Candy Eyeballs – 0.88 oz.
- Black Ready-to-Use Icing Tube – 4.25 oz.
Instructions
- Bake Brownies: Prepare the brownie batter according to your favorite recipe or mix instructions. Lightly spray your brownie molds with vegetable oil spray to prevent sticking. Spoon the batter into each mold cavity, filling them about two-thirds full. Bake in a preheated oven for 22 to 25 minutes, or until a toothpick inserted comes out with a few moist crumbs. Allow the brownies to cool completely within the molds. Once cooled, gently push from the back of the mold to release the brownie bites.
- Tint Icing: Prepare buttercream frosting to a smooth consistency. Divide the frosting into four equal portions. Tint each portion separately using the gel and liquid food colorings to achieve vibrant yellow, orange, teal, and violet shades. For the yellow frosting, mix Golden Yellow and Lemon Yellow colors together to get the desired hue. For the orange frosting, combine Orange color with a small amount of Lemon Yellow to brighten it.
- Decorate Brownies: Using a small spatula or butter knife, spread the colored icings on the tops of the brownies, leaving the stem area without icing to resemble a pumpkin stem. Place candy eyeballs decoratively on each brownie to create playful faces. Use the black ready-to-use icing tube with a fine tip (tip 2 recommended) to pipe mouths and facial expressions around the eyeballs, completing the pumpkin faces.
Notes
- Use gel food coloring for vibrant colors without thinning the icing consistency.
- Make sure the brownies are completely cool before decorating to prevent icing from melting.
- Customize facial expressions with the black icing to make each brownie unique and fun.
- You can use store-bought buttercream or make your own for icing.
- These brownie bites are best served the same day but can be stored in an airtight container at room temperature for up to 2 days.
Nutrition
- Serving Size: 1 brownie bite (approx. 30g)
- Calories: 120
- Sugar: 14g
- Sodium: 90mg
- Fat: 6g
- Saturated Fat: 2.5g
- Unsaturated Fat: 3g
- Trans Fat: 0g
- Carbohydrates: 17g
- Fiber: 1g
- Protein: 1.5g
- Cholesterol: 15mg