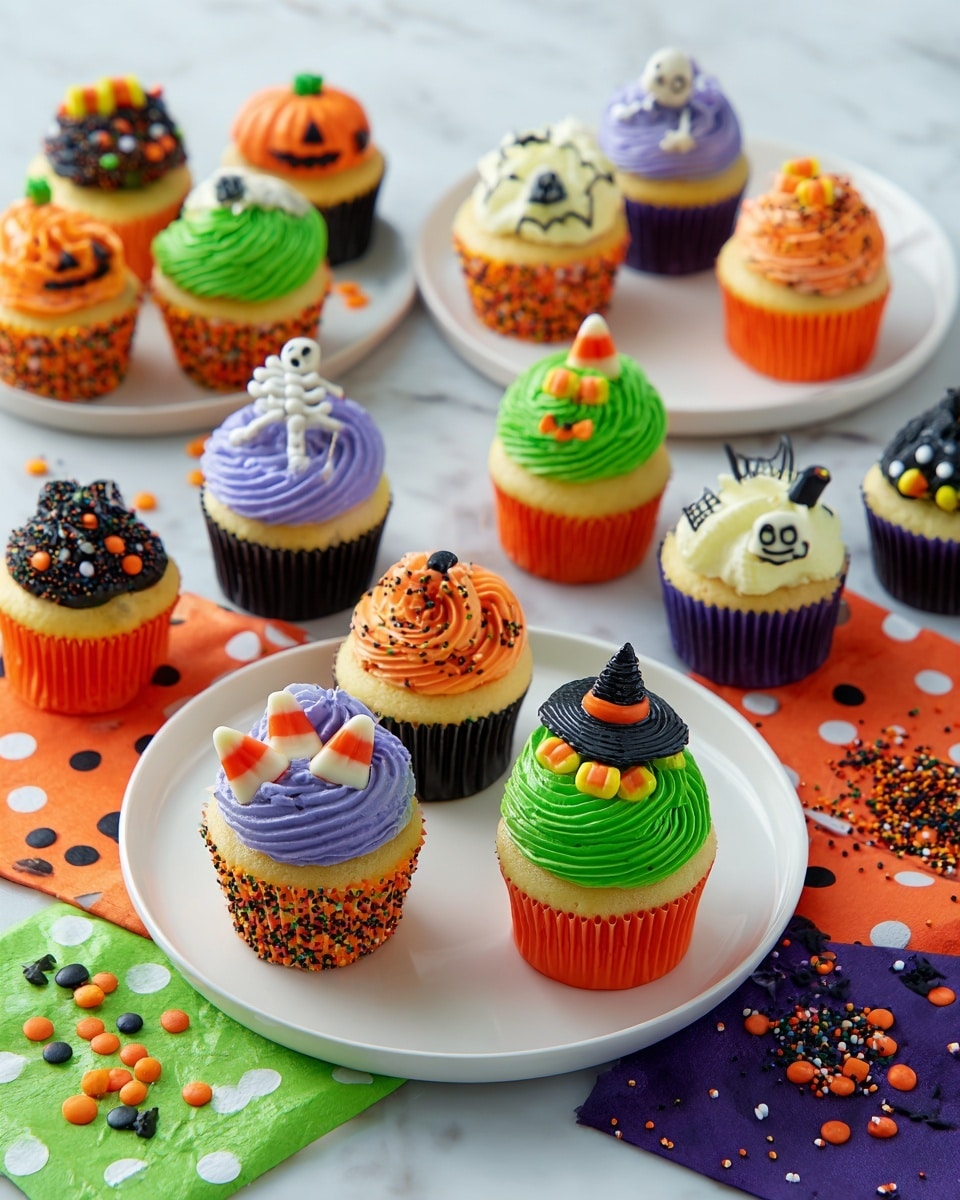
If you’re looking for a festive, fun, and oh-so-delicious way to celebrate the spooky season, you’re going to adore my Halloween Mini Cupcakes Recipe. This little treat is not just cute but packed with flavor and topped with those charming Halloween decorations that make any party pop. Trust me, once you try this, you’ll find yourself whipping them up every October!
Why You’ll Love This Recipe
- Perfectly Bite-Sized: These mini cupcakes are just the right size for snacking without feeling guilty.
- Fun, Festive Colors: The custom icing colors bring a playful Halloween vibe straight to your table.
- Easy to Customize: Whether it’s spooky sprinkles or adorable edible toppers, you can make these your own.
- Kid-Friendly and Crowd-Pleasing: I’ve never met anyone who didn’t smile after a bite of these!

Ingredients You’ll Need
To nail this Halloween Mini Cupcakes Recipe, you’ll need some basics for the cupcakes and a fun array of icing colors and decorations. Each component works together to give that festive spirit and yum factor — plus, the gel food colorings are super easy to work with for achieving those vibrant Halloween hues.
- Favorite Yellow Cake Mix or Recipe: I always start here; a yellow cake bakes up light with a subtle flavor perfect for fun colored icing.
- White Decorator Icing: This is your blank canvas for coloring and piping; choose a good-quality icing for smooth texture.
- Lemon Yellow Gel Food Coloring: Essential for that bright pumpkin and sunshine hue.
- Leaf Green Gel Food Coloring: Gives you lush green tones, perfect for creepy vines or witches’ hats.
- Ivory Gel Food Coloring: Softens colors and works great to create natural shades.
- Violet Gel Food Coloring: Deep purple icing is a Halloween must-have — it adds a rich contrast.
- Orange Gel Food Coloring: Mix with brown for a rustic pumpkin look.
- Red-Red Gel Food Coloring: Helps deepen purples and add vibrant red hints.
- Brown Gel Food Coloring: Adds that earthy tone to orange and helps create realistic pumpkin colors.
- Black Gel Food Coloring: Perfect for spooky details or gothic accents.
- Halloween Pumpkin Icing Decorations: These sweet toppers bring instant festive flair.
- Ghost with Candy Corn Icing Decorations: Super cute and great for newbies at decorating.
- Skeleton Edible Cupcake Toppers & Skeleton Icing Decorations: Perfect if you want to raise the spooky factor.
- Halloween Sprinkles Set & Pumpkin Sprinkles: These add texture and that extra pop of Halloween fun.
- Mini Muffin Pan & Solid Baking Cups: These tools help your cupcakes bake evenly and come out perfectly shaped every time.
Variations
I love how versatile this Halloween Mini Cupcakes Recipe is. Over the years, I’ve tried a few fun tweaks that really let you make the recipe your own — whether you want to mix up the flavors or cater to dietary needs.
- Vegan Option: I swapped out the cake mix for a vegan yellow cake mix once, and it worked beautifully with the same decorating steps.
- Flavored Icing: Sometimes I add a hint of vanilla or almond extract to my icing for an extra burst of flavor that matches the spooky vibe.
- Gluten-Free: Using a gluten-free yellow cake mix kept these mini cupcakes just as moist and tasty for my gluten-sensitive friends.
- Theme Colors: Don’t feel limited to traditional Halloween colors—you can go neon or pastel for a unique twist, which my niece absolutely adores.
How to Make Halloween Mini Cupcakes Recipe
Step 1: Bake Your Mini Cupcakes with Love
Start by prepping your mini muffin pan with solid baking cups — this helps the cupcakes keep their shape and makes removing them so much easier. I usually fill the cups about two-thirds full with my yellow cake batter, then pop them into the oven. Baking time varies, but 12-15 minutes is generally perfect until a toothpick comes out clean. One tip I learned? Don’t skip the cooling step — cupcakes straight from the oven can melt your icing and decorations.
Step 2: Tint Your Icing Like a Pro
The magic is in the colors! I mix different gel food colors into white decorator icing to get those iconic Halloween shades. For example, a combo of leaf green, ivory, and lemon yellow gives a vibrant green that really pops, while violet and red-red make a deep, spooky purple. For pumpkins, I blend orange and brown to get that just-right rustic hue. Divide the icing into separate bowls and mix each color thoroughly. This step is so fun because the colors come alive right before your eyes.
Step 3: Ice and Decorate Your Mini Masterpieces
I like to start by icing some cupcakes with a smooth, flat layer using a spatula — this is perfect if you want to showcase the Halloween decorations on top. For others, I fit disposable piping bags with tips 1M, 2A, and 4B to pipe swirls, stars, and festive patterns using the colored icings. Then comes the fun part: topping them off with pumpkin and ghost icing decorations or sprinkling on the Halloween-themed sprinkles. My family goes crazy for this stage because each cupcake feels like its own little work of art!
Pro Tips for Making Halloween Mini Cupcakes Recipe
- Don’t Rush Cooling: Let your cupcakes fully cool before icing to avoid melting and sliding decorations.
- Test Your Colors: I always do a small test drop of colored icing on parchment to make sure the shade is just right.
- Use Piping Bags with Different Tips: Mixing swirl and star tips lets you get a variety of fun textures and styles.
- Keep Decorations Handy: Lay out all your sprinkles and toppers before starting so you can decorate efficiently and creatively.
How to Serve Halloween Mini Cupcakes Recipe
Garnishes
I usually finish off these mini cupcakes with a few extra sprinkles and themed toppers — from pumpkins to little ghosts — because they instantly catch your eye and get everyone excited to dig in. Sometimes, I add edible glitter or tiny candy eyes for a whimsical touch that kids rave about.
Side Dishes
To round out a Halloween party spread, I like pairing these cupcakes with something savory, like mini grilled cheese sandwiches or spicy popcorn. A glass of chilled apple cider also complements the flavors perfectly and keeps everything seasonal and festive.
Creative Ways to Present
Presentation is half the fun! I’ve arranged these mini cupcakes on tiered stands draped in cobweb decorations and accented with tiny plastic spiders for a spooky effect. Another favorite is placing them inside mini cauldrons or hollowed-out pumpkins, which adds a surprising pop of Halloween flair and delight at parties.
Make Ahead and Storage
Storing Leftovers
I typically store leftover mini cupcakes in an airtight container at room temperature — they stay moist and tasty for up to three days. If your house is warm or humid, the fridge is also okay but let them come to room temp before serving to bring back the soft texture.
Freezing
Once iced and decorated, freezing these cupcakes can be a bit tricky because the decorations might shift. What I do is freeze the plain, baked cupcakes first, then thaw and decorate when I’m ready. This keeps the decorating fresh and vibrant while saving time on the day of your event.
Reheating
If you want to warm up your cupcakes slightly, a quick zap in the microwave for 10-15 seconds works wonders. Just be careful not to overheat, or you’ll end up with melted icing and squishy cupcakes.
FAQs
-
Can I make Halloween Mini Cupcakes Recipe from scratch instead of a cake mix?
Absolutely! While using your favorite yellow cake mix saves time, a homemade yellow cake batter works just as well. Just make sure it’s not too dense since mini cupcakes bake quickly and you want a tender crumb.
-
How do I get the icing colors so vibrant?
The key is gel food coloring instead of liquid — gels are more concentrated and don’t thin out your icing. Mix gradually and give the colors time to develop to your ideal shade before icing.
-
Can I prepare these mini cupcakes ahead of a party?
You sure can! Bake and cool the cupcakes up to two days ahead. Store them in an airtight container until ready to ice and decorate to keep the toppers fresh and intact.
-
What if I don’t have decorating tips?
No worries! You can spread icing smoothly with a small offset spatula or back of a spoon. For a textured look, try popping the icing into a zip-top bag and snipping a tiny corner to pipe simple swirls.
Final Thoughts
I absolutely love how this Halloween Mini Cupcakes Recipe turns out every time — it’s such a crowd-pleaser and the decorations make them feel truly special. Thinking back to the first time I tried this, I was blown away by how easy it was to transform simple cupcakes into a Halloween centerpiece. If you’re looking to add sweet charm and a bit of spooky fun to your Halloween celebrations, you’ve got to give this recipe a try. I promise you’ll get hooked just like my family and me!
Print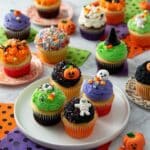
Halloween Mini Cupcakes Recipe
- Prep Time: 20 minutes
- Cook Time: 12 minutes
- Total Time: 32 minutes
- Yield: 36 mini cupcakes
- Category: Dessert
- Method: Baking
- Cuisine: American
- Diet: Vegetarian
Description
These festive Halloween Mini Cupcakes are perfect for celebrating the spooky season with colorful icing and themed decorations. Mini yellow cake cupcakes are baked, cooled, then decorated with vibrant green, purple, orange, and black icings, piped with various tips, and topped with Halloween-themed edible decorations and sprinkles for a fun and delicious treat.
Ingredients
Cupcakes
- Favorite Yellow Cake Mix or Recipe
- Mini muffin pan with solid baking cups
Icing Colors and Decorations
- Lemon Yellow Icing Color, 1 oz.
- Lemon Yellow Gel Food Coloring, 1 oz.
- Leaf Green Icing Color, 1 oz.
- Leaf Green Gel Food Coloring, 1 oz.
- Ivory Icing Color, 1 oz.
- Ivory Gel Food Coloring, 1 oz.
- Violet Icing Color, 1 oz.
- Violet Gel Food Coloring, 1 oz.
- Orange Icing Color, 1 oz.
- Orange Gel Food Coloring, 1 oz.
- Red-Red Icing Color, 1 oz.
- Red-Red Gel Food Coloring, 1 oz.
- Brown Icing Color, 1 oz.
- Brown Gel Food Coloring, 1 oz.
- Black Icing Color, 1 oz.
- Black Gel Food Coloring, 1 oz.
- White Decorator Icing – 4.5 lb.
- Halloween Pumpkin Icing Decorations
- Ghost with Candy Corn Icing Decorations, 12-count
- Skeleton Edible Cupcake Toppers
- Skeleton Icing Decorations, 12-count
- Halloween Sprinkles Set
- Halloween Witch Pumpkin Candy Decorations
- Pumpkins Sprinkles, 3.5 oz.
Instructions
- Bake mini cupcakes: Prepare your favorite yellow cake mix or recipe batter and fill mini muffin pans lined with solid baking cups. Bake according to recipe instructions until cupcakes are cooked through. Allow cupcakes to cool completely before decorating.
- Tint icing: Divide white decorator icing into separate bowls. Mix Leaf Green, Ivory, and Lemon Yellow icing colors to achieve the green shade. Combine Violet and Red-Red icing colors to create the purple shade. Mix Orange and Brown icing colors to make the orange shade. Leave some icing black by using black icing color. Tint icings accordingly to match the colors of your baking cups and decorations.
- Decorate cupcakes: Use a spatula to spread smooth icing on some of the cupcakes. Fit piping tips 1M, 2A, and 4B into disposable decorating bags and fill each bag separately with different colored icings. Pipe swirls and star shapes on the remaining cupcakes using the colored icings. Finally, top each cupcake with themed Halloween icing decorations like pumpkins, ghosts, skeletons, and witches, along with Halloween sprinkles for added festive flair.
Notes
- Ensure cupcakes are fully cooled before icing to prevent melting.
- Adjust food coloring amounts to achieve preferred icing shades.
- Disposable decorating bags make piping easier and cleanup faster.
- Use solid baking cups to prevent leakage and easy cupcake removal.
- Decorations can be swapped depending on availability or preference.
Nutrition
- Serving Size: 1 mini cupcake
- Calories: 110
- Sugar: 12g
- Sodium: 90mg
- Fat: 4g
- Saturated Fat: 1g
- Unsaturated Fat: 2g
- Trans Fat: 0g
- Carbohydrates: 17g
- Fiber: 0.5g
- Protein: 1g
- Cholesterol: 15mg