If you’re looking for a fun, eye-catching treat that’s as playful as it is delicious, then you’ve landed in the right place. I’m excited to share my all-time favorite **Meanie Marshmallows on the March! Recipe** with you—it’s a total crowd-pleaser and super simple once you get the hang of it. These colorful marshmallow characters come to life with a few creative steps, and trust me, you’ll be amazed at just how much fun making them is. Whether you’re prepping for a party, a creative snack, or just want to impress friends, these treats are a blast to make and devour!
Why You’ll Love This Recipe
- Playful and Colorful Fun: Each marshmallow comes alive with vibrant sprays that bring joy to kids and adults alike.
- Simple Yet Impressive: You don’t need fancy skills; just a little patience and creativity to wow your guests.
- Great for All Occasions: From birthdays to themed parties, these treats add a unique flair that steals the show.
- Hands-On Activity: Making them is as enjoyable as eating them, perfect for family bonding time or crafting with friends.

Ingredients You’ll Need
The magic of the Meanie Marshmallows on the March! Recipe comes from simple ingredients that work beautifully together, turning plain marshmallows into vibrant little characters. When you shop, look for quality food color sprays and high-quality candy melts to get that smooth, glossy finish.
- Marshmallows: Choose fresh, fluffy marshmallows that will hold their shape and absorb the color spray nicely.
- Blue Color Mist® Food Color Spray: Adds a cool, eye-catching shade with no mess of liquid dyes.
- Orange Color Mist® Food Color Spray: Gives a bright pop that contrasts perfectly with the blues and greens.
- Green Color Mist® Food Color Spray: Brings a lively, fresh vibe to the marshmallows, making them feel playful.
- Black Candy Melts® Candy: Essential for creating the fun hair, facial features, and little details with a smooth finish.
- Lollipop sticks or toothpicks: To hold marshmallows securely while you color and assemble.
Variations
One of the things I adore about the Meanie Marshmallows on the March! Recipe is how easily you can tweak it to fit your style or occasion. I often switch up the color spray combos to match holidays or themes, and it lets you get really creative with the decorating.
- Color Swaps: Instead of blue, orange, and green, try red, gold, and white for a festive holiday version – it instantly changes the mood.
- Diet-Friendly: Use sugar-free marshmallows and candy melts if you’re looking for a healthier treat or accommodating dietary restrictions.
- Extra Texture: Sprinkle edible glitter or sugar crystals on the melted candy hair before it hardens to add sparkle and crunch.
- Flavor Boost: Add a few drops of flavored extracts (like mint or vanilla) to your melted candy for a subtle taste upgrade.
How to Make Meanie Marshmallows on the March! Recipe
Step 1: Spray the Marshmallows with Color
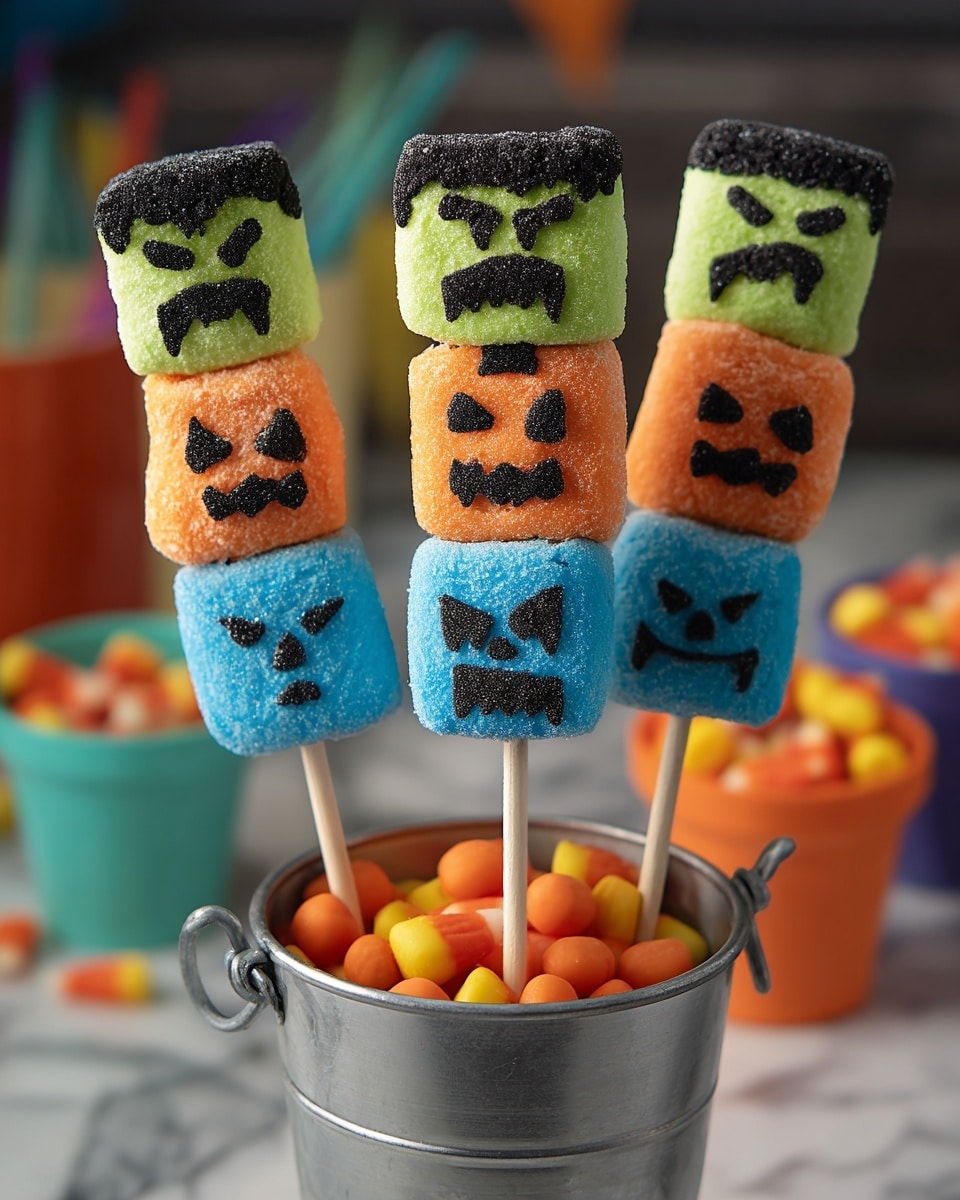
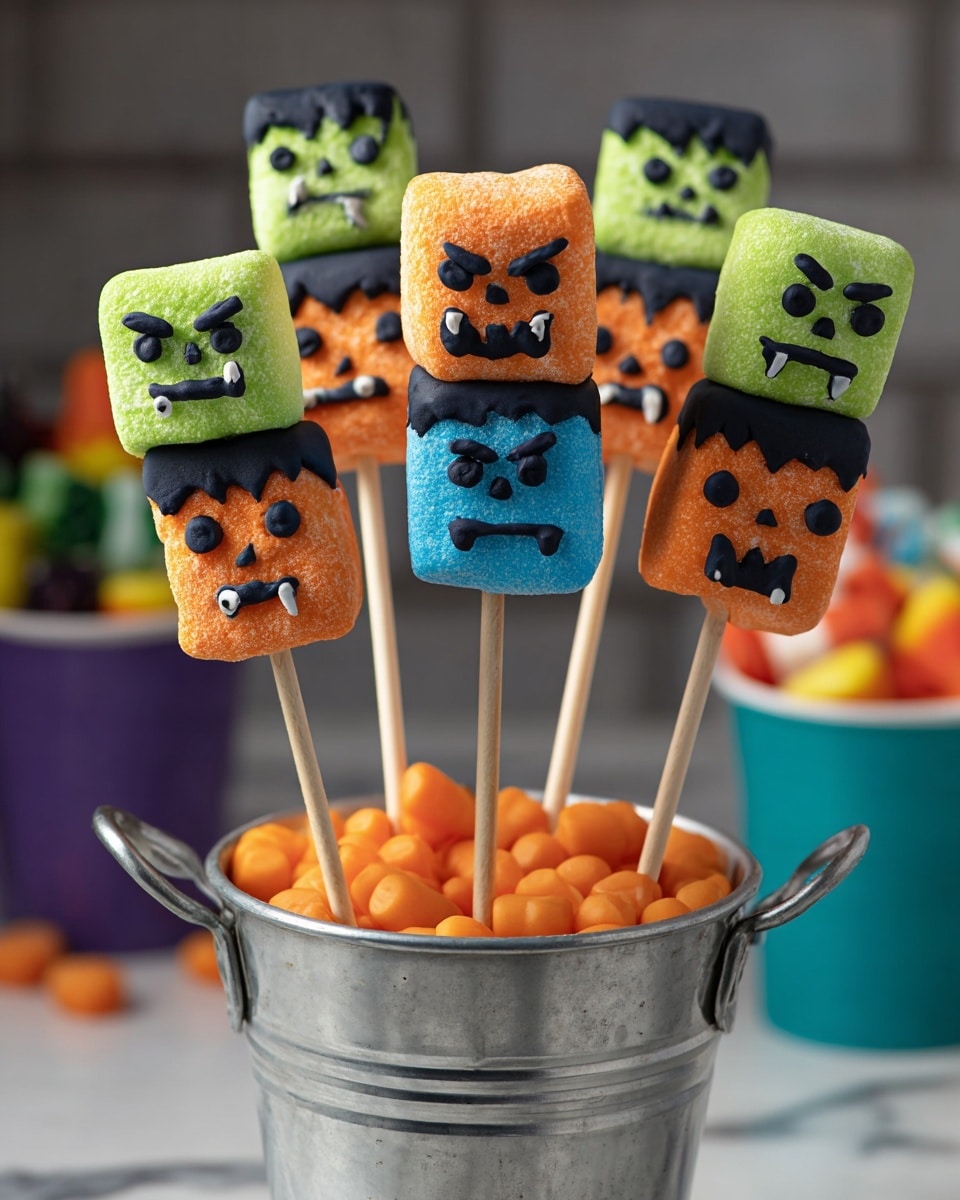
This is where the magic begins! Take a toothpick and gently insert it into the bottom of each marshmallow—this is your handle for spraying. Lightly mist the marshmallows with blue, orange, and green Color Mist food color spray for that vivid, playful finish. Pro tip: keep your spray light and even to avoid soggy marshmallows. Set them on a parchment-lined cake board, carefully remove the toothpick, then spray the bottom side. Let them dry for 10 to 15 minutes—I’ve found this wait ensures they hold their color and don’t smudge during the next steps.
Step 2: Assemble Your Meanie Marshmallows on the March!
Next, melt your black Candy Melts candy following the package directions—using a disposable decorating bag makes piping so much easier. Cut a small tip for precision. Insert a lollipop stick into the bottom of a blue marshmallow, leaving about 4 inches exposed. Using the melted candy, create “hair” on the top and a bit down the sides. Slide the orange marshmallow down the stick next and pipe a small dot of candy to help it stick. Add the green marshmallow on top, then cover it with more melted candy hair, letting it drip playfully over the sides. I like to pop the assembled marshmallows into a craft foam block so they stand up straight while chilling for 10 to 15 minutes until firm—this is a game changer to keep everything neat and stable while you decorate.
Step 3: Decorate Your Marshmallow Characters
Now for the fun facial details! Using your black melted candy and a fine tip, pipe on eyebrows, the mouth outline, tiny eyes, and even little teeth dots. This step really brings your Meanie Marshmallows on the March! to life. Chill them again for 3 to 5 minutes until the features set. Don’t rush this part—patience pays off with those cute expressions shining through!
Pro Tips for Making Meanie Marshmallows on the March! Recipe
- Handle Marshmallows Gently: Marshmallows can get sticky fast—use toothpicks and minimal handling to keep them looking pristine.
- Don’t Skip Drying Time: Letting each sprayed layer dry properly prevents color smudging and helps candy stick better.
- Use Craft Foam for Assembly: Inserting marshmallows into craft foam to chill stands them up perfectly and keeps hands free for decorating.
- Practice Piping First: I always pipe a few test dots on parchment before decorating to ensure the candy melts flow easily and your lines are smooth.
How to Serve Meanie Marshmallows on the March! Recipe
Garnishes
I tend to keep garnishes simple so the marshmallows themselves steal the spotlight. Sometimes, I sprinkle a little edible glitter or use tiny candy pearls around the base for texture and sparkle. But honestly, these treats are so fun and colorful on their own that they rarely need more than a cute presentation plate or tray.
Side Dishes
Because these marshmallow treats are sweet and whimsical, I like pairing them with something a little less sweet—think fresh fruit skewers or a light cheese platter. They also go wonderfully with warm drinks like hot chocolate or flavored milks, especially if you want to amplify the cozy vibes.
Creative Ways to Present
For special occasions, I’ve arranged my Meanie Marshmallows on the March! on a colorful cake stand, surrounded by mini cupcakes or cookies matching the marshmallow colors. Another fun idea is to create a “marching band” display with multiple marshmallow treats lined in rows on a decorated tray—kids absolutely go wild for it. Wrapping each treat in cellophane tied with ribbon makes for perfect party favors, too.
Make Ahead and Storage
Storing Leftovers
If you have leftovers (which, honestly, would be tough!), store them in an airtight container at room temperature. I’ve found that keeping them away from direct sunlight helps maintain the vibrant color and prevents the marshmallows from getting sticky or soggy.
Freezing
Personally, I haven’t tried freezing these marshmallows because it changes their texture a bit, making them less fluffy once thawed. But if you want to prepare ahead, it’s best to freeze before adding the candy melt decorations, then decorate fresh after thawing.
Reheating
Since these are marshmallow treats, reheating isn’t really necessary—they’re best enjoyed fresh. But if you want to soften the candy melt a little for reshaping or touch-ups, a quick blast of low heat in the microwave (just a few seconds) does the trick. Just be careful—too much heat can melt everything!
FAQs
-
Can I use regular food coloring instead of Color Mist sprays for this recipe?
You technically can, but I recommend using Color Mist sprays because they deliver even coverage without soaking the marshmallows. Regular liquid food coloring can make the marshmallows soggy and affect the texture. If you must use liquid coloring, apply it very sparingly with a brush and allow plenty of drying time.
-
What’s the best way to melt Candy Melts for decorating?
Microwaving in short bursts of 20-30 seconds, stirring in between, works best to avoid overheating. You want the candy smooth enough to pipe easily without becoming too runny. Using a disposable decorating bag makes piping precise details much simpler.
-
How long can I keep these decorated marshmallows fresh?
Stored properly in an airtight container at room temperature, they stay fresh and yummy for about 2-3 days. After that, the marshmallows may start to lose their texture and the candy decorations can become sticky.
-
Can kids help make Meanie Marshmallows on the March! Recipe?
Absolutely! Kids especially love spraying the colors and adding fun facial details. Just be sure an adult handles the melting candy part for safety. It’s a fantastic way to get the whole family involved and having a blast in the kitchen.
Final Thoughts
I absolutely love how these Meanie Marshmallows on the March! turn out every time—each batch feels like a little creative adventure, and the smiles they spark are totally worth the effort. When I first tried this recipe, I was pleasantly surprised by how accessible and fun it was to transform simple marshmallows into these colorful characters. Give it a go, and watch the giggles and compliments roll in. It’s more than just dessert; it’s a memorable, hands-on experience you and your loved ones will cherish. Trust me, once you try this recipe, it’ll become a go-to whenever you want to add a bit of whimsy to your kitchen!
Print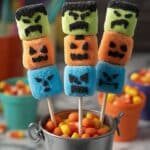
Meanie Marshmallows on the March! Recipe
- Prep Time: 15 minutes
- Cook Time: 15 minutes
- Total Time: 30 minutes
- Yield: Makes 1 marshmallow pop per serving
- Category: Dessert
- Method: No-Cook
- Cuisine: American
Description
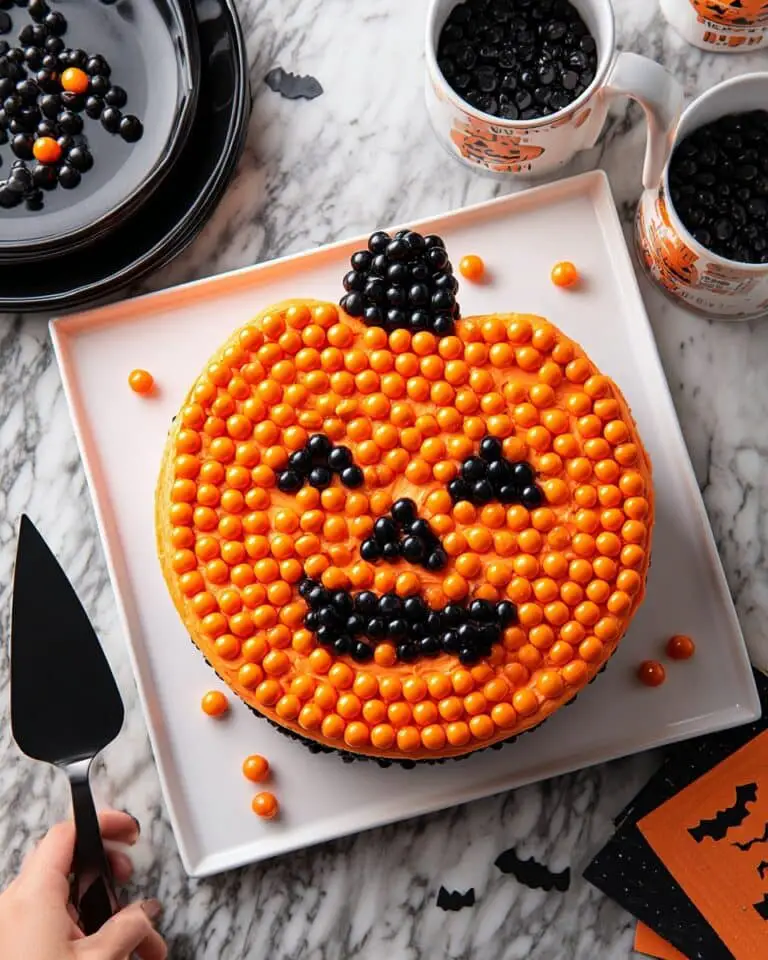
Create spooky and colorful Meanie Marshmallows on the March! This fun, festive treat involves spraying marshmallows with vibrant food color sprays, assembling them into quirky characters with melted candy melts, and decorating them with expressive facial features. Perfect for Halloween parties or themed celebrations, these marshmallow pops are as delightful to make as they are to eat.
Ingredients
Marshmallows
- Large marshmallows, assorted colors or plain white
Food Color Spray
- Blue Color Mist® Food Color Spray, 1.5 oz.
- Orange Color Mist® Food Color Spray, 1.5 oz.
- Green Color Mist® Food Color Spray, 1.5 oz.
Candy Melts
- Black Candy Melts® Candy, 10 oz.
- Lollipop sticks or toothpicks
- Disposable decorating bag
- Parchment paper
- Craft foam block
Additional Tools
Instructions
- Spray marshmallows: Insert a toothpick into the bottom of each marshmallow to hold it securely while spraying. Lightly spray each marshmallow evenly with blue, orange, and green Color Mist® food color sprays. Then, place the marshmallows on a parchment-covered cake board, remove the toothpicks, and spray the bottom of each marshmallow. Allow the sprayed marshmallows to dry for 10 to 15 minutes.
- Assemble marshmallows: Melt the black Candy Melts® candy in a disposable decorating bag according to package directions and cut a small point off the bag tip for piping. Insert a lollipop stick into the bottom of a blue marshmallow, leaving about 4 inches of the stick exposed. Cover the top and slightly over the sides of the blue marshmallow with melted candy to create “hair.” Slide an orange marshmallow down onto the stick beneath the blue one. Pipe a small dot of melted candy onto the orange marshmallow’s surface and position a green marshmallow on top. Cover the top green marshmallow with melted candy “hair” allowing the candy to drip over the sides to create texture. Insert the assembled marshmallow pops into a craft foam block and chill until firm, approximately 10 to 15 minutes.
- Decorate marshmallows: Using the remaining melted black candy in the decorating bag, pipe outlines for eyebrows and a mouth onto the marshmallows. Use small dots to create eyes and teeth details. Chill the decorated marshmallows again for 3 to 5 minutes until the candy is fully set and firm. Your Meanie Marshmallows on the March are ready to serve!
Notes
- Use parchment paper to prevent sticking and make cleanup easy.
- Be sure to chill the treats sufficiently to let the melted candy firm up and hold the marshmallows together.
- Handle the marshmallows gently once sprayed to avoid smudging the color.
- For safety and ease, use food-safe toothpicks or lollipop sticks when assembling.
- These treats are best served the same day made for optimum freshness.
Nutrition
- Serving Size: 1 marshmallow pop
- Calories: 120
- Sugar: 18g
- Sodium: 20mg
- Fat: 4g
- Saturated Fat: 3g
- Unsaturated Fat: 1g
- Trans Fat: 0g
- Carbohydrates: 22g
- Fiber: 0g
- Protein: 0g
- Cholesterol: 0mg