If you’re looking for a fun and festive treat to wow your friends and family this Halloween, you’ve come to the right place. I’m excited to share my Spooky Halloween Spider Cupcakes Recipe that’s not only adorable but also surprisingly easy to make. These creepy-cute cupcakes are packed with rich chocolate flavor and get their spooky vibe from the cutest spider decorations you’ll ever see. Stick around—I’ll walk you through every step so you can nail these Halloween hits with confidence!
Why You’ll Love This Recipe
- Fun and Kid-Friendly: My kids go crazy for these — they’re perfect for Halloween parties or a festive family bake day.
- Simple Yet Impressive: You don’t have to be a pro baker; the decorating tricks here are foolproof and incredibly rewarding.
- Rich Chocolate Flavor: The chocolate base is moist and indulgent, which balances perfectly with the sweet frostings.
- Creative Decoration: I discovered a neat trick using cornstarch that really smooths the spider legs—giving them a fun, polished look.

Ingredients You’ll Need
The magic of this Spooky Halloween Spider Cupcakes Recipe lies in combining simple ingredients that work harmoniously to create both taste and that adorable spider effect. You’ll want to gather everything ahead of time to stay relaxed while decorating.
- Chocolate Cupcakes: You can use a boxed mix or your favorite homemade recipe—just make sure they cool completely for the best decorating surface.
- White Frosting: Acts as a smooth base layer that will make the spider decorations pop visually.
- Orange Frosting: Key for the spider’s body, vibrant and festive for Halloween.
- Black Frosting: Essential for drawing spider legs and adding contrast.
- Candy Eyeballs: These give your spiders that realistic and fun creepy look—grab mini ones for the cutest effect.
- Mini Chocolate Sandwich Cookies: Perfect-sized heads for our spider friends and add a lovely crunch.
- Cornstarch: A secret weapon for smoothing the frosting dots on spider legs without smudging.
Variations
I love to switch things up with this Spooky Halloween Spider Cupcakes Recipe depending on who I’m baking for. Maybe you want it gluten-free or are craving a different flavor—go for it! Making it your own is part of the fun.
- Gluten-Free Version: I tried using a gluten-free chocolate cupcake mix once and it worked great—just watch baking times carefully as they might vary.
- Flavor Twist: Adding a touch of espresso powder to the chocolate cupcake batter really intensifies the chocolate flavor for grown-up palates.
- Colorful Spiders: I’ve experimented with purple or green frosting for the spider’s body to make them extra spooky and fun for kids.
- Vegan Adaptation: Using dairy-free frosting and egg replacers in your cupcake batter works well if you want something plant-based.
How to Make Spooky Halloween Spider Cupcakes Recipe
Step 1: Bake Your Chocolate Cupcake Base
Start by making your chocolate cupcakes according to your favorite recipe or the box instructions. I love to test doneness by gently pressing the top—the cupcake should spring back without feeling wet. Once baked, move them to a wire rack and let them cool completely. Don’t rush this step because warm cupcakes will cause your frosting to melt. Patience here pays off big time when decorating!
Step 2: Frost with White Base Layer
Using a piping bag fitted with a round tip, gently pipe a layer of white frosting on top of each cooled cupcake. Then smooth it out with a small offset spatula or butter knife for an even canvas. This white frosting acts like a clean paper that makes your spider decorations really stand out. It also keeps your cupcakes moist beneath the layers of fun!
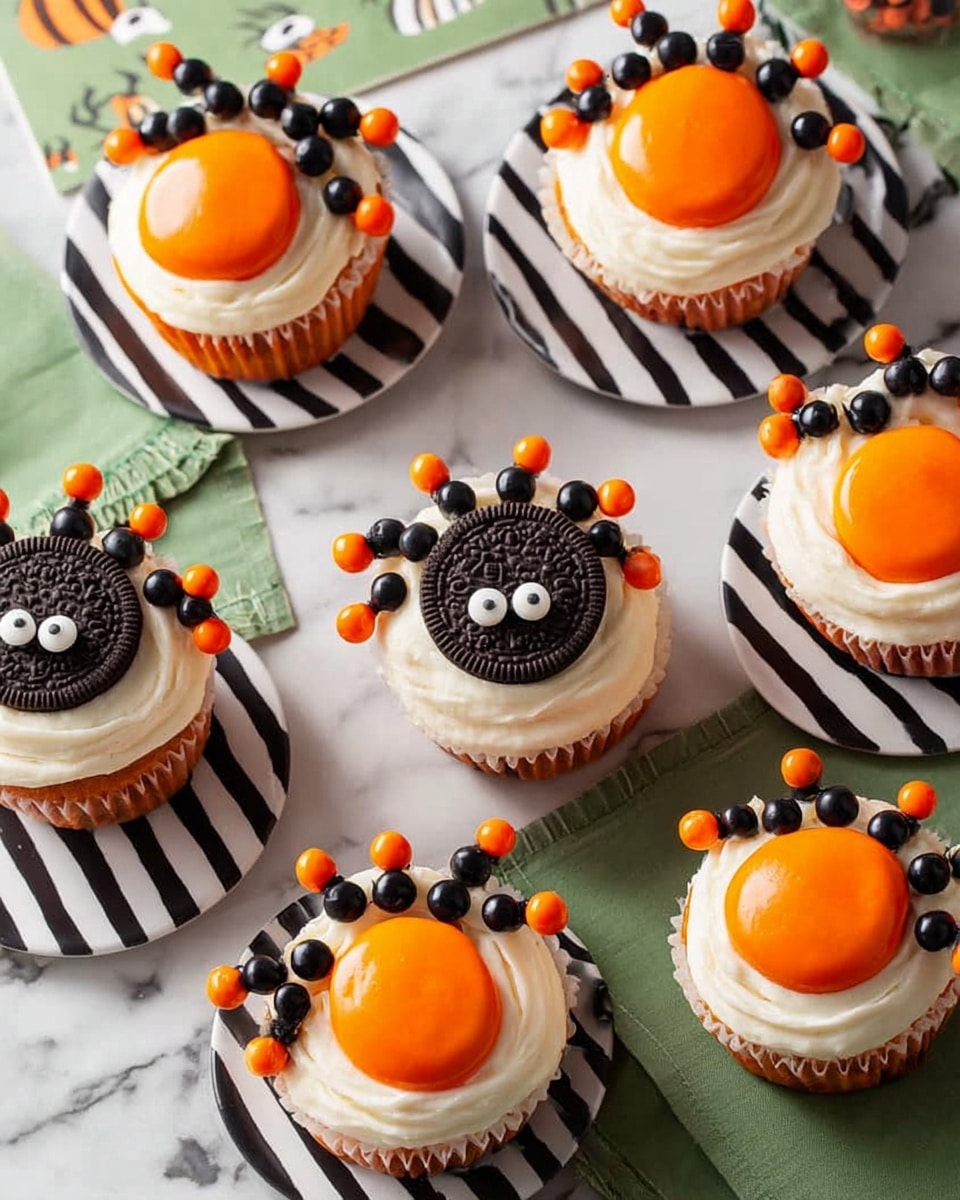
Step 3: Create the Orange Spider Body
Next, switch to your piping bag filled with orange frosting. Pipe a small circle—about the size of a half dollar—right on top of the white frosting. This orange circle will be the spider’s body and the most eye-catching part. I like to keep my pressure steady while piping to make a smooth, even circle. If your frosting is too stiff, briefly warming it by squeezing the bag a bit can help.
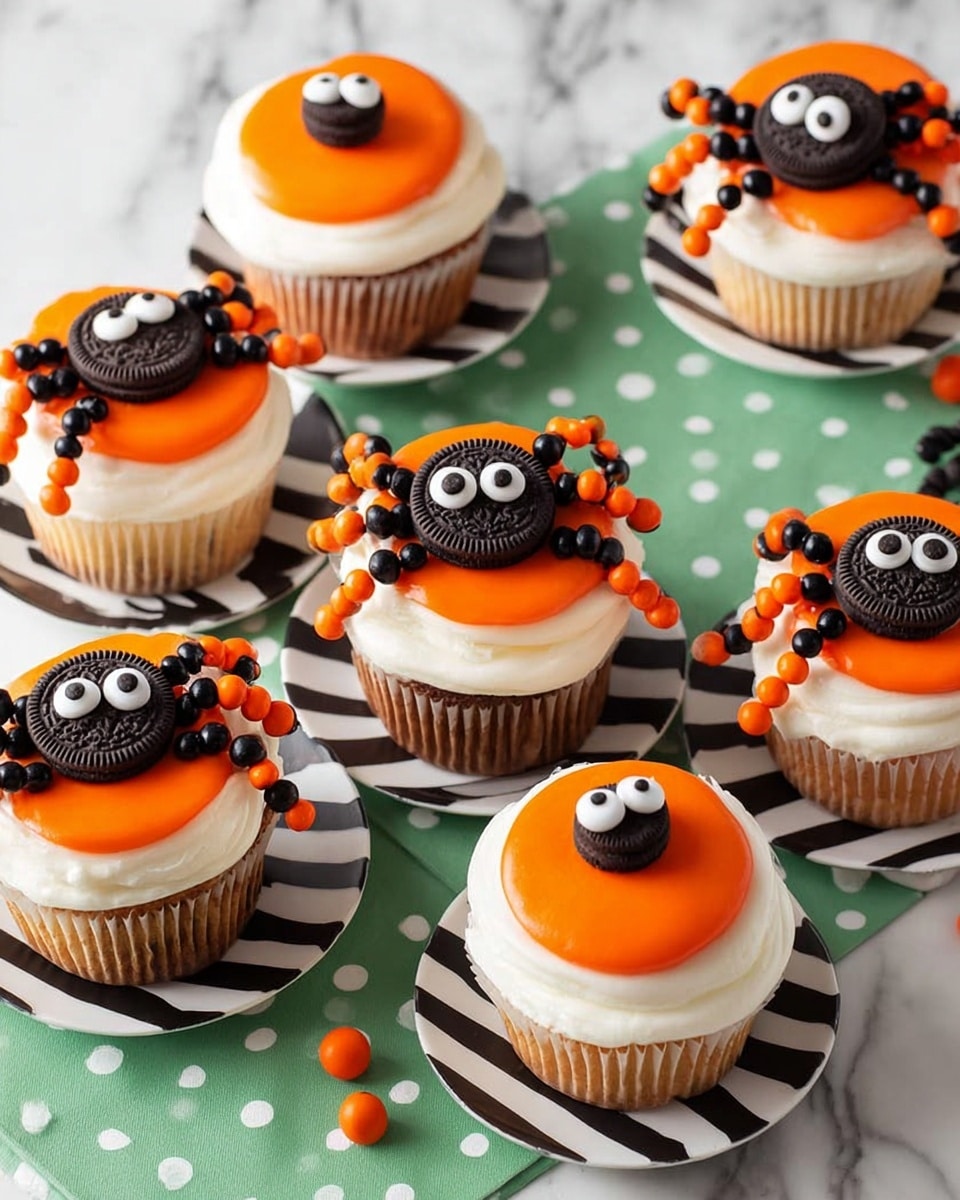
Step 4: Assemble Spider Head with Eyeballs
Take your mini chocolate sandwich cookie and pipe a small dot of frosting right on its flat side to act as “glue.” Then gently press two candy eyeballs on top of the cookie. This becomes your spider’s head. Carefully place the cookie so it leans against the orange body on the cupcake, creating that iconic creepy spider look. If you hold it in place for a few seconds, it sets nicely.
Step 5: Draw the Spider Legs with Black and Orange Dots
Finally, here’s the fun part—using both black and orange frosting, pipe small alternating dots from the spider’s body outward to form four legs on each side. It looks super spooky and festive! I discovered a neat trick: Dip a small brush in cornstarch and lightly smooth over the dots to make the legs look more polished and to prevent any smudging. This step makes all the difference and takes your cupcakes from cute to wow.
Pro Tips for Making Spooky Halloween Spider Cupcakes Recipe
- Cool Completely: Never decorate cupcakes until they’re fully cooled to keep your frosting smooth and neat.
- Cornstarch Smoothing: Using cornstarch on a small brush to smooth spider legs helps prevent frosting from sticking to your fingers.
- Steady Piping Pressure: Consistent pressure when piping frosting circles and dots ensures uniform shapes and polished results.
- Cookie Head Placement: Press the cookie head just right so it leans without tipping off. A little frosting glue does wonders here.
How to Serve Spooky Halloween Spider Cupcakes Recipe
Garnishes
For a finishing touch, I often sprinkle a little edible glitter or Halloween-themed candy sprinkles around the cupcakes. It makes the spiders look like they’re crawling around a sparkly web! Some friends like to add a few tiny candy pumpkins or ghost candies nearby for extra festive flair.
Side Dishes
These cupcakes are perfect on their own but pair beautifully with a simple glass of cold milk or an autumn-spiced hot chocolate. If you’re hosting a Halloween party, serve them alongside pumpkin-shaped sugar cookies or a bowl of candied popcorn for a sweet treat spread.
Creative Ways to Present
I love arranging these cupcakes on a black serving platter lined with fake spider webs and some plastic spiders for a dramatic presentation. Another time, I used orange and black cupcake liners and stacked the cupcakes in a tiered stand to give the effect of a spider nursery. It’s a real conversation starter and looks spectacular!
Make Ahead and Storage
Storing Leftovers
If you have leftovers—which usually means you didn’t share enough!—store them in an airtight container in the fridge. They stay moist and tasty for up to 3 days. I keep them chilled especially because of the frosting, which can soften in warmer temps.
Freezing
I’ve frozen these cupcakes successfully by wrapping each one individually in plastic wrap and then placing them in a freezer bag. Freeze for up to a month. When ready, thaw in the fridge overnight to keep the frosting intact without sweat.
Reheating
These cupcakes don’t need reheating per se, but if you want to enjoy them at room temperature, just let them sit out for about 30 minutes after taking them from the fridge. This restores the softness of the cake and makes the frosting creamy without melting.
FAQs
-
Can I make these spider cupcakes without the candy eyeballs?
Absolutely! If you can’t find candy eyeballs, you can pipe little white frosting dots and add a smaller black dot in the center as an eye substitute. It’s a bit more time-consuming but looks just as cute and spooky.
-
What type of frosting works best for spider legs?
Buttercream frosting works best because it holds its shape well when piped into dots. Avoid runny frostings like glaze or whipped cream, which won’t hold the spider legs’ form.
-
Can I prepare the cupcakes in advance?
Yes! You can bake cupcakes a day in advance and store them in an airtight container. Frost and decorate the day you plan to serve for the freshest look and taste.
-
What can I use instead of mini chocolate sandwich cookies?
If you don’t have mini sandwich cookies, small chocolate wafer cookies or even chocolate discs can work. Just be sure they’re about the same size for the proportionate spider heads.
Final Thoughts
I absolutely love how this Spooky Halloween Spider Cupcakes Recipe brings a playful spirit to the table. It’s been a favorite in my family for years, especially with little helpers in the kitchen who adore making the spiders come alive. You’ll find that the balance of delicious chocolate and fun decoration techniques will make you want to bake these year after year. Give it a try—you won’t regret adding these cute crawlers to your Halloween festivities!
Print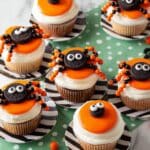
Spooky Halloween Spider Cupcakes Recipe
- Prep Time: 45 minutes
- Cook Time: 1 hour 55 minutes
- Total Time: 2 hours 40 minutes
- Yield: 12 cupcakes
- Category: Dessert
- Method: Baking
- Cuisine: American
- Diet: Vegetarian
Description
Create adorable and spooky Halloween Spider Cupcakes perfect for festive celebrations. These chocolate cupcakes are topped with white frosting, decorated with handmade spider bodies and legs using colorful frostings and candy eyeballs, making them fun and easy treats for beginners.
Ingredients
The Best Chocolate Cupcakes
- 12 chocolate cupcakes (baked according to your favorite box or recipe instructions)
Frostings and Decorations
- White frosting, 8 oz. (for cupcake base)
- Orange buttercream frosting, approximately 8 oz. (for spider’s body and legs)
- Black buttercream frosting, approximately 8 oz. (for spider’s legs)
- Mini chocolate sandwich cookies, 12 (for spider heads)
- Candy eyeballs, 24 (2 per spider head)
- Cornstarch (for smoothing frosting dots)
Instructions
- Make chocolate cupcakes: Bake 12 chocolate cupcakes according to your preferred box or homemade recipe instructions. Once baked, transfer the cupcakes to a cooling rack and allow them to cool completely before decorating to ensure frosting adheres well.
- Frost cupcakes with white frosting: Using a piping bag fitted with a round tip, pipe white frosting evenly over the top of each cooled cupcake. Then, use a spatula to smooth out the frosting, creating a clean base for your spider decorations.
- Create spider’s body: Using orange frosting, pipe a small circle approximately the size of a half dollar coin on top of each cupcake. This will serve as the spider’s body.
- Make spider’s head: Take one mini chocolate sandwich cookie for each spider. Pipe a small dot of orange frosting on the cookie to act as glue, then attach two candy eyeballs onto each cookie to form the spider’s head. Place the cookie so it leans against the orange body on the cupcake.
- Form spider’s legs: Using alternating black and orange frostings, pipe small dots extending from the body to create spider legs—four on each side. Dip a small brush into cornstarch and gently smooth each dot to give the legs a clean and polished finish.
Notes
- Ensure cupcakes are completely cooled before frosting to prevent melting and sliding.
- Use a clean brush and cornstarch for smoothing frosting dots to avoid sticky fingers and keep details crisp.
- If you can’t find candy eyeballs, use small white and black frosting dots as a substitute.
- For easier piping, warm frosting slightly or knead in a bag before use.
- Store finished cupcakes in an airtight container at room temperature for up to 2 days or refrigerate for longer freshness.
Nutrition
- Serving Size: 1 cupcake
- Calories: 320
- Sugar: 28g
- Sodium: 150mg
- Fat: 15g
- Saturated Fat: 6g
- Unsaturated Fat: 7g
- Trans Fat: 0g
- Carbohydrates: 40g
- Fiber: 2g
- Protein: 4g
- Cholesterol: 35mg