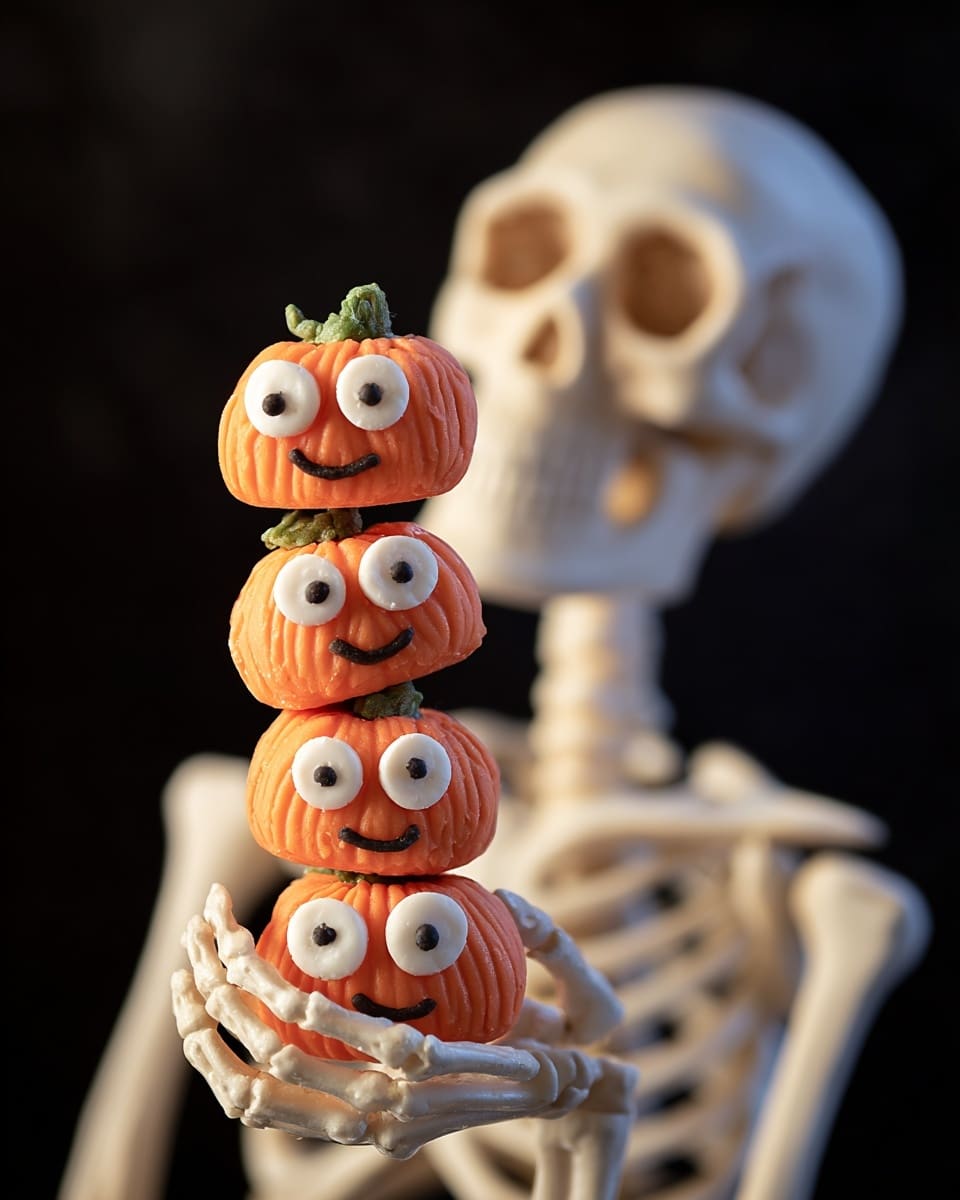
If you’re looking for a spooktacular treat that’s both adorable and delicious, you’re going to want to try this Mini Donut Halloween Treats Recipe. These bite-sized goodies aren’t just cute — they’re a total crowd-pleaser at any Halloween party or cozy night in with family. I absolutely love how these mini donuts transform into festive Halloween masterpieces with a coating of melted candy and fun decorations. Stick with me, and I’ll walk you through everything so your treats turn out perfectly every time.
Why You’ll Love This Recipe
- Simple Steps: You’ll find this recipe broken down so it’s easy to follow, even if you’re new to decorating donuts.
- Fun & Festive: These mini donuts are perfect for Halloween and can be customized, making them great for kids and adults alike.
- No-Fuss Ingredients: Using candy melts and mini cake donuts means less mess and less stress in the kitchen.
- Crowd-Pleasing Presentation: Stacking them up creates such a cute display that’ll have everyone coming back for seconds.

Ingredients You’ll Need
Each ingredient plays a special role in making these treats festive and flavorful. Using candy melts over traditional icing makes the decorating process smoother, while spice drops add a fun touch. Here are some quick tips on what to look for when shopping:
- Baked Mini Cake Donuts: I prefer baked mini donuts for a lighter texture that holds up well under the candy coating.
- Orange Candy Melts® Candy: These melt beautifully and give that perfect pumpkin-orange color for a Halloween vibe.
- Black Candy Melts® Candy: Great for detailing the smile and accent features on your donuts.
- Candy Eyeballs: Having good-quality candy eyeballs can make your donuts look super cute and spooky.
- Spice Drops: I use these for the “stem” on the pumpkin donut stack—it’s an easy way to add a realistic touch.
Variations
I love making this Mini Donut Halloween Treats Recipe my own by switching up flavors and decorations depending on the year. Don’t hesitate to get creative here—your kids will have a blast helping, too!
- Gluten-Free Option: Try using gluten-free mini cake donuts for those with dietary restrictions—I’ve done this before and it works great with the candy melts.
- Chocolate Coating: Swap the orange candy melts for colored white chocolate or dark chocolate melts if you want a different flavor twist.
- Eyes & Faces: Instead of candy eyeballs, use small candy buttons or sprinkles for unique faces.
- Spice It Up: Add a dash of cinnamon or pumpkin pie spice to your donuts before decorating to deepen that fall flavor.
How to Make Mini Donut Halloween Treats Recipe
Step 1: Bake and Cool Your Mini Donuts
Start by following the batter instructions of your choice to make mini cake donuts. I usually bake mine because they’re lighter and don’t get soggy when covered in candy. Once baked, let them cool completely on a wire rack. Trust me, if they’re warm when you start the candy melting step, your coating won’t set properly and can get messy.
Step 2: Ice the Bottoms with Orange Candy Melts
Melt the orange Candy Melts according to the package directions (usually in short bursts in the microwave, stirring often). Use a spatula to spread a generous layer on the bottom side of the donuts, which helps them stick later. I find that using a toothpick is super helpful to clear out the hole in the center so the candy doesn’t clog it. Place the donuts candy side up on parchment paper and pop them in the fridge to chill for about 10 to 15 minutes until the coating firms up.
Step 3: Coat the Tops and Sides with Candy Melts
Now flip the donuts so the coated bottom rests on a cooling rack over parchment (this lets excess candy drip off). Use more melted orange candy in a piping bag to generously cover the entire top and sides of each donut. Tap gently to smooth the surface and remove any extra drips. Refrigerate again until firm, about 10 to 15 minutes. Don’t rush this step—it really helps get that smooth pumpkin look!
Step 4: Decorate Your Donuts
Remelt orange candy melts as needed for piping. Use a decorating bag with a small hole to pipe “section lines” onto the donuts—this mimics the ridges of a real pumpkin. Then melt your black candy melts the same way and pipe a cute smile or face. Chill again between steps for 3-5 minutes so details hold their shape.
For the pumpkin “stem,” use scissors to trim the top third of a green spice drop and roll it between your fingers to create a stem shape. Secure it to the hole in the top donut with melted orange candy, along with candy eyeballs for an extra touch of Halloween fun. Chill once more for about 3 to 5 minutes until everything is firm.
Step 5: Assemble the Donut Stack
Use melted orange candy in a piping bag as edible glue to stack five mini donuts on top of each other on parchment paper. Hold gently for a moment so they set, then chill until firm, about 3 to 5 minutes. This stacked pumpkin look is always a showstopper and so fun to serve at your next Halloween party!
Pro Tips for Making Mini Donut Halloween Treats Recipe
- Even Cooling Is Key: Always chill your donuts after each candy melt step to prevent smudging and keep clean edges.
- Melting Magic: Microwave candy melts in short bursts (15-20 seconds) and stir well to avoid burning or graininess.
- Piping Bag Hack: I cut a tiny tip on the decorating bag to control how much candy comes out—less mess and more precision.
- Work Quickly but Steadily: Candy melts set fast once cooled, so have your decorating tools ready before melting the candy.
How to Serve Mini Donut Halloween Treats Recipe
Garnishes
I love adding a sprinkle of edible glitter or a few mini Halloween-themed sprinkles to these donuts just before the final chill – it adds that magical, festive touch. The candy eyeballs do a lot of the heavy lifting to make these extra fun, but if you want, you can pop in tiny chocolate chips or jelly beans as well.
Side Dishes
These mini donuts are quite the sweet showstopper, so I like pairing them with something simple like a warm cup of spiced cider or a bowl of fresh fruit. For a fun party spread, add some popcorn tossed with cinnamon sugar or a charcuterie board with cheeses and crackers to balance the sweetness.
Creative Ways to Present
For Halloween parties, I’ve stacked these donut pumpkins on a tiered cake stand surrounded by fake autumn leaves. Another time, I presented them individually wrapped in clear cellophane tied with orange and black ribbon—so cute for giving out as party favors or to trick-or-treaters!
Make Ahead and Storage
Storing Leftovers
If you have leftovers (which is rare in my house!), store them in an airtight container in the fridge. I find that keeping the coating from getting soft works best if the container is big enough so the donuts don’t touch each other and ruin the decorations.
Freezing
Freezing isn’t my go-to for these treats because the candy melts can get a bit dull in texture after thawing. But if you need to freeze them, wrap each donut individually in plastic wrap and place in an airtight container or freezer bag. Thaw overnight in the fridge before serving.
Reheating
These Mini Donut Halloween Treats are best enjoyed cold or at room temperature—the candy coating can melt if warmed. If you want to freshen them up a bit, take them out of the fridge about 30 minutes before eating to take the chill off without losing that smooth candy shell.
FAQs
-
Can I use store-bought mini donuts instead of baking them?
Absolutely! Store-bought mini cake donuts can work, but I recommend choosing plain or lightly glazed ones without heavy coatings. Baking your own gives you more control over texture, which helps the candy melts adhere better.
-
What if I don’t have candy melts?
You can substitute candy melts with colored white chocolate or use regular chocolate with a few drops of oil for a smoother consistency. Just make sure to melt gently to avoid burning.
-
How long can I store these Mini Donut Halloween Treats?
When stored properly in an airtight container in the fridge, these treats keep well for up to 3 days before the donut starts getting stale or the candy coating softens.
-
Can kids help decorate these mini donuts?
Definitely! Kids love adding faces with candy melts and eyeballs. Just be sure to supervise with melted candy and scissors for the spice drop stems.
Final Thoughts
This Mini Donut Halloween Treats Recipe has become a seasonal favorite in my family. I love pulling these out because they bring a little extra fun and festivity that simple cupcakes just can’t match. Plus, they’re so customizable! Whether you’re making them for a party or just a special baking afternoon with the kids, I’m confident you’ll enjoy the process and the smiles they bring. So go ahead—give this recipe a whirl and make your Halloween celebrations extra sweet this year!
Print
Mini Donut Halloween Treats Recipe
- Prep Time: 15 minutes
- Cook Time: 15 minutes
- Total Time: 50 minutes
- Yield: 1 donut stack (5 mini donuts per treat)
- Category: Dessert
- Method: Baking
- Cuisine: American
Description
Create festive Mini Donut Halloween Treats by baking mini cake donuts, coating them with vibrant orange Candy Melts, and decorating with candy eyeballs, black candy smiles, and green spice drop stems. These spooky, colorful treats are perfect for Halloween parties and are assembled into a fun donut stack featuring charming details.
Ingredients
Mini Cake Donuts
- Mini cake donut batter (for 5 mini donuts per treat, prepared according to your favorite recipe)
Candy Coating and Decorations
- 12 oz Orange Candy Melts® Candy
- 10 oz Black Candy Melts® Candy
- 0.88 oz Candy Eyeballs
- Green spice drops (for stems)
Instructions
- Make mini doughnuts: Prepare the mini cake donut batter following your chosen recipe directions. Bake five mini donuts for each treat and allow them to cool completely.
- Ice bottoms with candy: Melt the orange Candy Melts candy according to package instructions. Use a spatula to coat the bottoms of the cooled donuts with the melted orange candy, using a toothpick to clear the center hole if needed. Place the donuts candy-side up on a parchment-covered board and chill until the coating is firm, about 10 to 15 minutes.
- Cover donuts with candy: Turn the chilled donuts candy side down onto a cooling grid set over parchment paper. Use the remaining melted orange candy in a cut decorating bag to cover the tops and sides evenly, tapping to smooth out excess. Chill again until firm, approximately 10 to 15 minutes.
- Decorate donuts: Remelt the orange candy melts as needed and pipe section lines over the donuts using a cut decorating bag. Chill for 3 to 5 minutes to set. Then melt the black Candy Melts and pipe smiling mouths onto each donut; chill again for 3 to 5 minutes. For the stem on the top donut, cut off the top third of a green spice drop with scissors, roll it into a stem shape, and attach it along with candy eyeballs into the donut hole using melted orange candy as adhesive. Chill for another 3 to 5 minutes.
- Assemble donuts: Using melted orange Candy Melts in a cut decorating bag, stack and attach five decorated donuts on parchment-covered board, building a festive Halloween donut tower. Chill until the assembly is firm, about 3 to 5 minutes, before serving.
Notes
- Ensure donuts are completely cooled before coating to avoid melting the candy melts.
- A toothpick is helpful for clearing the donut holes to ensure perfect candy coating coverage.
- For even coating, tapping the donuts after applying melted candy helps create a smooth surface.
- Chilling between steps is crucial for firm candy coating and decorations.
- Use scissors and gentle rolling to shape spice drops into stems for a natural look.
- Store assembled donuts in a cool, dry place to maintain their shape and flavor.
Nutrition
- Serving Size: 1 donut stack (5 mini donuts)
- Calories: 320
- Sugar: 25g
- Sodium: 110mg
- Fat: 15g
- Saturated Fat: 8g
- Unsaturated Fat: 6g
- Trans Fat: 0g
- Carbohydrates: 40g
- Fiber: 1g
- Protein: 3g
- Cholesterol: 25mg