
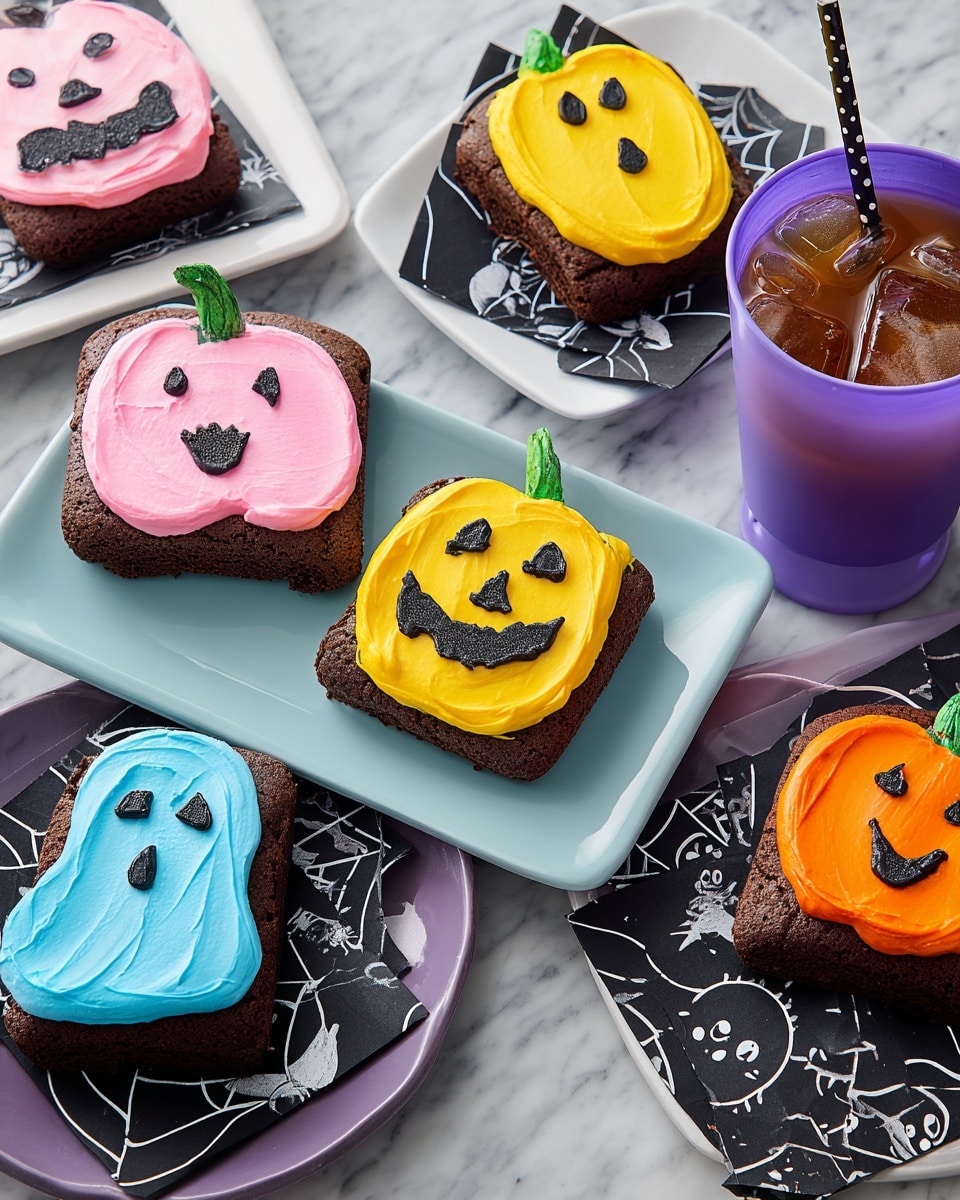
If you’re looking to add an adorable touch to your Halloween celebrations, this Pumpkin and Ghost Halloween Mini Cakes Recipe is exactly what you need. These little cakes are not only festive but fun to make, and they bring a playful spirit to any party or family gathering. I absolutely love how this recipe brings the Halloween vibe alive with bright colors and cute decorations — plus, they’re surprisingly simple to create, even if you’re new to cake decorating.
Why You’ll Love This Recipe
- Festive and Fun: These mini cakes perfectly capture the Halloween spirit with pumpkin and ghost designs that both kids and adults adore.
- Beginner-Friendly: You don’t need fancy skills or equipment to pull this off; it’s approachable yet impressive.
- Customizable Colors: You’ll enjoy mixing and matching icing colors to make your creations uniquely yours.
- Great for Parties: Mini cakes make portion control easy and are perfect for sharing some Halloween joy.

Ingredients You’ll Need
The magic of the Pumpkin and Ghost Halloween Mini Cakes Recipe lies in combining a good cake base with vibrant, colorful frostings that bring each mini cake to life. You can use your favorite cake mix or even whip up a chocolate cake from scratch. When choosing your food colorings, gel types work best to get those bright, vivid tones.
- Favorite Cake Mix or Chocolate Cake Recipe: Using a tried-and-true mix or recipe means your cakes will have that perfect moist texture to hold decorations well.
- Lemon Yellow Icing Color: Great for creating pumpkins that glow with fall vibes.
- Lemon Yellow Gel Food Coloring: Gel colors are concentrated, so you’ll get vibrant shades without thinning your frosting.
- Easy Vanilla Buttercream Frosting: A smooth, sweet canvas that’s perfect for piping and smoothing on the cakes.
- Black Food Coloring Icing Color & Gel: Essential for those ghostly faces and pumpkin details—don’t skimp here!
- Rose Icing Color/Pink Gel: Adds a subtle warmth or rosy cheeks to your ghost decorations.
- Orange Icing Color & Gel: The classic pumpkin color—you’ll want this rich and bold.
- Sky Blue Food Coloring & Gel: Perfect for adding some cool, spooky touches or backgrounds.
Variations
I love making this recipe my own by tweaking colors and even flavor profiles. One of the things that makes Pumpkin and Ghost Halloween Mini Cakes Recipe so fun is how easy it is to customize the look and theme to fit your vibe or dietary needs—whether you want spookier colors or a dairy-free frosting.
- Dairy-Free Version: Swap out buttercream frosting for a coconut oil-based frosting—I’ve done this, and it still pipes beautifully!
- Chocolate Lover’s Variation: Use a rich chocolate cake base, then tint your frosting with deeper autumnal shades—my family goes crazy for this one.
- Spice It Up: Add pumpkin pie spices or cinnamon to the batter for that extra fall warmth; when I first tried this, it made the mini cakes taste like cozy hugs.
- Color Mix-ups: Instead of traditional Halloween colors, try pastel versions for a more whimsical twist—kids really enjoyed this fresh take at last year’s party.
How to Make Pumpkin and Ghost Halloween Mini Cakes Recipe
Step 1: Bake Your Mini Cakes to Perfection
Start by preparing your cake batter according to your favorite recipe or cake mix directions—simple, right? Bake your mini cakes until a skewer comes out clean, then cool them completely before decorating. One tip I learned is to let the cakes cool in the pans for about 10 minutes before turning them out—that helps avoid any crumbling. And if you want to mix it up, brownies work beautifully here too—they offer a denser texture perfect for decorating.
Step 2: Tint and Prepare Your Frosting
This part is like your Halloween art class. Divide your vanilla buttercream frosting into five smaller portions—around half a cup each works well. Use the gel food colorings to tint the frosting in rose, sky blue, lemon yellow, orange, and black. Pro tip: gel colorings are stronger than liquid ones, so start with a tiny amount and build up to your desired shade. Once colored, fit the rose, blue, yellow, and orange frostings into piping bags fitted with a medium round tip (like a tip 8). The black frosting goes into its own piping bag with a smaller round tip (tip 3) for the delicate facial features.
Step 3: Decorate Your Mini Cakes Like a Pro
Now the fun really begins. Use your colored frostings and tip 8 to pipe layers onto your mini cakes, shaping pumpkins and ghost forms. I like to build up a rounded base and smooth it with a small spatula for a neat finish—this gives the cakes a clean canvas to work on. After that, switch to the black icing and smaller tip to add expressive faces: big eyes, spooky smiles, or surprised ghosts. Don’t be afraid to get creative here; my family always enjoys guessing who each mini cake is supposed to be! If you’re worried about perfect piping, practice on parchment paper first—that’s what helped me nail my designs.
Pro Tips for Making Pumpkin and Ghost Halloween Mini Cakes Recipe
- Use Gel Colors Sparingly: A little gel color goes a long way. Start with just a drop, so your frosting stays nice and thick, perfect for piping.
- Room Temperature Frosting: Always work with frosting that’s at room temperature—it pipes smoother and blends easier, which I discovered after struggling with cold frosting.
- Practice Your Faces on Paper: Before piping on cakes, a few test runs on parchment will boost your confidence and reduce mistakes.
- Keep Cakes Covered: To prevent drying out, keep the mini cakes loosely covered while you work on them and after decorating.
How to Serve Pumpkin and Ghost Halloween Mini Cakes Recipe
Garnishes
I usually keep garnishes simple so the cute decorations shine, but a light sprinkle of edible glitter or a few candy eyes can add that extra Halloween magic. Sometimes, I like to dust a little powdered sugar around the cakes to look like ghostly mist—it’s subtle but effective. Plus, edible gold stars or little pumpkin-shaped candies complement the colors well.
Side Dishes
These mini cakes pair wonderfully with warm drinks like apple cider or hot chocolate. If it’s a party, serving alongside a small platter of spiced nuts or pumpkin seeds balances the sweetness and keeps your guests happy.
Creative Ways to Present
I love arranging these mini cakes on a dark-colored platter decorated with candy corn and autumn leaves—it really makes the colors pop. For a kid’s party, I’ve used clear cellophane bags tied with Halloween ribbon to give them as take-home treats. Another time, I set them up as part of a themed dessert table with little paper ghost cutouts and pumpkin candles for an immersive spooky setup.
Make Ahead and Storage
Storing Leftovers
I usually store leftover mini cakes in an airtight container in the fridge, where they keep fresh for 2–3 days. Let them come to room temperature before serving again to enjoy the frosting’s smoothness. This method has saved me from last-minute baking during busy Halloween weeks!
Freezing
Freezing works well if you want to prep in advance. I tightly wrap each mini cake in plastic wrap, then place them in a freezer-safe container or bag. When you’re ready to enjoy, thaw them overnight in the fridge and bring to room temp before serving. The key is wrapping well to avoid freezer burn and to preserve the frosting’s charm.
Reheating
These mini cakes don’t really need reheating. I prefer eating them cool or at room temperature since warming tends to melt the frosting. But if you do want to warm them slightly, I recommend just 10–15 seconds in the microwave on low power—you don’t want the decorations to lose their shape!
FAQs
-
Can I use store-bought cake mix for this recipe?
Absolutely! A good-quality store-bought cake mix works perfectly for this recipe—just follow the package instructions. Many times I have used a yellow or chocolate cake mix with great results, so feel free to save time and still enjoy delicious mini cakes.
-
What’s the best way to achieve vibrant icing colors?
Gel food colorings are your best bet for bright, vivid frostings without affecting texture. I recommend adding the gel color inch by inch and mixing well, so you get just the intensity you want without thinning your buttercream.
-
How do I pipe faces neatly on the mini cakes?
Practice makes perfect! Try piping on parchment paper before decorating your cakes. Use a small piping tip and steady hands. If you accidentally mess up, gently scrape off the black icing with a small spatula and try again.
-
Can these mini cakes be made ahead of time?
Yes, you can bake and frost the mini cakes a day or two ahead. Store them covered in the fridge, and take them out an hour before serving to let them come to room temperature for best texture and flavor.
Final Thoughts
This Pumpkin and Ghost Halloween Mini Cakes Recipe holds a special place in my heart every fall. From the first time I tried piping those cheerful, spooky faces, I knew these mini cakes would become a seasonal favorite. They’re perfect for sharing laughs, creating memories, and delighting both kids and adults alike. Trust me, once you try this recipe, you’ll be looking for any excuse to whip up these little treats year after year. So grab your piping bags, invite a few friends to join you in the kitchen, and make some Halloween magic happen!
Print
Pumpkin and Ghost Halloween Mini Cakes Recipe
- Prep Time: 1 hr 45 min
- Cook Time: 1 hr 45 min
- Total Time: 3 hr 30 min
- Yield: 6 mini cakes
- Category: Dessert
- Method: Baking
- Cuisine: American
- Diet: Vegetarian
Description
Create festive Pumpkin and Ghost Halloween Mini Cakes perfect for a spooky celebration. This beginner-friendly recipe uses a favorite cake mix base with colorful, tinted buttercream frostings to decorate charming mini cakes in vibrant Halloween colors. Ideal for parties or seasonal treats, these mini cakes combine easy baking with fun, creative decorating techniques.
Ingredients
Cake Base
- 1 batch Favorite Cake Mix or Chocolate Cake Recipe (as per the chosen cake mix instructions)
Frosting and Food Coloring
- Easy Vanilla Buttercream Frosting, divided into 1/2 cup portions
- Lemon Yellow Icing Color, 1 oz.
- Lemon Yellow Gel Food Coloring, 1 oz.
- Black Food Coloring Icing Color, 1 oz.
- Black Gel Food Coloring, 1 oz.
- Rose Icing Colors Pink Food Coloring, 1 oz.
- Rose Gel Food Coloring, 1 oz.
- Orange Icing Color, 1 oz.
- Orange Gel Food Coloring, 1 oz.
- Sky Blue Food Coloring, 1 oz.
- Sky Blue Gel Food Coloring, 1 oz.
Instructions
- Bake cakes. Prepare the cake batter by following the directions on your favorite cake mix or use the chocolate cake recipe. Pour the batter into mini cake pans and bake until a toothpick inserted comes out clean. Allow the cakes to cool completely in the pan before removing them carefully.
- Tint frosting and prepare decorating bags. Divide the vanilla buttercream frosting into several 1/2 cup portions. Tint each portion separately with rose, sky blue, lemon yellow, and orange colors using the respective coloring gels or liquid icings. Place each tinted frosting into decorating bags fitted with tip 8 for piping. Put about 1/4 cup of black frosting in a decorating bag fitted with a smaller tip 3 for finer details.
- Decorate cakes. Use the differently colored frostings and tip 8 to pipe the frosting around and on top of the mini cakes to create festive pumpkin and ghost designs. Smooth the icing gently with a spatula to refine the shapes. Use the black frosting and tip 3 to pipe on facial features such as eyes, mouths, and other Halloween-themed accents. Smooth with a spatula if needed to perfect the details.
Notes
- Ensure cakes are completely cooled before frosting to prevent melting.
- Use gel food coloring for more vibrant frosting colors without thinning the consistency.
- Experiment with different tip sizes for varied decorative effects.
- These mini cakes can be prepared a day ahead and stored in an airtight container to keep fresh.
- Optional: Substitute cake mix with brownie mix for a richer flavor and denser texture.
Nutrition
- Serving Size: 1 mini cake
- Calories: 320
- Sugar: 28g
- Sodium: 210mg
- Fat: 15g
- Saturated Fat: 9g
- Unsaturated Fat: 5g
- Trans Fat: 0g
- Carbohydrates: 42g
- Fiber: 1g
- Protein: 3g
- Cholesterol: 45mg


