
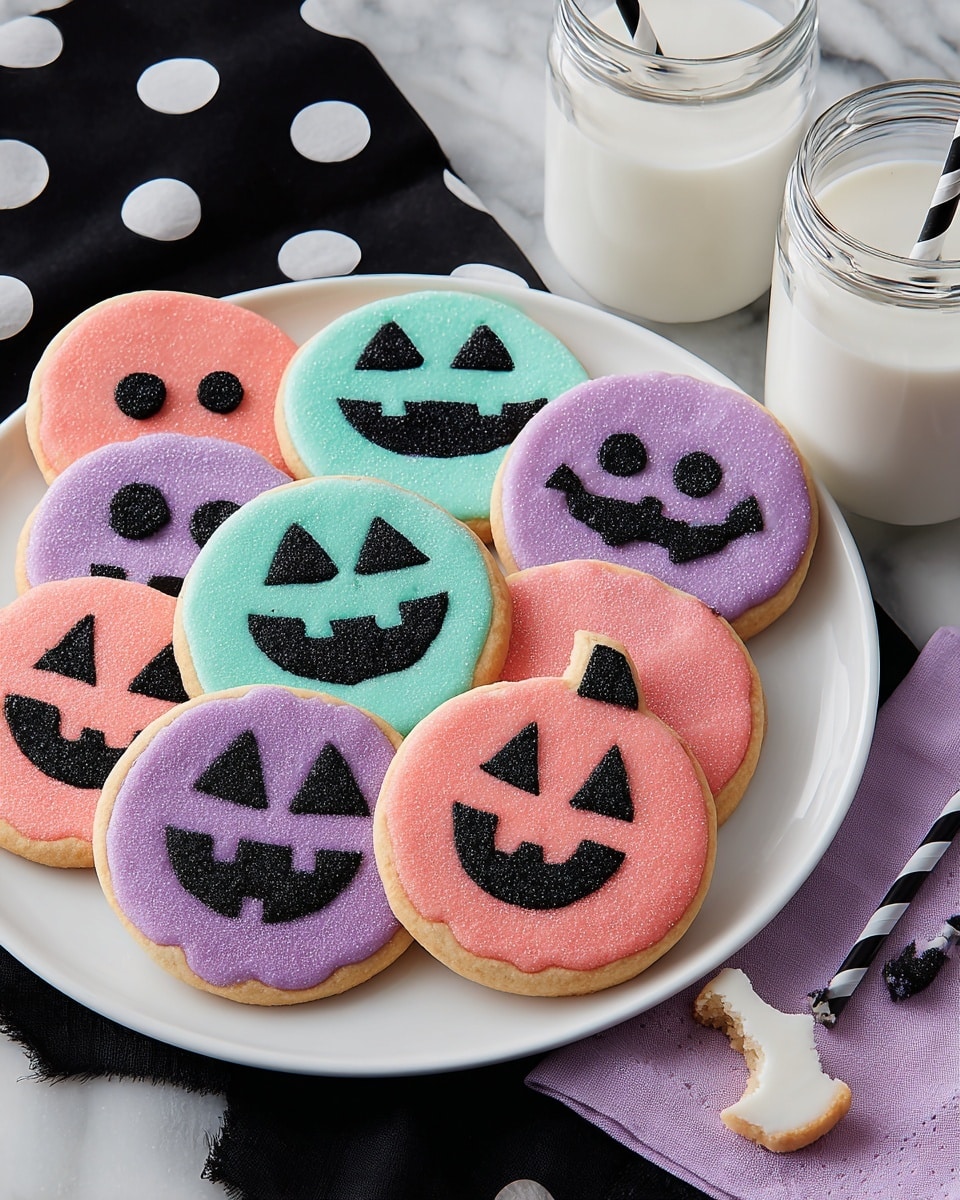
If you’re looking for a festive and fun way to celebrate Halloween with treats that bring both deliciousness and a touch of spooky charm, you’ve got to try this Spooky Face Halloween Sugar Cookies Recipe. These cookies aren’t just your typical sugar cookies – they come bursting with vibrant colors, cute-yet-spooky faces, and a crunchy sugar coating that makes every bite something special. Trust me, once you try this recipe, you’ll find yourself coming back to it year after year!
Why You’ll Love This Recipe
- Vibrant Colors: I love how the mix of pink, violet, and sky blue gives these cookies a spooky yet playful vibe that kids and adults both adore.
- Simple Decorating: You don’t need to be a pro decorator—this recipe uses easy black icing piping and sanding sugar for quick but impressive spooky faces.
- Perfect Texture: These sugar cookies have a soft, buttery center with just enough crunch around the edges, making them utterly irresistible.
- Family Favorite: My family goes crazy for these every Halloween, and I bet yours will too once they taste these festive treats!

Ingredients You’ll Need
These ingredients work magically together to create the perfect roll-out sugar cookie dough that’s easy to color and decorate. Having good quality gel food colors and ready-to-use black icing really simplifies your decorating process.
- Roll-Out Cookie Dough: Use your favorite recipe or store-bought dough—this recipe is super flexible here.
- Pink Gel Food Coloring: Gives the cookies a bright, fun pop of color.
- Violet Gel Food Coloring: When combined with pink, it creates that perfect spooky purple shade for the cookies.
- Sky Blue Gel Food Coloring: Adds an unexpected cool tone that contrasts beautifully with the darker decorations.
- Black Ready-to-Use Icing Tube: Convenient and perfect for piping spooky facial features crisply.
- Black Sanding Sugar: Gives a sparkly, crunchy finish that takes these cookies from cute to candy-level irresistible.
Variations
I’ve played around with colors and decorations over the years, and I really encourage you to make this recipe your own. Halloween is the perfect holiday to get creative and have fun with mixing colors or even cookie shapes!
- Color Variations: I once swapped out the violet for orange and green gel food coloring for a traditional Halloween palette—and it was just as festive and fun.
- Dietary Adjustments: Using gluten-free dough or alternative sweeteners works really well, just make sure your dough can roll out smoothly for decorating.
- Decorating Complexity: If you want to get fancy, try adding edible glitter or tiny candy eyes on top of the black icing facial features for extra spooky detail.
- Cookie Shapes: Although I use a round cutter here, Halloween-themed cutters like pumpkins or ghosts work beautifully too.
How to Make Spooky Face Halloween Sugar Cookies Recipe
Step 1: Prep and Color the Dough
This part is fun and lets you get hands-on with your dough colors. After preparing your roll-out sugar cookie dough per your favorite recipe, divide it into three portions. Tint one with pink gel food coloring, another with sky blue, and mix pink and violet gels for the last portion to get that signature spooky purple. Mix until the colors are vibrant and even—trust me, this coloring step makes the cookie magic happen.
Step 2: Cut and Bake Your Cookies
Roll out each colored dough portion evenly to about ¼ inch thickness on a lightly floured surface. Use a round cookie cutter to cut out shapes—round cookies give you the perfect canvas for spooky faces. Transfer them to a baking sheet lined with parchment paper, then bake according to your dough recipe’s directions. Once baked, be sure to let the cookies cool completely—you don’t want your icing to melt before you decorate!
Step 3: Decorate with Spooky Faces
This is where the fun really begins. Using the black ready-to-use icing tube, pipe on spooky facial features like eyes, crooked grins, or little fangs. Don’t worry about perfection here; the charm is in the spooky handmade look. Immediately after piping, sprinkle black sanding sugar over the icing while it’s still wet to add an extra sugary crunch. Shake off any excess sugar gently, and voilà—your spooky sugar cookies are ready!
Pro Tips for Making Spooky Face Halloween Sugar Cookies Recipe
- Even Thickness: I make sure my rolled dough is the same thickness throughout by using rolling pin guides—this avoids uneven baking and cookie warping.
- Cool Completely Before Decorating: I learned the hard way that warm cookies make the icing melt; patience here pays off for crisp decorating.
- Use a Steady Hand or Toothpick: For more precise facial features, sometimes I outline with the icing tube then smooth with a toothpick for fine details.
- Don’t Overload Sanding Sugar: Too much sugar weighs down the cookies; gently tap off the excess for that perfect sparkle without sogginess.
How to Serve Spooky Face Halloween Sugar Cookies Recipe
Garnishes
I usually keep garnishes simple with these cookies—just the black sanding sugar adds enough fun sparkle. For parties, I like placing a few edible googly eyes or tiny candy bats on plates alongside the cookies for extra Halloween flair.
Side Dishes
These cookies pair beautifully with hot apple cider or a spooky-themed punch. I’ve also served them alongside pumpkin spice cupcakes or a creamy vanilla pudding for a festive Halloween dessert spread.
Creative Ways to Present
One of my favorite presentation ideas is to arrange these cookies on a tiered serving tray, alternating the pink, violet, and sky blue cookies. Another fun idea: place each cookie inside a mini clear cellophane bag tied with a black and orange ribbon—for cute party favors!
Make Ahead and Storage
Storing Leftovers
I store leftover cookies in an airtight container at room temperature. They stay fresh and soft for up to a week, though in my house, they rarely last that long! Adding a slice of bread to the container helps keep them soft—trust me, it really works.
Freezing
I’ve had great success freezing these cookies after baking and cooling but before decorating. I just wrap them well in plastic wrap and store them in a freezer-safe bag. When I’m ready to decorate, I let them thaw completely at room temperature.
Reheating
Since these are sugar cookies, they’re best enjoyed at room temperature. If you want to freshen them up a bit, I briefly warm them in the microwave for 5-7 seconds—just enough to soften them without melting the decorations.
FAQs
-
Can I use regular liquid food coloring instead of gel?
You can, but gel food coloring gives much more vibrant colors without watering down your dough. If you only have liquid coloring, add it sparingly to avoid affecting the dough texture.
-
How do I prevent my cookies from spreading too much?
Chilling the dough before rolling and cutting really helps keep cookies from spreading. Also, avoid greasing the baking sheet too heavily—parchment or silicone mats work best.
-
Can I make these cookies without sanding sugar?
Absolutely. The sanding sugar adds texture and sparkle, but the cookies will still taste fantastic without it, especially if you want a smoother look.
-
What’s the best way to pipe spooky facial features if I’m a beginner?
Start with simple shapes like dots for eyes and a zigzag line for a mouth. Use a small nozzle on your icing tube or even a plastic bag with a tiny punctured corner. Practice on parchment paper before decorating your cookies.
-
Is this Spooky Face Halloween Sugar Cookies Recipe kid-friendly?
Definitely! Kids love helping with coloring the dough and simple decorating. Plus, the colorful spooky faces make for a fun interactive baking experience.
Final Thoughts
Honestly, I absolutely love how this Spooky Face Halloween Sugar Cookies Recipe brings a little extra joy and whimsy to my Halloween celebrations. Whether you’re baking with family or hosting a party, these cookies add that perfect spooky sweetness and color that everyone appreciates. Plus, decorating them is a blast and gives you a chance to get creative without pressure. So grab your mixing bowl and some cookie cutters—you really can’t go wrong with this recipe, and I’m sure it will become a Halloween tradition in your kitchen just like it did in mine!
Print
Spooky Face Halloween Sugar Cookies Recipe
- Prep Time: 20 minutes
- Cook Time: 12 minutes
- Total Time: 32 minutes
- Yield: Approximately 24 cookies depending on dough thickness and cutter size
- Category: Dessert
- Method: Baking
- Cuisine: American
Description
Create festive and spooky face Halloween sugar cookies perfect for celebrating the season. These colorful cookies are made from a classic roll-out dough, tinted with vibrant pink, sky blue, and violet gel food colorings, baked to golden perfection, and decorated with black icing and sanding sugar to add eerie facial features that delight all ages.
Ingredients
Cookie Dough
- Roll-Out Cookie Dough, amount as needed per recipe
Food Coloring
- Pink Gel Food Coloring, 1 oz
- Sky Blue Gel Food Coloring, 1 oz
- Violet Gel Food Coloring (mix of pink and violet), 1 oz
Decoration
- Black Sanding Sugar, 3.25 oz
- Black Ready-to-Use Icing Tube, 4.25 oz
Instructions
- Prepare Dough and Bake: Follow your roll-out cookie dough recipe directions to prepare the dough. Divide the dough evenly into three portions. Tint one portion pink, one sky blue, and one violet by combining pink and violet gel food colorings. Roll out each colored portion and cut shapes using a round cookie cutter. Bake the cookies according to your recipe’s baking time and temperature, then allow them to cool completely.
- Decorate Cookies: Using tip 3 on the black ready-to-use icing tube, carefully pipe spooky facial features onto each cookie. Once the icing is piped, sprinkle black sanding sugar over the faces to add texture and enhance the spooky effect. Shake off any excess sanding sugar to leave a clean, decorated finish.
Notes
- Ensure cookies are completely cooled before decorating to prevent icing from melting.
- Violet icing can be created by blending pink and violet gel food colorings to achieve the desired shade.
- Use a piping tip #3 for detailed line work on facial features.
- Excess sanding sugar can be gently tapped off to avoid clumping on the icing.
- Store decorated cookies in an airtight container to keep them fresh.
Nutrition
- Serving Size: 1 cookie (approx. 30g)
- Calories: 120 kcal
- Sugar: 12 g
- Sodium: 90 mg
- Fat: 5 g
- Saturated Fat: 3 g
- Unsaturated Fat: 2 g
- Trans Fat: 0 g
- Carbohydrates: 17 g
- Fiber: 1 g
- Protein: 1 g
- Cholesterol: 10 mg


