
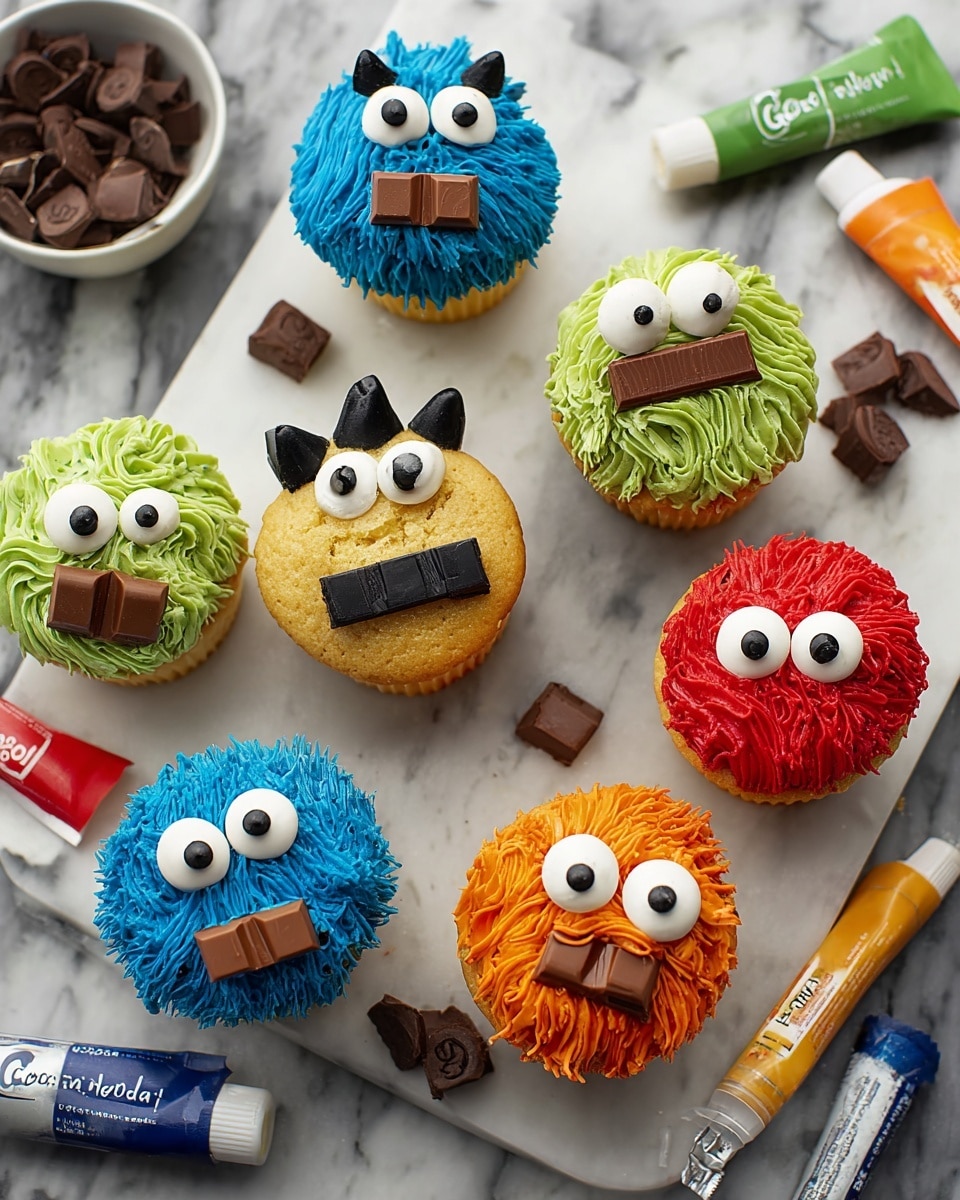
If you’re on the hunt for a playful, show-stopping treat that’s as fun to make as it is to eat, I have to share this Monster Mouthful Cupcakes Recipe with you. Trust me, these cupcakes aren’t just any ordinary sweet—they’re a whimsical little monster party on a plate, guaranteed to bring smiles and maybe even a few giggles. Whether it’s a kid’s party or just a fun weekend baking session, these cupcakes have this fantastic way of stealing the spotlight. Let’s dive in, and I’ll walk you through everything you need to know to nail them perfectly!
Why You’ll Love This Recipe
- Playful and Unique: These cupcakes bring creativity and fun to any occasion, making dessert a highlight.
- Beginner Friendly: Even if you’re new to decorating, the step-by-step makes it super manageable.
- Customizable Designs: Multiple monster styles mean you can mix and match to suit your vibe.
- Crowd-Pleaser: My family goes crazy for these spooky-cute cupcakes, especially during parties.

Ingredients You’ll Need
The magic behind the Monster Mouthful Cupcakes starts with a solid base cupcake and colorful icings and decorations that bring those monster faces alive. You’ll find it’s best to gather up some fun candy eyeballs and a variety of icing colors before you get started.
- Favorite Cupcake Recipe: Use your go-to vanilla or chocolate cupcake recipe or a trusted mix to keep things simple and tasty.
- Large Candy Eyeballs: These are the stars of the show—make sure to get a good size to really make those monsters pop.
- Black and White Candy Eyeball Sprinkles: Perfect for adding extra eye details and texture.
- Blue Icing Pouch: Ready-to-use vanilla-flavored icing works wonders and saves prep time.
- Red Icing Pouch: For vibrant monster mouths and fun zigzag patterns.
- Yellow Icing Pouch: Ideal for bold shapes like triangles around the mouth.
- Orange Icing Pouch: Brings warm, spiky “fur” texture to your orange monsters.
- Green Icing Pouch: Great for star-shaped frosting bursts giving the green monster a wild look.
- Black Icing Pouch: Essential for piping mouths, lashes, and fine details.
Variations
One of the things I love about the Monster Mouthful Cupcakes Recipe is how flexible it is. You can customize colors, add your own monster features, or even switch up the base flavor to suit your mood or occasion.
- Flavor Swaps: I’ve tried swapping the vanilla cupcakes for pumpkin spice during fall, and it was a huge hit with friends.
- Allergy-Friendly: Use dairy-free or gluten-free cupcake mixes and icings, so everyone can enjoy these monsters safely.
- Extra “Fur”: Try adding shredded coconut dyed with food coloring to create fuzzy monster fur instead of or alongside the piped stars.
- Seasonal Monsters: During holidays, I tweak colors—greens and reds for Christmas monsters or pastel shades for a springtime twist.
How to Make Monster Mouthful Cupcakes Recipe
Step 1: Bake Your Cupcakes to Perfection
Start by baking your favorite cupcake recipe as per the directions—whether from scratch or mix. I always make sure not to overbake, which keeps the cupcakes moist and perfect for decorating. Once baked, let them cool completely on a wire rack. This cooling step is crucial because piping icing on warm cupcakes will make everything melt into a gooey mess, and no one wants that.
Step 2: Create Monster Mouths with Black Icing
Using your black icing pouch, pipe a mouth shape onto each cupcake’s surface. You can get creative here—some mouths are smiles, others are crooked or monster-like grins. Don’t worry about perfection; a little unevenness adds personality. After piping, gently smooth the edges with a small spatula or the back of a spoon. This gives you a nice canvas for adding all those monster “fur” details.
Step 3: Add the Monster Fur and Eyes
This is the fun part, and where the monsters truly come alive! Depending on the color, use the piping bags to add textures:
- Green Monster: Pipe star shapes using the star tip, pulling the tip straight up to get those classic spiky “fur” points. Make sure the stars are close together to avoid gaps. Top each cupcake with one large candy eyeball right on the frosting.
- Orange Monster: Same star technique as green, but with the orange icing for a fiery fuzzy look. These monsters get two candy eyeballs perched on top like they’re double checking if you’re ready.
- Blue Monster: Use the round tip to pipe overlapping loops that look like little squiggly lines, covering the cupcake surface for a wispy effect. Add three candy eyeballs on top, spacing them evenly across. With your black icing and round tip, pipe three little lash lines onto the middle eyeball for some extra character.
- Red Monster: Pipe zigzag lines around the black mouth using the red icing with a round tip. This up-and-down motion creates fun texture around the mouth, and feel free to vary the width as you go for that wild monster vibe. Add two candy eyeballs spaced apart, then pipe three lashes on each eye using black icing.
- Yellow Monster: Pipe triangle shapes around the mouth opening with the yellow icing to create a sharp, toothy effect. Keep the triangles overlapping as you spread them to the edge. Top with two candy eyeballs and don’t forget to add lashes with black icing.
Pro Tips for Making Monster Mouthful Cupcakes Recipe
- Work with Room Temperature Cupcakes: This helps the icing stick better and prevents melting or sliding off.
- Practice Your Piping Strokes: I like to practice each tip’s technique on parchment paper first to get comfortable with pressure and motion.
- Use Small Spatulas or Toothpicks: Handy for smoothing black mouth icing edges or tweaking details without ruining surrounding frosting.
- Don’t Rush Decorating: Take breaks between colors to avoid mixing and to let layers set slightly for cleaner looks.
How to Serve Monster Mouthful Cupcakes Recipe
Garnishes
I love keeping the garnishes playful but minimal to avoid overwhelming the design. Usually, the large candy eyeballs are enough, but I sometimes sprinkle a few black and white candy eyeball sprinkles around the monsters’ edges for extra creepy-cuteness. For a touch of sparkle, edible glitter sprinkled lightly over the frosting works wonders without taking away the monster vibe.
Side Dishes
Pair these cupcakes with simple sides that keep the focus on these decorative treats. Think a fresh fruit platter for a pop of color or a nice cold milk glass for dunking. For Halloween or theme parties, I like to add some spooky punch or colorful lemonade to round out the monster snack table.
Creative Ways to Present
For special occasions, I arrange the cupcakes on a tiered serving platter with some faux monster eyes tucked around the tiers. I also like placing each cupcake in cute themed liners or little monster cupcake wrappers for an extra festive touch. Another fun idea is to add mini monster flags made of toothpicks and paper for personalized monster names!
Make Ahead and Storage
Storing Leftovers
Any leftover Monster Mouthful Cupcakes I store in an airtight container in the fridge to keep them fresh. They hold well for about 3-4 days, though those cute piped icings might soften slightly, so enjoy within the first couple days for ideal texture.
Freezing
I’ve also frozen these cupcakes before, especially when I bake ahead for parties. Wrap each cupcake individually in plastic wrap, then place in a freezer-safe container. They freeze well for up to a month. Just be gentle when unwrapping so the icing stays intact.
Reheating
When you’re ready to enjoy frozen cupcakes, let them thaw overnight in the fridge. I recommend serving them at room temperature—avoid microwaving because it can melt the icing and candy eyes. With a little patience, the cupcakes taste just as fresh as when you first made them.
FAQs
-
Can I use homemade frosting instead of the icing pouches?
Absolutely! While the ready-to-use icing pouches make decorating quick and consistent, you can definitely pipe these monster designs with homemade buttercream or cream cheese frosting. Just make sure to use piping bags with appropriate tips to mimic the shapes mentioned—stars, dots, and zigzags.
-
What cupcake flavors work best with this recipe?
Vanilla and chocolate are classic choices that pair really well with colorful icings and candy eyes. That said, I’ve had success with fun flavors like red velvet, pumpkin spice, and even funfetti for a festive twist. The key is a flavor that doesn’t overpower the playful decorations.
-
How do I keep the candy eyeballs from sliding off?
Make sure the frosting is firm enough to hold them in place—letting the cupcakes cool completely before decorating helps. Also, gently pressing the eyeballs slightly into the frosting without disturbing the design too much will anchor them well.
-
Can I make these cupcakes ahead for a party?
Yes! You can bake the cupcakes a day or two ahead and store them tightly covered in the fridge. For best results, decorate them a few hours before serving, especially if you’re using perishable icings or delicate candy eyes.
Final Thoughts
Honestly, this Monster Mouthful Cupcakes Recipe holds a special place in my baking heart because it brings out the kid in me every time. I love watching friends and family’s faces light up when they see these quirky little monsters come to life. If you want to impress without stress and have fun while you’re at it, this recipe is your go-to. Give it a try—you’ll be so thrilled with the results, and your crew might just beg you to make them again!
Print
Monster Mouthful Cupcakes Recipe
- Prep Time: 45 minutes
- Cook Time: 1 hour
- Total Time: 1 hour 45 minutes
- Yield: 12 cupcakes
- Category: Dessert
- Method: Baking
- Cuisine: American
Description
These Monster Mouthful Cupcakes are a fun and spooky treat perfect for Halloween or any monster-themed party. With colorful icing designs and candy eyeballs, each cupcake is decorated to resemble a unique monster with vivid textures and playful details. Easy to make with your favorite cupcake recipe and ready-to-use icing pouches, these cupcakes will delight kids and adults alike.
Ingredients
Cupcakes
- 4 1/2 cups of your favorite cupcake recipe batter
Decorations
- Large Candy Eyeballs
- Large Edible Black and White Candy Eyeball Sprinkles, 1 oz.
- Blue Icing Pouch, ready-to-use with round tip, 8 oz.
- Red Icing Pouch, ready-to-use with round tip, 8 oz.
- Yellow Icing Pouch, ready-to-use with round tip, 8 oz.
- Orange Icing Pouch, ready-to-use with star and round tips, 8 oz.
- Green Icing Pouch, ready-to-use with star and round tips, 8 oz.
- Black Icing Pouch, ready-to-use with star and round tips, 8 oz.
Instructions
- Bake Cupcakes: Prepare your cupcake batter according to your favorite recipe and bake the cupcakes as instructed on the recipe or package. Once baked, allow the cupcakes to cool completely before decorating.
- Decorate with Black Icing Mouth: Using the black icing pouch fitted with an appropriate tip, pipe a mouth shape onto each cupcake. Smooth the shape gently with a spatula to create a base for the monster designs.
- Green Monster Decoration: Using the green icing pouch with the star tip, pipe stars onto the cupcake by pulling the tip straight up and away. Pipe stars close together, slightly adjusting the tip position to eliminate gaps, covering the cupcake surface. Place one large candy eyeball on top of the frosting to complete the monster eye.
- Orange Monster Decoration: Repeat the star piping technique with the orange icing pouch using the star tip, covering the entire cupcake surface. Position two candy eyeballs above the frosting for eyes.
- Blue Monster Decoration: Using the blue icing pouch with the round tip, pipe overlapping loops resembling slightly squiggly lines all over the cupcake surface. Top with three candy eyeballs arranged on the frosting. Use black icing with the round tip to pipe three pull-out lash lines on the center eyeball for added detail.
- Red Monster Decoration: Use red icing with the round tip to pipe zig-zag lines around the mouth area of the cupcake. Use an up and down motion with steady pressure, ending the lines by stopping pressure and pulling the tip away. For elongated zigzags, move your hand vertically while maintaining pressure; for a relaxed look, increase width by moving the bag sideways. Add two candy eyeballs spaced apart on the frosting and pipe three black lash lines on each eyeball.
- Yellow Monster Decoration: With yellow icing and round tip, pipe triangular shapes around the mouth opening, overlapping them until edges of cupcake are covered. Place two candy eyeballs on top and use black icing to add three pull-out lash lines on each eyeball.
Notes
- Ensure cupcakes are completely cooled before decorating to prevent icing from melting.
- Adjust the number of candy eyeballs according to your preference or theme.
- Use piping bags or icing pouches with tips as specified for best texture and effect.
- These cupcakes can be made a day ahead and stored in an airtight container to maintain freshness.
- Substitute any icing colors with similar colors if certain pouches are not available.
Nutrition
- Serving Size: 1 cupcake
- Calories: 380
- Sugar: 32g
- Sodium: 150mg
- Fat: 18g
- Saturated Fat: 7g
- Unsaturated Fat: 9g
- Trans Fat: 0.5g
- Carbohydrates: 50g
- Fiber: 1g
- Protein: 3g
- Cholesterol: 45mg

