
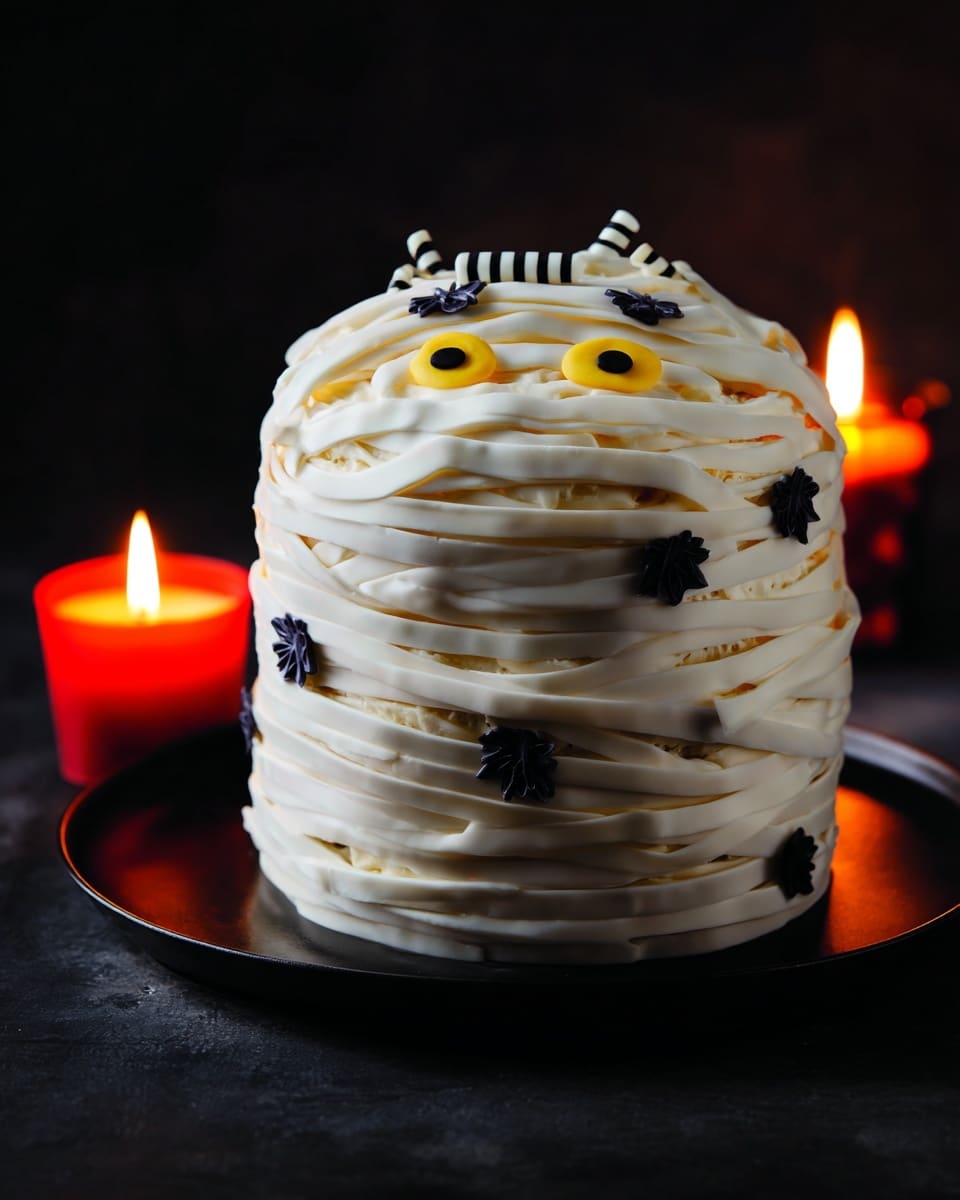
If you’re searching for a truly show-stopping Halloween treat, you’re going to fall head over heels for this Mummy Mallow Cake Recipe. I absolutely love this cake because it’s playful, delicious, and surprisingly easy to pull off—plus, it brings just the right spooky vibe to the party! Whether you’re baking for the kids or just want to wow your guests, this recipe combines a fluffy vanilla sponge with a coconut-cherry filling and a fun mummy face made from marshmallows and liquorice. Stick around, because I’m going to walk you through every step and share my insider tips to make sure your cake turns out perfectly!
Why You’ll Love This Recipe
- Delightfully Themed: The mummy design brings Halloween fun without being too spooky for little ones.
- Moist & Fluffy Sponge: Thanks to a perfect balance of ingredients and techniques, the layers stay light and tender.
- Simple yet Impressive: It looks like a professionally decorated cake but doesn’t require advanced skills.
- Customizable Filling & Toppings: You can easily tweak the jam or decorations to fit your taste or occasion.

Ingredients You’ll Need
The ingredients in the Mummy Mallow Cake Recipe work harmoniously to create a moist and flavorful cake that’s perfect for Halloween. I always recommend using the best quality butter and vanilla paste you can find—they make a noticeable difference in flavor. Oh, and the morello cherry jam adds a subtle tartness that really brightens the sweetness without overpowering it.
- Morello Cherry Jam: Pick a rich, smooth jam—Tesco’s Finest works beautifully for that nice balance of sweet and tart.
- Desiccated Coconut: Adds a lovely texture and tropical hint to the filling layer.
- Unsalted Butter: Softened to room temperature for easy creaming—don’t substitute with margarine if you want that rich taste.
- Caster Sugar: Gives a fine, even sweetness that blends well into the batter.
- Vanilla Bean Paste: I love this over extract because it has tiny vanilla flecks and a richer aroma.
- Eggs: Use medium eggs, beaten—adding them gradually helps keep the batter smooth.
- Plain Flour: Sift it first to aerate for a lighter fluffier sponge.
- Baking Powder: Essential for the cakes to rise evenly and get that perfect crumb.
- Hot Water: Helps loosen the batter for a tender crumb; make sure it’s just boiled and warm, not hot enough to cook eggs.
- Icing Sugar: For the creamy, smooth icing—make sure it’s superfine.
- Soft Cheese: Gives the icing a slight tang and silky texture.
- Ready Rolled Royal Icing Sheet: The best way to make your mummy wraps look neat and authentic.
- Marshmallows: Use fresh and soft to build the mummy face structure.
- Liquorice Allsorts: Perfect for eyes, eyebrows, and mouth details—fun and colorful.
- Pirate Sprinkles: Adds that spooky decorative touch on the cake sides.
Variations
I’m all about making recipes your own, so feel free to experiment with this Mummy Mallow Cake Recipe! Over the years, I’ve tried a few tweaks that really take it to the next level—or accommodate different dietary needs.
- Fruit Jam Swap: I sometimes switch the cherry jam for raspberry or strawberry—each gives a different fruity note while keeping the look and texture consistent.
- Gluten-Free Version: Using a gluten-free flour blend works well if you want a celebratory cake safe for everyone.
- Dairy-Free Option: Substitute the butter and soft cheese with plant-based alternatives—I’ve done this successfully with coconut-based spreads and vegan cream cheese.
- Decorations Variation: When I feel adventurous, I swap liquorice allsorts for edible eyes and use colored icing strips to make a rainbow mummy for kids’ parties.
How to Make Mummy Mallow Cake Recipe
Step 1: Prep Your Pans and Mix the Batter
First things first: preheat your oven to 180°C (fan 160°C) or gas mark 4. Lightly grease and line three 18cm (7-inch) round cake tins with nonstick baking paper. This step is crucial—if you don’t line your tins well, your beautiful sponge will stick and lose its shape when you remove it.
In a large mixing bowl, cream the softened butter, caster sugar, and vanilla bean paste with an electric mixer until the mixture is very light and fluffy. It usually takes about 2 to 3 minutes on medium-high speed. I learned this trick from my baking mentor—the fluffier this stage, the lighter your cake will be!
Step 2: Incorporate Eggs, Flour, and Water
Now, add the beaten eggs little by little, beating well after each addition. If you notice the mixture looking like it’s about to curdle, stir in a spoonful of flour—that helps keep everything stable and smooth. This is something I had to figure out the hard way before—it really saves the batter.
Next, fold in the rest of the sifted flour mixed with baking powder in stages, alternating with the hot water. Use gentle folding motions so you don’t knock out the air you’ve worked hard to build.
Step 3: Bake Your Cake Layers
Divide the batter evenly between your three prepared tins—aim for about 495g (15½oz) per tin for even layers. Smooth the tops gently with a spatula. Pop them into your oven for 30 to 40 minutes. You’ll know they’re done when they’re golden, risen, and springy to the touch. A clean skewer test is your best friend here—insert it into the middle, and if it comes out clean, the cakes are ready!
After baking, let the cakes cool in their tins for 5 minutes before turning out onto wire racks to cool completely. When cool, trim the tops and edges to get neat, even layers—this makes assembling the mummy look much easier and professional.
Step 4: Prepare the Icing
While your cakes are cooling, make the icing by mixing the soft cheese, softened butter, and icing sugar. Use an electric mixer with the paddle attachment or electric beaters and whip on medium-high speed for about 5 to 7 minutes until pale and fluffy. This gives such a luxurious texture that spreads easily without sliding off.
Step 5: Assemble Your Mummy Mallow Cake
Place a little icing on your cake board to help ‘glue’ the first cake layer in place. Spread half of the cherry jam on top, leaving a small border, then sprinkle over some desiccated coconut. Layer your second cake on top and repeat the jam and coconut. Finish with the last cake layer.
Next, give the cake a rough, thick coat of the cream cheese icing using a palette knife. Don’t fret perfect smoothness here—you want an organic, slightly paddled look that adds to the mummy vibe.
Step 6: Create the Mummy Face and Decorations
For the face, build up a white marshmallow cluster in the center top of the cake. Use yellow and black liquorice allsorts to form eyes, secured with cocktail sticks pushed through the marshmallows and cake. The black allsorts make great eyebrows, and you can create a grinning mouth with striped liquorice sweets.
Unroll your royal icing sheet and cut thin strips to layer across the mummy’s face like wrappings—leave the sides of the cake icing-free for a clean look. Finally, press black skull-shaped liquorice allsorts to decorate the sides and sprinkle pirate sprinkles for that extra creepy flair.
Pro Tips for Making Mummy Mallow Cake Recipe
- Perfect Layering: I always weigh the batter equally between tins to get those perfectly even cake layers—the difference is worth the little extra effort.
- Avoid Soggy Jam Borders: Leave a small margin around the jam when spreading so it doesn’t ooze out when you assemble the layers.
- Stick the Decorations Well: Use cocktail sticks to secure your liquorice eyes and marshmallows—it keeps everything stable, especially if you’re transporting the cake.
- Keep Icing Thick: Don’t skimp on the icing layer; the thicker coverage hides crumbs nicely and gives you better canvas for the mummy “bandages.”
How to Serve Mummy Mallow Cake Recipe
Garnishes
For garnishes, I usually keep it simple—pirate sprinkles on the sides add a fun spooky touch without overwhelming the cake. I’ve also seen friends add edible glitter over the marshmallow ‘bandages’ for a magical twist that shines under party lights. If you want, a few fresh mint leaves around the plate can add a nice pop of color and freshness.
Side Dishes
A slice of this mummy cake pairs beautifully with a classic vanilla custard or even a scoop of good quality dark chocolate ice cream. For a hot drink, I like pairing it with spiced chai tea or a pumpkin latte to keep that cozy Halloween mood going.
Creative Ways to Present
One time, I baked several of these as individual cupcakes and decorated each as mini mummies using the same liquorice and marshmallow technique—so cute for kids’ parties! For a more dramatic effect, try placing the cake on a black cake stand and surround it with cobweb doilies and plastic spiders for a fun Halloween display.
Make Ahead and Storage
Storing Leftovers
Leftover cake keeps well in an airtight container in the fridge for up to 3 days. I found that storing it away from strong odors helps the delicate icing and marshmallows keep their fresh flavor and texture. Before covering, make sure it’s fully cooled and the icing has set slightly to avoid any smudging.
Freezing
If you want to prep in advance, you can freeze the un-iced and undecorated cake layers. Wrap each layer tightly with clingfilm and foil to prevent freezer burn, and they’ll keep well for up to 3 months. When you’re ready, defrost completely at room temperature before assembling and decorating. This trick saved me the day when hosting last-minute parties!
Reheating
I usually don’t reheat this cake because it’s best served fresh or at room temperature, but if you want to warm a slice slightly, a few seconds in the microwave (about 10-15 seconds) works well to soften the icing a little without melting it. Just be careful—not too hot or you’ll lose that lovely texture.
FAQs
-
Can I make the Mummy Mallow Cake Recipe gluten-free?
Absolutely! You can substitute the plain flour with a good-quality gluten-free flour blend that’s designed for baking. Just make sure it includes xanthan gum or similar to help with structure. The texture might be slightly different but still delicious and enjoyable.
-
How far ahead can I assemble and decorate the cake?
It’s best to assemble and decorate your mummy cake on the day you plan to serve it to keep the marshmallows and liquorice looking fresh. You can bake and freeze the sponge layers up to 3 months in advance and then defrost and assemble on the day.
-
What if I don’t have liquorice allsorts for decoration?
No worries! You can get creative with other candies like chocolate chips, mini M&Ms, or fondant decorations. The idea is to create the mummy’s eyes, mouth, and eyebrows, so anything that can be cut or shaped works great.
-
Will the marshmallows melt if I store the cake in the fridge?
Chilling can make the marshmallows a bit sticky but they won’t melt completely. To keep them looking their best, store the cake in a cool room or a cake box outside the fridge if your home isn’t too warm.
Final Thoughts
This Mummy Mallow Cake Recipe is one of those joyful kitchen projects that blends creativity with great taste. I remember the first time I made it for my niece’s Halloween party—her face lit up with pure delight, and so did everyone else’s! It’s a cake that’s fun to make, impressive to serve, and utterly delicious to eat. So go ahead, grab your ingredients, and channel your inner cake artist—your spooky celebration deserves a centerpiece like this. I promise, you’ll want to bake it again and again.
Print
Mummy Mallow Cake Recipe
- Prep Time: 1 hour
- Cook Time: 40 minutes
- Total Time: 1 hour 40 minutes
- Yield: 16 servings
- Category: Cake
- Method: Baking
- Cuisine: British
Description
A fun and festive Mummy Mallow Cake perfect for Halloween parties, featuring a rich vanilla sponge layered with morello cherry jam and coconut, topped with creamy soft cheese icing and decorated with marshmallows, liquorice allsorts, and royal icing strips to create a spooky mummy effect.
Ingredients
For the filling
- 6 tbsp Tesco Finest morello cherry jam
- 2 heaped tbsp desiccated coconut
For the sponge
- 275g unsalted butter, softened
- 375g caster sugar
- 2 tsp vanilla bean paste
- 6 medium eggs, beaten
- 425g (14oz) plain flour, sifted
- 3 tsp baking powder
- 5 tbsp hot water
For the icing
- 200g (1lb) icing sugar
- 125g soft unsalted butter
- 125g (4oz) soft cheese
To decorate
- 200g (7oz) ready rolled royal icing
- 200g (7oz) marshmallows
- 2 x 190g bags liquorice allsorts
- 1 x tub pirate sprinkles
Instructions
- Preheat and Prepare Tins: Preheat your oven to Gas Mark 4, 180°C (fan 160°C). Lightly grease and line three 18cm (7in) cake tins with nonstick baking paper to prevent sticking during baking.
- Cream Butter and Sugar: In a large bowl, use an electric mixer to cream the softened butter, caster sugar, and vanilla bean paste together until the mixture is very light and fluffy, about 2 to 3 minutes. This step aerates the batter for a tender sponge.
- Add Eggs Gradually: Slowly add the beaten eggs one at a time, beating well after each addition. If the mixture starts to curdle, stir in 1 tablespoon of the flour to stabilize it.
- Combine Dry Ingredients and Water: Fold in the remaining sifted flour, baking powder, and hot water in stages, mixing gently until the batter is smooth and well combined.
- Divide Batter and Bake: Pour the batter evenly into the prepared tins, aiming for about 495g (15 1/2oz) per tin for even thickness. Smooth the tops and bake in the preheated oven for 30 to 40 minutes until the cakes have risen, are golden, springy to the touch, and a skewer inserted in the center comes out clean.
- Cool the Cakes: Let the cakes cool in their tins for 5 minutes before carefully removing them onto a wire rack. Allow to cool completely. Once cooled, trim the cakes to level the tops and bottoms for even layers.
- Make the Icing: In a clean bowl, use an electric mixer fitted with a paddle attachment to beat the soft cheese, softened butter, and icing sugar on medium-high speed for 5 to 7 minutes until the icing is pale and fluffy.
- Assemble the Cake: Place a small dot of icing on a 30cm (12in) round cake board to secure the first cake layer. Spread half the morello cherry jam evenly over this layer, leaving a border around the edge, then sprinkle with desiccated coconut. Add the second cake layer on top and repeat the jam and coconut spread. Finish by placing the final cake layer on top.
- Rough Ice the Cake: Using a palette knife, apply the cream cheese icing all over the cake in a thick, rough, and slightly paddled manner for texture, rather than a smooth finish.
- Create the Mummy Face Decoration: Build a white marshmallow mound in the middle of the cake top. Use two yellow and black liquorice allsorts as eyes, securing them into the marshmallows and cake with cocktail sticks. Make eyebrows with black liquorice pieces and form a mouth using striped black and white liquorice sweets.
- Add Royal Icing Strips: Unroll the sheet of royal icing and cut it into thin strips. Layer these strips over the mummy face to mimic bandages, leaving the sides of the cake clear.
- Decorate the Cake Sides: Use black skull liquorice allsorts and pirate sprinkles to decorate the sides of the cake, adding fun and spooky details.
Notes
- To freeze, bake cakes without icing or decoration. Cool completely, wrap in clingfilm and foil, and freeze up to 3 months.
- Defrost cakes wrapped at room temperature for several hours before adding icing or decorations.
- Use cocktail sticks carefully to secure decorations safely, especially for children.
- This cake is best served at room temperature to enjoy the full texture and flavor.
- Trim cake layers evenly to avoid a wonky final cake.
Nutrition
- Serving Size: 1 slice (1/16 of cake)
- Calories: 682 kcal
- Sugar: 81 g
- Sodium: 0.4 g
- Fat: 28 g
- Saturated Fat: 16 g
- Unsaturated Fat: around 10 g
- Trans Fat: 0 g
- Carbohydrates: 105.6 g
- Fiber: 1.2 g
- Protein: 6.8 g
- Cholesterol: approx. 120 mg


