
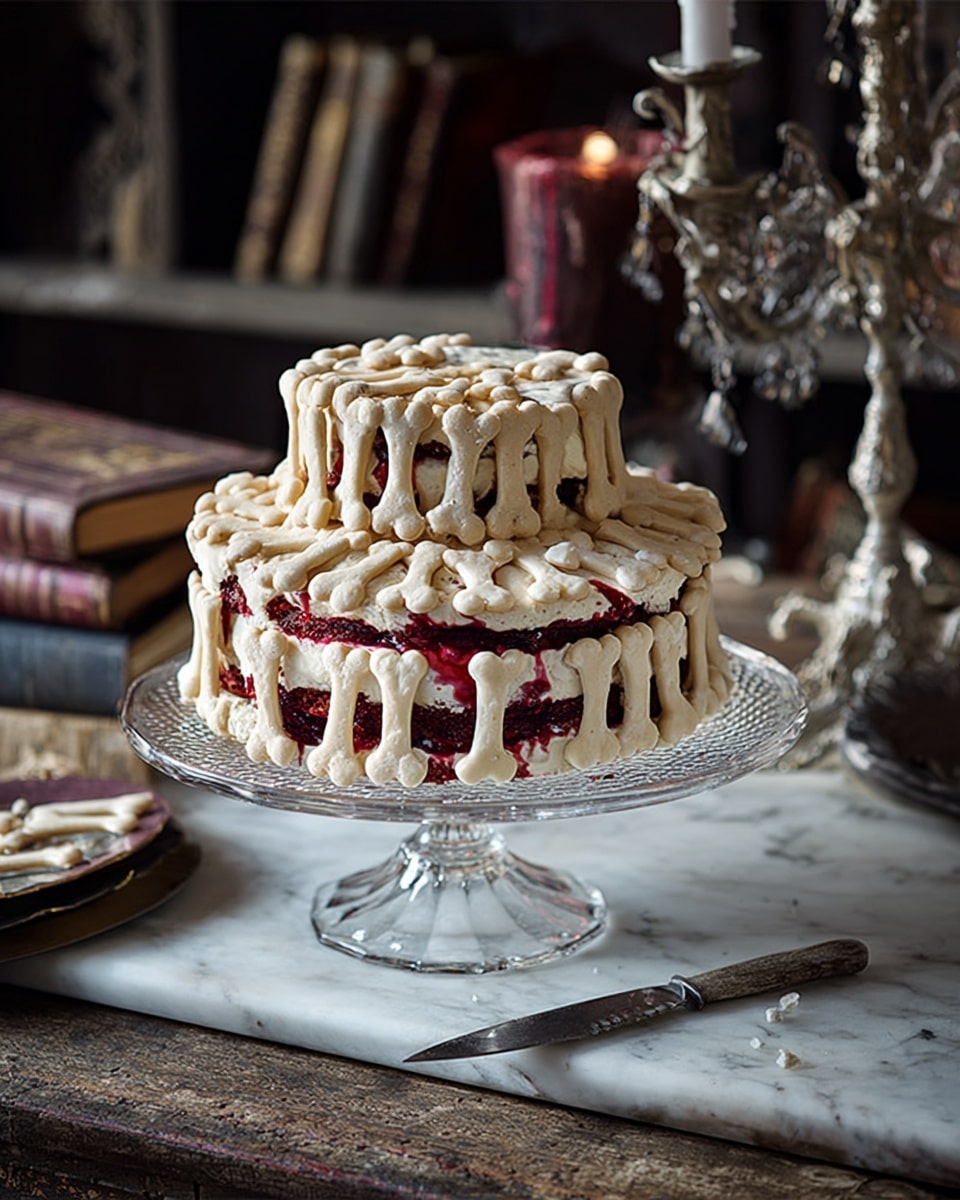
If you’re looking to create a show-stopping dessert that’s perfect for Halloween parties, I absolutely love this Halloween Bone Cake Recipe. It’s not only spooky and visually impressive but surprisingly easy once you get the hang of the meringue bones. Trust me, this cake becomes an instant centerpiece that gets everyone talking and reaching for seconds!
Why You’ll Love This Recipe
- Impressively Themed: The meringue bones give this cake a spooky but elegant vibe that’s perfect for Halloween.
- Simple Ingredients: It uses pantry staples and store-bought cakes to keep things easy without sacrificing wow factor.
- Fun to Make: Piping the bones feels like a little craft project anyone can enjoy, even if you’re not a pro baker.
- Great Crowd-Pleaser: My family goes crazy for this at parties, and I love how it doubles as decor and dessert.

Ingredients You’ll Need
When you gather your ingredients, you’ll find they work well together to create a moist, flavorful cake base and crisp, delicate bones for decoration. Using a high-quality store-bought red velvet cake simplifies the process while the homemade meringue bones add that personal touch.
- Large egg white: Key for making stiff, glossy meringue bones that hold their shape beautifully.
- Caster sugar: Slowly incorporated to stabilize the meringue and keep it smooth without collapsing.
- Vanilla extract: Adds subtle warmth and depth to the egg white meringue.
- Icing sugar: Used in the thick-ish icing that acts like edible glue for the bones.
- Tesco Finest red velvet cake (serves 6 and 14): Perfect for stacking and layering without the fuss of baking from scratch.
Variations
I love how versatile this Halloween Bone Cake Recipe is—you can tweak it to fit your style or dietary needs. Whether you want to try a different cake flavor or switch up the icing, there’s room to make it your own. Don’t be afraid to experiment; that’s part of the fun!
- Flavored Bones: I once tinted the meringue bones light gray with food coloring for an eerie effect, and it was a total hit at my kids’ party.
- Diet-Friendly: For a gluten-free twist, swap the store-bought cakes for gluten-free equivalents; the decorating process remains the same.
- Chocolate Cake Base: Using a rich chocolate cake instead of red velvet adds a deep, moody flavor that pairs beautifully with the white bones.
How to Make Halloween Bone Cake Recipe
Step 1: Whisk the Egg White to Stiff Peaks
Start with one large egg white in a clean, grease-free metal or glass bowl—avoid plastic as it can hold residual fat which stops your egg whites from whipping properly. Whisk on low speed and gradually increase to high, whipping for about 3 minutes until stiff peaks form. You’ll know it’s ready when the peaks stand tall and don’t flop over.
Step 2: Slowly Incorporate the Sugar
Add the caster sugar a tablespoon at a time, whisking thoroughly after each addition. This slow approach prevents your meringue from collapsing and keeps it glossy and smooth. When all sugar is incorporated, whisk in half a teaspoon of vanilla extract for flavor. Spoon the meringue into a piping bag fitted with a 3mm round nozzle.
Step 3: Pipe Your Meringue Bones
On lined baking trays, pipe the bones in two sizes: 6cm long (about 5mm thick) on one tray, and 4cm bones on the other. To form a bone shape, start by piping a small heart, extend a thin line, and finish with another heart. You should be able to make around 50 bones—just the right amount to decorate! Bake at 130°C (fan 110°C) for 45 minutes and then leave them to cool completely.
Step 4: Prepare the Icing “Glue”
Place the smaller cake (serves 6) on top of the larger one (serves 14) to create a tiered effect. Mix icing sugar with ½ to 1 teaspoon of cold water until it reaches a thick yet slightly runny consistency. This icing acts like edible glue—thick enough to hold bones in place, but fluid enough to pipe easily. Transfer it to a piping bag with a 3mm nozzle as well.
Step 5: Attach the Bones to the Cake
Starting with the bottom tier, pipe a dollop of icing onto the back of a long meringue bone and gently press it against the cake’s side. Alternate attaching large and small bones as you work your way around the cake. This layering effect creates dimension and fills out the spooky skeleton look.
Step 6: Fill in Gaps and Finish the Top
Use smaller bones or even broken pieces to fill any empty spaces, tucking them neatly in. Once the lower tier is covered, repeat the process on the top tier. For the grand finale, position crossed bones on the very top to complete your creepy cake centerpiece.
Pro Tips for Making Halloween Bone Cake Recipe
- Use Fresh Egg Whites: Older eggs sometimes whip less effectively—fresh egg whites give the best volume and hold.
- Don’t Rush the Sugar: Adding sugar too fast can deflate the meringue; patience here leads to perfectly glossy bones.
- Consistent Piping Pressure: Keep your piping steady and don’t pause mid-bone to get uniform shapes easily.
- Cool Bones Fully Before Assembling: Warm bones can get soggy or break when moved—letting them cool fully means they stay crisp and sturdy.
How to Serve Halloween Bone Cake Recipe
Garnishes
I like to keep the garnishes subtle to let the bone details shine. A few edible blackberries or dark chocolate shards around the base can add extra color contrast without taking away from the spooky skeleton effect. Sometimes a light dusting of cocoa powder adds a dusty, “ancient bone” vibe that’s fun too.
Side Dishes
Since this cake is rich and sweet, I usually pair it with something light like fresh fruit platters or a crisp green salad if it’s part of a larger Halloween spread. It also goes great with a cup of spiced tea or a chilled autumn cider to balance out the sweetness.
Creative Ways to Present
For maximum spooky impact, try placing your Halloween Bone Cake Recipe on a slate or wooden board sprinkled with edible “dust” made from crushed cookies or cocoa powder. Adding small plastic spiders or faux cobwebs around the cake adds fun spooky details—perfect if you’re hosting kids or a themed party.
Make Ahead and Storage
Storing Leftovers
I keep leftovers covered tightly with plastic wrap and stored in the refrigerator, which helps keep the cake moist. Just keep in mind that the meringue bones lose their crisp texture over time and become chewy, so I usually save the bones for fresh decorating just before serving.
Freezing
Freezing the assembled cake isn’t the best idea due to the delicate bones, but you can freeze the individual red velvet cakes if you want to prep in advance. Meringue bones can be made weeks ahead and stored in an airtight container at room temperature to keep their crunch.
Reheating
For best results, serve the cake chilled or at room temperature. Since this is a cake decorated with fragile meringue, I avoid reheating, as it can soften the bones. If you’re reheating leftover cake layers, do so gently in the microwave or oven before decorating.
FAQs
-
Can I use store-bought meringue for the bones instead of making them?
While store-bought meringues are handy, they usually don’t have the perfect shape or uniform size needed for this bone cake. Making them fresh ensures you get consistent bones to decorate and design the cake as intended.
-
What if my meringue bones break when assembling?
Broken bones can actually be tucked into gaps to fill space and add texture—don’t fret! Just handle them gently and pipe a bit more icing “glue” to keep pieces securely attached.
-
Can I make this cake entirely from scratch, including the red velvet layers?
Absolutely! Using store-bought cakes is a shortcut, but feel free to bake your own red velvet cake layers if you prefer. Just make sure the cakes are fully cooled before stacking and decorating.
-
How long can I make the meringue bones ahead of time?
You can make and store the meringue bones in an airtight container at room temperature for up to 1 week before decorating, which makes party prep stress-free.
Final Thoughts
This Halloween Bone Cake Recipe has become a personal favorite for its whimsical look and approachable technique. I remember the first time I made it, feeling a bit intimidated by the piping, but once those bones came out perfect and the cake was assembled, it was pure magic. You’ll find that it’s easier than it looks and makes any Halloween gathering extra special. Give it a try—you might just start a new festive tradition in your kitchen!
Print
Halloween Bone Cake Recipe
- Prep Time: 30 minutes
- Cook Time: 45 minutes
- Total Time: 1 hour 15 minutes
- Yield: Serves 20
- Category: Dessert
- Method: Baking
- Cuisine: American
Description
Create a spooky Halloween bone cake perfect for a festive party centerpiece using meringue bones and rich red velvet cake layers. This recipe combines delicate homemade meringue shaped like bones and classic red velvet cakes stacked and decorated to impress your guests.
Ingredients
Meringue Bones
- 1 large egg white
- 70g caster sugar
- ½ tsp vanilla extract
Icing
- 50g icing sugar, sifted
- ½-1 tsp cold water
Cake
- 1 Tesco Finest red velvet cake (serves 6)
- 1 Tesco Finest red velvet cake (serves 14)
Instructions
- Whisk to stiff peaks: Preheat the oven to gas mark ½, 130°C, fan 110°C. Line two large baking trays with nonstick baking paper. In a large, clean, non-plastic bowl, whisk 1 large egg white using an electric whisk starting at low speed and gradually increasing to high. Whisk for about 3 minutes or until stiff peaks form.
- Mix in the sugar slowly: Gradually add 70g caster sugar, about 1 tablespoon at a time, whisking well after each addition. Continue until all sugar is incorporated and the meringue is smooth and glossy. Whisk in ½ tsp vanilla extract. Transfer the meringue into a piping bag fitted with a round 3mm nozzle.
- Pipe meringue bones: Pipe bone shapes onto the baking trays: about 6cm long and 5mm thick bones on one tray, and smaller 4cm bones on the other. To shape a bone, pipe a heart shape, then extend the tip into a line ending in a second heart. You should have about 50 meringue bones total. Bake for 45 minutes, then remove and cool completely.
- Make the icing: Place the smaller 6-serving red velvet cake on top of the larger 14-serving cake to create tiers. Mix 50g sifted icing sugar with ½ to 1 tsp cold water until you achieve a thick but slightly runny icing suitable for piping. Spoon the icing into a piping bag fitted with a 3mm nozzle.
- Decorate the cake: Once the meringue bones have cooled, pipe a little icing onto the back of a long bone and gently stick it to the side of the larger bottom cake tier. Attach a short bone next to it, and continue alternating large and small bones to cover the lower tier fully.
- Fill in the gaps: Repeat the decorating process on the top tier by alternating large and small bones. Tuck in smaller bones and any broken meringue pieces to cover any gaps and complete the decoration.
- Finish with crossed bones on top: Finish the cake decoration by placing crossed meringue bones on top to enhance the spooky bone effect.
Notes
- Use a clean, grease-free non-plastic bowl to whip egg whites effectively.
- Add caster sugar slowly to prevent the egg white from collapsing.
- Ensure meringue bones are fully cooled before handling to avoid breakage.
- The icing should be thick enough to hold decorations but runny enough to pipe smoothly.
- Use two different sizes of meringue bones to fill gaps and create visual interest.
- Store the finished cake in a cool, dry place to keep meringue bones crisp.
Nutrition
- Serving Size: 1 slice (1/20th of cake)
- Calories: 320
- Sugar: 28g
- Sodium: 210mg
- Fat: 14g
- Saturated Fat: 7g
- Unsaturated Fat: 5g
- Trans Fat: 0g
- Carbohydrates: 38g
- Fiber: 1g
- Protein: 4g
- Cholesterol: 40mg
