
If you’ve ever wanted a cookie that’s both festive and downright delicious, you’re in for a treat with this Day of the Dead Cookies Recipe. I absolutely love how these cookies not only capture the spirit of Día de los Muertos with their colorful designs but also taste buttery, tender, and just sweet enough to keep you coming back for more. Stick around, because I’m going to share all my favorite tips to get these spooky-cute cookies just right—and trust me, they’re fan-freaking-tastic!
Why You’ll Love This Recipe
- Authentic Flavors: The almond paste infusion adds a subtle nuttiness that makes each bite special.
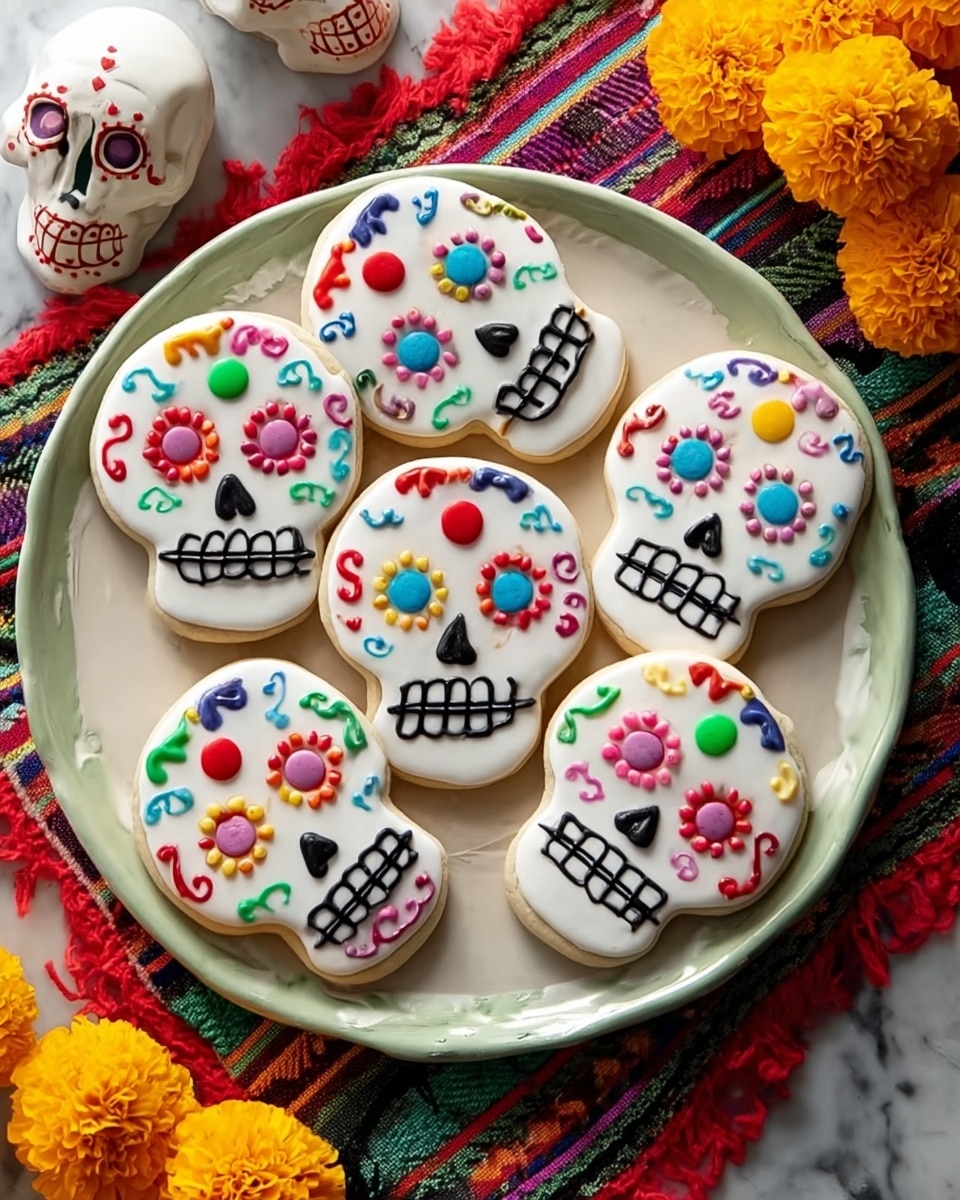
- Beautiful Presentation: Perfectly shaped skull cookies ready for colorful decorating fun.
- Simple to Make: No complicated techniques, just straightforward steps and ingredients you probably already have.
- Endless Customization: You can go classic with white icing or get creative with all sorts of candies and colors.

Ingredients You’ll Need
Every ingredient in this Day of the Dead Cookies Recipe plays an important role—whether it’s the creamy butter that makes the cookies soft or the confectioners’ sugar that ensures they’re melt-in-your-mouth tender. Plus, the almond paste is a little trick I discovered that really elevates the flavor and texture.
- Butter: Use softened butter for easy creaming and a light, fluffy dough.
- Confectioners’ sugar: This helps keep the dough soft and adds a delicate sweetness without graininess.
- Almond paste: Adds richness and a subtle nutty flavor that makes these cookies stand out.
- Egg: Use a room temperature egg; it helps bind everything and adds moisture.
- Milk (2%): Keeps the dough tender without making it too wet.
- Vanilla extract: For warmth and depth in flavor.
- All-purpose flour: The main structure builder—make sure you measure properly for perfect texture.
- Salt: Enhances all the flavors and balances the sweetness.
- White candy coating melts: These are perfect for smooth, easy decorating and create that shiny icing look.
- Optional decorations: Think jumbo sprinkles, peppermint candies, Skittles, or even candy-coated sunflower kernels—whatever you love to make your cookies pop!
- Black paste food coloring: For piping on those iconic creepy-cute skull details.
Variations
What I love most about this Day of the Dead Cookies Recipe is how flexible it is. You can stick to the classic look or switch it up with your favorite colors and candies. I’ve played around with everything from classic pastel icings to bold neon colors, and it’s always a hit.
- Gluten-Free Version: I’ve swapped out all-purpose flour for a gluten-free blend with good success—just make sure your blend has xanthan gum for structure.
- Vegan Adaptation: Using vegan butter, a flax egg, and plant-based milk works well if you need to avoid dairy and eggs.
- Flavor Twists: Adding a hint of orange zest or cinnamon to the dough can add a subtle festive note—my family actually loves the orange twist during the holidays.
- Decoration Styles: You can skip the candy coating melts and opt for royal icing if you want sharper details, though it requires more patience.
How to Make Day of the Dead Cookies Recipe
Step 1: Cream and Chill the Dough
Start by creaming your softened butter and confectioners’ sugar together for about 3-4 minutes until the mixture is light and fluffy—this step is crucial because it gives the cookies their tender crumb. Then, add the almond paste and beat it well to blend those gorgeous nutty flavors throughout. Mix in the egg, milk, and vanilla until everything is smooth. Once your wet ingredients are combined, gradually add the flour and salt, mixing until the dough comes together. Cover and pop the dough in the fridge for at least one hour. Chilling makes rolling the dough out much easier and helps the cookie shapes hold up better during baking.
Step 2: Roll, Cut, and Bake
Lightly flour your surface and roll the dough out to about 1/4-inch thickness. Use a 5-inch skull-shaped cookie cutter—trust me, this size gives you the perfect canvas for decorating without being overwhelming—to cut out your cookies. Make sure to flour the cutter so your shapes come out clean every time. Arrange the cookies about 1 inch apart on ungreased baking sheets; the dough doesn’t spread too much, so no worries about them sticking together. Bake at 375°F (190°C) for about 7-9 minutes, or until they feel firm to the touch. Let them sit on the baking sheet for a couple of minutes before transferring to wire racks to cool completely. This cooling step is important; icing warm cookies can lead to a messy, melty mess.
Step 3: Dip and Decorate
Once your cookies are completely cooled, it’s time to get creative. Melt your white candy coating melts in a shallow microwave-safe dish according to package instructions—stir often to avoid burning. I like to dip just the top side of each cookie into the melted coating, then gently tap off the excess. Place the dipped cookies on waxed paper to set. While the coating is still wet, grab your decorations and press them gently onto the candy coating so they stick well. For that iconic Day of the Dead smile and facial details, tint the remaining white coating black using paste food coloring and pipe on the designs. Let the icing set completely—if you can hold off, they taste even better the next day!
Pro Tips for Making Day of the Dead Cookies Recipe
- Almond Paste Hack: I recommend warming the almond paste slightly in the microwave before mixing so it blends seamlessly without clumps.
- Chill Twice: After cutting the cookies, chill them on the baking sheet for 10-15 minutes before baking to keep the edges sharp and prevent spreading.
- Candy Coating Consistency: If your candy melts seem too thick for dipping, add a teaspoon of vegetable oil or shortening to smooth it out.
- Decoration Timing: Always decorate while the candy coating is tacky—not dry—to ensure your candies stick perfectly without sliding off.
How to Serve Day of the Dead Cookies Recipe
Garnishes
I love topping these cookies with jumbo sprinkles for a burst of color, but peppermint candies and candy-coated sunflower kernels also add such fun textures and pops of flavor. For a nostalgic twist, I sometimes add small pieces of Twizzlers or Good & Plenty candy to give them a playful, retro vibe that my kids adore.
Side Dishes
These cookies pair beautifully with a warm cup of Mexican hot chocolate or a spiced chai tea. I also enjoy serving them alongside fresh fruit platters or even a small cheese board when celebrating with friends—it’s a nice balance between sweet and savory.
Creative Ways to Present
For parties, I’ve arranged the cookies on colorful papel picado beneath glass cloches, which adds a lovely festive touch. Another fun idea is placing each cookie in clear cellophane bags tied with bright ribbons—perfect for gifting or take-home favors. I swear, presentation makes these cookies look even more irresistible!
Make Ahead and Storage
Storing Leftovers
I usually keep leftovers in an airtight container at room temperature for up to 5 days. To preserve the candy coating’s shine and prevent it from getting sticky, I place wax paper sheets between the layers of cookies.
Freezing
If you want to make these ahead for a big party, the unbaked dough can be wrapped tightly in plastic wrap and frozen for up to 3 months. When thawed, just roll and cut as usual. For baked cookies, freezing is a bit trickier because candy melts can lose their smooth texture, but you can freeze the plain cookies and decorate after thawing instead.
Reheating
I don’t recommend reheating decorated cookies—especially those with candy coating—because warmth can make decorations melty. Instead, bring them to room temperature if refrigerated, and they’ll taste fresh and delightful.
FAQs
-
Can I make the dough ahead of time?
Yes! The dough can be made and refrigerated for up to 24 hours before rolling. This actually helps the flavors meld and makes the dough easier to work with.
-
What if I don’t have a skull cookie cutter?
No worries—if you don’t have a skull cutter, you can use any Halloween or autumn-themed cutter like pumpkins, bats, or even simple circles that you can decorate creatively.
-
Can I use royal icing instead of candy melts?
Absolutely! Royal icing gives a matte finish and lets you pipe detailed designs, but it requires more drying time and some experience with icing consistency.
-
How do I prevent cookies from spreading too much?
Chilling your dough after mixing and again after cutting your shapes really helps keep the cookies from spreading too much during baking.
-
Can I substitute almond paste with almond extract?
You could, but almond paste adds moisture and texture that almond extract alone can’t replicate. If you skip the paste, you’ll want to add moisture to compensate so your cookies don’t turn out dry.
Final Thoughts
This Day of the Dead Cookies Recipe has become one of my favorite ways to celebrate this beautiful Mexican tradition right in my kitchen. From the moment you start mixing the dough to when you decorate those happy skulls, it’s a joy-filled baking experience that brings smiles all around. I really hope you give this recipe a try—it’s more than just a cookie; it’s a little celebration on your plate that your family and friends will absolutely love. Happy baking!
Print
Day of the Dead Cookies Recipe
- Prep Time: 2 hours 15 minutes
- Cook Time: 10 minutes
- Total Time: 2 hours 25 minutes
- Yield: 1 dozen (12 cookies)
- Category: Dessert
- Method: Baking
- Cuisine: Mexican
Description
Celebrate the Day of the Dead with these festive and delicious almond sugar cookies, beautifully decorated with white and black candy coatings and colorful candy accents. Perfect for a holiday treat, these cookies have a tender, buttery texture with a hint of almond flavor, topped with sweet and vibrant decorations to bring the spirit of the celebration to your table.
Ingredients
Cookie Dough
- 1-1/4 cups butter, softened
- 1-3/4 cups confectioners’ sugar
- 2 ounces almond paste
- 1 large egg, room temperature
- 1/4 cup 2% milk
- 1 teaspoon vanilla extract
- 4 cups all-purpose flour
- 1/2 teaspoon salt
Decoration
- 2 packages (12 ounces each) white candy coating melts
- Optional decorations: Jumbo sprinkles, peppermint candies, candy-coated sunflower kernels, Skittles, Twizzlers Rainbow Twists, and Good & Plenty candies
- Black paste food coloring
Instructions
- Prepare the Dough: In a large bowl, cream the softened butter and confectioners’ sugar together until light and fluffy, about 3-4 minutes. Add the almond paste and mix well. Beat in the egg, milk, and vanilla extract to combine fully.
- Combine Dry Ingredients: In a separate bowl, whisk together the all-purpose flour and salt. Gradually add the flour mixture to the creamed mixture, mixing until a dough forms. Cover the dough and refrigerate it for 1 hour to chill and firm up.
- Shape the Cookies: On a lightly floured surface, roll out the chilled dough to 1/4-inch thickness. Using a floured 5-inch skull-shaped cookie cutter, cut out cookie shapes. Arrange the cookies 1 inch apart on ungreased baking sheets to prepare for baking.
- Bake the Cookies: Preheat the oven to 375°F (190°C). Bake the cookies for 7-9 minutes or until they are firm to the touch. Remove from oven and let them stand on the baking sheet for 2 minutes before transferring to wire racks to cool completely.
- Melt the Candy Coating: In a large, shallow, microwave-safe dish, melt the white candy coating melts according to package directions, stirring until smooth and melted.
- Dip and Decorate: Dip the top side of each cooled cookie into the melted white candy coating. Allow the excess to drip off, then place the cookies on waxed paper.
- Add Decorations: While the coating is still wet, decorate the cookies with your choice of jumbo sprinkles, peppermint candies, candy-coated sunflower kernels, Skittles, Twizzlers Rainbow Twists, and Good & Plenty candies.
- Create Black Icing Details: Tint remaining white candy coating with black paste food coloring. Use the tinted coating to pipe on mouths and other details on the cookies.
- Set the Coating: Let the decorated cookies stand at room temperature until the candy coating is fully set and firm.
Notes
- Make sure the almond paste is well mixed with the butter and sugar for even almond flavor.
- Chilling the dough before rolling helps prevent spreading during baking and makes cutting out shapes easier.
- Use a wrist motion when dipping cookies into the candy coating to ensure an even layer without overcoating.
- Customize decorations with various colorful candies to personalize your Day of the Dead cookies.
- Store cookies in an airtight container at room temperature to maintain freshness for up to 5 days.
Nutrition
- Serving Size: 1 cookie
- Calories: 280
- Sugar: 18g
- Sodium: 100mg
- Fat: 16g
- Saturated Fat: 9g
- Unsaturated Fat: 5g
- Trans Fat: 0g
- Carbohydrates: 32g
- Fiber: 1g
- Protein: 3g
- Cholesterol: 40mg


