
If you’re craving something fresh, fun, and packed with flavor, you’re going to love this Easy Baked Salmon Sushi Cups Recipe. When I first tried it, I was amazed at how simple it was to create these little sushi cups that have all the deliciousness of takeout, but in a snackable, bite-size form. Trust me, once you make these, they’ll become your go-to party appetizer or weeknight treat.
Why You’ll Love This Recipe
- Simple and Quick: From prep to baking, it’s ready in just about 30 minutes.
- Fun and Unique: These sushi cups are an eye-catching twist on regular salmon dishes.
- Flavor-Packed: The combination of spicy mayo, soy, and sesame oil creates a perfect balance.
- Great for All Skill Levels: Whether you’re a kitchen newbie or a seasoned pro, you’ll nail these cups easily.

Ingredients You’ll Need
The ingredients here come together beautifully to give you that classic sushi taste without all the fuss. I always recommend using fresh salmon and good-quality sushi rice for the best results.
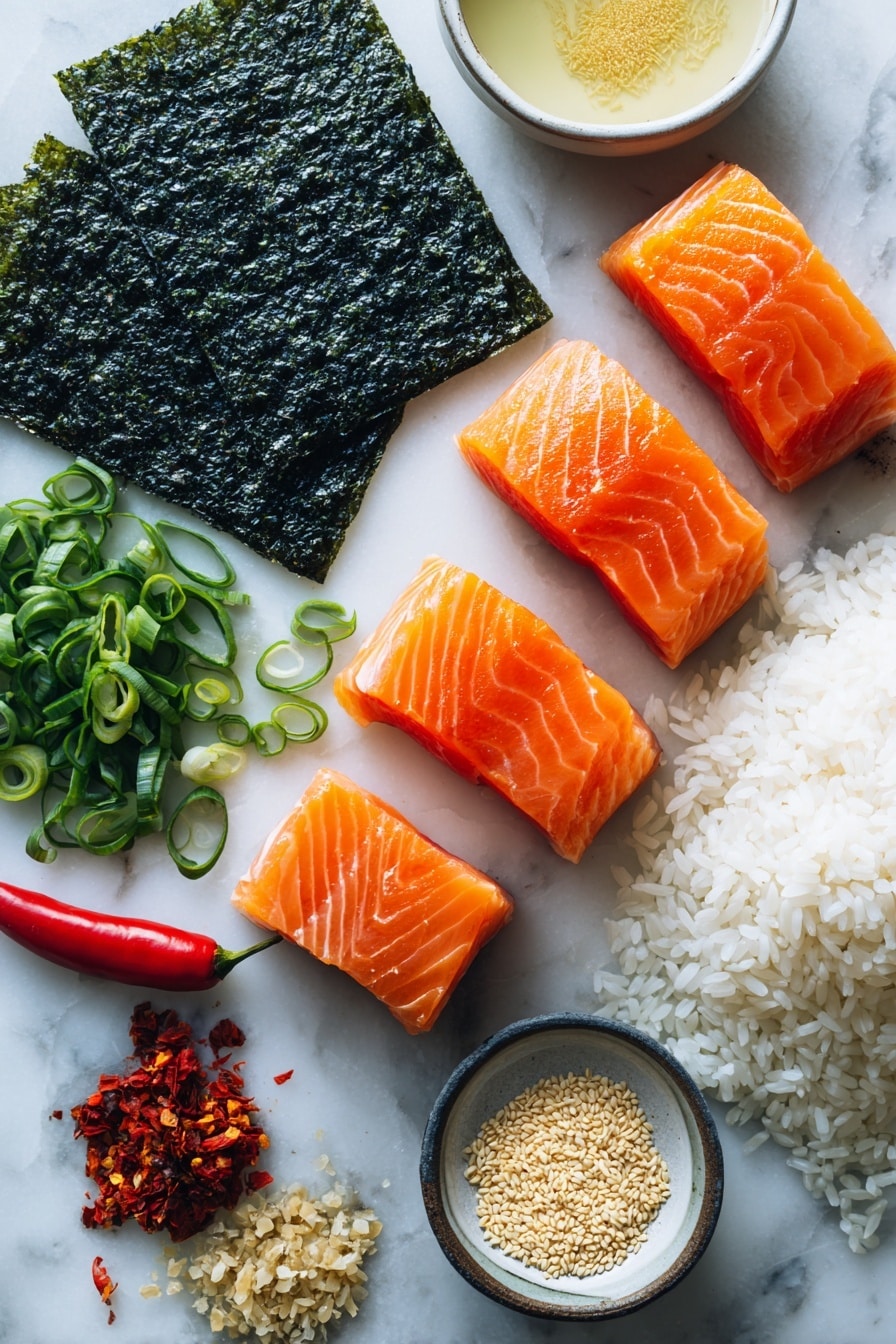
- Salmon: Fresh, cubed salmon works best – it cooks evenly and keeps the texture just right.
- Light soy sauce: Adds salty umami depth without overpowering flavors.
- Kewpie mayo: This Japanese mayo is richer and tangier than regular mayo and is key for that creamy spicy topping.
- Sriracha: The perfect kick of heat – adjust to your heat tolerance!
- Sesame oil: Just a touch amps up the nuttiness for that authentic sushi vibe.
- Sushi rice: The foundation of the cups, stick to sushi rice for the right sticky texture.
- Rice vinegar: Sweetens and seasons the rice, essential for that sushi flavor.
- White sugar: Balances out the vinegar’s acidity in the rice.
- Nori sheets: Seaweed sheets cut into squares to line your muffin tins, creating the “cup.”
- Furikake: A flavorful Japanese seasoning that adds crunch and extra umami.
- Green onion: A fresh, mild oniony garnish to finish things nicely.
- Cooking spray: Keeps the nori and rice from sticking to your muffin tin.
Variations
I love how versatile this Easy Baked Salmon Sushi Cups Recipe is. You can make it your own by swapping ingredients or tweaking the spice level. Don’t hesitate to experiment and find your perfect balance.
- Use cooked shrimp or crab: When I’m short on time or want a milder seafood flavor, I swap salmon for cooked shrimp or crab – it’s just as tasty!
- Try avocado slices: Add creamy avocado on top after baking for an extra layer of richness.
- Make it vegetarian: Replace salmon with marinated tofu or sautéed mushrooms for a meat-free delight.
- Adjust the spice: If sriracha is too spicy or not spicy enough, mix in some mayo or swap for a milder chili sauce.
How to Make Easy Baked Salmon Sushi Cups Recipe
Step 1: Perfect Your Sushi Rice
Start by cooking the sushi rice according to the package instructions. This is a critical step because the texture of your rice makes or breaks the cups. While the rice is still warm, stir in a mixture of rice vinegar and sugar that you’ve microwaved until the sugar dissolves. This tangy-sweet mix gives the rice that authentic sushi flavor you want. Once combined, set the rice aside to cool slightly, but don’t let it get cold and hard.
Step 2: Mix the Flavorful Salmon Filling
This is where the magic happens — in a bowl, combine your cubed salmon, soy sauce, Kewpie mayo, sriracha, and a drizzle of sesame oil. I like to mix these gently so you don’t mash up the fish but still get everything coated evenly. This spicy, creamy salmon layer is what makes these cups sing, so feel free to taste and adjust the heat or saltiness here.
Step 3: Prepare the Nori Cups
Cut your nori sheets into four equal squares. You want them just big enough to line each muffin tin cup and hold rice and salmon without tearing. Spray your muffin tin lightly with cooking spray — this little trick keeps everything from sticking and helps you pop the sushi cups out easily after baking.
Step 4: Assemble and Bake
Spoon some sushi rice into each nori-lined cup and press it gently to create a base. Then add a layer of your salmon mixture on top. Fill every cup — this recipe usually makes about 12 sushi cups. Pop them in the oven at 400℉ for about 15 minutes until the salmon is cooked through and the tops start to look golden. Keep an eye on them so they don’t dry out — the salmon cooks quickly in these small portions.
Step 5: Garnish and Serve
Once out of the oven, let the sushi cups cool for a few minutes. Then drizzle on extra sriracha or your favorite spicy mayo. Sprinkle furikake and chopped green onions over the top for flavor, crunch, and color. Serve immediately while warm and enjoy all those delicious layers of flavor!
Pro Tips for Making Easy Baked Salmon Sushi Cups Recipe
- Use Room Temperature Rice: Mixing the vinegar while the rice is warm helps it absorb the flavors better.
- Don’t Overfill the Cups: Leave some space at the top so the salmon layer can crisp slightly when baked.
- Choose Fresh Salmon: Freshness is key for both taste and texture since the salmon cooks quickly in the oven.
- Be Gentle with Nori: Nori can tear easily, so handle it carefully when lining the muffin tins.
How to Serve Easy Baked Salmon Sushi Cups Recipe

Garnishes
I’m a sucker for classic garnishes like furikake and chopped green onion for that perfect finishing touch. Sometimes, I’ll add a tiny dollop of extra spicy mayo or even a thin slice of pickled ginger on top to keep things authentic and fresh. These little details elevate the cups from tasty to truly irresistible.
Side Dishes
Since these sushi cups are bite-sized and packed with flavor, I usually keep sides light. A simple miso soup or cucumber salad pairs nicely without stealing the spotlight. If it’s a party, edamame beans sprinkled with sea salt make a perfect companion to balance the spiciness.
Creative Ways to Present
For special occasions, I love arranging the sushi cups on a platter lined with fresh kale or shiso leaves for a vibrant, green backdrop. Adding small bowls of dipping sauces like wasabi mayo, extra soy, or ponzu lets guests customize their bites. I even tried toothpicking mini nori squares on top for easier grabbing at a party — a huge hit!
Make Ahead and Storage
Storing Leftovers
Leftover sushi cups are best stored in an airtight container in the fridge, where they keep well for up to 2 days. I like to separate layers with parchment paper to avoid sogginess. When you’re ready to eat, they’re still delicious — just not quite as crisp as fresh from the oven.
Freezing
While I haven’t personally frozen these sushi cups myself, the consensus is that they can be frozen after baking. Just wrap each cup tightly to prevent freezer burn and thaw overnight in the fridge before reheating gently in the oven. Keep in mind the nori may lose some crispness.
Reheating
To reheat, I recommend placing the cups in a preheated oven at 350℉ for about 5-7 minutes to restore warmth and some crisp texture. Microwaving tends to make the nori soggy, so I avoid that if possible. Just watch them closely so they don’t dry out.
FAQs
-
Can I use other types of fish instead of salmon?
Absolutely! While salmon is perfect because of its rich flavor and texture, you can substitute it with cooked shrimp, tuna, or even cooked crab meat. Just make sure whatever fish you use is fresh and suitable for quick baking to maintain the delicate sushi texture.
-
Do I need special equipment to make these sushi cups?
Not really! A standard muffin tin is all you need to shape the sushi cups. Just be careful when lining it with nori sheets to avoid tears. A microwave-safe bowl is handy for mixing the rice vinegar and sugar, but you can always do that on the stove if needed.
-
How do I make sure the sushi rice doesn’t get mushy?
Great sushi rice texture depends on cooking it properly and not overloading the cups. Don’t press the rice too hard when assembling, and use just enough so it holds shape but isn’t packed tight. Also, spreading out the rice evenly prevents sogginess under the salmon layer.
-
Is this recipe spicy? Can I adjust it?
Yes, there’s a nice spicy kick from the sriracha, but it’s easy to adjust. If you want milder sushi cups, reduce the sriracha or mix it with extra mayo for a creamier, gentler heat. You can also omit the sriracha altogether and serve it on the side.
Final Thoughts
I absolutely love how this Easy Baked Salmon Sushi Cups Recipe makes sushi approachable and fun in a way that’s perfect for any occasion. Whether you’re making a quick weeknight dinner or impressing friends at a party, these cups never disappoint. Give them a try—you’ll find they’re just the right mix of tasty, spicy, and satisfying, and I bet they’ll become a new favorite in your recipe rotation, just like they did in mine.
Print
Easy Baked Salmon Sushi Cups Recipe
- Prep Time: 15 minutes
- Cook Time: 15 minutes
- Total Time: 30 minutes
- Yield: 12 sushi cups
- Category: Appetizer
- Method: Baking
- Cuisine: Japanese
Description
These Easy Baked Salmon Sushi Cups offer a fun, delicious twist on traditional sushi by combining seasoned salmon, sushi rice, and nori sheets baked together in muffin tins. Perfect as an appetizer or snack, these sushi cups are flavorful, easy to prepare, and ideal for entertaining or quick meals.
Ingredients
Salmon Mixture
- 1 lb salmon, cubed
- 1 tbsp light soy sauce
- 1 tbsp Kewpie Mayo
- 1 tbsp Sriracha
- 1 tsp sesame oil
Sushi Rice
- 1 ½ cup uncooked sushi rice
- 1 tbsp rice vinegar
- 2 tsp white sugar
Other
- 3 large nori sheets
- Furikake, for garnish
- 1 green onion, chopped for garnish
- Cooking spray
Instructions
- Cook the Sushi Rice: Cook sushi rice according to package instructions to ensure it is perfectly tender and sticky for forming the sushi cups.
- Prepare Vinegar Mixture: In a microwave-safe bowl, combine rice vinegar and sugar, microwave for 30 seconds or until sugar dissolves. Pour this over the cooked rice and mix well to season and cool the rice properly.
- Preheat Oven: Preheat the oven to 400℉ (200℃) to get ready for baking the sushi cups.
- Mix Salmon: In a bowl, combine cubed salmon with soy sauce, Kewpie mayo, Sriracha, and sesame oil. Mix thoroughly to create a flavorful salmon mixture.
- Prepare Nori Sheets: Cut nori sheets into 4 rectangles or squares sized to fit your muffin tin cavities.
- Assemble Sushi Cups: Lightly grease the muffin tin with cooking spray. Place a piece of nori into each muffin cup. Spoon sushi rice onto each nori piece and press lightly. Top the rice with the prepared salmon mixture.
- Bake: Bake the assembled sushi cups at 400℉ for 15 minutes until the salmon is cooked through and the tops are lightly golden.
- Garnish and Serve: Remove from oven, let cool slightly. Drizzle extra Sriracha or spicy mayo on top, garnish with furikake and chopped green onions, and serve immediately.
Notes
- Be careful not to overcook the salmon to maintain moisture and texture.
- You can substitute Kewpie mayo with regular Japanese mayo for a similar flavor.
- Use freshly cooked sushi rice for best texture and taste.
- Furikake adds a nice crunchy texture and umami flavor—don’t skip it as garnish.
- Feel free to adjust the spice level by modifying the amount of Sriracha.
- Wear gloves or use a silicone brush when greasing the muffin tin to avoid excess oil.
Nutrition
- Serving Size: 1 sushi cup
- Calories: 120
- Sugar: 1.2 g
- Sodium: 320 mg
- Fat: 4.5 g
- Saturated Fat: 0.8 g
- Unsaturated Fat: 3 g
- Trans Fat: 0 g
- Carbohydrates: 15 g
- Fiber: 1 g
- Protein: 8 g
- Cholesterol: 30 mg


