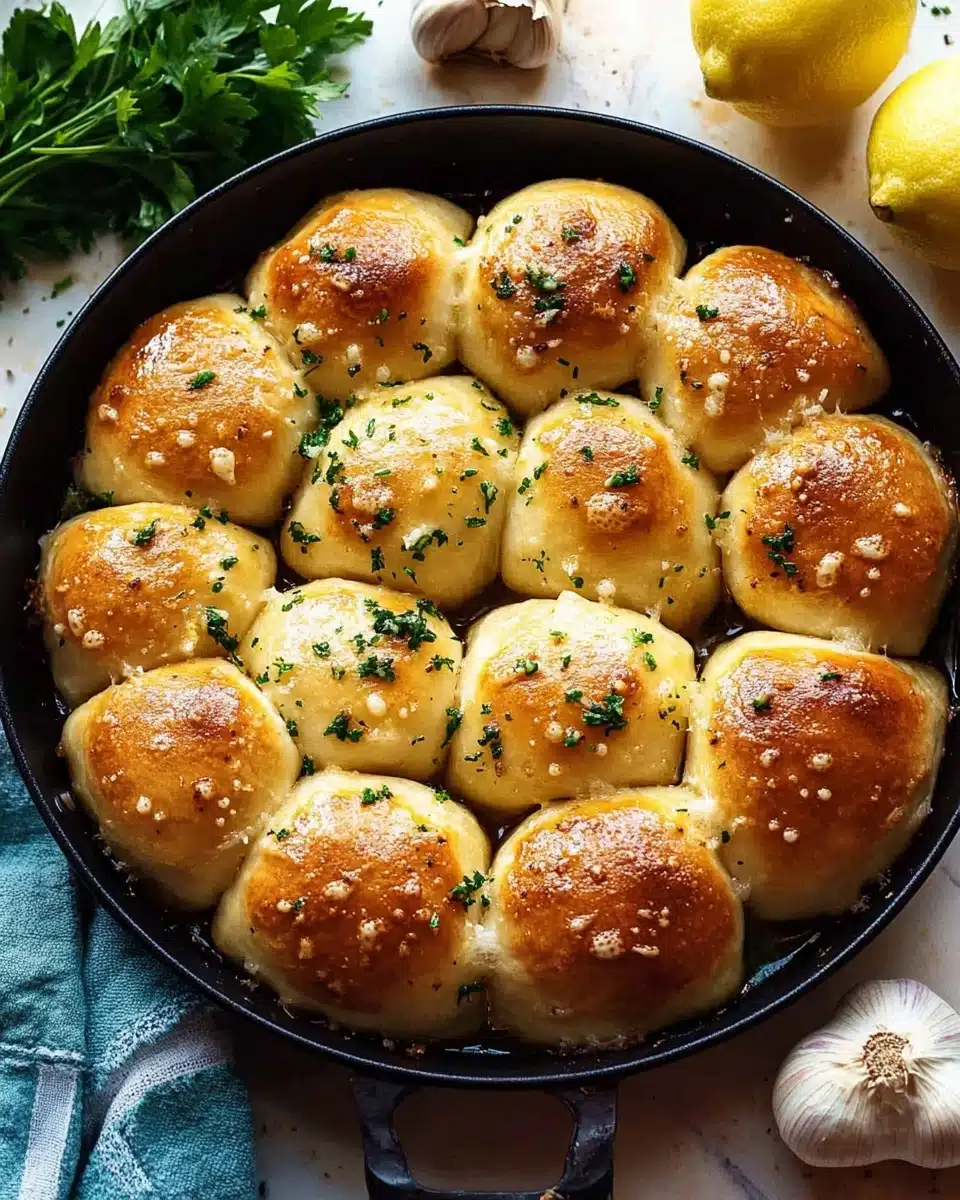
This is the Air Fryer Garlic Pizza Bread Made from Scratch you’ll want to make on repeat! Crisp golden on the outside, pillowy and aromatic at the center, and loaded with fresh garlic, parmesan, and herbs—each bite tastes like pure homemade comfort. You won’t believe how easy it is to get bakery-style, pull-apart bread in under 40 minutes, right in your trusty air fryer.
Why You’ll Love This Recipe
- Super Fast, Minimal Effort: Skip the kneading and rising—just shape, brush, and bake for fresh bread in no time.
- Unbeatable Homemade Flavor: Every bite is bursting with real garlic, fragrant parsley, and that irresistible cheesy-umami finish from parmesan.
- Golden, Buttery Perfection: Mastering the air fryer method gives you pull-apart bread with a crisp crust and pillowy-soft interior.
- Totally Customizable: Add cheeses, switch up the herbs, or jazz it up with chili flakes—this recipe is as playful as you are.

Ingredients You’ll Need
No long list of fancy ingredients here—just a handful of pantry staples to make Air Fryer Garlic Pizza Bread Made from Scratch shine. Each one plays a crucial role, from the lush, buttery crumb to the flavorful, aromatic crust. Here’s what makes every bite so special:
- Pizza dough (1 ball): The foundation! You can use homemade or store-bought dough—either way, this is your shortcut to fresh bread in minutes.
- Unsalted butter (½ cup): Gives every bite that deliciously rich, melt-in-your-mouth flavor and golden finish.
- Garlic cloves, minced (4 large): Use fresh for the best punch—this is the backbone of that classic garlic bread aroma.
- Parsley, finely chopped (¼ cup): Brings a pop of color and freshness, balancing the richness of the butter and cheese.
- Lemon zest (1 teaspoon): A subtle, zippy lift that brightens all the savory flavors and adds surprising depth.
- Grated parmesan (2 tablespoons): Adds salty, nutty flavor and a cheesy crust on top—don’t skimp!
Variations
The beauty of Air Fryer Garlic Pizza Bread Made from Scratch is how easily you can tweak it to fit your cravings or what you have on hand. Explore the fun of mixing in your favorite flavors and watch it become a family staple that never gets old.
- Cheesy Garlic Bread: Sprinkle mozzarella or provolone on top before the final air fryer bake for extra gooeyness.
- Herb Medley: Swap parsley for chopped basil, oregano, or chives, or use a combination for more complexity.
- Spicy Kick: Add a pinch of red pepper flakes or freshly ground black pepper to the butter mixture for some heat.
- Dairy-Free Option: Replace the butter with vegan butter and skip the parmesan, or use a plant-based cheese alternative.
How to Make Air Fryer Garlic Pizza Bread Made from Scratch
Step 1: Preheat the Air Fryer
Start by preheating your air fryer to 400°F (204°C) for 5–10 minutes. This step guarantees the bread will be beautifully golden and crisp right from the start. If you skip it, your dough can end up pale or gummy on the bottom, so don’t rush—let your air fryer get nice and hot!
Step 2: Mix the Garlicky Butter
Melt your butter in a heatproof bowl—just warm enough that it’s creamy and smooth, not overly hot. Stir in all the minced garlic, vibrant parsley, grated parmesan, and bright lemon zest. This is the flavor powerhouse that transforms dough balls into classic Air Fryer Garlic Pizza Bread Made from Scratch.
Step 3: Shape and Butter the Dough Balls
Cut your pizza dough into 12 equal pieces and roll each into a smooth ball. Generously brush the bottom and sides of a 7- or 8-inch pan with half the butter mixture. Place each dough ball in the pan, rolling or brushing so all sides are coated (save about a quarter of that glorious butter for later). Resist brushing the tops now—if you do, the herbs can scorch during air frying.
Step 4: Air Fry, Glaze, and Finish
Slide the pan into your preheated air fryer and bake at 400°F (204°C) for 5 minutes. Lower the temperature to 325°F (163°C) (but don’t open the basket), then let them bake for another 5 minutes. After that, generously spoon the reserved butter mixture over the tops. Bake for a final 5 minutes until puffed, deeply golden, and aromatic. Let cool for a few minutes so the flavors settle—then serve warm!
Pro Tips for Making Air Fryer Garlic Pizza Bread Made from Scratch
- Choose the Right Pan: A 7- or 8-inch metal or cake pan fits most air fryers, but always double check yours—parchment rounds can help prevent sticking and uneven browning.
- Don’t Skip the Preheat: Preheating your air fryer gives your bread that classic golden crust right from the first minute, avoiding that “doughy” bottom.
- Save Butter for the Top: Holding back a bit of the garlicky butter until the final bake gives you all the flavor and none of the burnt herbs.
- Let It Rest: A 5–10 minute cool before serving allows the crumb to set—making the texture soft, airy, and perfect for pulling apart.
How to Serve Air Fryer Garlic Pizza Bread Made from Scratch

Garnishes
For a fresh, pretty finish, shower the warm bread with more chopped parsley, a sprinkle of coarse sea salt, or a dusting of extra parmesan right before serving. If you love zing, a touch of lemon zest just before plating makes the whole kitchen smell delightful.
Side Dishes
This Air Fryer Garlic Pizza Bread Made from Scratch is the best sidekick to any hearty pasta, cozy soup, or fresh salad—dunk it in marinara, pair with minestrone, or serve alongside a leafy Caesar. It’s also perfect for game day spreads or as a starter for pizza night.
Creative Ways to Present
Try arranging the bread balls in a wreath for the holidays, or serve in a skillet for that rustic, straight-from-the-oven vibe. For parties, pull them apart and stack on a platter with dipping sauces in the center—it’s interactive and instantly impressive!
Make Ahead and Storage
Storing Leftovers
Have leftovers? Lucky you! Pop any cooled bread into an airtight container or plastic wrap and keep it at room temperature for up to two days. The flavor stays punchy and rich, just like day one.
Freezing
To freeze, arrange completely cooled bread balls in a zip-top bag or wrap tightly in foil. They’ll keep in the freezer for up to 2 months. When you’re ready, just thaw overnight in the fridge and reheat—still pillowy, still amazing!
Reheating
For best results, refresh the bread in your air fryer at 300°F for about 3–4 minutes, or just until warm and revived. You can also use the oven, but avoid the microwave: air frying brings back the crisp edges and soft center you want.
FAQs
-
Can I use store-bought pizza dough?
Absolutely! Store-bought pizza dough makes Air Fryer Garlic Pizza Bread Made from Scratch incredibly quick and convenient. Just let it rest at room temperature so it’s easy to portion and shape into balls.
-
What can I substitute for parmesan cheese?
If you’re out of parmesan, try pecorino romano or asiago for a similar sharpness. For a dairy-free version, nutritional yeast and a pinch of salt can add that savory, cheesy note.
-
How do I prevent the tops from burning in the air fryer?
Be sure not to brush the tops with herb butter before the first bakes—wait until the final five minutes, then glaze for golden color and flavor without burnt bits.
-
Can I double this recipe?
You sure can! If your air fryer can’t hold two pans, bake in batches. Keep the first batch warm in a low oven while the second batch cooks, and everyone gets fresh, hot bread at the table.
Final Thoughts
If ever there was a reason to fire up your air fryer, Air Fryer Garlic Pizza Bread Made from Scratch is it! It’s comfort food at its simplest and most flavorful, and you’ll love having this quick, crowd-pleasing recipe in your back pocket. Happy baking—your kitchen is about to smell incredible!
Print
Air Fryer Garlic Pizza Bread Made from Scratch Recipe
- Prep Time: 20 minutes
- Cook Time: 15 minutes
- Total Time: 35 minutes
- Yield: 4 servings
- Category: Appetizer
- Method: Air Fry
- Cuisine: Italian
- Diet: Vegetarian
Description
Learn how to make delicious Air Fryer Garlic Pizza Bread from scratch. This recipe yields flavorful, buttery garlic bread made in the air fryer, perfect for a quick and tasty snack or appetizer.
Ingredients
Pizza Dough:
- 1 pizza dough*
Garlic Butter Mixture:
- 1/2 cup unsalted butter
- 4 large garlic cloves, minced
- 1/4 cup parsley, finely chopped
- 1 teaspoon lemon zest
- 2 tablespoon grated parmesan
Instructions
- Preheat the Air Fryer: Set the air fryer to 400°F (204°C) and preheat for 5-10 minutes.
- Prepare Garlic Butter: Melt butter in a heat-proof bowl until creamy. Add parsley, parmesan, garlic, and lemon zest. Mix well.
- Prepare Dough: Divide pizza dough into 12 pieces. Roll into balls.
- Coat Dough Balls: Brush pan with some butter mixture. Coat dough balls, reserving some butter for later.
- Air Fry: Cook in the air fryer at 400°F (204°C) for 5 minutes, then reduce to 325°F (163°C) and bake for another 5 minutes. Spread remaining butter on top and bake for additional 5 minutes.
- Serve: Cool for 5-10 minutes. Serve warm, optionally topped with herbs or sea salt.
Nutrition
- Serving Size: 1 serving
- Calories: 290
- Sugar: 1g
- Sodium: 380mg
- Fat: 18g
- Saturated Fat: 10g
- Unsaturated Fat: 6g
- Trans Fat: 0g
- Carbohydrates: 29g
- Fiber: 1g
- Protein: 4g
- Cholesterol: 40mg


