
If you’re a fan of easy, crowd-pleasing desserts, then this Banana Poke Cake Recipe is going to feel like a little slice of heaven. I absolutely love how this cake comes out super moist, thanks to the magic of poking holes into the cake layer and letting banana pudding soak right in. It’s perfect for family dinners, potlucks, or any time you need a guaranteed “wow” dessert with minimal fuss.
When I first tried this Banana Poke Cake Recipe, I was amazed at how simple it was to make something that tastes so homemade and indulgent. You’ll find that this recipe is flexible, too — it works with fresh bananas, and if you’re like me, you might even sneak in some extras to please the banana lovers around your table. Trust me, once you master this, it’ll quickly become your go-to dessert for busy days.
Why You’ll Love This Recipe
- Effortless Moistness: The poke step allows the banana pudding to soak deep into the cake for unbeatable moistness.
- Kid-Approved Flavor: The sweet banana flavor combined with creamy pudding creates a dessert even picky eaters ask for.
- Make-Ahead Friendly: The layers set overnight beautifully, so you can prep ahead for stress-free entertaining.
- Customizable: Easy to swap vanilla pudding for banana or even add chopped nuts for texture.

Ingredients You’ll Need
Each ingredient in this Banana Poke Cake Recipe plays a simple but essential role — from the tender cake base to the creamy pudding soak and fresh bananas that bring it home. Here’s what you’ll want to have on hand before you start baking.
- Yellow Cake Mix: The perfect neutral base that balances the sweet banana flavor; box mixes work great here.
- Bananas: Ripe, but not too mushy—I like mine with just a little softness so they blend into the pudding.
- Vanilla Instant Pudding Mix: This is what gives the poke part its rich, creamy texture.
- Milk: Needed to whisk with the pudding mix and create that luscious soak.
- Cool Whip or Whipped Topping: Adds a light, airy finish to the top layer for that dreamy dessert feel.
- Powdered Sugar: Sweetens the whipped topping just a bit for extra indulgence.
- Vanilla Extract: Just a splash enhances the banana and pudding flavors.
Variations
I love mixing things up sometimes to keep this Banana Poke Cake Recipe fresh and exciting. Whether you prefer tweaking flavors or need to accommodate dietary needs, play around with these ideas to make it your own.
- Add Nuts or Coconut: I often sprinkle chopped pecans on top for some crunch; it adds a wonderful contrast to the creamy layers.
- Swap Vanilla Pudding: Try banana or even butterscotch pudding mix for a fun twist that still tastes amazing.
- Make It Gluten-Free: Use a gluten-free cake mix and check your pudding ingredients to keep it safe and delicious.
- Extra Fresh Bananas: For a fruitier pop, add a thin layer of sliced bananas between the cake and pudding for an extra “wow” factor.
How to Make Banana Poke Cake Recipe
Step 1: Bake Your Cake Base
Start by preparing your yellow cake mix as directed on the box, usually with eggs, oil, and water. Pour the batter into a greased 9×13-inch pan and bake it until the edges turn golden and a toothpick inserted in the center comes out clean. It’s important not to overbake since you want the cake to absorb the pudding perfectly later.
Step 2: Poke and Soak It Up
Once the cake is warm but not hot, use the handle of a wooden spoon or a skewer to poke holes all over the surface—don’t be shy! This is the fun part where the banana pudding gets infused into every bite. Whisk together your instant pudding and milk until thickened, then gently pour it over the cake, letting it seep down into the holes.
Step 3: Layer on Cream and Bananas
After the pudding settles for a bit, spread a generous layer of whipped topping over it. Then, add sliced bananas on top of the whipped layer. This adds freshness and bold banana flavor that really makes the dessert shine. Cover and chill the whole cake for at least 3-4 hours, but I prefer overnight because the flavors marry beautifully that way.
Step 4: Serve and Enjoy!
Before serving, you can sprinkle a little powdered sugar or chopped nuts for a finishing touch. Cut into squares and watch your friends and family delight in every luscious forkful. You’ll notice that the cake stays moist and flavorful even the next day, which makes it perfect for making ahead.
Pro Tips for Making Banana Poke Cake Recipe
- Use Slightly Warm Cake: Poking and pouring the pudding on a warm cake helps absorption without sogginess.
- Don’t Skip the Chill Time: Patience is key—letting it set overnight improves texture and flavor melding.
- Fresh Bananas Matter: Pick bananas that are ripe but firm so they don’t turn mushy in the fridge.
- Gentle Pudding Pour: Pour slowly to avoid displacing the holes; this ensures pudding soaks evenly inside the cake.
How to Serve Banana Poke Cake Recipe
Garnishes
I like to keep things simple yet pretty by dusting a little powdered sugar on top or sprinkling chopped toasted pecans for crunch. Sometimes I even add a few banana slices or a drizzle of caramel sauce for an extra decadent touch. It’s those little details that make this dessert feel special for the table.
Side Dishes
If you want to round out your dessert night, a scoop of vanilla ice cream or a dollop of fresh whipped cream pairs perfectly with this Banana Poke Cake Recipe. For brunch or casual gatherings, fresh fruit or a cup of strong coffee complement the rich flavors nicely, balancing the sweetness.
Creative Ways to Present
I’ve had great success making this Banana Poke Cake Recipe in clear glass pans or trifle bowls to show off the beautiful layers. On special occasions, I build individual portions in parfait glasses with extra banana slices between layers — your guests will think you spent hours in the kitchen!
Make Ahead and Storage
Storing Leftovers
Leftover Banana Poke Cake stores wonderfully in the fridge, covered tightly with plastic wrap or a lid. I usually keep it chilled for up to 3 days, and honestly, it tastes just as good on day two after the flavors have had more time to meld.
Freezing
I’ve frozen this cake before by wrapping individual slices tightly in plastic wrap and foil. Thaw them in the fridge overnight for a creamy treat that tastes almost as good as fresh — just know the banana slices might soften more after freezing.
Reheating
This dessert is best enjoyed chilled, so I usually don’t reheat it. But if you prefer it slightly warmer, I recommend letting it come to room temperature for about 20 minutes rather than microwaving, to keep the pudding and bananas from becoming too mushy.
FAQs
-
Can I use homemade banana pudding instead of instant mix?
Yes! Homemade banana pudding works beautifully; just make sure it’s thick enough to soak into the cake without making it soggy. You might want to chill it a bit before pouring over the cake to maintain the right consistency.
-
How ripe should the bananas be?
I like using bananas that are yellow with a few brown spots for sweetness and flavor, but not overripe or mushy, so they hold up well in the dessert and don’t turn the layers watery.
-
Can I make this gluten-free?
Absolutely! Swap the cake mix for a gluten-free version and check the pudding and whipped topping labels for gluten-free certification. This recipe adapts easily while keeping all the deliciousness.
-
How long does the Banana Poke Cake last in the fridge?
Properly stored in an airtight container or wrapped tightly, it will stay fresh for about 3 days. After that, the bananas might start to brown and the texture can change.
Final Thoughts
This Banana Poke Cake Recipe has become one of my absolute favorites for a reason—it’s easy, delicious, and feels like a special treat even on hectic days. I hope you’ll give it a try and experience how the simple act of poking holes and adding pudding can transform a humble cake into something truly memorable. Once you do, I’m pretty sure it’ll earn a permanent spot in your recipe rotation, just like it did in mine!
Print
Banana Poke Cake Recipe
- Prep Time: 25 minutes
- Cook Time: 0 minutes
- Total Time: 3 hours 25 minutes
- Yield: 16 servings
- Category: Dessert
- Method: No-Cook
- Cuisine: American
Description
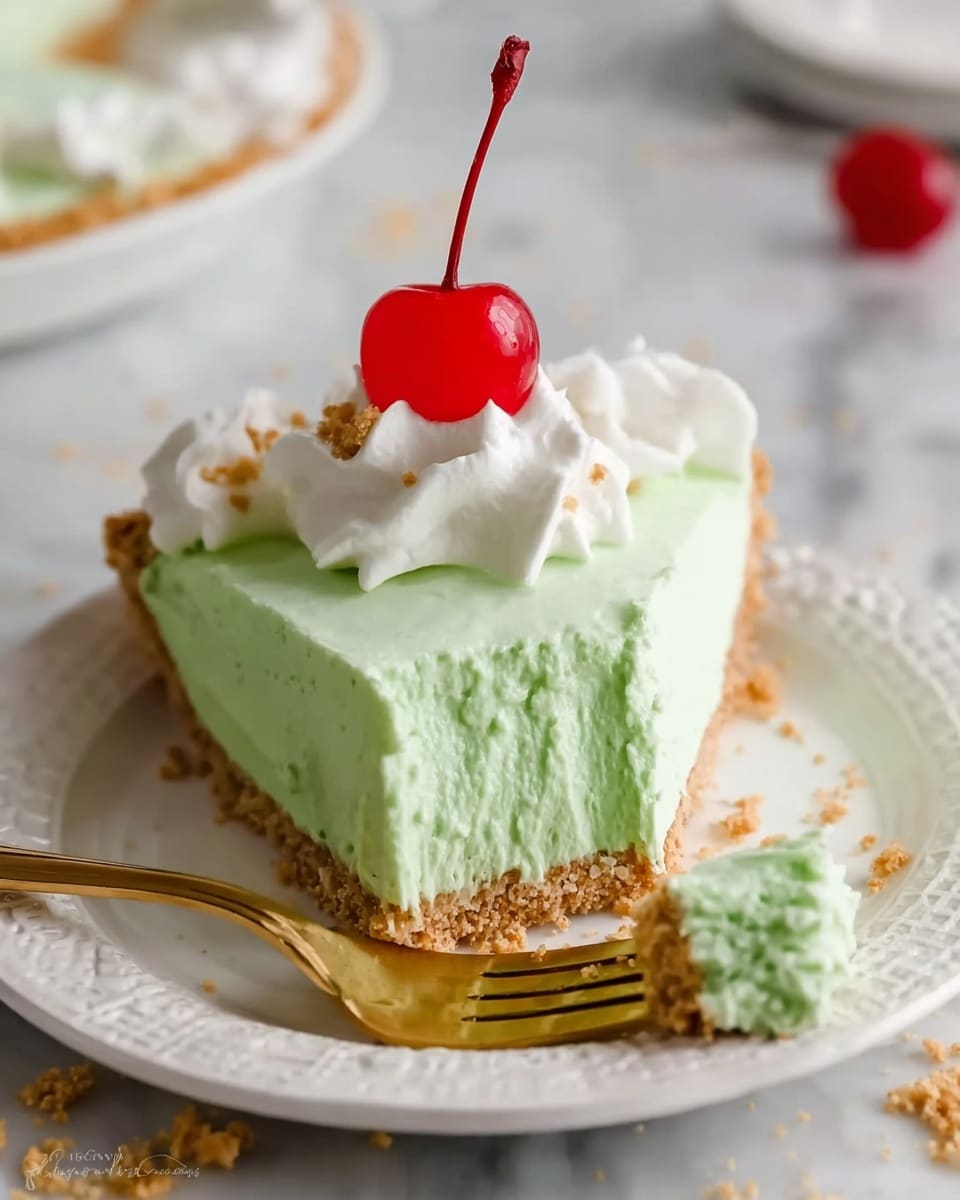
This No Bake Shamrock Shake Dessert is a festive, layered treat inspired by the classic shamrock shake. Featuring a crunchy Oreo cookie crust, a creamy peppermint-flavored cheesecake layer, a bright green vanilla pudding layer, and topped with whipped cream and chocolate chips, this dessert is perfect for St. Patrick’s Day or any occasion needing a refreshing, minty sweet treat without baking.
Ingredients
Cookie Crust Layer
- 24 Oreos, crushed (about 2 sleeves)
- 6 tbsp Salted Butter, melted
Cheesecake Layer
- 8 oz Cream Cheese, softened
- 1/4 cup Granulated Sugar
- 1 tsp Pure Peppermint Extract
- 8 oz Cool Whip Original whipped topping, thawed
Pudding Layer
- 3.4 oz package Jello Vanilla Instant Pudding
- 1 3/4 cup Cold Milk
- 1 tsp Pure Peppermint Extract
- Green Food Coloring, a few drops (adjust to desired color)
Topping
- 8 oz Cool Whip Extra Creamy whipped topping, thawed
- 1/4 cup Miniature Chocolate Chips (optional)
- Green Candy Sprinkles (optional)
Instructions
- Prepare the Cookie Crust: Crush the Oreo cookies finely using a food processor or by placing them in a Ziploc bag and rolling with a rolling pin. Melt the butter and combine it thoroughly with the cookie crumbs. Press this mixture evenly into the bottom of a 9×13-inch baking dish to form a firm crust. Place the crust in the refrigerator to chill and set.
- Make the Cheesecake Layer: In a mixing bowl, beat together the softened cream cheese, granulated sugar, and peppermint extract until the mixture is smooth and creamy. Gently fold in the thawed Cool Whip original whipped topping until fully combined and fluffy.
- Assemble the Cheesecake Layer: Spread the cheesecake mixture evenly over the chilled Oreo crust in the baking dish. Return the dish to the refrigerator to keep chilled while you prepare the pudding layer.
- Prepare the Pudding Layer: In another bowl, whisk together the vanilla instant pudding powder, cold milk, peppermint extract, and green food coloring. Use a hand mixer to whip the mixture until it thickens to a pudding consistency.
- Assemble the Pudding Layer: Carefully spread the green pudding mixture over the cheesecake layer, smoothing it out evenly. Place the dessert back into the refrigerator and chill for at least three hours to allow all layers to set firmly.
- Add the Topping: Once the dessert has completely set, remove from the refrigerator. Spread the extra creamy Cool Whip evenly over the top. Optionally sprinkle miniature chocolate chips and green candy sprinkles for a festive decoration.
Notes
- Ensure the cream cheese is fully softened for a smooth cheesecake layer without lumps.
- Adjust the amount of green food coloring to achieve your preferred shade of green.
- Use full-fat Cool Whip for best texture and taste in both the cheesecake and topping layers.
- This dessert should be kept refrigerated until serving and is best enjoyed within 2 days.
- To crush Oreos without a processor, place cookies in a sealed bag and use a rolling pin or heavy pan to crush evenly.
- The peppermint extract can be omitted or reduced for a milder mint flavor if desired.
Nutrition
- Serving Size: 1 slice (1/16th of the dessert)
- Calories: 260
- Sugar: 22g
- Sodium: 150mg
- Fat: 16g
- Saturated Fat: 9g
- Unsaturated Fat: 5g
- Trans Fat: 0g
- Carbohydrates: 26g
- Fiber: 1g
- Protein: 3g
- Cholesterol: 30mg


