
If you’re looking for a cozy, comforting dinner that feels like a warm hug, you’ve got to try this Biscuit Vegetable Pot Pie Casserole Recipe. It’s a delightful twist on the classic pot pie, swapping out the traditional crust for fluffy, buttery biscuits that bake right on top of a rich vegetable filling. When I first tried this, I was blown away by how satisfying and easy it was—plus, it’s packed with wholesome veggies. Keep reading because I’m sharing all my tips so you can nail it every single time.
Why You’ll Love This Recipe
- Rich, Creamy Filling: Loads of fresh and frozen veggies come together in a thick, savory sauce that tastes like pure comfort.
- Fluffy Homemade Biscuits: Easy-to-make biscuit dough tops the casserole, giving you a perfect golden crust with tender bites inside.
- Make-Ahead Friendly: You can prep both the filling and biscuits ahead of time, making dinner prep a breeze on busy nights.
- Family-Approved: My whole family goes crazy for this dish, and I bet yours will too—it’s a winner for picky eaters and veggie lovers alike!

Ingredients You’ll Need
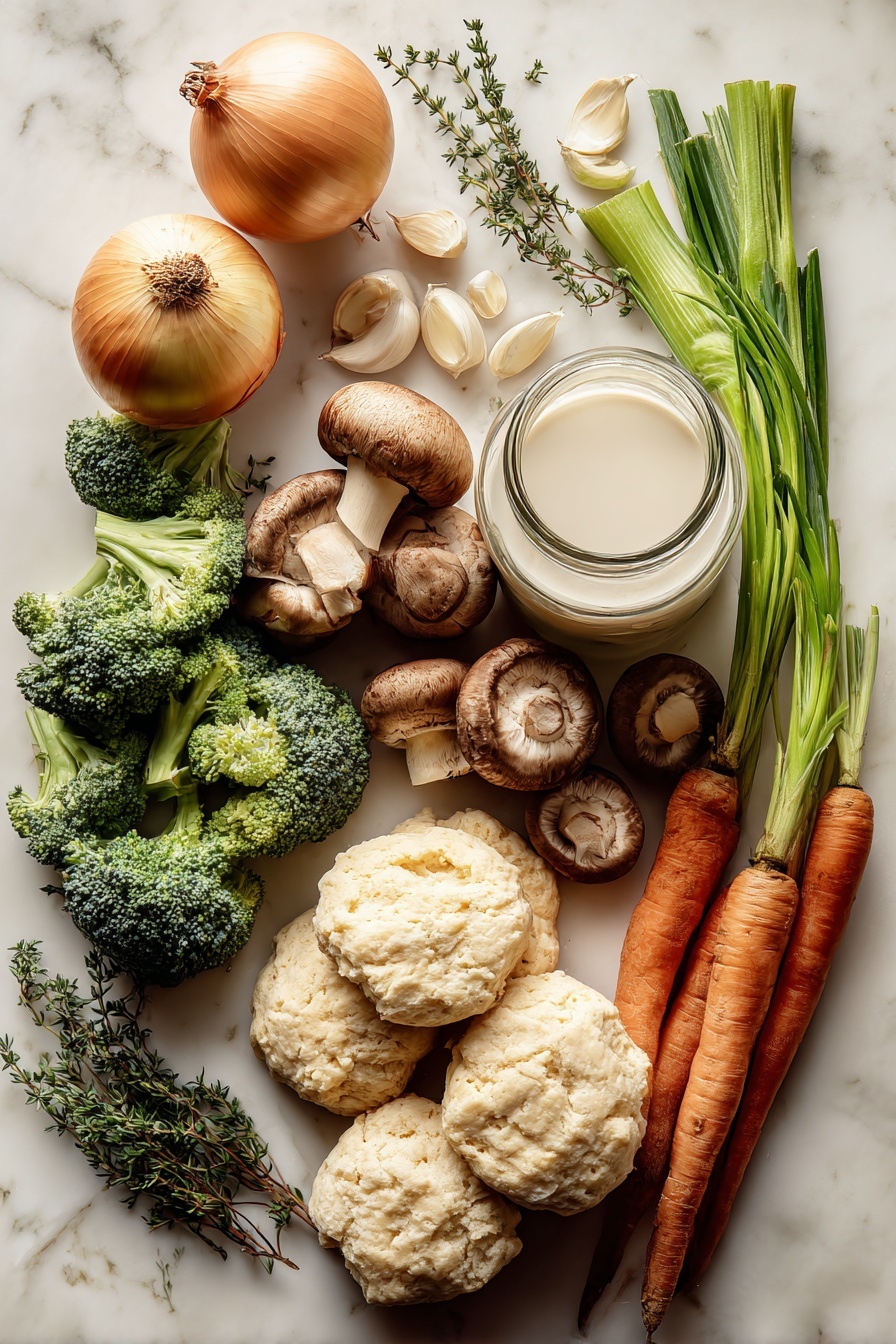
The star of this Biscuit Vegetable Pot Pie Casserole Recipe is the balance between the biscuit topping and veggie-rich filling. Using all-purpose flour and whole milk gives the biscuits tender, flaky layers, while a colorful medley of vegetables makes the filling hearty and flavorful. Here’s what I usually stock up on before getting started.
- All-purpose flour: Essential for biscuit dough and thickening the filling; spooned and leveled for accuracy.
- Baking powder: The secret behind those fluffy, rise-perfect biscuits.
- Unsalted butter: Cold and cubed for the biscuits; also melted for sautéing the veggies.
- Whole milk: Divided use keeps the dough moist and the filling creamy—skip it, and you lose the decadence.
- Yellow onion, carrots, celery, mushrooms: The veggie base for that classic pot pie flavor; feel free to vary quantities to your liking.
- Garlic cloves: Freshly minced for a punch of aromatic depth.
- Salt and freshly ground pepper: Basic seasoning that makes everything sing.
- Fresh thyme leaves (or dried): Adds subtle earthiness, working magic with all the vegetables.
- Vegetable broth: Keeps the filling hearty without overwhelming flavors; watch your salt levels as broths vary.
- Mixed vegetables: Frozen peas, broccoli, and cauliflower are my go-to combo for that perfect texture contrast.
- Fresh parsley: For a bright finish and a pop of color in the filling.
Variations
I love how flexible this Biscuit Vegetable Pot Pie Casserole Recipe is—whether you want to add a bit of protein or switch up the veggies based on the season, it’s easy to make it your own. Here are a few ways I’ve tweaked it over time.
- Adding shredded cheese: I once stirred in sharp cheddar to the biscuit dough—talk about next-level savory goodness!
- Using chicken broth and adding shredded chicken: For a heartier pot pie my family loves, especially when there’s leftover roast chicken on hand.
- Plant-based options: Swap whole milk for oat milk and keep the vegetable broth to keep it vegan—still creamy and satisfying.
- Seasonal vegetables: In fall, I like adding diced sweet potatoes or roasted butternut squash, which adds sweetness and texture.
How to Make Biscuit Vegetable Pot Pie Casserole Recipe
Step 1: Whip Up the Biscuit Dough
Start by whisking together your flour, baking powder, and salt. I like to use a food processor for quick and even mixing, but a large bowl with a pastry cutter works fine too. Next, toss in that cold, cubed butter. Cold butter is key here—it creates flaky layers when baked. Cut it into the flour mixture until you get coarse crumbs. Then, pour in 1 cup of milk and stir until the dough just comes together. It’ll look shaggy and might be sticky—that’s normal! Adjust with an extra tablespoon of milk or flour if needed. Flour your hands generously and form the dough into 8 or 9 thick discs. Don’t stress about them looking perfect—they bake beautifully rustic. Stick these in the fridge while you make the filling, or you can refrigerate for up to 2 days if prepping ahead.
Step 2: Sauté the Veggies and Make the Filling
Melt the butter in a large oven-safe skillet or pot over medium heat. Toss in your onions, carrots, celery, mushrooms, and garlic, then stir occasionally as the veggies soften and start releasing moisture—about 5 minutes. Sprinkle in the flour, salt, pepper, and thyme, stirring until the flour absorbs all the liquid. Now pour in the vegetable broth and 1/2 cup of milk, and simmer for about 7 to 9 minutes until it thickens into a creamy gravy. Toss in your mixed vegetables and parsley last—no need to cook these through fully since they’ll bake in the oven. Give it a quick taste and adjust seasoning if it needs a pinch more salt or thyme. Let the filling cool a bit as you preheat the oven to 400°F (204°C).
Step 3: Assemble and Bake
Grease your 2.5- or 3-quart baking dish (a 9-inch pie dish works too). Pour that luscious filling in evenly, then arrange the cold biscuit discs on top. It’s okay if you have to squeeze them in tight—that just means every bite will have biscuit! Use the remaining 2 tablespoons of milk to brush the biscuit tops for that gorgeous golden finish. Pop it into the oven and bake for 25 minutes, then crank the heat up to 425°F (218°C) and bake for another 5–6 minutes until the biscuits are golden brown and irresistibly fluffy. Let it cool for about 5 minutes before serving—you want that perfect scoop without burning your tongue!
Pro Tips for Making Biscuit Vegetable Pot Pie Casserole Recipe
- Keep Butter Cold: I learned the hard way that room temperature butter makes flat biscuits; always use cold butter and handle dough quickly.
- Don’t Overmix Dough: Stir until just combined to keep biscuits tender—overworking makes them tough.
- Adjust Seasoning at the End: Broths vary in saltiness, so taste your filling after cooking and add salt or herbs as needed.
- Add Biscuits Last Before Baking: Arranging biscuits right before baking prevents them from getting soggy in the filling.
How to Serve Biscuit Vegetable Pot Pie Casserole Recipe

Garnishes
I’m a sucker for fresh herbs, so I always sprinkle chopped parsley or thyme over the pot pie just before serving. If you want a bit of brightness, a squeeze of lemon juice or some freshly cracked black pepper can elevate the dish too. Occasionally, I top with a sprinkle of shredded cheese for a melty finish that my family adores.
Side Dishes
This casserole is quite filling on its own, but if you want to round out the meal, I love serving it alongside a crisp green salad with a light vinaigrette or some roasted Brussels sprouts for added texture. A simple bowl of tomato soup can also complement the creamy filling beautifully.
Creative Ways to Present
For special occasions, I’ve baked this Biscuit Vegetable Pot Pie Casserole Recipe in individual ramekins topped with one biscuit each—perfect for a cozy dinner party. You can also sprinkle a little grated Parmesan or fresh herbs on top of each biscuit before baking to impress your guests with an extra layer of flavor and flair.
Make Ahead and Storage
Storing Leftovers
I usually store leftovers in an airtight container in the fridge, and they keep beautifully for up to 5 days. When I reheat, I cover the dish loosely with foil to prevent the biscuits from drying out. The creamy filling reheats well without separating, which isn’t always the case with pot pies.
Freezing
This recipe freezes like a champ! I freeze the shaped biscuit dough separately from the filling, and both keep for up to 3 months. When you’re ready to cook, thaw filling in the fridge overnight and bring it to room temp before topping with thawed biscuits for baking. It’s such a lifesaver for busy weeknights.
Reheating
To reheat, pop leftovers in an oven set to around 350°F (175°C), covered with foil for about 15-20 minutes until warmed through. This preserves the biscuit’s softness and keeps the filling rich and creamy. Microwave works in a pinch, but the biscuits can get chewy.
FAQs
-
Can I use canned biscuits for this Biscuit Vegetable Pot Pie Casserole Recipe?
Absolutely! While homemade biscuits are my favorite for that fresh-baked flavor and texture, you can substitute canned biscuits. Just place them sliced on top of the filling right before baking. It’s a great shortcut without sacrificing much taste.
-
Can I add potatoes to the filling?
Yes, adding peeled and chopped potatoes or sweet potatoes is a fantastic way to bulk up the filling. I recommend about 1 cup added when you add the broth. To keep the balance, remove some mushrooms or mixed vegetables to make space.
-
Can I make this recipe vegan?
For a vegan twist, swap out butter for plant-based margarine, use oat milk, and vegetable broth. Omit any dairy cheese add-ins and double-check your biscuit topping ingredients. It may change the texture slightly, but it’s still deliciously comforting.
-
How do I make the biscuits extra fluffy?
Make sure your butter is cold, don’t overwork the dough, and handle it gently when forming the shapes. Also, brushing the tops with milk just before baking helps get that golden, tender crust.
-
Can I prepare this casserole entirely in advance?
You can make the filling up to a day ahead and refrigerate it. The biscuit dough can also be prepared and refrigerated for up to two days or frozen for longer storage. Just assemble right before baking for the best texture.
Final Thoughts
This Biscuit Vegetable Pot Pie Casserole Recipe is hands down one of my favorite comfort dishes to make when I want something hearty, veggie-packed, and satisfying without a ton of fuss. It’s wholesome enough to feel like a home-cooked meal but special enough to pull out for guests or a cozy family night. I hope you give it a try and find it as comforting and delicious as I do—don’t forget to let your biscuits get golden, and enjoy every buttery, veggie-loaded bite!
Print
Biscuit Vegetable Pot Pie Casserole Recipe
- Prep Time: 40 minutes
- Cook Time: 30 minutes
- Total Time: 1 hour 10 minutes
- Yield: Serves 8
- Category: Casserole
- Method: Baking
- Cuisine: American
- Diet: Vegetarian
Description
This Biscuit Vegetable Pot Pie Casserole is a comforting, hearty dish featuring a creamy vegetable filling topped with flaky homemade biscuits. Perfect for a cozy family dinner, it combines tender vegetables simmered in a savory sauce with a golden biscuit crust baked to perfection in the oven.
Ingredients
Biscuits
- 2 cups (250g) all-purpose flour (spooned & leveled), plus extra for hands
- 1 Tablespoon baking powder
- 1/2 teaspoon salt
- 6 Tablespoons (85g) unsalted butter, cold and cubed
- 1 cup + 2 Tablespoons (270ml) whole milk, divided
Filling
- 1/4 cup (4 Tbsp; 56g) unsalted butter
- 1 cup (130g) diced yellow onion (1/2 of a large onion)
- 1 cup (130g) sliced or diced carrots (1–2 large carrots or a handful of baby carrots)
- 1 cup (120g) sliced or diced celery (2–3 stalks)
- 1 cup (120g) roughly chopped mushrooms
- 3–4 garlic cloves, minced
- 1/3 cup (42g) all-purpose flour (spooned & leveled)
- 1 teaspoon salt
- 1/2 teaspoon fresh ground pepper
- 2 teaspoons fresh thyme leaves (or 1 teaspoon dried)
- 2 cups (480ml) vegetable broth
- 1/2 cup (120ml) whole milk
- 2 cups (about 300g or 10 ounces) mixed vegetables (such as frozen peas, frozen or fresh broccoli and/or cauliflower florets)
- 2 Tablespoons chopped fresh parsley (or 2 teaspoons dried)
Instructions
- Make the biscuit topping: Whisk together the flour, baking powder, and salt in a large bowl or food processor. Add the cold cubed butter and cut it into the dry ingredients using a pastry cutter or pulse in the processor until coarse crumbs form. Stir in 1 cup (240ml) of the milk until dough comes together but remains shaggy and a bit wet. Adjust consistency with more milk or flour as needed. Using floured hands, shape the dough into 8 or 9 discs about 1-inch thick. Place on a lined plate or pan, cover tightly, and refrigerate until ready to bake (or up to 2 days).
- Make the filling: Melt butter in a large skillet or oven-safe pan over medium heat. Add onion, carrots, celery, mushrooms, and garlic; cook for about 5 minutes until softened and liquid is released. Stir in flour, salt, pepper, and thyme and cook until flour absorbs all moisture. Gradually add vegetable broth and 1/2 cup milk, stirring continuously. Simmer for 7–9 minutes until thickened to a soup-like consistency. Stir in mixed vegetables and parsley, then remove from heat and taste for seasoning. Let cool for 5 minutes.
- Preheat oven: While filling cools, preheat oven to 400°F (204°C).
- Assemble casserole: Grease a 2.5- or 3-quart baking dish or a 9-inch pie dish (2 inches deep). Pour the filling into the dish. Arrange the chilled biscuit discs tightly on top of the filling. Brush the biscuit tops with the remaining 2 Tablespoons (30ml) milk.
- Bake: Bake the assembled pot pie for 25 minutes at 400°F (204°C). Then increase oven temperature to 425°F (218°C) and bake for an additional 5–6 minutes until the biscuits are golden brown.
- Cool and serve: Remove from the oven and let cool for 5 minutes before serving. Store leftovers in an airtight container in the refrigerator for up to 5 days and reheat as desired.
Notes
- Biscuit topping can be made up to 2 days ahead or frozen for up to 3 months. Thaw before baking.
- Filling can be prepared a day in advance and chilled; bring to room temperature before assembling and baking.
- Adding flavor to biscuits is optional: fresh thyme, parsley, garlic, or shredded cheese enhance the topping.
- Vegetable variations are flexible—use more carrots or onions, omit mushrooms, or add potatoes when adding broth.
- Use whole milk for best creaminess; oat milk or almond milk are alternatives but may affect flavor.
- You can substitute cornstarch for flour as a thickener.
- Choose vegetable or chicken broth based on preference and saltiness; adjust salt accordingly.
- Canned biscuits can replace homemade in a pinch; place on filling immediately before baking.
- Frozen vegetables do not need thawing before adding to filling.
Nutrition
- Serving Size: 1/8 of casserole
- Calories: 380
- Sugar: 5g
- Sodium: 550mg
- Fat: 18g
- Saturated Fat: 10g
- Unsaturated Fat: 7g
- Trans Fat: 0g
- Carbohydrates: 45g
- Fiber: 5g
- Protein: 8g
- Cholesterol: 40mg


