If you’re looking for an adorable, festive treat that’s as tasty as it is fun to make, you’re in for a treat with this Candy Corn Cookies Recipe. I absolutely love how these cookies turn out—bright, colorful, and perfectly sweet with buttery goodness underneath. When I first tried making these, I didn’t expect the decorating step to be such a joyful experience, but trust me, you’ll find it oddly calming and super rewarding. So grab your favorite autumn playlist and let’s dive into these sweet little gems that my family goes crazy for every Halloween season!
Why You’ll Love This Recipe
- Simple Ingredients: Uses classic buttercream icing and basic cookie dough, so you probably have most of these right in your pantry.
- Fun Decorating Process: The trick with sanding sugars creates that candy corn look without complicated piping skills.
- Perfect for Beginners: I designed this with easy steps and time to chill, making it stress-free for bakers of all levels.
- Delightfully Festive: Bright colors and sweet flavors make these the star of any Halloween party or autumn gathering.

Ingredients You’ll Need
These ingredients come together in such a lovely way—the buttery richness of the cookie dough balances perfectly with the smooth sweetness of the buttercream and the crunchy texture from the sanding sugars adds a little magic on top. When shopping, look for quality butter and pure vanilla extract; they really elevate this simple recipe.
- Butter: Use unsalted for better control over the dough’s saltiness and flavor.
- Sugar: Granulated sugar for the dough and the white granulated sugar used for decorating add the right sweetness and sparkle.
- Flour: All-purpose works perfectly here to get a tender yet sturdy cookie.
- Eggs: They bind the dough—make sure they’re at room temperature for even mixing.
- Vanilla Extract: The real stuff makes all the difference in the aroma and flavor.
- Orange and Yellow Sanding Sugar: These provide the vibrant candy corn colors and crunch; don’t skimp on quality or you won’t get that satisfying sparkle.
- Buttercream Icing Ingredients: Butter, powdered sugar, milk or cream, and vanilla to whip up a smooth, sweet icing that holds the sugar decorating in place.
- Cardstock for Template: Making your candy corn shape consistent is so much easier with this simple tool.
Variations
I love putting my own spin on this Candy Corn Cookies Recipe depending on the occasion or what flavors my family is craving. You can easily personalize these cookies by tweaking the decorating sugars or even the icing flavors. This flexibility is one reason I keep coming back to this recipe year after year.
- Spiced Up: Once, I mixed a bit of cinnamon and nutmeg into the dough to give the cookies a subtle fall spice—it was a huge hit at my Halloween party!
- Vegan Twist: Swap in vegan butter and a plant-based milk in the icing, plus a flax egg for binding, and you’ve got a plant-friendly version that doesn’t skimp on flavor.
- Chocolate Lovers: Add mini chocolate chips into the dough or drizzle melted chocolate stripes over the finished cookies for an extra indulgent treat.
- Gluten-Free: I experimented with a gluten-free flour blend and was pleasantly surprised how tender the cookies stayed while holding their shape beautifully.
How to Make Candy Corn Cookies Recipe
Step 1: Prepare Your Candy Corn Template
Before diving into dough, I recommend printing out a candy corn template (you can use the classic watermelon cookie shape if you want) on card stock. I traced the candy corn shape and cut it out with scissors to make sure every cookie would be consistent and adorable. Trust me, this simple step saved me so much time later and keeps the cookie shapes uniform when rolling out the dough!
Step 2: Make the Buttercream Icing
You’ll want to prepare the buttercream icing ahead of time. I follow a classic recipe: soften butter, gradually beat in powdered sugar until smooth, then add just enough milk or cream and a splash of vanilla for that perfect texture. This icing acts as a glue for the sugars, so it needs to be thick but spreadable. Make it and let it chill slightly while you bake the cookies.
Step 3: Bake Your Cookies
Now for the fun part—preparing your cookie dough. Roll it out evenly to about 1/8 inch thickness for the right crunch-to-chew ratio. Pop the dough in the freezer for 5 to 10 minutes; this helps with cleaner cookie shapes when cutting them out using your card stock template and a small paring knife. Bake according to the recipe’s instructions and cool completely. Cooling is key — warm cookies will melt the sugar decorations later. Patience here pays off!
Step 4: Assemble Your Decorating Sugars
Fill three parchment bags with your orange sanding sugar, yellow sanding sugar, and white granulated sugar separately. Don’t forget to cut about half an inch off the tip of each bag so you get that nice flow when sprinkling. Preparing this assembly line of colors makes decorating a breeze, and it’s way more fun than doing each color one at a time!
Step 5: Decorate Your Candy Corn Cookies
Using your candy corn template, draw two horizontal guide lines on each cookie: one 1 inch from the pointed end, and the second 1 3/8 inch from the first line. This leaves you a 3/4 inch stripe in the middle. Place a flat piece of parchment paper shaped like a triangle over the cookie and the template. Starting from the bottom (the wide end), tap the parchment bag to sprinkle sugars in order: yellow first, then orange, and finally white granulated sugar at the tip. Use a small spatula to gently level the sugars for a smooth, layered look. This decorating method might take a bit of practice, but once you get the hang of it, it becomes downright addictive!
Pro Tips for Making Candy Corn Cookies Recipe
- Chill Times Matter: I learned chilling the dough and letting the icing firm up before applying sugars makes all the difference in keeping shapes sharp and sugar layers neat.
- Use Card Stock Templates: Don’t skip making a sturdy template; it saves so much time and frustration when cutting out your candy corn cookies.
- Keep Sugar Bags Ready: Keep your sanding sugars prepped in parchment bags to sprinkle quickly without mess—this trick keeps decorating fun, not frustrating.
- Avoid Overbaking: Overbaked cookies lose that tender-chewy feel I love; watch the edges closely as they bake to keep them perfectly soft inside.
How to Serve Candy Corn Cookies Recipe
Garnishes
I usually keep the garnishes simple since the candy corn sugars are so vibrant and pretty, but sometimes I like to add a light dusting of edible glitter for extra sparkle on special occasions. You might also enjoy sprinkling a few tiny edible pearls or Halloween-themed sprinkles around the platter for a festive touch—all while keeping the cookies themselves the star.
Side Dishes
These cookies pair wonderfully with a warm cup of spiced chai or pumpkin latte. For a fun party spread, I serve them alongside bowls of caramel popcorn, roasted pumpkin seeds, or even a spooky-themed cheese and fruit board. It’s a combo that always brings smiles around the table.
Creative Ways to Present
Last Halloween, I arranged the cookies on a tiered cake stand alternating candy corn shapes with mini mugs of hot cocoa. I also wrapped a few cookies in cellophane tied with orange and yellow ribbons as party favors—everyone loved the thoughtful presentation! Setting them out on bright fall-colored plates or beside small pumpkins instantly boosts the festive vibes.
Make Ahead and Storage
Storing Leftovers
I always store leftover candy corn cookies in an airtight container at room temperature, separated by parchment paper to keep the sugars from smudging. They stay fresh and delicious for up to 5 days—perfect for nibbling during the workweek or as an after-school treat.
Freezing
If you want to make these ahead for a party, I recommend freezing them after baking and cooling, but before decorating. Freeze the plain cookies in a single layer on a baking sheet, then transfer them to a freezer bag. When you’re ready, thaw fully, apply the icing and sugars, then let them set. This method keeps everything fresh and vibrant.
Reheating
I prefer to enjoy these cookies at room temperature, but if you like warmed cookies, pop one in the microwave for about 5 seconds. Just be gentle—too much heat will soften the sugar decorations. Alternatively, letting them sit at room temperature for a while brings out the buttery flavors nicely.
FAQs
-
Can I make the cookie dough ahead of time for this Candy Corn Cookies Recipe?
Absolutely! You can prepare the cookie dough up to 2 days in advance. Just wrap it tightly in plastic wrap and keep it refrigerated. When you’re ready to bake, bring the dough to room temperature for about 15 minutes so it’s easier to roll out.
-
What’s the best way to prevent sanding sugars from mixing colors while decorating?
The key trick I discovered is to use parchment paper as a stencil and sprinkle each color one at a time from parchment bags, tapping gently to cover only the intended section. Using a flat spatula to level sugars after each color also helps keep the lines crisp and separate.
-
Can I use store-bought cookie dough for this recipe?
You can, especially if you’re short on time! Just make sure the dough can be rolled thin and holds its shape when baked. Skip any dough with add-ins like chips or chunks, since they’ll interfere with clean sugar decorating.
-
How long do these Candy Corn Cookies keep fresh?
Stored in an airtight container at room temperature, they stay fresh and delicious for about 4 to 5 days. Beyond that, the sugars may start to absorb moisture and lose their crunch.
-
Can I color the buttercream icing to match the candy corn colors?
You could, but I find that the sanding sugars offer the best visual pop and texture for this recipe. If you want colored icing as an extra layer, use gel food coloring sparingly to avoid affecting the buttercream’s consistency.
Final Thoughts
Making this Candy Corn Cookies Recipe has turned into one of my favorite Halloween traditions. What started as a simple idea became a fun activity I look forward to sharing with friends and family each year. I hope you give it a try and enjoy the process as much as the sweet, buttery results. Whether you’re baking for a party, gifting to neighbors, or just treating yourself, these cookies bring a little extra sparkle and joy to the season. Happy baking!
Print
Candy Corn Cookies Recipe
- Prep Time: 1 hr 35 min
- Cook Time: 15 min (approximate baking time per batch)
- Total Time: 3 hr 45 min
- Yield: 12 cookies
- Category: Dessert
- Method: Baking
- Cuisine: American
- Diet: Vegetarian
Description
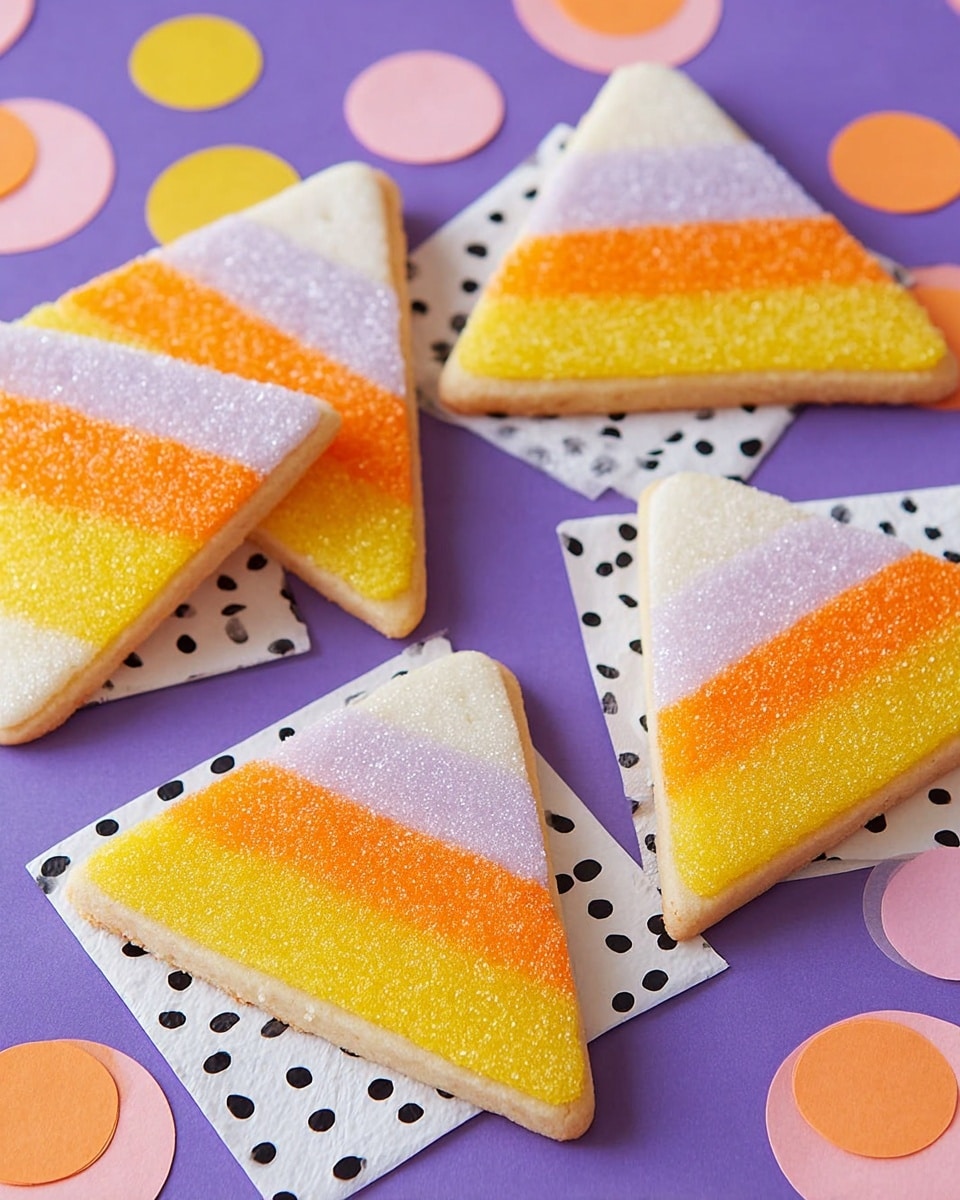
These Candy Corn Cookies are festive, colorful treats perfect for fall and Halloween celebrations. Featuring a classic roll-out cookie base decorated with vibrant orange, yellow, and white sanding sugars, these cookies mimic the beloved candy corn shape and colors with a fun and creative decorating technique using a handmade template. The buttercream icing complements the crunchy sugar coating, offering a delightful texture contrast.
Ingredients
Roll-Out Cookie Recipe
- Butter (amount per base recipe)
- Sugar
- Flour
- Eggs
- Vanilla extract
- Baking powder
- Salt
Buttercream Icing Recipe
- Butter
- Powdered sugar
- Milk or cream
- Vanilla extract
Decorating Sugars
- Orange sanding sugar (minimum 1 teaspoon per cookie)
- Yellow sanding sugar (minimum 1 teaspoon per cookie)
- White granulated sugar (1/2 teaspoon per cookie)
Instructions
- Prepare cookie template: Print the candy corn cookie template on cardstock and cut it out carefully to use as a guide for cutting the cookies.
- Prepare icing: Follow your buttercream recipe instructions to make a smooth, spreadable icing to complement the cookies.
- Bake cookies: Make the cookie dough according to the roll-out cookie recipe. Roll the dough out to 1/8 inch thick, then chill in the freezer for 5 to 10 minutes to firm up. Use the cardstock template and a paring knife to cut out candy corn shapes. Bake the cookies according to recipe instructions and allow them to cool completely.
- Assemble sugars: Fill three separate parchment bags with orange sanding sugar, yellow sanding sugar, and white granulated sugar. Cut about 1/2 inch off the tip of each bag to create an opening for sprinkling the sugar.
- Decorate cookies: Using the candy corn template, draw two horizontal lines on each cookie: one 1 inch from the pointed end and another 1 3/8 inches from the first line, creating a 3/4-inch stripe area. Place a flat triangle-shaped piece of parchment paper over the template on the cookie. Starting from the bottom of the pattern, tap the parchment bags to sprinkle the sanding sugars in order: yellow at the bottom, then orange in the middle, and white at the top. Use a spatula to level and smooth the sugar layers for even coverage.
Notes
- Ensure dough is chilled before cutting to prevent spreading.
- Use fine sanding sugars for even decorating.
- Work on a flat surface for even layering of sugars.
- Allow cookies to cool completely before decorating for best results.
- Consider sealing colored sugar with a light spray of edible glaze if prepping ahead.
Nutrition
- Serving Size: 1 cookie
- Calories: 180
- Sugar: 15g
- Sodium: 120mg
- Fat: 9g
- Saturated Fat: 5g
- Unsaturated Fat: 3g
- Trans Fat: 0g
- Carbohydrates: 24g
- Fiber: 1g
- Protein: 2g
- Cholesterol: 35mg