
I can’t say enough good things about this Cheesy Garlic Chicken Wraps Recipe! It’s one of those meals that just hits all the right notes—the gooey cheese, the bold garlicky flavor, and tender chicken, all wrapped up in a warm tortilla. I love making this when I want something comforting but quick, and honestly, it’s always a hit whether it’s a weeknight dinner or a casual weekend lunch.
You’ll find that this recipe isn’t just tasty—it’s super versatile and fuss-free, which means you don’t have to spend hours in the kitchen to enjoy something delicious. When I first tried this, it immediately became a go-to because it combines classic flavors with an easy assembly that feels a little special without a lot of work. If you like easy recipes that feel homemade and satisfying, you’re going to want to tuck this Cheesy Garlic Chicken Wraps Recipe into your regular rotation.
Why You’ll Love This Recipe
- Simple Ingredients: You probably have most of these on hand for quick prep that still feels homemade.
- Melty Cheese Magic: The gooey cheese pull is pure comfort food happiness that everyone loves.
- Customizable Flavors: You can easily swap out veggies or add spices to make it your own.
- Great for Any Meal: Breakfast, lunch, or dinner — these wraps totally deliver anytime you need a satisfying bite.

Ingredients You’ll Need
The ingredients for this Cheesy Garlic Chicken Wraps Recipe are straightforward but work together like magic—the garlic brings that aromatic punch, while the cheese adds richness and the chicken gives it heartiness. When shopping, I always look for fresh garlic and a good melting cheese, because that’s what really makes the difference.
- Chicken Breast: Choose boneless, skinless for easy cooking and tender bites.
- Garlic: Fresh minced garlic delivers the best flavor punch and aroma.
- Cheese (like mozzarella or cheddar): A good melting cheese creates that perfect gooey texture.
- Tortillas: Flour tortillas work great for wrapping, soft but sturdy enough to hold all the fillings.
- Vegetables (optional): Bell peppers, spinach, or onions add freshness and crunch if you like.
- Olive Oil or Butter: For cooking the chicken and adding extra flavor.
- Salt and Pepper: Simple seasonings to bring out the best in the ingredients.
- Optional Herbs: Fresh parsley or cilantro adds a little brightness to finish.
Variations
I love mixing things up depending on what I have on hand or what flavors I’m craving—this Cheesy Garlic Chicken Wraps Recipe is great for that. You can add different veggies, swap cheeses, or even try a spicy twist if you’re feeling adventurous. It’s all about making it your own and keeping it fun!
- Spicy Kick: Add a dash of chili flakes or a drizzle of sriracha—I tried this last week and it gave a perfect heat balance with the cheese.
- Veggie Boost: Toss in sautéed mushrooms or roasted red peppers for extra flavor and texture.
- Healthy Swap: Use whole wheat or spinach wraps for a fiber boost—I love the nuttier flavor whole wheat adds.
- Herb Infusion: Fresh basil or oregano can turn these wraps into an Italian-inspired treat.
How to Make Cheesy Garlic Chicken Wraps Recipe
Step 1: Prep and Season Your Chicken
Start by cutting your chicken into thin strips or bite-sized pieces—this helps it cook quickly and evenly. Then, season the chicken well with salt, pepper, and a generous amount of minced garlic. Trust me, the garlic here is the real game-changer, giving the chicken that irresistible aroma and flavor you’ll want in every bite.
Step 2: Cook the Chicken to Perfection
Heat a splash of olive oil or butter in a skillet over medium-high heat. When the pan is nice and hot, add your chicken pieces. Cook them for about 5-7 minutes, stirring occasionally, until the chicken is golden and cooked through. Don’t overcrowd the pan here; working in batches keeps the chicken juicy and nicely caramelized instead of steamed.
Step 3: Add the Cheese and Garlic Goodness
Once the chicken is cooked, reduce the heat to low and sprinkle your shredded cheese evenly over the top. Cover the pan with a lid for a minute or two to let the cheese melt perfectly. This is the moment where the wrap magic happens—gooey, cheesy, garlicky chicken that’s seriously mouthwatering.
Step 4: Assemble Your Wraps
Warm your tortillas in a dry skillet or microwave for a few seconds to make them pliable. Then load them up with your cheesy garlic chicken mixture along with any extra veggies or herbs you like. I usually add a little fresh spinach or sliced tomatoes for some brightness. Roll them tight, and you’re set!
Pro Tips for Making Cheesy Garlic Chicken Wraps Recipe
- Don’t Rush the Garlic: Mince your garlic fresh for max flavor—powder just won’t compare!
- Cheese Variety: Mixing two types of cheese, like mozzarella and sharp cheddar, adds depth and creaminess.
- Warm Tortillas: Always warm your wraps before filling—they fold better and don’t crack when you roll.
- Even Cooking: Cook chicken in batches if needed to keep the pan hot and get a better sear.
How to Serve Cheesy Garlic Chicken Wraps Recipe
Garnishes
I usually top my wraps with a sprinkle of fresh parsley or a few chopped green onions for a little color and freshness that really brighten the flavors. Sometimes a spoonful of sour cream or a drizzle of hot sauce works wonders if you like extra tang or heat.
Side Dishes
My go-to sides with these wraps are crispy sweet potato fries or a fresh garden salad with a light vinaigrette—that combination makes the whole meal feel balanced and satisfying. You can also slice some avocado or whip up a quick coleslaw for crunch.
Creative Ways to Present
For a fun party twist, I like to cut the wraps into bite-size pinwheels and serve them on a platter with toothpicks—a total crowd-pleaser and super easy to eat! Perfect for game day or casual gatherings. You can even add colorful veggie sticks alongside for a vibrant presentation.
Make Ahead and Storage
Storing Leftovers
I usually keep leftover wraps wrapped tightly in foil or plastic wrap and placed in the fridge. They keep well for up to 3 days, which is perfect for quick lunches or snacks during the week. Just be sure to cool them completely before storing to avoid sogginess.
Freezing
Freezing is totally doable! I recommend wrapping each filled wrap tightly in plastic wrap and then placing them in a freezer-safe bag. When you’re ready, thaw overnight in the fridge before reheating. The cheese and chicken hold up nicely, but veggies might lose some crunch.
Reheating
When reheating, I like to pop the wraps in a toaster oven or a skillet over medium heat for a few minutes on each side to get the tortilla crisp again and the cheese melty. The microwave works in a pinch but will make the wrap a little softer, so if you have time, try to use stovetop reheating for the best texture.
FAQs
-
Can I use other types of cheese for this Cheesy Garlic Chicken Wraps Recipe?
Absolutely! While mozzarella or cheddar are classic choices for melting, you can experiment with pepper jack for a spicy kick or Monterey Jack for creaminess. Just pick cheeses that melt well to keep that gooey texture.
-
Is it better to use chicken breast or thigh for this recipe?
Both work great! Chicken breast is leaner and cooks quickly, which I usually prefer for speed. Thighs are more flavorful and forgiving if slightly overcooked but may take a bit longer. Choose according to your taste and what you have on hand.
-
Can I make this recipe vegetarian?
Definitely! Swap chicken for hearty veggies like mushrooms, zucchini, or marinated tofu. Cook them with garlic and cheese the same way, and you’ll have a satisfying vegetarian wrap that’s equally delicious.
-
How do I prevent the wraps from getting soggy?
One trick I learned is to avoid adding too many wet ingredients inside before serving. Warming the wraps and serving immediately also helps. If you’re packing wraps for later, wrap them tightly and keep the sauce or extra veggies on the side until serving.
Final Thoughts
This Cheesy Garlic Chicken Wraps Recipe has been a kitchen favorite for me because it’s a perfect balance of simple, flavorful, and just downright comforting. Whether you’re cooking for family, friends, or just yourself, these wraps come together fast and never disappoint. Give it a try—you might just find yourself making them on repeat like I do!
Print
Cheesy Garlic Chicken Wraps Recipe
- Prep Time: 15 minutes (plus 30 minutes to 2 hours marinating time)
- Cook Time: 15 minutes
- Total Time: 45 minutes to 2 hours 30 minutes
- Yield: 4 servings
- Category: Main Course
- Method: Frying
- Cuisine: Asian
Description
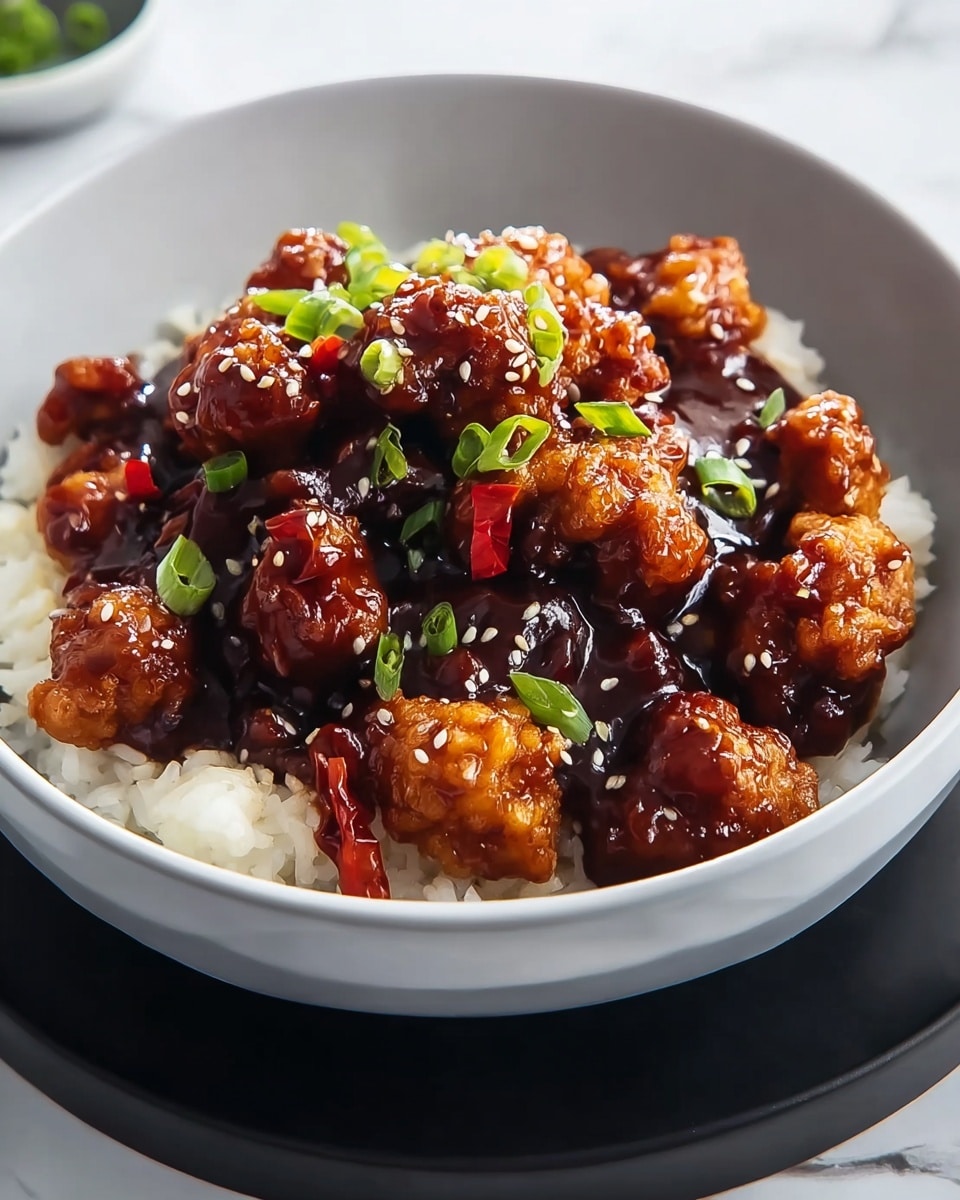
A flavorful Sweet Chili Chicken recipe featuring tender bite-sized pieces of chicken breast marinated in a tangy and spicy sweet chili sauce, coated in crispy cornstarch, pan-fried to golden perfection, and glazed with a savory-sweet sauce. This dish is garnished with fresh green onions and sesame seeds, and ideally served over jasmine rice, basmati rice, or noodles for a complete and satisfying meal.
Ingredients
Chicken and Marinade
- 1.5 to 2 pounds boneless, skinless chicken breasts
- 1 cup sweet chili sauce (store-bought or homemade)
- 2 tablespoons soy sauce
- 4 cloves garlic, minced
- 1 tablespoon ginger, minced
Coating
- 1/4 cup cornstarch
- Salt and pepper to taste
Cooking
- 2 tablespoons vegetable oil
Garnish and Serving
- 2 green onions, sliced
- 1 tablespoon sesame seeds
- Cooked jasmine rice, basmati rice, or noodles, for serving
Instructions
- Marinate the Chicken: Cut the chicken breasts into bite-sized pieces. In a mixing bowl, combine sweet chili sauce, soy sauce, minced garlic, and minced ginger. Add chicken pieces to the marinade, mix well to coat, cover with plastic wrap, and refrigerate for at least 30 minutes or up to 2 hours to infuse the flavors.
- Prepare the Coating: In a separate bowl, mix the cornstarch with a pinch of salt and pepper to season. This will create a crispy exterior on the chicken.
- Coat the Chicken: Remove chicken from the marinade using a slotted spoon to let excess liquid drip off. Dredge each piece in the seasoned cornstarch, ensuring even coating for a crispy texture when fried.
- Heat the Oil: In a large skillet or wok, heat the vegetable oil over medium-high heat until hot but not smoking, ready for frying.
- Cook the Chicken: Add coated chicken pieces in a single layer to the skillet without overcrowding. Fry for 4-5 minutes per side until golden brown and cooked through. Cook in batches if needed to maintain oil temperature. Use tongs or a spatula to flip for even browning.
- Drain the Chicken: Transfer the fried chicken to a plate lined with paper towels to remove excess oil, preserving crispiness.
- Make the Glaze: Reduce heat to medium and add the remaining marinade to the same skillet. Bring to a simmer and let it thicken slightly into a glaze.
- Combine Chicken and Sauce: Return the fried chicken to the skillet and toss it in the glaze, coating each piece well. Cook for an additional 2-3 minutes to meld flavors together.
- Adjust Seasoning: Taste the glaze and adjust seasoning as needed. Optionally, add sriracha or extra sweet chili sauce for more heat.
- Serve and Garnish: Transfer the glazed chicken onto a serving platter. Sprinkle with sliced green onions and sesame seeds for added flavor and crunch. Serve hot over jasmine rice, basmati rice, or noodles to soak up the delicious sauce.
Notes
- Marinating the chicken longer (up to 2 hours) enhances flavor and tenderness.
- Ensure the oil is hot enough before frying to achieve a crispy crust without greasy chicken.
- Cook the chicken in batches to avoid overcrowding the pan, which can cause steaming instead of frying.
- Adjust the sweetness or heat of the glaze by adding extra sweet chili sauce or sriracha according to taste.
- For a gluten-free version, use tamari or a gluten-free soy sauce alternative.
- Leftover chicken can be stored in an airtight container in the refrigerator for up to 3 days.
Nutrition
- Serving Size: 1 serving (approx. 1/4 recipe)
- Calories: 350 kcal
- Sugar: 12 g
- Sodium: 700 mg
- Fat: 14 g
- Saturated Fat: 2 g
- Unsaturated Fat: 10 g
- Trans Fat: 0 g
- Carbohydrates: 28 g
- Fiber: 1 g
- Protein: 30 g
- Cholesterol: 75 mg


