
If you’re craving something creamy, nutty, and bursting with juicy cherries, you’re in for a treat with this Cherry Pistachio Cheesecake Recipe. I absolutely love how this cheesecake combines the rich, smooth texture of cream cheese with the delightful crunch of pistachios and the sweet-tart pop of cherry topping. It’s one of those desserts that feels fancy but comes together surprisingly easily – trust me, once you try this, you’ll want to make it again and again!
Why You’ll Love This Recipe
- Perfect flavor combo: Pistachios and cherries create a beautiful balance of nutty and sweet that feels special but familiar.
- Easy to make: With simple ingredients and straightforward steps, you don’t need to be a pro baker to nail this cheesecake.
- Make ahead friendly: This cheesecake tastes even better after chilling overnight, perfect for hosting or celebrations.
- Stunning presentation: The cherry topping and chopped pistachios add a gorgeous pop of color and texture every time.

Ingredients You’ll Need
The ingredients here are simple pantry and fridge staples, plus a few special touches like pistachio pudding mix to boost that nutty flavor. Each element works together to create a cheesecake that’s both creamy and bursting with festive flair.
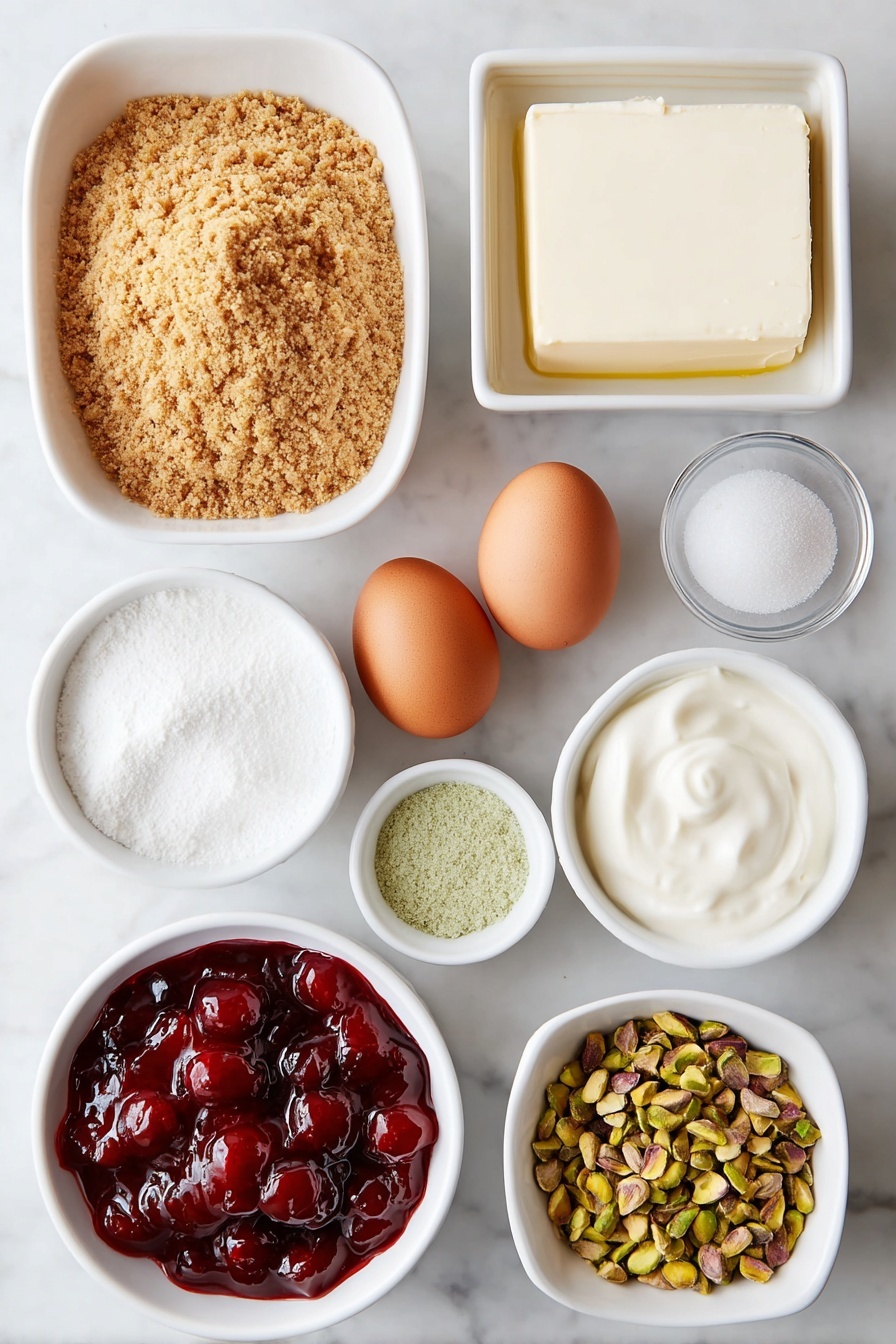
- Graham cracker crumbs: I prefer finely crushed for that perfect crust texture.
- Ground pistachios: Adds that unmistakable nutty crunch; roasting them ahead can deepen the flavor.
- Sugar: Balances the tartness and brings sweetness to both crust and filling.
- Melted butter: Helps bind your crust into a sturdy base.
- Cream cheese: Make sure it’s softened to room temp – this makes mixing silky smooth and quick.
- Eggs: They provide the structure without weighing down the cheesecake.
- Sour cream: Adds tanginess and creaminess to keep the filling light and luscious.
- Pistachio pudding mix (dry): A secret weapon for a big flavor punch without extra work.
- Vanilla extract: Just a splash to enhance all the other flavors.
- Cherry pie filling: The crowning glory – sweet, bright, and ready to eat right out of the can.
- Chopped pistachios (optional): I love them on top for visual appeal and extra crunch.
Variations
One of the things I love most about this Cherry Pistachio Cheesecake Recipe is how versatile it is. You can tweak it to suit your taste or dietary needs—don’t be shy about making it your own!
- Swap the cherry topping: I’ve tried raspberry or blueberry pie filling, and they work wonderfully for a different fruity twist.
- Almond extract boost: Adding just ¼ tsp almond extract with the vanilla gives the pistachio flavor an extra nutty depth—my family goes crazy for this version.
- Gluten-free crust: Use gluten-free graham crackers or almond flour in place of the crumbs for allergy-friendly options.
- Lower sugar option: You can reduce sugar slightly or try a natural sweetener, though I’d keep the pudding mix to help with texture.
How to Make Cherry Pistachio Cheesecake Recipe
Step 1: Crafting the Perfect Crust
First things first, preheat your oven to 325°F (160°C). I like to grease a 9-inch springform pan – or line the bottom with parchment paper for an easy release. Mix the graham cracker crumbs, ground pistachios, and sugar in a bowl, then stir in the melted butter until it feels like damp sand. Press this mixture firmly and evenly across the bottom of your pan. Bake it for about 8 minutes until it’s set and fragrant. Let it cool while you prepare the filling—this step really helps the crust hold together when slicing.
Step 2: Whip Up the Silky Pistachio Filling
Next, beat the softened cream cheese with sugar until silky smooth—this usually takes a minute or two with a hand mixer. I add the eggs one at a time, mixing until just combined after each. Overmixing here can cause cracks, so a gentle hand is key. Then fold in the sour cream, pistachio pudding mix, and vanilla extract. The pudding mix is my little secret to intensify the pistachio flavor without any extra fuss.
Step 3: Bake to Cheesecake Perfection
Pour your luscious filling over the cooled crust, smoothing the top with a spatula. Bake in the oven for 45 to 50 minutes. You want the edges to be set, but the center should still wobble just a bit—a sign it will firm up perfectly as it cools. Here’s a trick I learned: after baking, turn off the oven and crack the door open to let the cheesecake cool slowly. This helps avoid cracks and keeps the texture creamy.
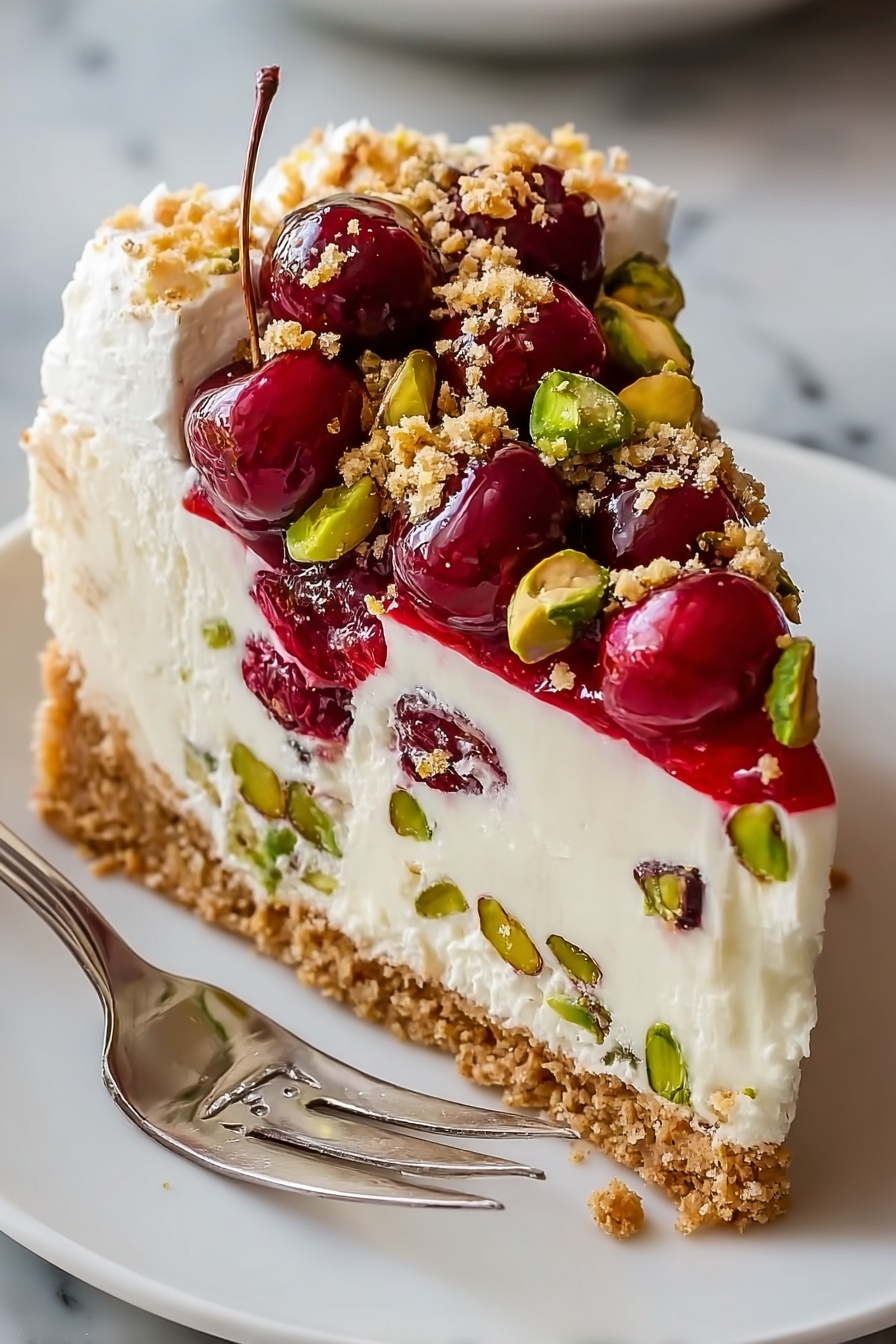
Step 4: Chill and Top with Cherries
After cooling, refrigerate the cheesecake for at least 4 hours—overnight is even better. When you’re ready to serve, spread the cherry pie filling evenly over the top. I love to sprinkle a handful of chopped pistachios on top to add texture and a splash of color. It’s such a simple touch but makes your presentation look like you spent hours on it!
Pro Tips for Making Cherry Pistachio Cheesecake Recipe
- Room Temperature Ingredients: Make sure your cream cheese and eggs are at room temp for a smooth, lump-free filling.
- Don’t Overbake: Slight wobble in the center means it’s done—overbaking dries it out and leads to cracks.
- Slow Cooling: Let cheesecake cool in the oven with door cracked after baking; this reduces cracking and improves texture.
- Use Unsalted Roasted Pistachios: They add an extra layer of flavor without any bitterness or excess salt.
How to Serve Cherry Pistachio Cheesecake Recipe
Garnishes
I always top mine with extra chopped pistachios—the crunch is irresistible and it looks gorgeous! If you want to jazz it up, a light dusting of powdered sugar or a few fresh cherries on top works beautifully, too. These little touches make the dessert feel fancy without extra effort.
Side Dishes
This cheesecake pairs wonderfully with a cup of rich coffee or a glass of dessert wine like Moscato. For a brunch spread, I like serving it alongside fresh berries or even a lightly dressed green salad for a nice balance of indulgence and freshness.
Creative Ways to Present
For special occasions, I’ve cut the cheesecake into mini portions using a ring mold to create elegant single-serve cakes. Layering with whipped cream and extra pistachios around the edges turns it into a showstopper. You can also swirl the cherry filling on top instead of just spreading it for a marbled effect that wows guests.
Make Ahead and Storage
Storing Leftovers
Leftover cheesecake keeps beautifully in the fridge, tightly covered with plastic wrap or stored in an airtight container. I find it tastes even better the next day as the flavors mingle and develop further. Just make sure to add the cherry topping fresh before serving if you can.
Freezing
I’ve frozen this cheesecake several times – just freeze without the cherry topping. Wrap it well in plastic wrap and foil, and when you’re ready to indulge, thaw overnight in the fridge. Add the cherries right before serving for best texture and flavor.
Reheating
Cheesecake is best eaten chilled, so I usually don’t reheat it. If you prefer it slightly warmer, let slices sit at room temperature for 15-20 minutes. Avoid microwaving, as it can alter the creamy texture.
FAQs
-
Can I use fresh cherries instead of canned cherry pie filling?
Absolutely! Fresh cherries can be cooked down with a bit of sugar and lemon juice to create your own topping. Just simmer until the cherries soften and syrup thickens. This adds a fresh, less sweet alternative that’s delicious and customizable.
-
What if I don’t have pistachio pudding mix?
If you’re out of pudding mix, you can substitute with a tablespoon of cornstarch and a pinch of ground pistachio or almond extract for that nutty flavor. The texture will be a little different but still tasty!
-
How do I avoid cracks on my cheesecake?
Preventing cracks is all about gentle mixing, baking at a lower temperature, and letting the cheesecake cool slowly in the oven with the door cracked. Avoid overbeating your filling and don’t open the oven door while baking to keep the temperature steady.
-
Can I make this cheesecake ahead of time?
Yes! In fact, making it a day ahead improves the flavor and texture. Just refrigerate overnight and add the cherry topping right before serving for the freshest look and taste.
Final Thoughts
This Cherry Pistachio Cheesecake Recipe holds a special place in my dessert repertoire because it’s truly effortless yet leaves such an impression. Whether you’re impressing guests or just treating yourself, the way those flavors come together feels like a little slice of heaven. Give it a try—I promise it’ll become one of your favorites too!
Print
Cherry Pistachio Cheesecake Recipe
- Prep Time: 20 min
- Cook Time: 50 min
- Total Time: 5 hr 10 min
- Yield: 8-10 servings
- Category: Dessert
- Method: Baking
- Cuisine: American
Description
This Cherry Pistachio Cheesecake is a luscious and creamy dessert featuring a buttery graham cracker and pistachio crust, a smooth pistachio-flavored cheesecake filling, and a sweet cherry topping. Perfect for celebrations or a special treat, this recipe combines nutty and fruity flavors in a beautifully balanced dessert.
Ingredients
For the crust:
- 1½ cups graham cracker crumbs
- ¼ cup ground pistachios
- 3 tbsp sugar
- 5 tbsp melted butter
For the filling:
- 16 oz cream cheese, softened
- ½ cup sugar
- 2 large eggs
- ½ cup sour cream
- ¼ cup pistachio pudding mix (dry powder)
- 1 tsp vanilla extract
For the topping:
- 1 can (21 oz) cherry pie filling
- Optional: extra chopped pistachios for garnish
Instructions
- Preheat oven: Set your oven to 325°F (160°C). Prepare a 9-inch springform pan by greasing it well or lining the bottom with parchment paper to prevent sticking.
- Make the crust: In a bowl, combine graham cracker crumbs, ground pistachios, sugar, and melted butter until the mixture is evenly moistened. Press this mixture firmly into the bottom of the springform pan to create an even crust. Bake the crust for 8 minutes, then remove from the oven and allow it to cool completely.
- Prepare the filling: In a large mixing bowl, beat the softened cream cheese with sugar until smooth and creamy. Add the eggs one at a time, mixing well after each addition. Then incorporate the sour cream, pistachio pudding mix, and vanilla extract. Mix the filling just until smooth and fully combined, avoiding overmixing.
- Bake the cheesecake: Pour the prepared filling over the cooled crust and smooth the top with a spatula. Bake in the preheated oven for 45 to 50 minutes, or until the center is just set but still slightly jiggly. Once done, turn off the oven and leave the cheesecake inside with the door cracked open to cool gradually, preventing cracks.
- Chill: After the cheesecake has cooled to room temperature, refrigerate it for at least 4 hours or preferably overnight. This resting time allows the flavors to meld and the texture to firm up.
- Top and serve: Before serving, spread the cherry pie filling evenly over the chilled cheesecake. For an added crunch and nutty accent, sprinkle extra chopped pistachios on top as a garnish. Slice and enjoy!
Notes
- Use roasted, unsalted pistachios for the best flavor in both the crust and as a garnish.
- For a more intense pistachio flavor, you can add ¼ teaspoon almond extract to the filling mixture.
- This cheesecake freezes very well; if freezing, add the cherry topping and chopped pistachios only after the cheesecake has thawed to keep quality high.
Nutrition
- Serving Size: 1 slice (1/10 of cheesecake)
- Calories: 390 kcal
- Sugar: 28 g
- Sodium: 230 mg
- Fat: 27 g
- Saturated Fat: 12 g
- Unsaturated Fat: 13 g
- Trans Fat: 0.3 g
- Carbohydrates: 30 g
- Fiber: 1.5 g
- Protein: 6 g
- Cholesterol: 90 mg
