
I’m so excited to share this Christmas Ornament Shaped Cookies Recipe with you! These cookies are a festive way to bring holiday cheer right from your oven, and they’re perfect for cookie exchanges, decorating with the kids, or gifting to friends and family. What I love about this recipe is how the delicate, buttery dough shapes into charming ornaments that you can personalize with colorful icing and sprinkles.
Whether you’re a seasoned baker or just starting out, you’ll find this Christmas Ornament Shaped Cookies Recipe incredibly user-friendly. The dough holds its shape beautifully, so your decorations really pop. I remember the first time I made these with my little ones; they were over the moon to see their handiwork come to life on these adorable cookies. Trust me, once you try this recipe, your holiday baking tradition will never be the same!
Why You’ll Love This Recipe
- Easy to Shape: The dough is perfectly firm, making your ornament shapes crisp and clear every time.
- Customizable Decorations: You can get creative with icing, sprinkles, or edible glitter to make each cookie unique.
- Kid-Friendly Fun: This recipe is perfect for holiday baking sessions with family, creating memories alongside delicious treats.
- Great for Gifting: These cookies keep beautifully, making them a thoughtful and charming homemade present.

Ingredients You’ll Need
The ingredients for this Christmas Ornament Shaped Cookies Recipe come together to create the ideal balance of buttery richness and just the right amount of sweetness. Most of them are staples you probably have on hand, and I’ve found that using quality vanilla and fresh butter really lifts the flavor.
- All-purpose flour: The base of your dough that gives structure without making the cookies tough.
- Unsalted butter: Use softened butter for a tender texture and to control the salt in your cookies.
- Sugar: Granulated white sugar sweetens the dough and helps with browning.
- Egg: Adds moisture and helps bind everything together.
- Vanilla extract: This is where the magic happens—boosts flavor wonderfully.
- Baking powder: Gives the cookies a slight lift so they aren’t too dense.
- Salt: Enhances flavor and balances sweetness.
- Optional spices (like cinnamon or nutmeg): I love adding these for a subtle festive hint, but totally up to you!
Variations
I love that you can make this Christmas Ornament Shaped Cookies Recipe your own by switching up flavors, decorating styles, or even making it gluten-free. It’s a versatile canvas for whatever holiday mood you’re in.
- Gluten-Free Version: Use a gluten-free flour blend; I’ve found a 1:1 swap works great without sacrificing texture.
- Spiced Up: Add a pinch of ginger or cloves with the cinnamon for a warming spice mix that feels super Christmassy.
- Decorating Style: Try royal icing for detailed designs or simple powdered sugar glazes with colored sanding sugar for easier decorating sessions.
- Vegan Adaptation: Replace butter with coconut oil and eggs with flax eggs—it’s a bit different but still delicious.
How to Make Christmas Ornament Shaped Cookies Recipe
Step 1: Mix Your Dry and Wet Ingredients Separately
Start by whisking together your dry ingredients—flour, baking powder, salt, and optional spices—in a large bowl. In another, beat your softened butter and sugar together until fluffy, then add the egg and vanilla extract. This two-bowl method helps ensure even mixing without overworking the dough.
Step 2: Combine and Chill the Dough
Gradually add the dry ingredients into the wet, mixing until just combined. Once your dough forms, wrap it tightly in plastic wrap and chill it for at least one hour (or overnight). This step is crucial because cold dough rolls out more easily and holds those ornament shapes better during baking.
Step 3: Roll Out and Cut Your Ornaments
Lightly flour your work surface and roll the dough to about a quarter-inch thickness. Use your favorite ornament cookie cutters to shape the dough. Don’t forget to create a little hole near the top of each cookie if you want to thread ribbon through later for hanging!
Step 4: Bake and Cool
Place your cutouts on a parchment-lined baking sheet and bake at 350°F (175°C) for 8–10 minutes, or until the edges just start to turn golden. Keep an eye on them since thin cookies bake quickly! Transfer to a wire rack and let cool completely before decorating.
Pro Tips for Making Christmas Ornament Shaped Cookies Recipe
- Keep Dough Cold: I learned that chilling the dough really helps maintain sharp shapes and keeps the cookies from spreading too much.
- Use Parchment Paper: Baking on parchment prevents sticking and makes cleanup a breeze—plus, your cookie bottoms won’t burn.
- Don’t Overbake: Watch for just golden edges; overbaking makes cookies too crisp and less pleasant to bite.
- Perfect Icing Consistency: Mix your royal icing to medium flow so decorations look polished but don’t run off the cookies.
How to Serve Christmas Ornament Shaped Cookies Recipe
Garnishes
I usually go for classic red and green royal icing with a sprinkle of edible glitter or tiny silver dragees for a touch of sparkle. Sometimes I add a dab of white icing “snow” effects which my family absolutely adores. Using multicolored nonpareils also adds a playful pop that’s perfect for kids.
Side Dishes
These cookies pair wonderfully with a warm cup of spiced hot cocoa or a chai latte. For holiday parties, I like setting them alongside a cheese and charcuterie board—they bring a sweet balance to savory nibbles.
Creative Ways to Present
One time, I threaded thin satin ribbons through the ornament holes and hung them on my Christmas tree as edible decorations—such a hit! Another idea is to arrange a batch in a holiday-themed box tied with a bow for gifting. If you make a lot, layering them between sheets of wax paper in a beautifully decorated tin is a lovely way to store and share your work.
Make Ahead and Storage
Storing Leftovers
After decorating, I store these cookies in an airtight container at room temperature to keep them nice and crisp. They usually last well for up to a week, but I’m honest—most don’t stick around that long in my house!
Freezing
For longer storage, you can freeze the baked cookies before decorating. Just freeze them flat in a single layer on a baking sheet until solid, then transfer to a freezer bag or box. Thaw at room temperature when ready. I recommend decorating after thawing for the best icing results.
Reheating
If you want to freshen up cookies that have softened a bit, pop them in a 300°F oven for 5 minutes to crisp them back up, but be careful not to melt the icing!
FAQs
-
Can I use store-bought cookie dough for this Christmas Ornament Shaped Cookies Recipe?
While store-bought dough can save time, it often lacks the buttery flavor and perfect texture needed for clean, crisp ornament shapes. This recipe’s dough is formulated to hold detailed shapes and produce a tender cookie, so I recommend trying it homemade if you want the best results.
-
How do I prevent my cookies from spreading too much?
Chilling the dough thoroughly before rolling and baking is key. Also, make sure your oven temperature is accurate and avoid using too much butter or sugar that can cause spreading. Using parchment paper or silicone mats can help maintain the shape too.
-
What’s the best icing to decorate these cookies?
Royal icing is my go-to because it dries hard and keeps decorations intact. It’s easy to tint with food coloring and pipe for intricate designs. For a simpler option, a powdered sugar glaze with a little milk works well too.
-
Can kids help make and decorate these cookies?
Absolutely! This Christmas Ornament Shaped Cookies Recipe is perfect for family bake days. Kids especially love cutting out the shapes and adding colorful decorations. Just keep an eye on them with sharp tools and baking sheets in the oven.
Final Thoughts
This Christmas Ornament Shaped Cookies Recipe holds a special place in my heart because it brings together delicious baking and festive creativity in the coziest way. I hope you’ll enjoy making these as much as my family always does—it’s one of those recipes that really makes holiday memories sweeter. So grab your flour and cookie cutters, and get ready to fill your home with that irresistible freshly-baked aroma that says “holidays are here!”
Print
Christmas Ornament Shaped Cookies Recipe
- Prep Time: 20 minutes
- Cook Time: 1 hour
- Total Time: 1 hour 20 minutes
- Yield: 24 slices (from 3 small loaf pans)
- Category: Breakfast, Dessert, Side Dish
- Method: Baking
- Cuisine: American
- Diet: Vegetarian
Description
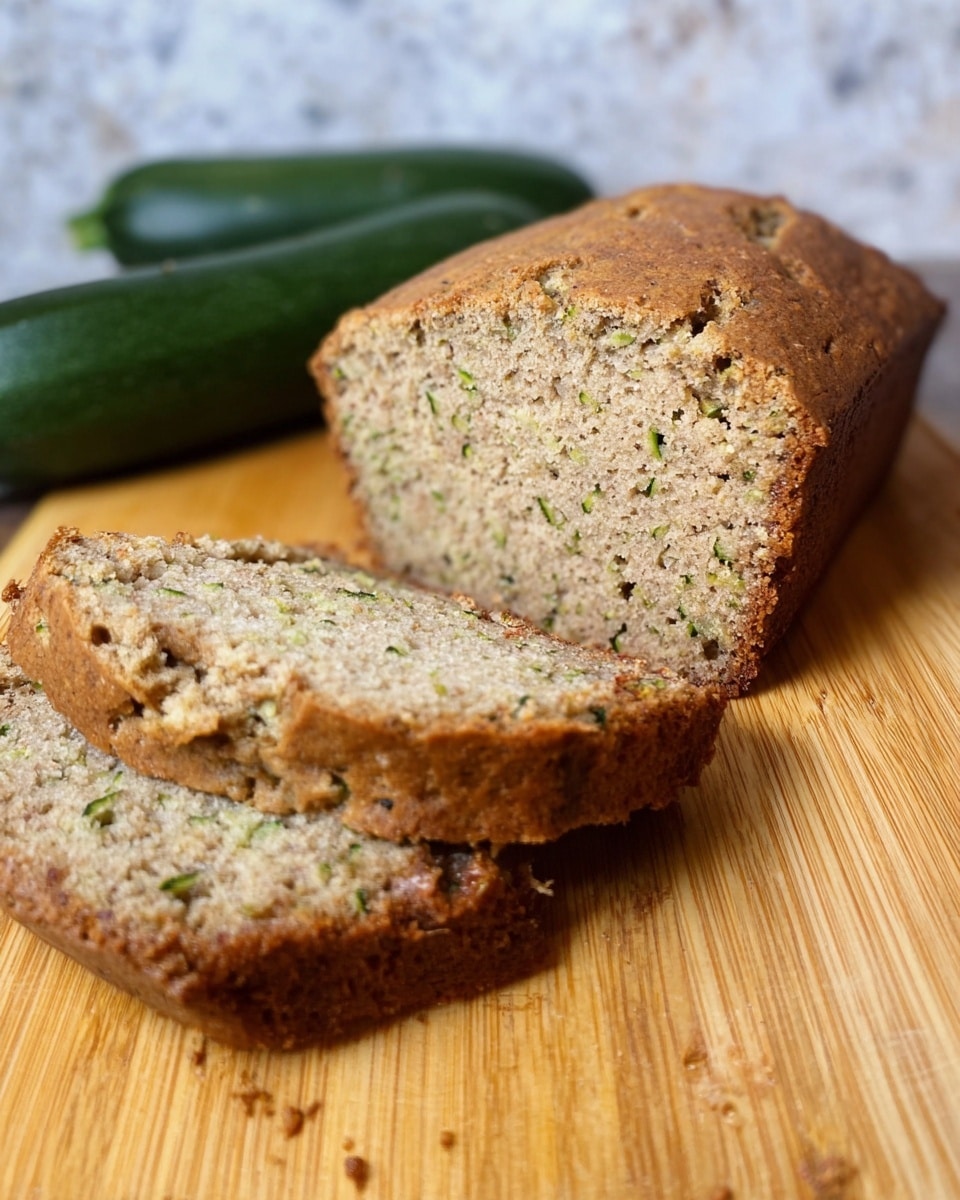
This moist and flavorful zucchini bread recipe is perfect for breakfast, dessert, or a delightful side dish. Made with shredded zucchini, warm spices like cinnamon and nutmeg, and sweetened with a blend of sugar and brown sugar, this bread is a delicious way to enjoy garden-fresh zucchini. The combination of vegetable oil and applesauce keeps it tender and moist, while easy-to-find ingredients make it a simple and wholesome homemade treat.
Ingredients
Dry Ingredients
- 3 cups All Purpose Flour
- 1 cup Sugar
- 1 cup Brown Sugar
- 1 Tsp Nutmeg
- 1 Tbsp Cinnamon
- 1 Tsp Baking Powder
- 1 Tsp Baking Soda
- 1 Tsp Salt
Wet Ingredients
- 1/2 cup Vegetable Oil
- 1/2 cup Applesauce
- 3 Eggs
- 1 Tsp Vanilla Extract
- 3 cups Shredded Zucchini (do not drain)
Instructions
- Preheat Oven: Preheat your oven to 350 degrees Fahrenheit to ensure it’s at the right temperature for baking the bread evenly.
- Prepare Zucchini: Shred 3 cups of zucchini. Do not drain it; keeping the moisture will add to the bread’s moist texture.
- Mix Dry Ingredients: In a large bowl, combine all the dry ingredients including flour, sugars, nutmeg, cinnamon, baking powder, baking soda, and salt. Whisk together until fully blended to distribute spices and leavening evenly.
- Combine Wet Ingredients: In a separate bowl, mix the vegetable oil, applesauce, eggs, and vanilla extract until smooth and well combined. This mixture adds moisture and richness to the bread.
- Incorporate Zucchini: Add the wet ingredients to the dry, mixing well until the batter is thick. Then fold in the shredded zucchini until the batter reaches a consistency similar to pancake batter.
- Prepare for Baking: Grease three small loaf pans evenly. Pour the batter into the pans, dividing it equally among them to ensure uniform baking.
- Bake: Place the loaf pans into the preheated oven and bake for about 55 minutes, or until a toothpick inserted into the center of the bread comes out clean. This ensures the bread is fully cooked and moist.
- Cool: Remove the bread from the oven and place on a wire rack. Allow it to cool for at least one hour before slicing to let the bread set properly.
Notes
- Do not drain the shredded zucchini; its moisture is essential for the bread’s texture.
- You can substitute applesauce with mashed banana for extra sweetness and flavor.
- Using three small loaf pans helps the bread bake evenly, but a couple of larger pans can be used with adjusted baking time.
- Store zucchini bread wrapped tightly at room temperature for up to 3 days or refrigerate to extend freshness.
Nutrition
- Serving Size: 1 slice (approximate)
- Calories: 180
- Sugar: 14g
- Sodium: 230mg
- Fat: 7g
- Saturated Fat: 1g
- Unsaturated Fat: 5g
- Trans Fat: 0g
- Carbohydrates: 27g
- Fiber: 2g
- Protein: 3g
- Cholesterol: 40mg


