
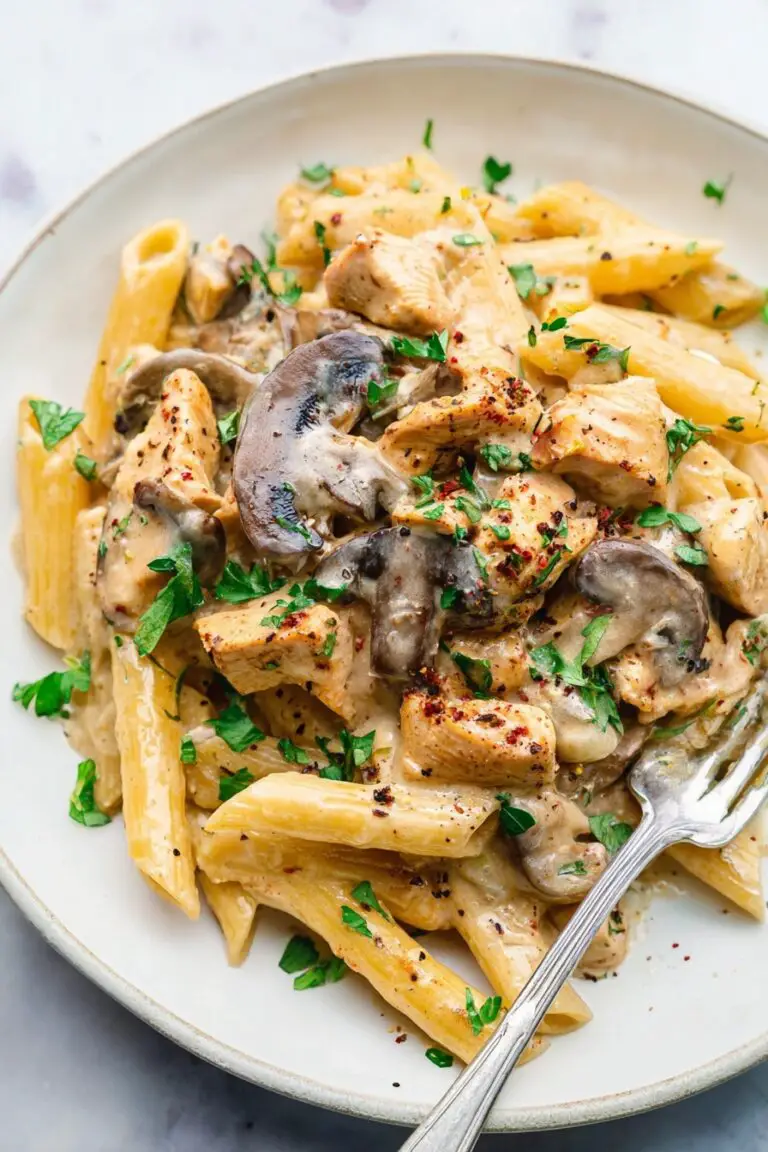
I absolutely love this Creamy Garlic Mushroom Pasta Recipe because it strikes the perfect balance between indulgent and comforting. Whenever I make it, the rich, velvety sauce combined with earthy mushrooms and that gentle garlic kick always feels like a hug on a plate. It’s one of those recipes that works beautifully both as a quick weeknight dinner and when you want to impress guests without stressing over complicated steps.
When I first tried this Creamy Garlic Mushroom Pasta Recipe, I was surprised at how easy it was to get restaurant-quality flavor with just a few simple ingredients. You’ll find that the creaminess comes together effortlessly, and the mushrooms soak up all those garlicky notes, making each bite deeply satisfying. Plus, it’s a versatile recipe that you can tweak based on what you have at home or your personal taste.
Why You’ll Love This Recipe
- Quick & Easy: Perfect for busy nights when you want gourmet flavors without hours in the kitchen.
- Comfort Food Magic: Creamy sauce and sautéed mushrooms create a cozy, satisfying meal everyone enjoys.
- Versatile: You can easily swap mushrooms or add herbs to make it your own special creation.
- Family Friendly: My family goes crazy for this pasta, which always means it’s a winner at the dinner table.

Ingredients You’ll Need
Each ingredient plays a key role in building layers of flavor and creamy texture. I like to use fresh garlic and good-quality mushrooms to really make this pasta sing.
- Fresh garlic: Essential for that aromatic garlicky punch that ties the dish together.
- Sliced mushrooms: Cremini or button mushrooms work wonderfully; they soak up the sauce beautifully.
- Heavy cream or half-and-half: Creates the silky, luscious base of the sauce.
- Butter: Adds richness and helps sauté the garlic and mushrooms to perfection.
- Parmesan cheese: Provides a savory, umami depth – don’t skip it if you have it on hand!
- Fresh parsley: For a pop of freshness and color at the end.
- Pasta of your choice: I prefer fettuccine or linguine, but spaghetti works well too.
- Salt and pepper: To enhance all the flavors perfectly.
Variations
I love how flexible this Creamy Garlic Mushroom Pasta Recipe is—you can add some personal flair or tweak it for dietary needs without losing any of the flavor.
- Protein boost: Add grilled chicken or crispy bacon for a heartier meal—I’ve tried both and loved how they complement the creamy sauce.
- Vegan version: Swap cream for coconut milk and use nutritional yeast instead of Parmesan. I once made this for a friend’s dinner, and no one missed the dairy.
- Herb infusion: Toss in fresh thyme or rosemary during mushroom sauté for an earthy twist I’ve come to enjoy in cooler months.
- Mushroom medley: Use shiitake, portobello, or oyster mushrooms for a richer mushroom flavor; it’s fun experimenting with what’s fresh at your local market.
How to Make Creamy Garlic Mushroom Pasta Recipe
Step 1: Prep your ingredients
Start by slicing your mushrooms evenly—this ensures they cook uniformly and absorb the sauce nicely. Mince the garlic finely; I find that fresh garlic really makes all the difference compared to powdered versions. Bring a large pot of salted water to a boil to cook your pasta—remember, perfectly cooked pasta is key to making the whole dish shine, so aim for al dente.
Step 2: Sauté mushrooms and garlic
Heat butter over medium heat in a large skillet, and add your mushrooms. Cook them until they’re golden and their moisture evaporates—this step concentrates their flavor. Toss in the minced garlic near the end and sauté for only about 30 seconds or until fragrant; you don’t want it to burn. This process developed my favorite robust mushroom flavor that perfectly infuses the sauce.
Step 3: Create the creamy sauce
Lower the heat and pour in the cream, stirring to combine. Let it gently simmer until it thickens slightly, about 3 to 5 minutes. Then, sprinkle in freshly grated Parmesan cheese and stir until melted and smooth. At this point, season generously with salt and pepper. The sauce should coat the back of a spoon—that’s how I know it’s perfect.
Step 4: Combine pasta with sauce
Once your pasta is cooked and drained, toss it directly into the skillet with the creamy mushroom sauce. Mixing it this way allows each noodle to soak up all those garlicky, cheesy goodness. If the sauce feels too thick, add a splash of pasta water to loosen it up—it’s a trick I learned that keeps the dish silky and not gluey.
Step 5: Garnish and serve
Finish by stirring in chopped fresh parsley for brightness and a few cracks of black pepper. Serve immediately while it’s warm and creamy—this dish doesn’t wait well, so dig in quickly! I always find a crisp salad or garlic bread pairs nicely with this to round out the meal.
Pro Tips for Making Creamy Garlic Mushroom Pasta Recipe
- Don’t Overcrowd the Pan: Cooking mushrooms in batches helps them brown instead of steam, boosting flavor and texture.
- Reserve Pasta Water: Adding a splash of starchy pasta water adjusts sauce consistency without watering down flavor.
- Fresh Garlic is Key: I’ve found that fresh garlic delivers the best aroma and taste compared to powders or pre-minced versions.
- Use Good Quality Cheese: Freshly grated Parmesan melts better and enriches the sauce way more than pre-shredded store-bought.
How to Serve Creamy Garlic Mushroom Pasta Recipe
Garnishes
I usually finish this pasta with chopped fresh parsley because it brightens the dish and adds a lovely green pop. Sometimes I add a little extra Parmesan right on top, especially if we’re feeling cheesy. If I’m in the mood, a sprinkle of red pepper flakes gives just the right kick without overpowering the creamy sauce.
Side Dishes
One of my favorite side dishes to serve alongside this creamy garlic mushroom pasta is a crunchy Caesar salad or garlic bread with a crisp outer crust and buttery inside. Roasted vegetables like asparagus or Brussels sprouts also pair nicely and add texture contrast to the creaminess. Honestly, simple steamed greens with a squeeze of lemon can brighten things right up too.
Creative Ways to Present
I’ve tried plating this pasta with a nest-like twirl using tongs for a sophisticated look when entertaining. For a cozy dinner at home, serving it family-style in a big pasta bowl with fresh herbs scattered on top is a crowd-pleaser. On occasion, I drizzle some truffle oil for a luxurious aroma that’ll make any gathering feel extra special.
Make Ahead and Storage
Storing Leftovers
I store leftover creamy garlic mushroom pasta in an airtight container in the fridge for up to 3 days. When you reheat, you might find the sauce thickened too much—no worries! Simply add a splash of milk or cream to loosen it and bring back that luscious texture.
Freezing
Freezing this dish is possible but I prefer not to because the cream sauce can separate and become grainy. If you must freeze, cool it thoroughly and store in a freezer-safe container, then thaw overnight in the fridge before reheating gently on the stove with a bit of extra cream. It won’t be quite like fresh but still tasty in a pinch.
Reheating
I find reheating on the stovetop over low heat works best since you can stir constantly to keep the sauce smooth. Adding a little extra cream or pasta water prevents it from drying out. Microwaving tends to cause clumping, so if you’re pressed for time, do it in short bursts and stir in between.
FAQs
-
Can I use other types of mushrooms in this recipe?
Absolutely! Cremini, shiitake, portobello, and oyster mushrooms all work wonderfully. Each variety contributes a unique flavor and texture, so feel free to mix or match depending on what you have or prefer. Just be sure to slice them evenly to cook uniformly.
-
Is there a dairy-free option for the creamy sauce?
Yes, you can substitute heavy cream with coconut cream or a cashew cream for a dairy-free version. Nutritional yeast can replace the cheesy Parmesan flavor, and olive oil or vegan butter can be used instead of dairy butter. The sauce won’t be exactly the same but will remain deliciously creamy.
-
How do I prevent the sauce from becoming too thick?
If the sauce thickens too much while simmering or after combining with pasta, simply add a splash of reserved pasta water, milk, or cream and stir until it reaches your desired consistency. This trick keeps the sauce smooth and silky.
-
Can I prepare the sauce ahead of time?
You can make the sauce a few hours in advance and store it in the refrigerator, but wait to add the cooked pasta until just before serving. When reheating, warm gently over low heat and add a bit of cream or water to refresh the texture.
-
What pasta shape is best for this creamy garlic mushroom pasta?
I love using fettuccine or linguine because their flat, broad shape holds the creamy sauce beautifully. That said, spaghetti or even penne can work well if that’s what you have on hand. The key is choosing a pasta that traps the sauce so every bite is flavorful.
Final Thoughts
This Creamy Garlic Mushroom Pasta Recipe has become one of my go-to dishes because it’s reliably delicious, comforting, and simple enough to fit any weeknight schedule. I always enjoy the process of turning fresh garlic and mushrooms into this luscious, creamy meal that feels like a little luxury on a plate. I encourage you to try it soon—you might just find your new favorite pasta that’s perfect for both family dinners and special occasions alike!
Print
Creamy Garlic Mushroom Pasta Recipe
- Prep Time: 10 minutes
- Cook Time: 20-25 minutes
- Total Time: 30-35 minutes
- Yield: 4 servings
- Category: Chicken, Main Course
- Method: Baking
- Cuisine: American
Description
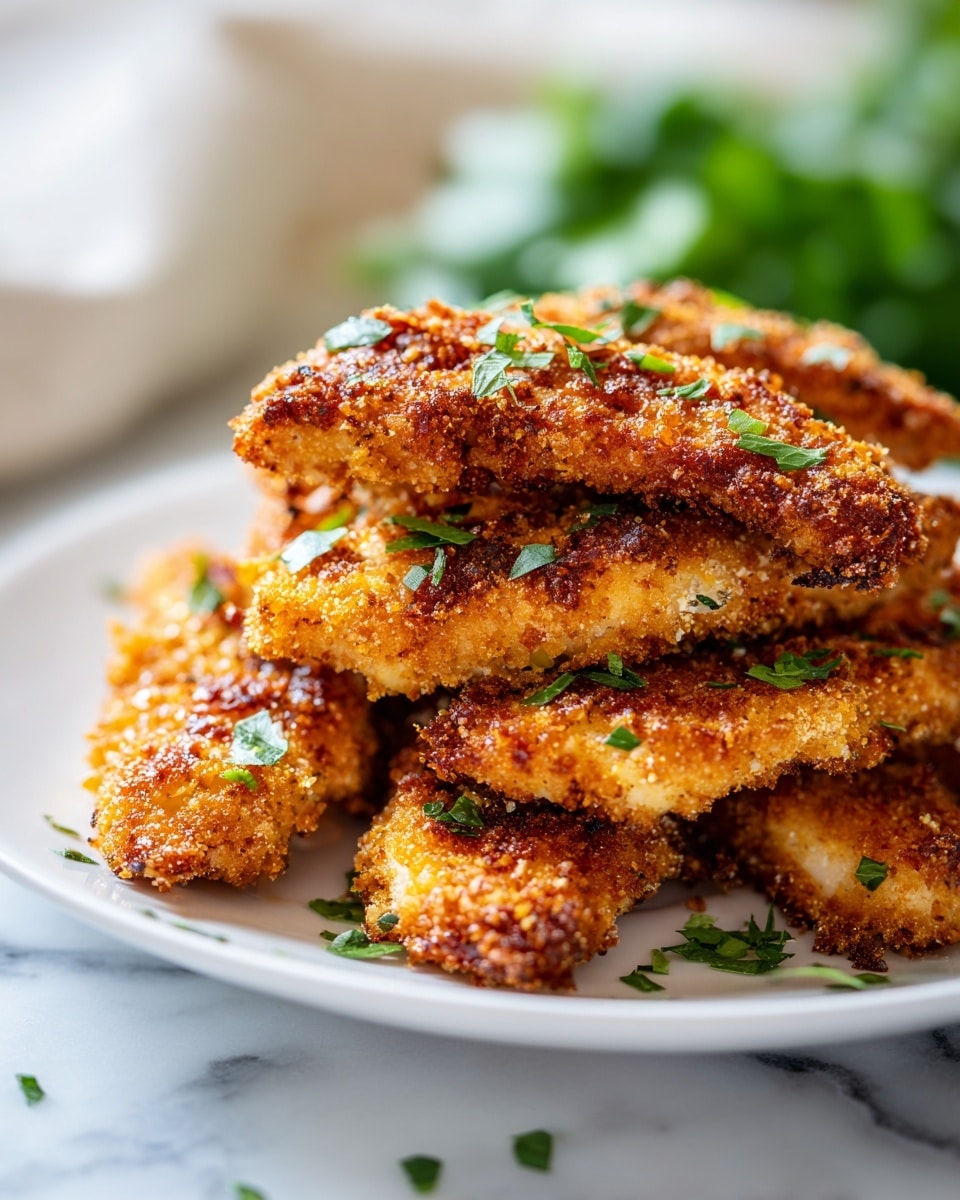
This recipe for Crispy Baked Chicken Tenders delivers a healthier take on classic fried chicken strips by baking them to golden perfection. Coated in a flavorful breadcrumb and Parmesan mixture, seasoned with garlic, paprika, and onion powder, these tenders are extra crispy thanks to a double coating and a light spray of olive oil. Perfect for a quick family meal, they pair wonderfully with a variety of dipping sauces.
Ingredients
Chicken
- 1 lb chicken breasts or chicken tenders, cut into strips
Breading
- 2 large eggs, beaten
- 1 cup panko breadcrumbs or regular breadcrumbs
- 1/2 cup grated Parmesan cheese (optional for extra flavor)
- 1 tsp garlic powder
- 1 tsp paprika
- 1/2 tsp onion powder
- 1/2 tsp salt
- 1/4 tsp black pepper
Other
- Olive oil spray for coating
Instructions
- Prep the Chicken: If using chicken breasts, cut them into strips about 1-inch wide. If using pre-cut chicken tenders, you can skip this step.
- Prepare the Breading Stations: Beat the eggs in one bowl until smooth. In another bowl, mix the panko breadcrumbs, Parmesan cheese (if using), garlic powder, paprika, onion powder, salt, and black pepper.
- Season the Chicken: Lightly season the chicken tenders with a pinch of salt and pepper for added flavor.
- Bread the Chicken: Dip each chicken strip into the beaten eggs, letting any excess drip off. Then coat evenly in the breadcrumb mixture, pressing lightly to help the crumbs stick. For an extra crunchy crust, dip the coated chicken back into the egg and breadcrumbs again to double coat.
- Prepare the Baking Sheet: Line a baking sheet with parchment paper or a silicone mat to prevent sticking. If possible, place a wire rack on top to promote airflow and crispiness during baking.
- Arrange the Chicken: Place the breaded chicken tenders spaced apart on the baking sheet or wire rack to ensure even cooking.
- Bake the Chicken Tenders: Preheat the oven to 400°F (200°C). Lightly spray the chicken tenders with olive oil spray for a crispier texture. Bake for 20-25 minutes, flipping the tenders halfway through baking. They should be golden brown and reach an internal temperature of 165°F (74°C).
- Serve and Enjoy: Remove the chicken tenders from the oven and let them rest for a few minutes. Serve warm with your favorite dipping sauces such as honey mustard, BBQ, or ranch dressing.
Notes
- Using a wire rack on the baking sheet helps the chicken tenders crisp up evenly by allowing air circulation.
- Double coating the tenders with egg and breadcrumbs produces extra crunchy results.
- Check the internal temperature with a meat thermometer to ensure safety and juiciness; it should reach 165°F (74°C).
- For gluten-free option, substitute regular breadcrumbs with gluten-free breadcrumbs.
- These baked tenders can be reheated in the oven or air fryer for best texture retention.
Nutrition
- Serving Size: 4 oz (about 3 tenders)
- Calories: 320 kcal
- Sugar: 1 g
- Sodium: 480 mg
- Fat: 12 g
- Saturated Fat: 3 g
- Unsaturated Fat: 8 g
- Trans Fat: 0 g
- Carbohydrates: 25 g
- Fiber: 2 g
- Protein: 30 g
- Cholesterol: 120 mg

