I can’t wait to share this Easy Chocolate Fudge Recipe with you because it’s an absolute game-changer for anyone craving smooth, rich fudge without the fuss. Whether you’re a seasoned chocolatier or a complete beginner, you’ll find this recipe a total breeze – plus, it’s incredibly satisfying to whip up in no time. Trust me, once you try this, it’ll become your go-to for sweet treats that impress without stress.
Why You’ll Love This Recipe
- Super Easy Process: No candy thermometer or complicated steps needed—just simple melting and stirring.
- Decadent Texture: Creamy fudge that’s perfectly smooth without any graininess or grit.
- Customizable: Mix in nuts, sea salt, or whatever you like to make it your own.
- Reliable Results: I’ve made this fudge countless times, and it’s never let me down, even on busy days.

Ingredients You’ll Need
These ingredients come together beautifully to create that luscious fudge texture and flavor. When shopping, look for good-quality semi-sweet chocolate and make sure your butter is unsalted to control the seasoning just right.
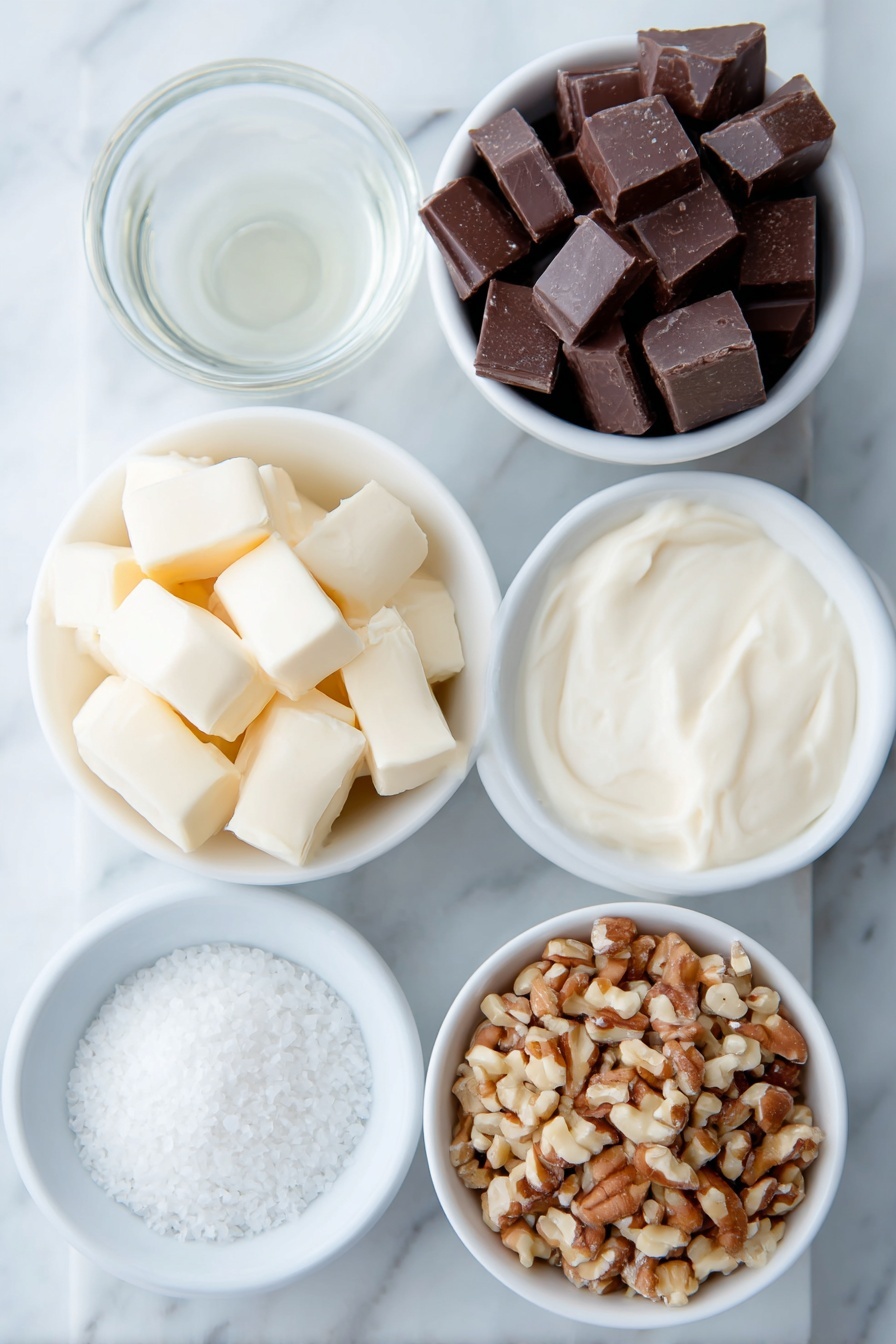
- Sweetened condensed milk: This is the magic base that makes the fudge creamy without fussing with sugar ratios.
- Vanilla extract: A splash of pure vanilla adds warmth and depth to the chocolate.
- Semi-sweet chocolate: I recommend chopping the chocolate roughly so it melts evenly and quickly.
- Unsalted butter: Adds richness and helps the fudge set with a silky finish.
- Flaky sea salt (optional): A sprinkle on top balances the sweetness and adds a nice crunch.
- Chopped nuts or crushed candies (optional): Feel free to toss in your favorite mix-ins for texture and extra flavor.
Variations
I love playing around with this Easy Chocolate Fudge Recipe to tailor it to different moods and occasions. You can easily swap in your favorite flavors or add-ins to keep things exciting.
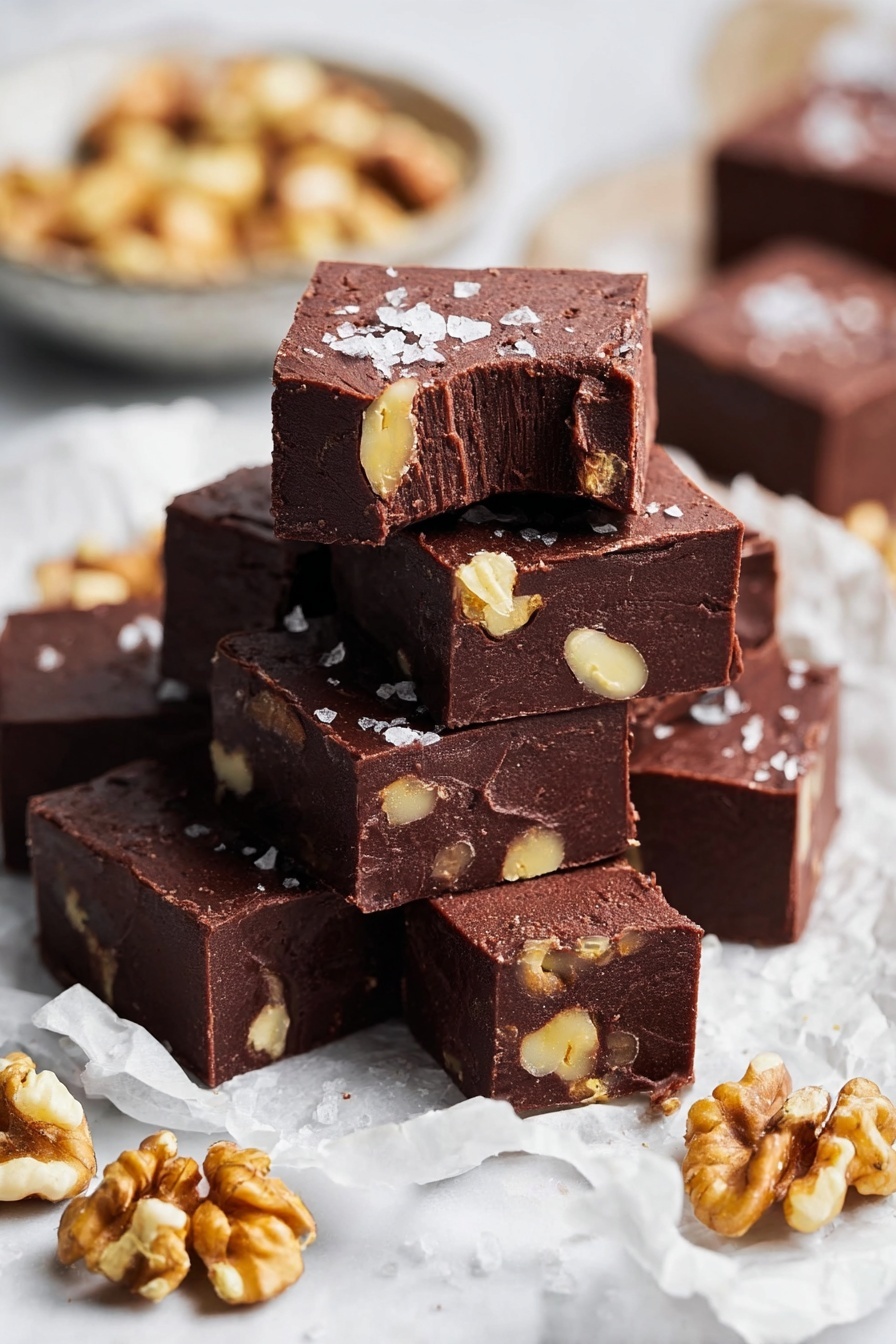
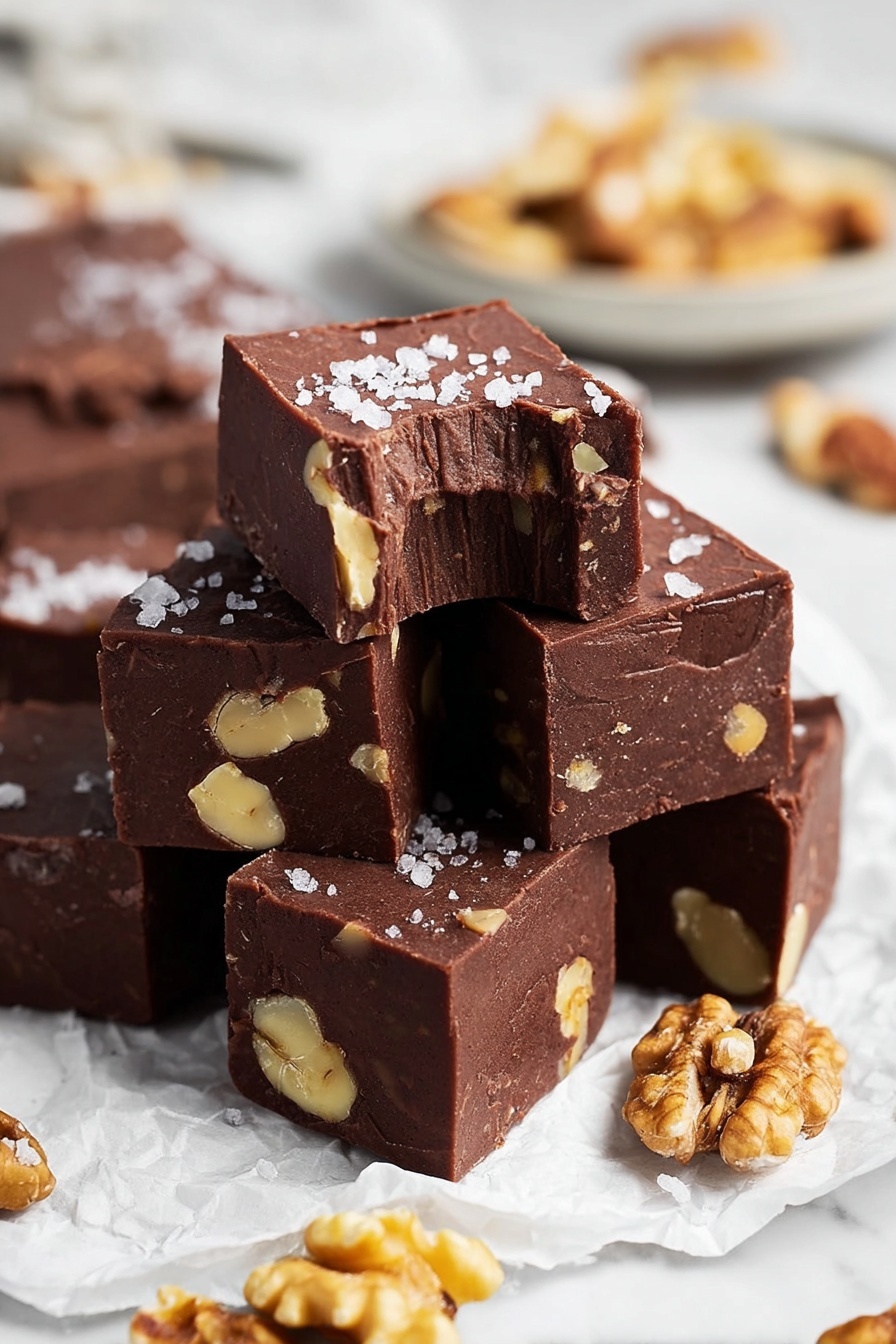
- Nutty Fudge: Adding chopped pecans or walnuts gives the fudge a lovely crunch that my family goes nuts for—literally!
- Salted Caramel Twist: Drizzle homemade caramel on top and sprinkle with flaky sea salt for a fancy but super easy upgrade.
- Spicy Kick: Toss in a pinch of cayenne or cinnamon for a subtle warmth that balances the chocolate sweetness – perfect for cozy evenings.
- Dairy-Free Option: Use a dairy-free butter substitute and dark vegan chocolate to make it allergy-friendly without sacrificing richness.
How to Make Easy Chocolate Fudge Recipe
Step 1: Prep Your Pan Like a Pro
Lightly grease an 8×8-inch baking pan, then line it with parchment paper or aluminum foil. I always let the paper overhang because it makes lifting the fudge out so easy once it’s set. Set the pan aside while you get the fudge ready.
Step 2: Combine Ingredients in a Heatproof Bowl
Put the sweetened condensed milk, vanilla extract, chopped semi-sweet chocolate, and butter pieces into a large, heatproof bowl. Trust me, using a glass or metal bowl that fits snugly over your saucepan helps control the melt perfectly.
Step 3: Create Your Double Boiler and Melt
Fill a saucepan about a quarter full with water and bring it to a boil, then reduce the heat to a low simmer. Place the bowl with your ingredients over the simmering water—be sure the bottom of the bowl doesn’t touch the water. Stir gently with a rubber spatula as the chocolate melts. You want to remove it from heat when the chocolate is just about melted but still showing a few small pieces—this is the trick to avoid greasy fudge, which I learned the hard way!
Step 4: Finish Stirring and Add Mix-ins
Take the bowl off the heat carefully, then keep stirring off the heat until the mixture is silky smooth. This few-minute rest lets any remaining chocolate melt gently, which guarantees perfect fudge texture. Now’s the time to fold in any nuts or candy crumbs you’re using.
Step 5: Spread and Chill
Scrape the fudge into your prepared pan and spread it out evenly with your spatula. Pop it in the refrigerator and let it set for about 2 hours. I’ve found the chill time is crucial here—be patient to get those clean, perfect-cut squares.
Step 6: Slice and Serve
Once set, gently run a butter knife around the pan’s edge to loosen your fudge. Lift it out using the parchment overhang and transfer it to a cutting board. Peel off the paper and slice into small squares. This is the part my kids always rush back for, so I recommend making plenty!
Pro Tips for Making Easy Chocolate Fudge Recipe
- Don’t Overheat the Chocolate: I’ve found removing the bowl when a few pieces remain prevents the fudge from turning greasy or grainy.
- Use a Rubber Spatula: It helps you stir gently and scrape every last bit from the bowl without scrambling the mixture.
- Let it Chill Fully: Cutting too soon makes a mess; waiting the full two hours means perfect, neat squares.
- Prep Your Pan Right: The parchment overhang trick makes clean removal super simple, no fudged edges!
How to Serve Easy Chocolate Fudge Recipe
Garnishes
I love finishing my fudge with a sprinkle of flaky sea salt—it creates that irresistible sweet-and-salty combo that keeps everyone coming back for more. Sometimes I also dust lightly with cocoa powder if I want a more sophisticated look for gifting.
Side Dishes
This fudge pairs beautifully with a cup of strong coffee or a creamy latte; the bitterness of the drink contrasts so well with the rich chocolate. For parties, I’ve served it alongside fresh berries and whipped cream for a simple, elegant dessert spread.
Creative Ways to Present
For gift-giving, I like to cut the fudge into mini bite-size pieces and layer them in decorative tins with parchment paper. You can also drizzle melted white chocolate on top or dust with colored sprinkles to match holidays or birthdays—it always gets rave reviews!
Make Ahead and Storage
Storing Leftovers
I store leftover fudge in an airtight container in the refrigerator, where it keeps beautifully for up to a month. It’s handy to have a stash ready for when you need a sweet pick-me-up or an unexpected guest shows up.
Freezing
You can freeze fudge too! I wrap pieces individually in wax paper and place them in an airtight container or freezer bag. It freezes well for up to two months and thaws overnight in the fridge without any loss of flavor or texture.
Reheating
Fudge generally tastes best cold or at room temperature, but if you prefer it a bit softer, let it sit at room temp for 10-15 minutes. Avoid microwaving as it can change the texture, making it grainy or oily.
FAQs
-
Can I use evaporated milk instead of sweetened condensed milk for this fudge?
Evaporated milk is not a good substitute here because it’s unsweetened and has a different texture. Sweetened condensed milk provides the necessary sweetness and creaminess that forms the fudge’s base, so I recommend sticking with it for best results.
-
Why did my fudge turn out grainy or crumbly?
Grainy fudge usually happens if the chocolate overheats or the sugar crystallizes. Following the steps carefully—especially removing the bowl when some chocolate pieces remain—and stirring gently off the heat helps keep it smooth and creamy.
-
Can I add flavors like peppermint or espresso?
Absolutely! Adding a teaspoon of peppermint extract or a tablespoon of instant espresso powder is a fun way to customize your fudge. Just fold them in when the mixture is smooth and off the heat.
-
How long does the fudge need to chill before cutting?
I recommend chilling your fudge for at least 2 hours so it’s fully set. Cutting too early can cause sticky edges and uneven pieces. Patience here really pays off!
-
Is it okay to use milk chocolate instead of semi-sweet chocolate?
You can use milk chocolate, but keep in mind it will make the fudge sweeter and less intense. Semi-sweet strikes a nice balance between richness and sweetness, but feel free to experiment based on your preferences.
Final Thoughts
Honestly, this Easy Chocolate Fudge Recipe is one of my favorite sweet projects—it’s so straightforward yet feels indulgently special every time. I used to be intimidated by fudge-making, but this approach takes all the guesswork away and replaces it with a warm, satisfying experience. I’m sure once you try it, you’ll love it as much as my family and I do. Go ahead and treat yourself—you deserve this blissful chocolate moment!
Print
Easy Chocolate Fudge Recipe
- Prep Time: 10 minutes
- Cook Time: 10 minutes
- Total Time: 2 hours 20 minutes
- Yield: 1 8×8-inch pan (about 24 pieces)
- Category: Dessert
- Method: Stovetop
- Cuisine: American
Description
This Foolproof Chocolate Fudge recipe offers a rich, creamy, and indulgent treat that is incredibly easy to make. Combining sweetened condensed milk, semi-sweet chocolate, butter, and vanilla extract, this fudge melts smoothly in a double boiler to create a perfectly textured dessert that sets beautifully in the refrigerator. Optional additions like flaky sea salt and chopped nuts add delightful crunch and flavor contrast.
Ingredients
Fudge Base
- 1 14-ounce can sweetened condensed milk (NOT evaporated milk)
- 1 teaspoon pure vanilla extract
- 20 ounces semi-sweet chocolate, roughly chopped
- 3 tablespoons unsalted butter, cut into 1/2-inch pieces, at room temperature
Optional Toppings
- Flaky sea salt, for sprinkling
- 1/2 cup chopped nuts or crushed candy canes
Instructions
- Prepare the Pan: Lightly grease an 8×8-inch baking pan. Line it with parchment paper or aluminum foil, letting the excess overhang the edges for easy removal later.
- Combine Ingredients: In a large, heatproof bowl, mix the sweetened condensed milk, vanilla extract, roughly chopped semi-sweet chocolate, and room temperature butter pieces. Set aside.
- Set Up Double Boiler: Fill a saucepan with about 1/4 full of water and bring it to a boil. Reduce heat to a low simmer to gently heat the water.
- Melt Chocolate Mixture: Place the heatproof bowl on top of the saucepan (double boiler setup). Stir with a rubber spatula continuously until the chocolate is almost completely melted with just a few small pieces remaining, about 4 minutes. Be careful not to overheat or the fudge may separate.
- Finish Melting: Remove the bowl from heat and keep stirring until the chocolate fully melts and the mixture becomes smooth, about 2 more minutes.
- Add Mix-ins: Stir in any optional mix-ins like chopped nuts or crushed candy canes, if desired.
- Transfer and Set: Pour the fudge mixture into the prepared pan and spread evenly with a spatula. Sprinkle flaky sea salt on top if using.
- Refrigerate: Chill the fudge in the refrigerator until fully set, approximately 2 hours.
- Cut and Serve: Use the parchment or foil overhang to lift the fudge out of the pan. Run a butter knife along the edges to loosen if needed. Peel off the parchment and slice into squares. Serve immediately or store refrigerated for up to 1 month. The fudge can also be frozen in an airtight container for up to two months.
Notes
- Use sweetened condensed milk, not evaporated milk, for the right texture and sweetness.
- Do not overheat the chocolate mixture to avoid separation and greasy fudge.
- For easy removal, ensure the pan is well lined with parchment or foil with overhangs.
- Fudge keeps well refrigerated up to 1 month or frozen for 2 months.
- Optional mix-ins and toppings like chopped nuts, crushed candy canes, or flaky sea salt enhance flavor and texture.
Nutrition
- Serving Size: 1 piece (about 1/24 of pan)
- Calories: 130
- Sugar: 18g
- Sodium: 35mg
- Fat: 7g
- Saturated Fat: 4.5g
- Unsaturated Fat: 2g
- Trans Fat: 0g
- Carbohydrates: 18g
- Fiber: 1g
- Protein: 1g
- Cholesterol: 15mg


