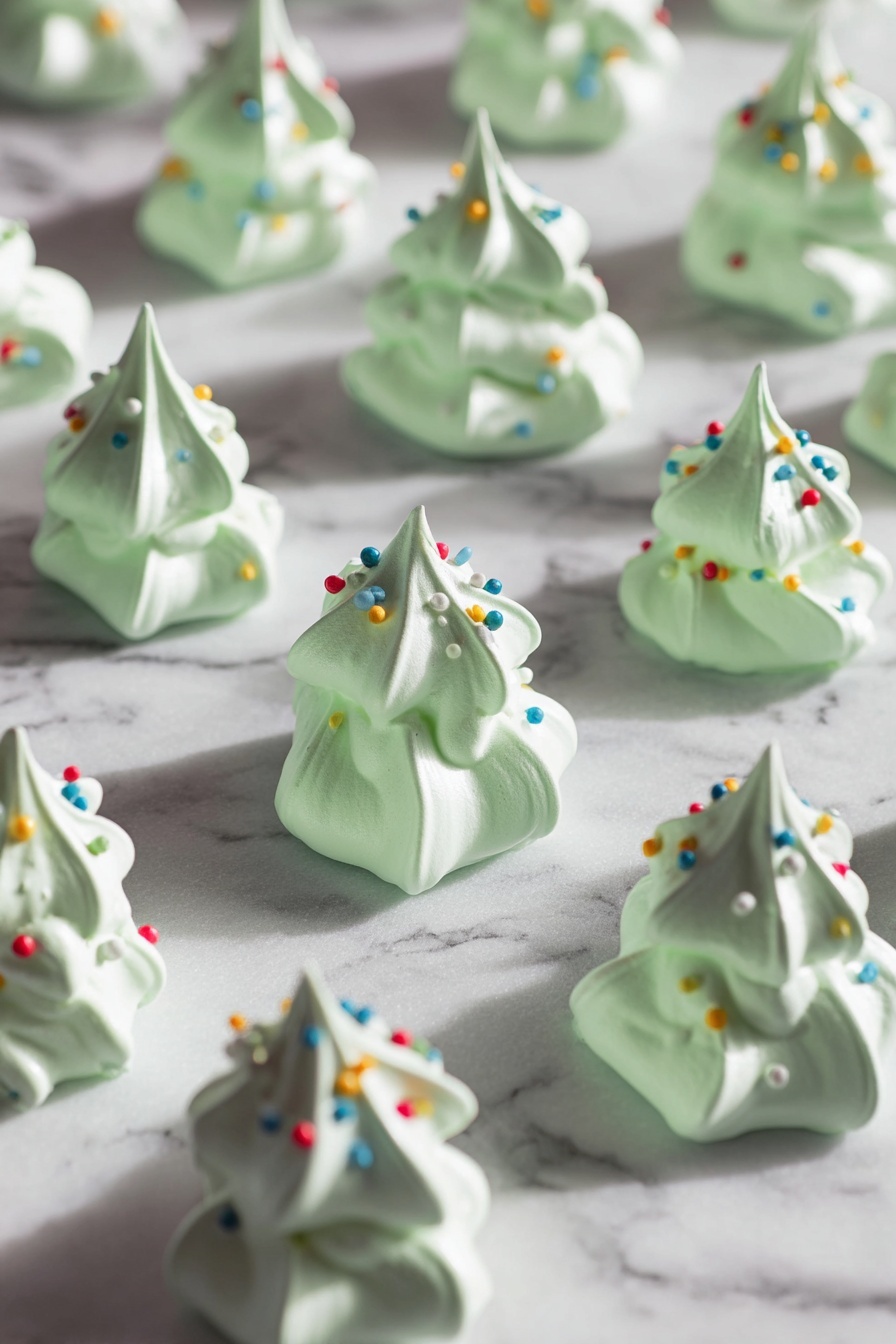
If you’re looking to add a whimsical and delicious touch to your holiday table, you have to try this Festive Meringue Christmas Trees Recipe. It’s light, sweet, and absolutely adorable — perfect for both impressing guests and satisfying your festive sweet tooth. I love how easy it is to make yet how stunning the results look, so stick around and I’ll walk you through my go-to method for these charming little treats.
Why You’ll Love This Recipe
- Simple Ingredients: You’ll only need a handful of pantry staples, making this recipe easy and approachable.
- Fun & Festive: These meringue trees add a playful Christmas vibe to your dessert spread that everyone will adore.
- Light & Airy Texture: The meringues are delicate and melt in your mouth, a wonderful contrast to rich holiday treats.
- Great for Beginners: With my tips, you’ll avoid common pitfalls and get perfect meringues every time.

Ingredients You’ll Need
The magic of this Festive Meringue Christmas Trees Recipe lies in the simplicity of the ingredients. Each component works in harmony to give you that glossy, crisp, and fluffy texture with an irresistible festive look. When shopping, look for fresh eggs for better volume, and gel food coloring for vibrant green without affecting texture.

- Egg Whites: Fresh, room temperature ones whip up more easily and give you greater volume.
- Cream of Tartar: This stabilizer is key for firm peaks—it’s a small addition that makes a big difference.
- Granulated Sugar: Adding sugar slowly ensures that the meringue becomes glossy and stiff without graininess.
- Green Gel Food Colouring: Gel is best because it gives vibrant color without making the meringue runny.
- Sprinkles: Choose festive shapes or colors to add a joyful sparkle on top of your trees.
Variations
Once you get the basics down, you can have a lot of fun mixing things up with this Festive Meringue Christmas Trees Recipe. I often experiment with different colors and toppings to match my holiday decor or theme—feel free to get creative!
- Color Variations: I once tried a gradient effect by gently folding in two shades of green gel for an ombré look—it was a hit with my guests!
- Flavored Meringues: Adding a pinch of peppermint extract is a lovely twist that brings more holiday spirit to your trees.
- Sprinkle Mix: Try gold dust or edible glitter for an elegant vibe, or use mini silver balls for a classic Christmas touch.
- Vegan Option: Aquafaba (chickpea water) works in place of egg whites, but expect a slightly different texture.
How to Make Festive Meringue Christmas Trees Recipe
Step 1: Prep Your Oven and Tools
Start by preheating your oven to a low 200°F (that’s about 93°C). Line a baking sheet with parchment paper to prevent sticking. Prepare your piping bag fitted with a large star tip—it’s what gives these meringue trees their lovely layers. I like to have everything set before whipping the egg whites because timing is everything here.
Step 2: Whip Egg Whites to Frothy Perfection
Pop those room temperature egg whites into your mixing bowl, add the cream of tartar, and start whisking at medium speed. You’re aiming for that cappuccino-foam stage where it’s all bubbly and soft. This takes about a couple of minutes with a hand mixer. Don’t rush—I’ve found this initial froth is the foundation for your perfect peaks.
Step 3: Slowly Add Sugar, Beat to Stiff Peaks
This is where patience is key. Add your sugar one spoonful at a time, beating well after each addition so the sugar dissolves fully. When you’ve added all the sugar, mix until you get glossy, stiff peaks—that means when you lift the whisk, the meringue holds its shape without collapsing. If you see graininess, keep beating a bit more.
Step 4: Color Your Meringue
Add a few drops of green gel food coloring and gently fold or mix until it’s evenly combined. Gel colors are perfect here because they won’t thin out the meringue. You’ll love how vibrant the color turns out—my family always comments on how “Christmassy” these little trees look at this point!
Step 5: Pipe Your Christmas Trees
Squeeze three dollops of meringue on top of one another per tree: start with a larger base, then a medium middle, and a small top for that tree shape. Don’t forget to sprinkle on some festive sprinkles right away—this helps them stick before baking. I like to keep the trees spaced evenly to prevent them from touching as they bake.
Step 6: Bake and Cool to Crisp Perfection
Bake for 45-50 minutes until the sides feel dry and the bottoms peel easily from the parchment paper without sticking. Then comes the critical cooling phase—turn off the oven and leave the meringues inside overnight, or at least crack the door open and cool for an hour. This slow cool keeps them crisp but not cracked. I always tell friends not to skip this, or they might end up with chewy meringues.
Pro Tips for Making Festive Meringue Christmas Trees Recipe
- Use Room Temperature Egg Whites: Egg whites whip better and hold air more effectively when not cold, giving you that light, airy texture.
- Add Sugar Slowly: Patience here ensures smooth, glossy meringue rather than grainy or weepy peaks.
- Low and Slow Baking: Keeping the oven low prevents browning and ensures a crisp, delicate finish.
- Cool Gradually: Avoid cracking by cooling inside the oven or with the door ajar—I learned this one the hard way after cracking several batches!
How to Serve Festive Meringue Christmas Trees Recipe

Garnishes
I love topping these charming meringue trees with colorful sprinkles—red, gold, and white are my favorites to make them instantly Christmas-y. Sometimes I dust a little powdered sugar over them for a snowy effect. Tiny edible silver balls add a beautiful sparkle too!
Side Dishes
These meringue trees pair beautifully with a warm cup of mulled wine or hot chocolate. For a holiday dessert spread, I like to serve them alongside rich chocolate truffles or spiced cookies—this contrast of airy meringue and dense chocolate is pure heaven.
Creative Ways to Present
For my last Christmas party, I arranged these meringue trees standing upright in small glasses filled with crushed candy canes to resemble snow. It was a conversation starter! You could also display them on a tiered stand with fresh pine sprigs for a natural holiday vibe.
Make Ahead and Storage
Storing Leftovers
I store leftover meringue trees in an airtight container at room temperature to keep them crisp. In my experience, the secret is to avoid any moisture—storing them in the fridge will make them soft, so I definitely steer clear of that.
Freezing
If you want to make these ahead of time, you can freeze the baked meringues. I place them in a single layer on a baking sheet to freeze, then transfer to a freezer-safe container. When ready, just thaw at room temperature—there’s no loss in texture if you do it this way.
Reheating
Meringues are best enjoyed cool. I usually skip reheating, but if you want to freshen them up, a very brief 5-minute warm-up in a low oven (under 200°F) can help crisp them without melting—just watch them closely to avoid browning.
FAQs
-
Can I use regular food coloring instead of gel for the meringue?
While you can use liquid food coloring, gel is preferred because it won’t thin out or alter the consistency of the meringue. Liquid coloring can make the mixture too wet, impacting the texture and ability to hold stiff peaks.
-
Why do my meringues collapse or become sticky?
This often happens if you add sugar too quickly, don’t beat to stiff peaks, or bake at too high a temperature. Also, humidity can affect meringues, so choose a dry day if possible and cool them properly in the oven to avoid moisture absorption.
-
Can I make these without cream of tartar?
Cream of tartar stabilizes egg whites, making it easier to achieve stiff peaks. If you don’t have it, you can substitute with a few drops of lemon juice or white vinegar, or just proceed carefully, but your meringues might be less stable.
-
How long will these meringue Christmas trees keep fresh?
Stored in an airtight container at room temperature, they’ll stay fresh and crisp for up to one week. Beyond that, they might start to absorb moisture and become chewy.
Final Thoughts
This Festive Meringue Christmas Trees Recipe has become one of my absolute favorites each holiday season. I remember the first time I made them—I was nervous about the meringue peaks and low-temperature baking, but with a little care, they turned out beautifully. Now, they’re a staple at our Christmas gatherings and always spark smiles. I can’t wait for you to try making these simple, charming treats and share that joy with your family and friends!
Print
Festive Meringue Christmas Trees Recipe
- Prep Time: 30 minutes
- Cook Time: 50 minutes
- Total Time: 2 hours 20 minutes
- Yield: 30 meringues
- Category: Dessert
- Method: Baking
- Cuisine: Western
- Diet: Gluten Free
Description
Delightfully festive and light, these Meringue Christmas Trees are made by whipping egg whites and sugar into stiff peaks, coloring them green, and piping them into charming tree shapes. Perfect for holiday parties or as a sweet decorative treat, they are crisp on the outside and melt-in-your-mouth soft on the inside.
Ingredients
Ingredients
- 2 large egg whites, room temperature
- ¼ teaspoon cream of tartar
- 100 g granulated sugar
- Green gel food colouring
- Sprinkles for decoration
Instructions
- Preheat oven and prepare baking sheet: Preheat your oven to 200°F (93°C). Line a baking sheet with parchment paper and set aside to prevent sticking and ensure even cooking.
- Beat egg whites and cream of tartar: In a large mixing bowl, use an electric hand mixer or stand mixer with a whisk attachment to beat the egg whites and cream of tartar on medium speed until the mixture becomes frothy, resembling cappuccino foam.
- Incorporate sugar gradually: Add one spoonful of granulated sugar at a time, mixing well after each addition. Continue this process until all sugar is added and the mixture forms stiff, glossy peaks that hold their shape firmly.
- Add food colouring: Add a few drops of green gel food colouring to the meringue mixture and mix gently until the color is evenly distributed to create a festive green hue.
- Pipe meringue trees: Transfer the meringue mixture into a piping bag fitted with a large star tip. On the prepared baking sheet, pipe three dollops of meringue stacked vertically with the largest at the bottom and smallest on top forming a Christmas tree shape. Decorate each dollop with sprinkles immediately after piping.
- Bake meringues: Bake the piped meringue trees in the preheated oven for 45-50 minutes, or until the sides are completely dry to the touch and the bottoms lift cleanly off the parchment paper.
- Cool meringues: Turn off the oven and either leave the meringues inside to cool overnight with the oven door closed, or crack the oven door open and allow them to cool for about one hour for quicker cooling. Make sure they are completely cooled before storing to maintain crispness.
Notes
- Ensure egg whites are at room temperature before whipping for better volume and stability.
- Add cream of tartar to stabilize the egg whites and help achieve stiffer peaks.
- Gradually adding sugar helps dissolve the sugar fully and creates glossy, firm meringue.
- Use gel food colouring as it will not affect the meringue’s texture unlike liquid colours.
- Leave enough space between piped meringues on the baking sheet as they do not spread much but need room for easy removal.
- Cool meringues completely in the oven to prevent cracks caused by sudden temperature changes.
Nutrition
- Serving Size: 1 meringue (approx. 10g)
- Calories: 15 kcal
- Sugar: 4 g
- Sodium: 0 mg
- Fat: 0 g
- Saturated Fat: 0 g
- Unsaturated Fat: 0 g
- Trans Fat: 0 g
- Carbohydrates: 4 g
- Fiber: 0 g
- Protein: 0.3 g
- Cholesterol: 0 mg

